
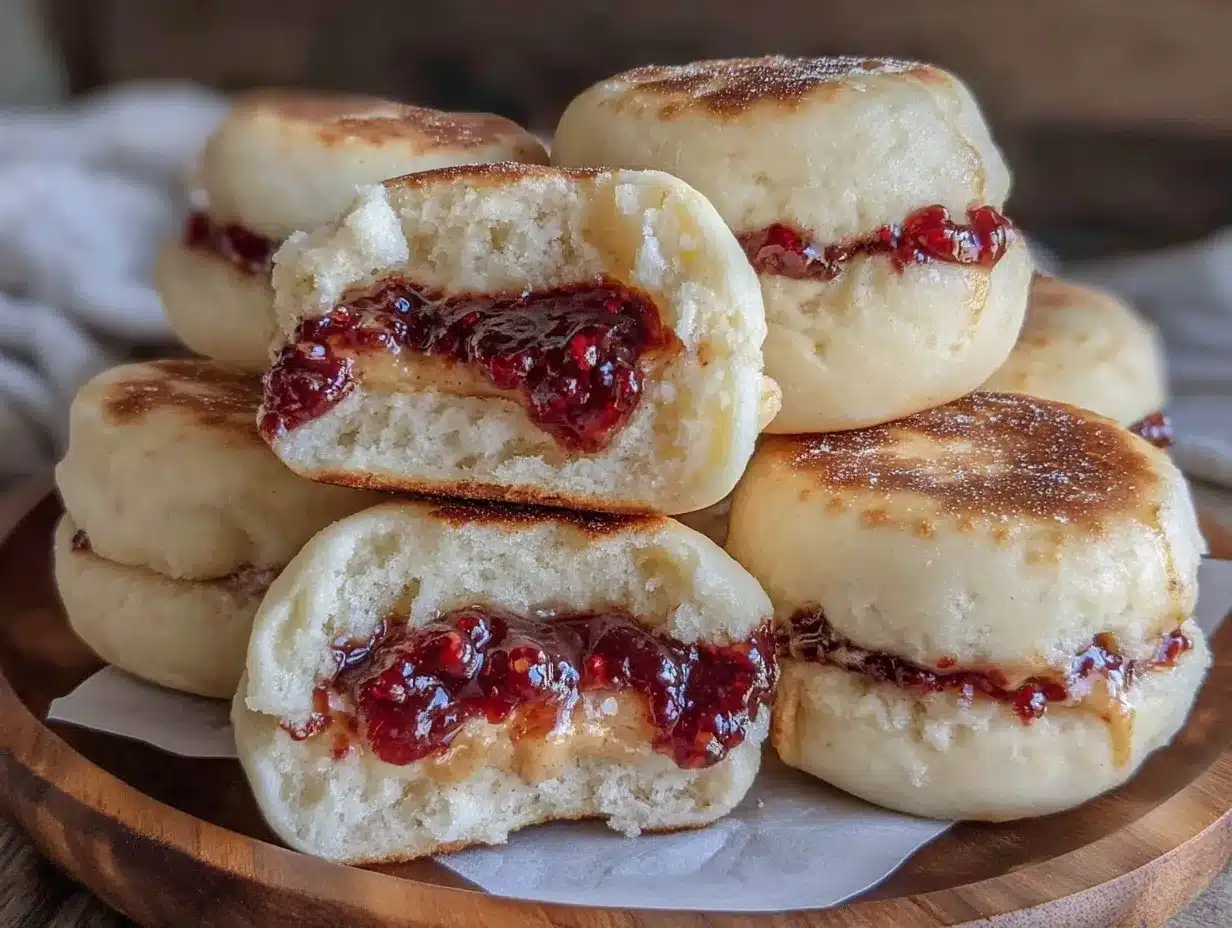
Early Sunday morning, with the soft light drifting through the kitchen window and the quiet hum of the house still settling into the day, the only thing on my mind was making a snack that felt like a small kindness—simple, familiar, and just right. The scent of fresh bread warming ever so slightly, the gentle sweep of peanut butter spreading thick and even, and the sweet whisper of jelly tucked inside. This recipe for Easy Homemade Uncrustables Peanut Butter & Jelly Sandwiches isn’t a flashy kitchen experiment; it’s a quiet ritual that brings a little calm, no matter how hectic the day might become.
I remember the first time I tried making these at home—honestly, it was a bit of a fling, a way to avoid the store-bought versions packed with preservatives. The process felt oddly soothing, pressing the sandwich edges together with a simple cookie cutter and watching the peanut butter and jelly meld inside a perfect, crustless pocket. It stuck with me because it’s not just a sandwich; it’s a small, portable memory of childhood lunches and after-school snacks. And it’s easy enough that anyone can make it, no matter their skill level.
What makes this version stand out is the balance—the peanut butter is creamy but not overpowering, the jelly just sweet enough without being sticky, and the bread soft but sturdy enough to hold it all together. It’s the kind of snack you pack for a picnic or grab on the go when you need a little comfort without fuss. And while these sandwiches evoke nostalgia, they’re surprisingly fresh and customizable, perfect for any season or occasion.
Making these Easy Homemade Uncrustables Peanut Butter & Jelly Sandwiches isn’t just about the food—it’s about that quiet moment of care you tuck into your day. It’s the kind of recipe that quietly promises a little sweetness and reliability every time you bite in.
Why You’ll Love This Recipe
Over the years, making these peanut butter and jelly sandwiches at home has become a go-to for me—especially when I want something quick but satisfying. It’s the kind of snack that feels both nostalgic and practical, and honestly, it’s saved me more times than I can count on rushed mornings or lazy afternoons. Here’s why this recipe holds a special place in my kitchen:
- Quick & Easy: Ready in under 15 minutes, these sandwiches come together fast—perfect for when you’re juggling a million things.
- Simple Ingredients: You don’t need anything fancy or hard to find—just basics you likely have in your pantry.
- Perfect for Any Occasion: Whether you’re prepping snacks for a picnic, packing school lunches, or just craving a little comfort food, these uncrustables fit right in.
- Crowd-Pleaser: Kids love the fun shape and mess-free bite, and adults appreciate the homemade quality without the fuss.
- Unbelievably Delicious: The creamy peanut butter and sweet jelly marry perfectly inside soft bread, creating a texture and flavor combo that’s just right.
What makes this recipe different? It’s the little details—using room temperature peanut butter for easy spreading, sealing the edges firmly to prevent leaks, and choosing a jelly that’s just the right consistency (no runny jams here). Plus, you can swap in natural peanut butter or even almond butter to suit your tastes. This isn’t just a copy of the store-bought classic; it’s a homemade version that feels fresh and thoughtful, like a quiet hug in sandwich form.
Honestly, the best part is the satisfaction you get from making something so recognizable but with your own touch. It’s comfort food, yes, but with the care that makes it feel special every time. If you love simple, nostalgic snacks that don’t complicate your day, this recipe is definitely worth a try.
What Ingredients You Will Need
This recipe calls for straightforward, pantry-friendly ingredients that come together to create a classic flavor combo without any fuss. Each ingredient plays a simple role—soft bread for structure, peanut butter for creaminess and protein, and jelly for that sweet burst that keeps you coming back for more.
- White sandwich bread: Soft and fresh, preferably unsliced so you can cut your own shapes. I like to use a brand like Pepperidge Farm for consistent texture.
- Creamy peanut butter: Room temperature spreads more easily. You can also use natural or crunchy peanut butter if you prefer a bit more texture.
- Grape jelly or strawberry jam: Thick and not too runny to keep the filling neat. I usually pick Smucker’s because it has a balanced sweetness and good consistency.
- Butter or margarine (optional): Spread lightly on the outside if you want a golden crust when pan-frying or grilling your uncrustables.
- Flour (optional): A small dusting on your work surface to prevent sticking when pressing sandwiches.
Substitutions are easy here. For a gluten-free version, swap the bread for your favorite gluten-free sandwich bread. You could also try almond butter or sunflower seed butter for a nut-free alternative. When it comes to jelly, fresh berry preserves or homemade compotes work beautifully, especially in summer when fruit is in season.
This recipe keeps things simple but you can always personalize it with your favorite peanut butter and jelly combos. In winter, a touch of cinnamon in the peanut butter adds a cozy note. The key is soft bread and a good seal so your filling stays put, making these sandwiches just as portable and neat as the store-bought kind.
Equipment Needed
- Butter knife or small spatula: For spreading peanut butter and jelly evenly without tearing the bread.
- Round sandwich cutter or cookie cutter (about 3 inches): For cutting the sandwiches into perfect circles and sealing the edges. If you don’t have one, a glass rim or small bowl works in a pinch.
- Baking sheet or plate: To arrange sandwiches before storing or freezing.
- Plastic wrap or airtight container: For storing sandwiches to keep them fresh.
Optional but handy:
- Rolling pin: If your bread is a bit thick, a quick roll can help flatten it slightly for easier sealing.
- Non-stick skillet or pan: For toasting the sandwiches if you want a crispy finish.
Personally, I started with just a simple jar lid as a cutter, and it worked surprisingly well! If you’re into kitchen gadgets, investing in a sandwich sealer like the Pampered Chef version can be fun, but it’s definitely not necessary. The key is gentle hands and a firm press to keep everything together.
Preparation Method
- Prepare your workspace: Lightly dust your countertop or cutting board with a bit of flour to prevent sticking. Gather your ingredients—make sure your peanut butter is soft enough to spread easily (about room temperature).
- Cut bread slices (if needed): If your bread isn’t pre-sliced, cut it into slices about ½ inch (1.25 cm) thick. If slices are thick, gently roll with a rolling pin to flatten slightly, making sealing easier.
- Spread peanut butter: Use a butter knife to spread about 1 tablespoon (15 g) of peanut butter evenly over one slice of bread. Cover the surface but leave about ¼ inch (0.6 cm) border near the edges.
- Add jelly: On top of the peanut butter, spread about 1 tablespoon (15 g) of jelly or jam evenly, again leaving a border around the edges to prevent leaking.
- Top with second slice: Place another slice of bread on top, pressing gently to sandwich the fillings together.
- Cut and seal: Using your sandwich cutter or cookie cutter, press firmly down through the sandwich to cut out a perfect circle and seal the edges. If you don’t have a cutter, carefully trim the crusts off and press the edges with a fork or your fingers to seal.
- Check the seal: Run your fingers around the edges to ensure no gaps where filling can escape. If needed, press again gently.
- Optional toasting: Heat a non-stick skillet over medium heat. Lightly butter the outside of each sandwich and toast for 1-2 minutes per side until golden brown for a warm, crispy treat.
- Store or serve: Wrap sandwiches tightly in plastic wrap or place in an airtight container. These keep well in the fridge for up to 3 days or freeze for up to 2 months.
Some quick tips: If your jelly is too runny, strain it through a fine mesh before using. Thin jelly tends to leak when pressed. Also, don’t overload the sandwich with peanut butter or jelly—it’s tempting, but a balanced amount keeps the sandwich neat and easy to eat. And if you’re prepping ahead, freezing these sandwiches individually wrapped helps keep them fresh without sticking together.
Cooking Tips & Techniques
One thing I learned the hard way is how important it is to get the seal right. The classic mistake is pressing too lightly, which leads to filling oozing out when you bite in. Firm, even pressure around the edges keeps everything inside, and if you want to be extra sure, a quick pinch with a fork around the border adds a rustic seal that works wonders.
Another tip is to let your peanut butter sit out for a bit before spreading. Cold, stiff peanut butter tears the bread and makes spreading uneven. Room temperature peanut butter slides on smoothly, creating a perfect layer that sticks to the jelly, preventing slippage.
Multitasking works well here—you can prep several sandwiches at once, cutting and sealing them in batches. If you’re prepping for a crowd or a picnic, freezing them individually means you can pull out exactly how many you need without waste.
When toasting, keep an eye on the heat. Too hot, and you risk burning the bread before the filling warms through. Medium heat and patience result in a golden crust and melty, gooey inside—totally worth the extra step.
If you want to get creative, try mixing a bit of honey or cinnamon into your peanut butter before spreading for a subtle flavor twist. Or swap out grape jelly for a fresh strawberry jam to brighten things up. From my experience, small tweaks like that can transform this simple snack into something a bit more special without complicating the process.
Variations & Adaptations
This recipe is wonderfully adaptable, whether you’re catering to dietary needs or just want to mix things up. Here are a few of my favorite variations:
- Nut-free version: Swap peanut butter for sunflower seed butter or soy nut butter. Use a seed-based butter and your favorite jelly to keep the familiar taste but avoid nuts.
- Gluten-free option: Use gluten-free sandwich bread. Brands like Udi’s or Canyon Bakehouse work well and keep the bread soft enough for sealing.
- Flavor twist: Add sliced bananas or thin apple slices inside for some fresh fruit texture. It adds a pleasant crunch and natural sweetness, especially good with cinnamon-spiced peanut butter.
- Toasted version: After sealing, grill sandwiches on a skillet with a bit of butter for a warm, crispy outside—like a peanut butter and jelly panini.
- Seasonal jam swaps: In summer, fresh berry preserves or homemade jams bring vibrant flavor. In fall, try apple butter or pumpkin butter for a cozy twist.
Personally, I once made a batch with almond butter and raspberry jam for a friend who prefers those flavors, and they were a hit. It’s fun to experiment and make these sandwiches your own. Just remember, a firm seal is key no matter the ingredients.
Serving & Storage Suggestions
These Easy Homemade Uncrustables Peanut Butter & Jelly Sandwiches are best served at room temperature, especially if freshly made. For kids’ lunchboxes, they’re ideal straight from the fridge, still soft and easy to eat. If you’ve toasted them, let them cool slightly before packing to avoid condensation and sogginess.
Pair these sandwiches with fresh fruit like apple slices or a simple cucumber salad, such as the fresh creamy cucumber dill salad, for a refreshing balance. A cold glass of milk or a homemade lemonade like the strawberry basil lemonade rounds out the snack beautifully.
To store, wrap each sandwich tightly in plastic wrap or place in an airtight container. In the fridge, they keep well for up to 3 days. For longer storage, freeze individually wrapped sandwiches for up to 2 months. Thaw in the fridge overnight or at room temperature for an hour before serving.
Reheating toasted sandwiches is easy—pop them in a skillet over medium-low heat for a minute or two per side to warm through without burning. The flavors tend to meld and deepen a bit after resting, making leftovers just as enjoyable the next day.
Nutritional Information & Benefits
A typical sandwich contains approximately 250-300 calories, depending on the type of peanut butter and jelly used. You get a good mix of protein and healthy fats from the peanut butter, plus some carbs from the bread and natural sugars from the jelly.
Peanut butter is a rich source of plant-based protein, vitamin E, and magnesium, which supports energy and muscle function. Using whole-grain or enriched bread adds fiber and B vitamins, making this snack a bit more balanced.
For those watching sugar intake, opting for natural peanut butter without added sugars and low-sugar or no-sugar jelly helps keep this snack lighter. Gluten-free and nut-free variations accommodate common allergies, making this recipe flexible for many diets.
From a wellness perspective, this snack is a satisfying choice that combines comfort with a bit of nutrition, perfect for fueling active kids or a quick energy boost during busy days.
Conclusion
There’s something quietly satisfying about making your own Easy Homemade Uncrustables Peanut Butter & Jelly Sandwiches. They bring together simple ingredients, a little hands-on care, and a touch of nostalgia into a snack that feels just right. Whether you’re packing lunches, prepping for snacks on the go, or just craving a cozy bite, this recipe offers a straightforward way to enjoy a classic treat with your own homemade touch.
Don’t hesitate to tweak the fillings or bread to fit your preferences—it’s these little personal touches that make the recipe truly yours. I love how this simple sandwich can bring a moment of calm and sweetness to any day, and I hope it does the same for you.
If you try this recipe, I’d love to hear how you make it your own or what variations you enjoy. Sharing your thoughts helps keep the kitchen stories alive and growing.
Frequently Asked Questions
Can I use any type of bread for these sandwiches?
Yes! Soft sandwich bread works best, but you can use gluten-free or whole wheat bread. Just make sure it’s soft enough to seal without tearing.
How long do homemade uncrustables keep in the freezer?
Wrapped tightly, they stay fresh for up to 2 months. Thaw them overnight in the fridge before eating.
Is it better to use creamy or crunchy peanut butter?
Creamy spreads more evenly and seals better, but crunchy adds a nice texture if you don’t mind a bit of crunch.
Can I add other fillings besides peanut butter and jelly?
Absolutely! Try almond butter with honey, or add sliced bananas or apples for extra flavor and texture.
How do I prevent the jelly from leaking out?
Leave a small border around the edges when spreading jelly and seal the sandwich firmly. Using thicker jams or preserves helps too.
Pin This Recipe!

Easy Homemade Uncrustables Peanut Butter & Jelly Sandwiches

A simple, nostalgic snack recipe for homemade peanut butter and jelly sandwiches sealed into perfect crustless pockets, ideal for quick snacks, lunchboxes, or picnics.
- Prep Time: 10 minutes
- Cook Time: 4 minutes (optional toasting)
- Total Time: 14 minutes
- Yield: 4 servings
- Category: Snack
- Cuisine: American
Ingredients
- White sandwich bread (soft and fresh, preferably unsliced)
- Creamy peanut butter (room temperature)
- Grape jelly or strawberry jam (thick, not runny)
- Butter or margarine (optional, for toasting)
- Flour (optional, for dusting work surface)
Instructions
- Lightly dust your countertop or cutting board with a bit of flour to prevent sticking. Gather your ingredients and ensure peanut butter is at room temperature for easy spreading.
- If bread is not pre-sliced, cut into slices about 1/2 inch thick. If slices are thick, gently roll with a rolling pin to flatten slightly for easier sealing.
- Spread about 1 tablespoon of peanut butter evenly over one slice of bread, leaving about a 1/4 inch border near the edges.
- Spread about 1 tablespoon of jelly or jam evenly on top of the peanut butter, again leaving a border around the edges to prevent leaking.
- Place another slice of bread on top, pressing gently to sandwich the fillings together.
- Using a round sandwich cutter or cookie cutter (about 3 inches), press firmly down through the sandwich to cut out a perfect circle and seal the edges. If no cutter is available, trim crusts and press edges with a fork or fingers to seal.
- Run your fingers around the edges to ensure no gaps where filling can escape; press again gently if needed.
- Optional: Heat a non-stick skillet over medium heat. Lightly butter the outside of each sandwich and toast for 1-2 minutes per side until golden brown for a warm, crispy treat.
- Wrap sandwiches tightly in plastic wrap or place in an airtight container. Store in the fridge for up to 3 days or freeze for up to 2 months.
Notes
Use room temperature peanut butter for easy spreading and a better seal. Leave a small border around edges to prevent jelly from leaking. For a crispy finish, lightly butter and toast sandwiches in a skillet. Freeze individually wrapped sandwiches for up to 2 months. Variations include nut-free butters, gluten-free bread, and adding fresh fruit slices.
Nutrition
- Serving Size: 1 sandwich (about 3-
- Calories: 275
- Sugar: 12
- Sodium: 250
- Fat: 14
- Saturated Fat: 3
- Carbohydrates: 30
- Fiber: 2
- Protein: 8
Keywords: peanut butter and jelly, uncrustables, homemade snacks, easy sandwiches, kid-friendly, quick snack, lunchbox ideas