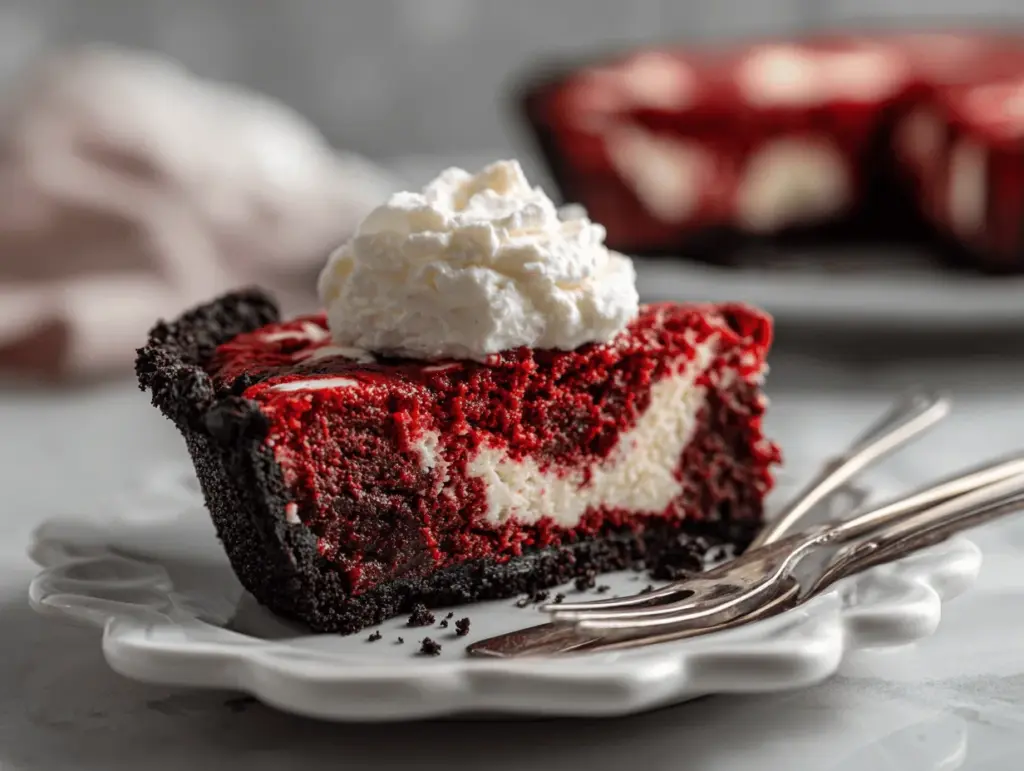
That first bite—rich, fudgy, and impossibly decadent. The velvety red filling, the crunch of chocolate cookies, and the irresistible aroma swirling out of my kitchen. Honestly, if I didn’t know better, I’d think this red velvet brownie pie with Oreo cookie crust was straight out of a bakery. But nope—it’s homemade, and it’s shockingly doable. I stumbled upon this recipe when I was trying to impress my friends during a movie night (you know, the kind where you want everyone to ask for seconds). I’ve tweaked and tested it so many times, and trust me, you’ll love how the classic red velvet flavor meets the boldness of an Oreo cookie crust. It’s a dessert that’s not just pretty for Pinterest photos—it’s the kind people actually ask you for the recipe.
What makes this red velvet brownie pie special? For starters, it’s got that iconic tangy cocoa richness, layered on top of a crunchy cookie base. The colors pop, and the flavors dance—plus, it’s fast enough for busy bakers and fancy enough for special occasions. I’ve made it for birthdays, Valentine’s Day, and, let’s face it, those “just because” cravings. The best part? You don’t need to be a pastry chef. If you can crush cookies and stir brownie batter, you’re already halfway there! If you’ve ever wished for a show-stopping dessert without the stress, this is it.
I’ve baked this red velvet brownie pie for family and friends, and it always disappears fast. The Oreo cookie crust holds up to generous slices, and the brownie filling is gooey, vibrant, and just the right amount of sweet. Whether you’re a red velvet fanatic or just want a new twist on brownies, you’ll find yourself making this again and again. So, let’s jump in—grab your Oreos, your cocoa powder, and your favorite mixing bowl. I’ll walk you through every step, and share tricks that guarantee success. Ready? Let’s make magic happen in your kitchen!
Why You’ll Love This Red Velvet Brownie Pie
I’ve baked and tasted more brownies and pies than I can count, but this red velvet brownie pie with Oreo cookie crust stands out every time. It’s the kind of dessert that makes people gasp (in a good way) when you slice into it. Here’s why this recipe is a keeper:
- Quick & Easy: No need to spend hours—this pie comes together in under an hour. Perfect for last-minute gatherings or spontaneous sweet tooth attacks.
- Simple Ingredients: Seriously, you probably already have most of these in your pantry. No wild goose chase for fancy stuff.
- Perfect for Any Occasion: It’s gorgeous enough for holidays like Christmas or Valentine’s Day, yet casual enough for weekend potlucks. I’ve even made it for a Friday night Netflix binge!
- Crowd-Pleaser: Kids, teens, adults—everyone goes crazy for the combo of red velvet brownie and Oreo crust. It’s always the first thing gone at parties.
- Unbelievably Delicious: The red velvet brownie filling is moist, fudgy, and slightly tangy, while the Oreo crust brings crunch and deep chocolate flavor. It’s the ultimate comfort dessert.
What sets this apart from other brownie pies? You’re not just pouring batter into a pan. You’re layering flavors—crushing Oreos for that iconic crust (which, honestly, is never soggy!), and blending cocoa powder with a dash of vinegar and buttermilk for that classic red velvet taste. It’s my best version because I’ve tweaked everything, from the amount of cocoa to the perfect bake time (let’s just say my oven has seen a LOT of test pies).
This recipe is more than a dessert—it’s a little celebration in every slice. There’s something magical about how the colors and flavors come together. When your fork cuts into that bright red filling and hits the dark cookie base, you know you’re in for a treat. It’s comfort food that looks fancy, tastes indulgent, and never fails to impress. If you want a dessert that feels special but doesn’t stress you out, this is the one.
What Ingredients You Will Need
This red velvet brownie pie recipe is all about simple, bold ingredients working together for a knockout dessert. Nothing too fancy—just pantry staples and a couple of special touches. Here’s what you’ll need:
For the Oreo Cookie Crust:
- 24 Oreo cookies (regular, not Double Stuf; use chocolate sandwich cookies with filling)
- 1/4 cup (60g) unsalted butter, melted (adds richness and helps the crust set)
For the Red Velvet Brownie Filling:
- 1/2 cup (115g) unsalted butter, melted and slightly cooled
- 1 cup (200g) granulated sugar
- 2 large eggs, room temperature
- 1 teaspoon vanilla extract (I like Nielsen-Massey for depth)
- 1 tablespoon (15ml) red food coloring (liquid or gel)
- 2/3 cup (85g) all-purpose flour (or swap in gluten-free 1:1 flour)
- 2 tablespoons (12g) unsweetened cocoa powder (Dutch-process or natural; I recommend Ghirardelli)
- 1/4 teaspoon salt
- 1 teaspoon white vinegar (for that classic tang)
- 1/4 cup (60ml) buttermilk (or make your own with milk and lemon juice)
Optional Topping:
- 1/2 cup (90g) white chocolate chips (for a pretty finish)
- Extra Oreo cookie crumbs (to sprinkle over the top)
Ingredient notes:
- Oreos: Any chocolate sandwich cookie works, but classic Oreos give the best crunch and flavor balance.
- Red Food Coloring: Gel colors make the pie super vibrant, but liquid works fine if that’s what you have.
- Buttermilk: If you don’t have buttermilk, stir 1/2 teaspoon lemon juice into 1/4 cup milk and let it sit 5 minutes.
- Unsalted Butter: You can use salted butter—just reduce the added salt slightly.
- Gluten-Free Option: Use a cup-for-cup gluten-free flour blend and gluten-free chocolate sandwich cookies.
Substitutions and swaps are welcome here. I’ve tried almond flour for a nuttier flavor, swapped white chocolate chips for dark, and even used dairy-free butter without changing the texture much. If you’re baking for allergies or dietary needs, this pie is flexible. Just don’t skip the vinegar and buttermilk—they’re essential for that classic red velvet flavor!
Equipment Needed
Nothing fancy—just your basic kitchen gear. Here’s what you’ll need to whip up a red velvet brownie pie with Oreo cookie crust:
- 9-inch (23cm) pie pan: Glass, metal, or ceramic all work. If you only have a springform pan, that’s fine too—just line the bottom with parchment for easy removal.
- Food processor or blender: For crushing Oreos. If you don’t have one, a zip-top bag and rolling pin does the job (I’ve done it both ways—sometimes the hand-crushed crust is chunkier, but still delicious!).
- Mixing bowls: One large for the brownie batter, one small for the crust.
- Rubber spatula: For scraping every last bit of batter into your pan.
- Measuring cups and spoons: Both US and metric for accuracy.
- Whisk or hand mixer: A whisk works—no need for a stand mixer unless you want to.
- Oven mitts: This pie gets hot—trust me, I’ve learned the hard way!
If you’re on a budget, don’t worry—no need for specialty pans. I’ve even baked this in a cake pan when my pie dish went missing. Just grease well! For maintenance, food processors get sticky with Oreo filling, so clean the blades right after use. And if you’re using a glass pie plate, let it cool before washing to avoid cracks.
Preparation Method
Ready to bake? Here’s the step-by-step guide to making a show-stopping red velvet brownie pie with Oreo cookie crust. I’ll walk you through every detail, so you get perfect results—even if it’s your first time.
- Preheat and Prep: Preheat your oven to 350°F (175°C). Lightly grease your 9-inch (23cm) pie pan. If using a springform pan, line the bottom with parchment paper for easy release.
- Make the Oreo Cookie Crust: Add 24 Oreo cookies to a food processor or blender. Pulse until you have fine crumbs (should look like wet sand; it’s OK if a few chunks remain). Pour in 1/4 cup (60g) melted butter and pulse again until combined. If you’re crushing by hand, smash cookies in a zip-top bag with a rolling pin, then mix with melted butter in a bowl.
- Press the Crust: Pour Oreo mixture into your greased pie pan. Use your fingers or the back of a spoon to press evenly into the bottom and up the sides. Try to get a compact layer—press firmly so it holds together. (Tip: If it looks too crumbly, add 1 extra tablespoon melted butter.)
- Bake the Crust: Bake for 10 minutes. This helps it set and prevents sogginess. Remove from oven and let cool while you make the brownie filling.
- Mix the Brownie Batter: In a large bowl, whisk together 1/2 cup (115g) melted butter and 1 cup (200g) sugar until slightly creamy. Add 2 eggs and 1 teaspoon vanilla; whisk until smooth. Stir in 1 tablespoon (15ml) red food coloring.
- Add Dry Ingredients: Sift in 2/3 cup (85g) flour, 2 tablespoons (12g) unsweetened cocoa powder, and 1/4 teaspoon salt. Fold gently with a spatula until just combined—don’t overmix (overmixing makes brownies tough).
- Finish the Batter: Add 1 teaspoon vinegar and 1/4 cup (60ml) buttermilk. Stir until batter is smooth and glossy. (It should be thick, but pourable; if too stiff, add 1 tablespoon extra buttermilk.)
- Pour and Smooth: Pour the red velvet brownie batter onto the cooled Oreo crust. Use a spatula to spread evenly, getting to every edge.
- Add Toppings (Optional): Sprinkle 1/2 cup (90g) white chocolate chips and a handful of extra Oreo crumbs over the top. They’ll melt into the pie for extra flair.
- Bake: Bake at 350°F (175°C) for 30-35 minutes. The edges should look set, and the center should be slightly soft (a toothpick will come out with a few moist crumbs, not wet batter).
- Cool: Let pie cool in pan for at least 1 hour before slicing. For cleaner slices, chill in the fridge for 30 minutes after cooling.
- Slice and Serve: Run a thin knife around the edge, then cut into wedges. Serve slightly warm or at room temperature.
Troubleshooting Tips:
- If the crust crumbles when slicing, it may need more butter or firmer pressing—don’t worry, it’s still delicious.
- If the pie is too dense, check that you didn’t overmix the batter.
Personal Tip: I always bake my pie in the lower third of the oven for even cooking—no burnt edges, just perfect, fudgy center every time!
Cooking Tips & Techniques
Here’s where years of baking (and a few kitchen fails) come in handy! Let’s make sure your red velvet brownie pie with Oreo cookie crust turns out picture-perfect every time.
- Crust Consistency: The secret to a sturdy cookie crust is pressing firmly and evenly. I use a flat-bottomed measuring cup for the job. If it’s too dry, add a splash more melted butter.
- Batter Mixing: Overmixing makes brownies cakey—mix just until the flour disappears. The batter should be glossy and thick, not runny.
- Color Control: Want that bold red velvet shade? Opt for gel food coloring, and don’t skimp. But start with less and add until you hit the color you like. Staining your hands is part of the fun (wear gloves if you want to avoid it).
- Timing: Don’t overbake! The center should be soft—not liquid, but not dry. I check at 30 minutes, then every 2 minutes. A toothpick with a few crumbs is perfect.
- Multitasking: While the crust is cooling, prep the brownie batter. It saves time and keeps the butter from setting up too hard.
- Common Mistakes: If your pie cracks, don’t worry—just cover with chocolate chips or a drizzle. If the crust sticks, run a knife around the edge before slicing.
- Personal Lesson: Once, I forgot the vinegar. The pie tasted fine, but missed that signature red velvet tang. Don’t skip it!
Consistency is key. Use room temperature eggs and buttermilk for best texture. If you’re baking in a glass pan, lower the oven temp by 5°F (about 2°C) to keep the crust from overbrowning. For guaranteed success, let the pie cool fully before slicing—it’s hard, but worth the wait!
Variations & Adaptations
Want to switch things up? Here are my favorite ways to adapt this red velvet brownie pie with Oreo cookie crust:
- Gluten-Free: Use gluten-free chocolate sandwich cookies and a cup-for-cup gluten-free flour blend. Texture stays fudgy and delightful.
- Dairy-Free: Swap butter for vegan butter and buttermilk for dairy-free milk with lemon juice. I’ve made this for lactose-intolerant friends—no one noticed the difference!
- Holiday Twist: Add crushed peppermint candies to the batter and top with festive sprinkles for Christmas. Or swirl in cream cheese for a Valentine’s treat.
- Flavor Boost: Stir in 1/2 cup chopped walnuts or pecans for crunch, or add a teaspoon of instant espresso powder for deeper chocolate flavor.
- Cooking Methods: If you prefer bars, press the crust and bake in an 8×8-inch (20cm) square pan. Cut into brownie squares instead of pie slices.
- Allergen Substitution: For egg-free, use flax eggs (1 tablespoon ground flaxseed + 2.5 tablespoons water per egg). Texture will be a bit more cake-like.
My personal favorite? Swapping half the Oreo crust for Golden Oreos—gives a beautiful color contrast and a hint of vanilla. Every time I make a new variation, I jot notes in my recipe book. Don’t be afraid to make this your own; it’s flexible and forgiving!
Serving & Storage Suggestions
This red velvet brownie pie with Oreo cookie crust is as stunning on the table as it is delicious. Here’s how I love to serve and store it:
- Serving Temperature: Serve at room temperature for gooey texture, or slightly chilled for cleaner slices. Warm slices are extra decadent with a scoop of vanilla ice cream!
- Presentation: Sprinkle extra Oreo crumbs or white chocolate chips on top. Add a dollop of whipped cream for fancy flair.
- Pairings: Goes perfectly with milk, coffee, or even a sweet red wine. For brunch, serve alongside fresh berries or fruit salad.
Storage: Cover leftovers tightly with plastic wrap or foil. Store in the refrigerator up to 4 days. For longer storage, wrap individual slices and freeze for up to 2 months—just thaw overnight in the fridge.
Reheating: Warm slices in the microwave for 15-20 seconds, or in a low oven (300°F/150°C) for 5 minutes. The flavors deepen after a day, so leftovers taste even richer!
Don’t worry if the crust softens a bit in the fridge—it’s still delicious. This pie keeps its color and texture beautifully. I always make extra for snacking the next day!
Nutritional Information & Benefits
Let’s talk numbers and benefits for this red velvet brownie pie with Oreo cookie crust:
- Estimated per slice (1/8th pie):
- Calories: ~370
- Fat: 18g
- Carbs: 48g
- Protein: 4g
- Sugar: 32g
- Key Ingredients:
- Cocoa powder: Antioxidants and a natural mood boost
- Eggs: Protein and structure
- Buttermilk: Adds calcium plus a tangy flavor
- Oreos: Okay, maybe not so healthy—but hey, treat yourself!
- Dietary Considerations: Easily made gluten-free or dairy-free with substitutions above.
- Allergens: Contains wheat, dairy, eggs, and soy (in Oreos).
From a wellness perspective, I treat this pie as a celebration food—perfect for sharing and enjoying in moderation. The balance of rich cocoa and tangy buttermilk makes it more satisfying, so a little goes a long way. If you make it with allergen-friendly swaps, everyone at the table can enjoy a slice!
Conclusion
This red velvet brownie pie with Oreo cookie crust is more than a recipe—it’s a guaranteed winner for any occasion. The flavors are bold, the colors are striking, and the process is simple enough for any home baker. Every time I make this pie, I’m reminded why it’s one of my favorites: it’s easy, fun, and always gets rave reviews.
Don’t hesitate to make it your own—play with toppings, swap cookies, or even add a swirl of cream cheese. You’ll learn what you love most with every batch. Honestly, I keep coming back to this recipe because it never lets me down. It’s comfort food, celebration food, and “just because” food, all in one.
Give it a try and let me know how it goes! Share your results, your tweaks, and your photos in the comments. I can’t wait to hear what you think. Happy baking—and remember, life’s too short not to treat yourself to a little extra chocolate now and then!
FAQs
Can I make this red velvet brownie pie ahead of time?
Absolutely! Bake it a day in advance, cool, and store covered in the fridge. The flavors deepen overnight, and slices are even easier to cut.
Can I use store-bought Oreo crust?
You can, but homemade gives a better texture and flavor. If you’re short on time, pre-made crust is a handy shortcut (just skip the crust steps).
How do I know when the brownie filling is done?
Check with a toothpick at 30 minutes—it should come out with a few moist crumbs, not wet batter. The edges will look set and the center will puff slightly.
What’s the best way to crush Oreos without a food processor?
Put Oreos in a zip-top bag and smash with a rolling pin or heavy bottle. It’s easy and a bit therapeutic, honestly!
Can I freeze leftover pie?
Yes! Wrap individual slices tightly and freeze for up to 2 months. Thaw in the refrigerator before serving—just as tasty as fresh.
PrintRed Velvet Brownie Pie with Oreo Cookie Crust

This decadent red velvet brownie pie features a fudgy, tangy red velvet filling atop a crunchy homemade Oreo cookie crust. It’s easy enough for weeknights but impressive enough for special occasions, and can be adapted for gluten-free or dairy-free diets.
- Prep Time: 20 minutes
- Cook Time: 40 minutes
- Total Time: 1 hour
- Yield: 8 servings 1x
- Category: Dessert
- Cuisine: American
Ingredients
- 24 Oreo cookies (regular, not Double Stuf; use chocolate sandwich cookies with filling)
- 1/4 cup (60g) unsalted butter, melted (for crust)
- 1/2 cup (115g) unsalted butter, melted and slightly cooled (for filling)
- 1 cup (200g) granulated sugar
- 2 large eggs, room temperature
- 1 teaspoon vanilla extract
- 1 tablespoon (15ml) red food coloring (liquid or gel)
- 2/3 cup (85g) all-purpose flour (or gluten-free 1:1 flour)
- 2 tablespoons (12g) unsweetened cocoa powder
- 1/4 teaspoon salt
- 1 teaspoon white vinegar
- 1/4 cup (60ml) buttermilk (or 1/4 cup milk + 1/2 teaspoon lemon juice)
- 1/2 cup (90g) white chocolate chips (optional topping)
- Extra Oreo cookie crumbs (optional topping)
Instructions
- Preheat your oven to 350°F (175°C). Lightly grease a 9-inch pie pan. If using a springform pan, line the bottom with parchment paper.
- Add 24 Oreo cookies to a food processor or blender and pulse until fine crumbs form. Add 1/4 cup melted butter and pulse again until combined. (Alternatively, crush cookies in a zip-top bag and mix with melted butter in a bowl.)
- Press the Oreo mixture evenly into the bottom and up the sides of the prepared pie pan. Press firmly to compact the crust. If too crumbly, add 1 extra tablespoon melted butter.
- Bake the crust for 10 minutes. Remove from oven and let cool while preparing the filling.
- In a large bowl, whisk together 1/2 cup melted butter and 1 cup sugar until slightly creamy. Add 2 eggs and 1 teaspoon vanilla extract; whisk until smooth. Stir in 1 tablespoon red food coloring.
- Sift in 2/3 cup flour, 2 tablespoons cocoa powder, and 1/4 teaspoon salt. Fold gently with a spatula until just combined.
- Add 1 teaspoon vinegar and 1/4 cup buttermilk. Stir until the batter is smooth and glossy. If too thick, add 1 tablespoon extra buttermilk.
- Pour the red velvet brownie batter onto the cooled Oreo crust and spread evenly to the edges.
- Sprinkle 1/2 cup white chocolate chips and extra Oreo crumbs over the top, if desired.
- Bake at 350°F (175°C) for 30-35 minutes, until the edges are set and the center is slightly soft (a toothpick should come out with a few moist crumbs).
- Let the pie cool in the pan for at least 1 hour before slicing. For cleaner slices, chill in the fridge for 30 minutes after cooling.
- Run a thin knife around the edge, then cut into wedges. Serve slightly warm or at room temperature.
Notes
For best results, use room temperature eggs and buttermilk. Press the crust firmly for a sturdy base. Don’t overmix the brownie batter to keep it fudgy. Let the pie cool fully before slicing for clean cuts. Easily adapted for gluten-free or dairy-free diets. Store leftovers covered in the fridge for up to 4 days or freeze slices for up to 2 months.
Nutrition
- Serving Size: 1/8th of pie
- Calories: 370
- Sugar: 32
- Sodium: 220
- Fat: 18
- Saturated Fat: 10
- Carbohydrates: 48
- Fiber: 2
- Protein: 4
Keywords: red velvet, brownie pie, Oreo crust, dessert, easy, chocolate, holiday, Valentine's Day, birthday, fudgy, homemade, crowd-pleaser