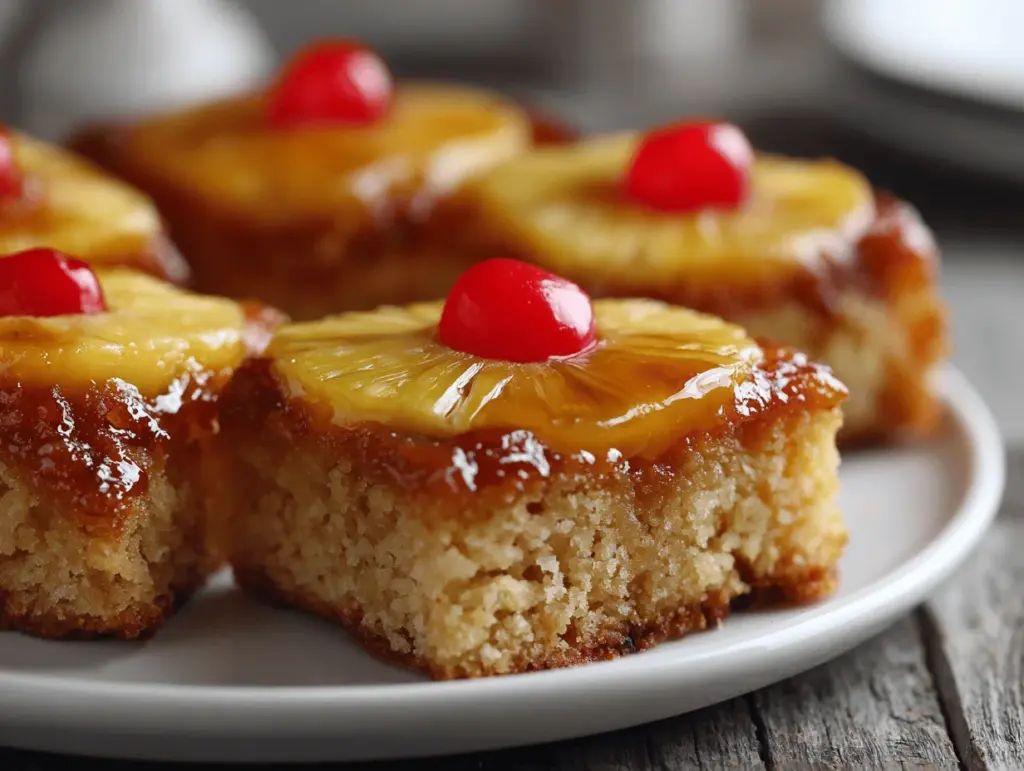
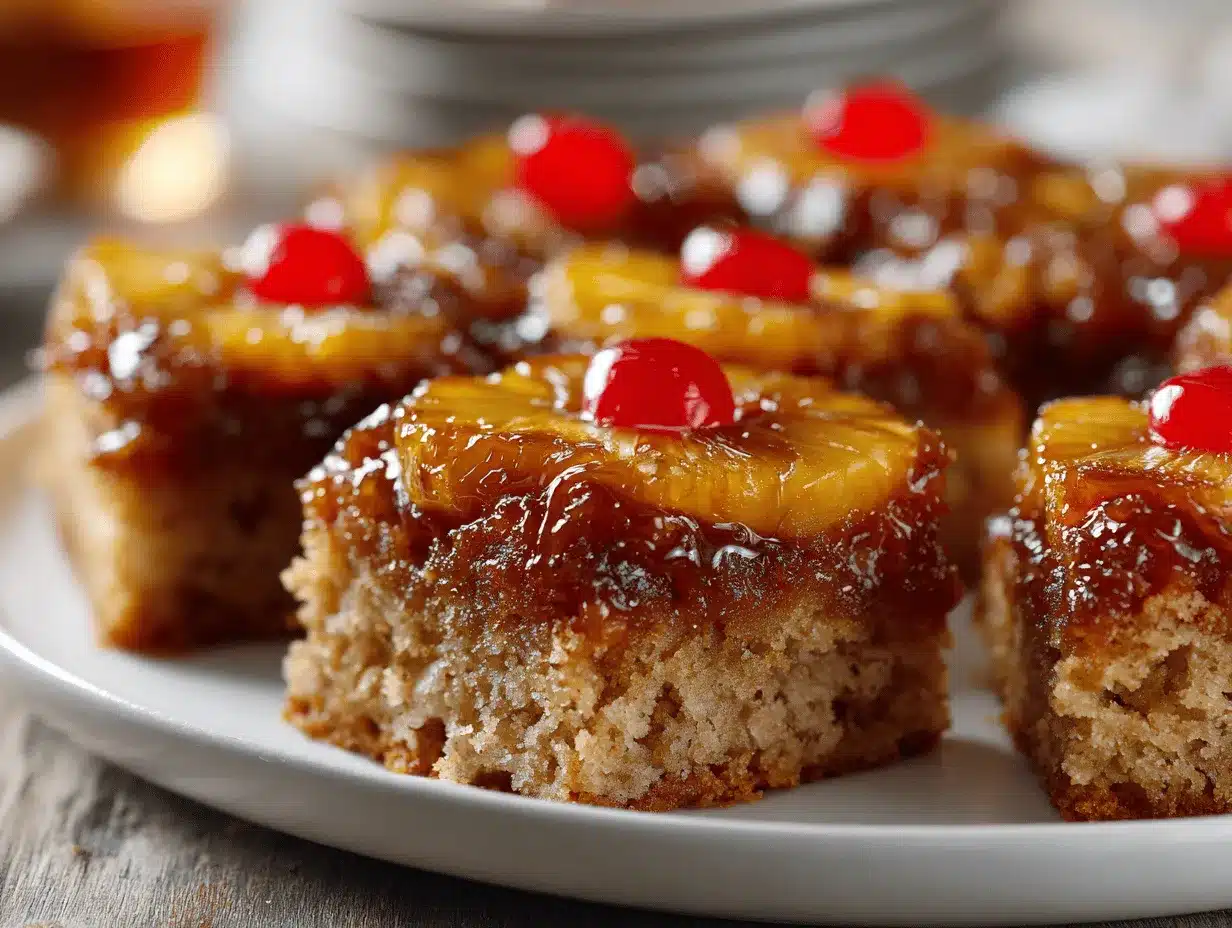
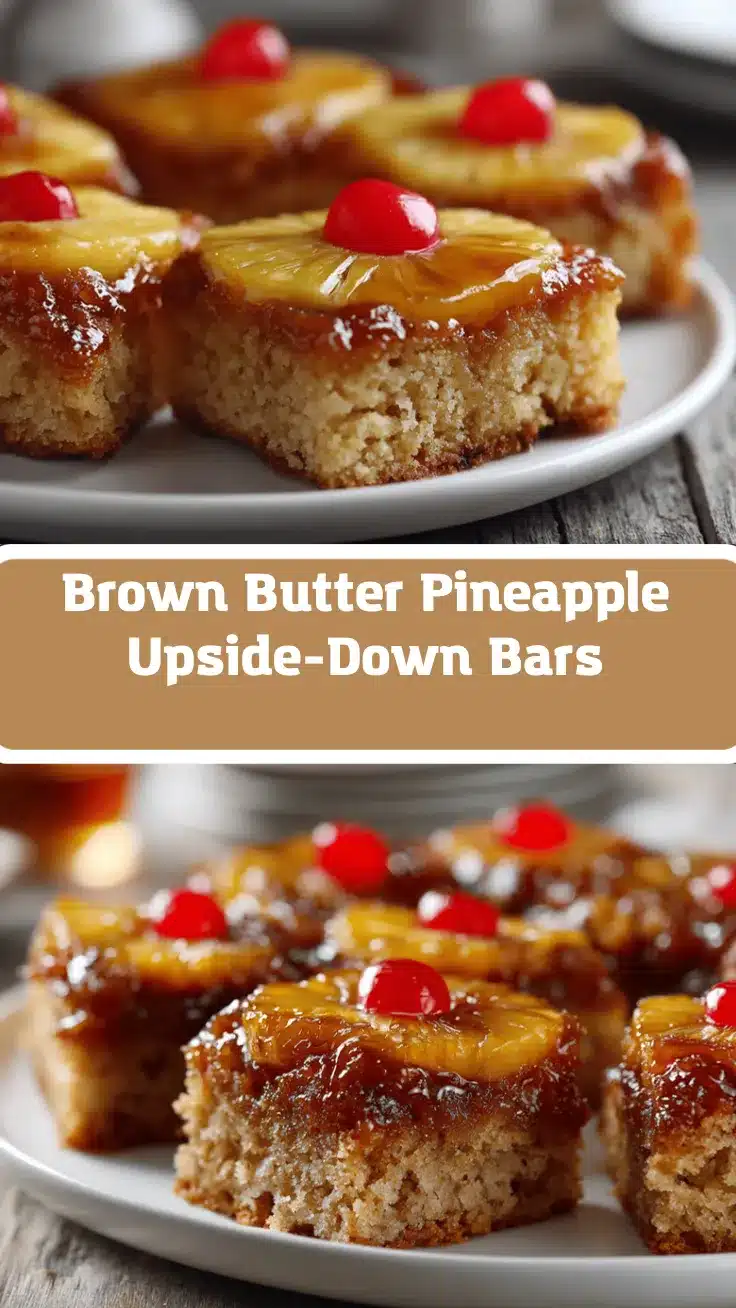
The scent of caramelized pineapple and brown butter drifting through my kitchen brings back memories of childhood birthday parties, sticky fingers, and laughter echoing off the walls. The first time I made these Pineapple Upside-Down Cookie Bars, I was honestly just trying to recreate that nostalgic upside-down cake magic—but in a form you could grab with one hand (because, let’s face it, sometimes you just want dessert without needing a fork). These bars are soft, chewy, and topped with buttery pineapple goodness, all smothered in a swoon-worthy brown butter glaze that makes every bite melt-in-your-mouth amazing.
I stumbled onto this recipe by accident during a summer barbecue when I realized I’d forgotten to prep dessert. With a can of pineapple rings, a handful of maraschino cherries, and my trusty cookie bar base, these Pineapple Upside-Down Cookie Bars pretty much invented themselves. Over time, I’ve tweaked and tested (and taste-tested—lots!) to make them extra special. That brown butter glaze? Total game changer. It adds this nutty, caramel note that makes the bars taste like you spent hours fussing, but honestly, they’re a breeze to whip up.
Whether you’re baking for a family get-together, a picnic, or just a Tuesday night sweet tooth, this pineapple upside-down cookie bars recipe is a crowd-pleaser. It’s easy for beginners, fun for kids, and impressive enough for company. Plus, the tropical flavor always feels like a mini vacation in every bite. I’ve made these bars for bake sales, holiday brunches, and even as a cheeky breakfast treat—no judgment here. If you love the classic cake, you’re about to fall head over heels for these irresistible, portable cookie bars!
Why You’ll Love These Pineapple Upside-Down Cookie Bars
After years of baking (and more than a few kitchen mishaps), I can confidently say these Pineapple Upside-Down Cookie Bars check every box for the perfect dessert. Here’s why they’re a must-make:
- Quick & Easy: You can get these bars from mixing bowl to oven in under 20 minutes—no fancy equipment or complicated steps.
- Simple Ingredients: Everything you need is probably already in your pantry or fridge. No need for a special trip to the store!
- Perfect for Every Occasion: These bars shine at potlucks, picnics, birthday parties, or just as a homemade treat to brighten any day.
- Crowd-Pleaser: Kids love the sweet pineapple and cherry topping, while adults rave about the chewy cookie base and rich glaze.
- Unbelievably Delicious: The combination of caramelized fruit, soft cookie, and brown butter glaze is—well—unforgettable.
What sets my pineapple upside-down cookie bars recipe apart is the brown butter glaze. Most recipes just use a basic powdered sugar drizzle, but here, browning the butter first takes things to a whole new level (trust me, it’s worth the extra two minutes at the stove). The glaze soaks into the bars, making them extra gooey and flavorful.
I’ve tested this recipe at least a dozen times—tweaking sugar levels, trying different flour blends, and even swapping in coconut for a tropical twist. Each batch taught me something new about layering flavors and achieving just the right texture. These bars are comfort food, but with a playful, modern twist. They have that “wow” factor without any of the stress. If you want a dessert that’s easy, reliable, and guaranteed to earn compliments, this is the one to bake. Honestly, after you try them, you might never go back to the old pineapple upside-down cake again!
What Ingredients You Will Need
This pineapple upside-down cookie bars recipe uses simple, approachable ingredients that come together for a show-stopping treat. Each component plays a special part in building flavor and texture, so here’s what you’ll need:
- For the Topping:
- Pineapple rings (canned, drained and patted dry; fresh works too if you have it!)
- Maraschino cherries (classic and pretty—don’t skip them!)
- Light brown sugar (for that signature caramelized top)
- Unsalted butter, melted (adds richness and helps caramelize the fruit)
- For the Cookie Bar Base:
- All-purpose flour (I use King Arthur for consistent results)
- Baking powder (gives a gentle lift—don’t confuse with baking soda!)
- Salt (just a pinch to balance sweetness)
- Unsalted butter, softened (for a tender crumb)
- Granulated sugar (for sweetness and structure)
- Light brown sugar (extra moisture and caramel notes)
- Large eggs, room temperature (binds everything and adds richness)
- Pure vanilla extract (I love Nielsen-Massey, but any real vanilla works)
- Pineapple juice (reserved from the canned pineapple, for extra tropical flavor)
- For the Brown Butter Glaze:
- Unsalted butter (you’ll brown this for a nutty depth)
- Powdered sugar (for a smooth, sweet glaze)
- Pineapple juice or milk (thins the glaze and adds subtle flavor)
- Pinch of salt (just a tiny bit to round out the sweetness)
Ingredient Tips: Choose pineapple rings that are firm but ripe—they hold their shape best during baking. If you need a gluten-free version, swap the flour for a 1:1 gluten-free blend (like Bob’s Red Mill). For dairy-free, use vegan butter throughout. You can also use coconut sugar in place of brown sugar for a different flavor twist. And if you’re feeling extra, sprinkle some shredded coconut on top before baking for a real tropical treat!
Equipment Needed
You don’t need anything fancy to make these pineapple upside-down cookie bars, which is one of the reasons I love them so much. Here’s what I use every time:
- 9×13-inch baking pan (metal or glass both work, but metal gives a slightly crisper edge)
- Parchment paper (for easy removal and cleanup—trust me, this is a lifesaver!)
- Mixing bowls (one large, one medium)
- Hand mixer or stand mixer (or just a sturdy whisk and some elbow grease)
- Measuring cups and spoons (accuracy is key, especially for baking powder and flour)
- Small saucepan (for browning the butter for the glaze—watch it closely!)
- Rubber spatula or wooden spoon (to mix and spread the batter evenly)
- Sharp knife (for slicing bars cleanly once cooled)
If you don’t have parchment paper, you can generously grease and flour your pan, but parchment makes everything easier. For browning butter, a light-colored pan helps you see when the milk solids turn golden (don’t walk away—it can go from browned to burnt faster than you think!). And for budget-friendly options, most dollar stores carry great mixing bowls and measuring spoons that do the job just fine.
How to Make Pineapple Upside-Down Cookie Bars with Brown Butter Glaze
- Preheat and Prep: Preheat your oven to 350°F (175°C). Line a 9×13-inch baking pan with parchment paper, leaving a bit of overhang for easy lifting later.
- Prepare the Topping: Melt 1/4 cup (57g) unsalted butter and pour it evenly into the bottom of your prepared pan. Sprinkle 1/2 cup (100g) light brown sugar over the butter. Arrange pineapple rings (about 8-10, depending on size) over the sugar, then place a maraschino cherry in the center of each ring. If you want, you can cut the rings and puzzle them to cover the whole surface—no rules here!
- Mix Dry Ingredients: In a medium bowl, whisk together 2 1/2 cups (315g) all-purpose flour, 1 1/2 teaspoons baking powder, and 1/2 teaspoon salt. Set aside.
- Cream Butter and Sugars: In a large mixing bowl, beat 3/4 cup (170g) unsalted butter (softened), 1 cup (200g) granulated sugar, and 1/2 cup (100g) light brown sugar together until light and fluffy—about 2-3 minutes. Don’t rush this part; it’s what makes the bars light!
- Add Eggs and Vanilla: Beat in 2 large eggs (room temperature) and 2 teaspoons pure vanilla extract until well combined. Scrape down the sides as you go.
- Incorporate Pineapple Juice: Add 1/4 cup (60ml) reserved pineapple juice and mix until smooth. If the batter looks a little curdled, don’t panic—it’ll come together in the next step.
- Combine Wet and Dry: Gradually add the dry ingredients to the wet, mixing on low speed (or with a spatula) just until combined. The batter will be thick—almost like cookie dough.
- Spread the Batter: Carefully dollop the batter over your arranged pineapple and gently spread it out with a spatula. Try not to disturb the fruit too much. Smooth the top as best you can.
- Bake: Bake for 28-32 minutes, or until the top is golden, the edges are set, and a toothpick inserted in the center comes out mostly clean (a few moist crumbs are fine). Rotate the pan halfway through baking for even browning.
- Cool: Let the pan cool on a wire rack for at least 30 minutes. Don’t rush this—if you flip too soon, the bars might fall apart!
- Flip and Slice: Once cool, use the parchment overhang to lift the bars out and flip onto a large cutting board or tray. If any pineapple sticks, just nudge it gently back into place.
- Make the Brown Butter Glaze: In a small saucepan over medium heat, melt 1/4 cup (57g) unsalted butter. Continue cooking, swirling the pan, until the butter foams and the milk solids turn golden brown and nutty—about 3-5 minutes. Remove from heat and let cool slightly. Whisk in 1 cup (120g) powdered sugar, 2-3 tablespoons (30-45ml) pineapple juice or milk, and a pinch of salt until smooth and pourable.
- Glaze and Serve: Drizzle the brown butter glaze generously over the cooled bars. Slice into squares or rectangles and enjoy!
Troubleshooting Tips: If your bars seem too soft, chill them for 30 minutes before slicing. If the glaze is too thick, add more juice a teaspoon at a time. If using fresh pineapple, pat very dry to avoid soggy bars. And if the edges darken too quickly, tent lightly with foil during the last 10 minutes of baking.
Cooking Tips & Techniques
I’ve learned a thing or two while testing this pineapple upside-down cookie bars recipe—sometimes the hard way! Here’s what will help you nail it every time:
- Don’t Overmix the Batter: Once you add the flour, mix just until combined. Overmixing leads to tough bars, and nobody wants that.
- Even Fruit Layer: Arrange pineapple and cherries flat and snug—this helps every bite get some fruit (and makes for gorgeous bars after flipping!).
- Use Room Temperature Ingredients: Eggs and butter blend more smoothly, so give them a little time on the counter before baking.
- Brown the Butter Carefully: The glaze goes from nutty brown to burnt in a flash. Watch for golden flecks and a toasty aroma, then pull it off the heat.
- Let Bars Cool Thoroughly: The most common mistake? Flipping too soon. The base needs to set, or the topping will slide off. If you’re impatient (like me), pop the pan in the fridge to speed things up.
- Use Parchment Paper: This makes the flip-and-lift process so much easier and keeps all that gooey caramel right where it belongs—on your bars, not stuck in the pan.
- For Perfect Slices: Wipe your knife clean between cuts and use a sharp blade. If you want super neat bars, chill them first and then slice.
- Bake Evenly: Ovens can be quirky. Rotating the pan halfway through baking helps prevent uneven browning, especially if your oven has hot spots (mine definitely does!).
Honestly, I’ve burned the glaze, had bars stick to the pan, and even forgotten the cherries (oops). But every batch taught me a little more. My best advice? Relax, have fun, and don’t worry if things aren’t picture-perfect. The flavor will win everyone over, guaranteed.
Variations & Adaptations
One of my favorite things about this pineapple upside-down cookie bars recipe is how easy it is to riff on. Here are a few ideas to make it your own:
- Gluten-Free Variation: Swap the all-purpose flour for a gluten-free 1:1 baking blend. I’ve used Bob’s Red Mill and had great results—just check for any extra moisture needed.
- Dairy-Free Adaptation: Use vegan butter for both the bars and the glaze. Coconut oil also works, though the flavor will be a bit different (and deliciously tropical!).
- Flavor Twists: Replace half the pineapple with mango slices for a fun, sunny twist. Or sprinkle shredded coconut over the fruit layer before adding the batter.
- Seasonal Fruit: Try peaches or plums in place of pineapple during their peak months. Just make sure to slice thin and pat dry.
- Nutty Addition: For crunch, sprinkle chopped pecans or walnuts over the brown sugar layer before adding fruit.
I once made a version with fresh pineapple and a splash of rum in the glaze—my friends called it “pina colada bars.” And for a fall spin, thin apple slices with a dash of cinnamon in the glaze are incredible. Don’t be afraid to experiment!
Serving & Storage Suggestions
These bars are best served slightly warm or at room temperature, when the glaze is silky and the topping is gooey. For a show-stopping presentation, arrange them on a platter with extra maraschino cherries or a sprinkle of toasted coconut.
Pairing Ideas: Serve with a scoop of vanilla ice cream, a dollop of whipped cream, or a mug of strong coffee. For brunch, they’re fantastic with fresh fruit and a mimosa (just saying!).
Storage: Keep leftovers in an airtight container at room temperature for up to 2 days, or in the fridge for up to 5 days. The flavors actually deepen overnight! For longer storage, wrap bars tightly and freeze for up to 2 months. Thaw at room temp, and reheat gently in the microwave for 10-15 seconds if you want that just-baked taste.
Pro tip: If the glaze gets a little sticky in the fridge, a quick zap in the microwave brings it right back to life. The bars hold up well, but I doubt they’ll last long—mine never do!
Nutritional Information & Benefits
Each pineapple upside-down cookie bar (based on 20 bars) is approximately:
- Calories: 210
- Fat: 8g
- Carbohydrates: 32g
- Protein: 2g
- Sugar: 22g
Key Benefits: These bars use real pineapple, which brings vitamin C and a little fiber to the party. The brown butter adds satisfying richness, and you can make them gluten- or dairy-free as needed. They’re nut-free as written (just skip nuts in adaptations if allergies are a concern).
Personally, I love that you get big flavor in a portable, shareable form. Just remember, these are a sweet treat—perfect for special occasions or when you want a taste of sunshine, no matter the season!
Conclusion
If you’re looking for a dessert that’s easy to make, full of nostalgic flavor, and guaranteed to impress, these pineapple upside-down cookie bars with brown butter glaze are calling your name. They have all the goodness of the classic cake, but in a chewy, grab-and-go bar that’s perfect for any gathering (or just a little solo treat with your coffee).
Don’t be afraid to play around with the recipe—swap fruits, try new flavors, or make them fit your dietary needs. Every batch is a chance to make the recipe your own. I keep coming back to these bars because they never fail to put a smile on my face (and everyone else’s, too!).
Give this recipe a try, and let me know how it goes! Leave a comment, share your favorite adaptations, or tag me if you post a pic—I’d love to see your creations. Happy baking, and here’s to sweet, sunny days—no matter what the weather outside!
Frequently Asked Questions
Can I use fresh pineapple instead of canned?
Absolutely! Just slice the pineapple thin and pat it dry with paper towels to avoid excess moisture. Fresh pineapple can add an extra pop of flavor and a bit more tang.
Do I have to use maraschino cherries?
Nope, but they do add that classic look and a sweet touch. You can leave them out or swap for dried cherries, cranberries, or even fresh berries if you prefer.
Can I make these bars ahead of time?
Yes, these pineapple upside-down cookie bars keep well! Bake them a day ahead and store covered at room temp or in the fridge. The flavors get even better overnight.
What if I don’t have a 9×13-inch pan?
You can use two 8×8-inch pans or a slightly larger sheet pan—just watch the baking time, as thinner bars bake faster. The key is to not overfill the pan; aim for an even layer.
How do I brown butter for the glaze?
Melt butter over medium heat, swirling the pan, until it foams and you see brown flecks at the bottom. It’ll smell nutty and toasty—pull it off the heat right away before it burns. Let it cool a bit, then mix with the remaining glaze ingredients.
Pin This Recipe!
Pineapple Upside-Down Cookie Bars with Brown Butter Glaze
These Pineapple Upside-Down Cookie Bars are a chewy, portable twist on the classic cake, featuring caramelized pineapple, maraschino cherries, and a rich brown butter glaze. Perfect for gatherings, bake sales, or a sweet treat any day.
- Prep Time: 20 minutes
- Cook Time: 32 minutes
- Total Time: 1 hour
- Yield: 20 bars 1x
- Category: Dessert
- Cuisine: American
Ingredients
- 8–10 pineapple rings (canned, drained and patted dry, or fresh)
- 8–10 maraschino cherries
- 1/2 cup light brown sugar (for topping)
- 1/4 cup unsalted butter, melted (for topping)
- 2 1/2 cups all-purpose flour
- 1 1/2 teaspoons baking powder
- 1/2 teaspoon salt
- 3/4 cup unsalted butter, softened
- 1 cup granulated sugar
- 1/2 cup light brown sugar (for cookie base)
- 2 large eggs, room temperature
- 2 teaspoons pure vanilla extract
- 1/4 cup pineapple juice (reserved from canned pineapple)
- 1/4 cup unsalted butter (for glaze)
- 1 cup powdered sugar
- 2–3 tablespoons pineapple juice or milk (for glaze)
- Pinch of salt (for glaze)
Instructions
- Preheat your oven to 350°F (175°C). Line a 9×13-inch baking pan with parchment paper, leaving overhang for easy lifting.
- Melt 1/4 cup unsalted butter and pour into the bottom of the prepared pan. Sprinkle 1/2 cup light brown sugar evenly over the butter.
- Arrange pineapple rings over the sugar, placing a maraschino cherry in the center of each ring.
- In a medium bowl, whisk together flour, baking powder, and salt. Set aside.
- In a large mixing bowl, beat 3/4 cup softened unsalted butter, 1 cup granulated sugar, and 1/2 cup light brown sugar until light and fluffy (2-3 minutes).
- Beat in eggs and vanilla extract until well combined, scraping down the sides as needed.
- Mix in 1/4 cup pineapple juice until smooth.
- Gradually add the dry ingredients to the wet, mixing just until combined. The batter will be thick.
- Dollop the batter over the arranged fruit and gently spread it evenly without disturbing the fruit.
- Bake for 28-32 minutes, until golden and a toothpick inserted in the center comes out mostly clean. Rotate pan halfway through baking.
- Cool the pan on a wire rack for at least 30 minutes.
- Lift the bars out using the parchment and flip onto a cutting board or tray. Gently reposition any pineapple if needed.
- For the glaze: In a small saucepan over medium heat, melt 1/4 cup unsalted butter. Cook, swirling, until the butter foams and milk solids turn golden brown (3-5 minutes). Remove from heat and cool slightly.
- Whisk in powdered sugar, 2-3 tablespoons pineapple juice or milk, and a pinch of salt until smooth and pourable.
- Drizzle glaze over cooled bars. Slice and serve.
Notes
For gluten-free, use a 1:1 gluten-free flour blend. For dairy-free, substitute vegan butter. Arrange fruit evenly for best appearance. Let bars cool thoroughly before flipping. If glaze is too thick, add more juice a teaspoon at a time. Bars can be made ahead and stored at room temperature or refrigerated. For extra flavor, sprinkle shredded coconut over the fruit before baking.
Nutrition
- Serving Size: 1 bar (1/20th of recipe)
- Calories: 210
- Sugar: 22
- Sodium: 80
- Fat: 8
- Saturated Fat: 5
- Carbohydrates: 32
- Fiber: 1
- Protein: 2
Keywords: pineapple upside-down bars, cookie bars, brown butter glaze, pineapple dessert, easy dessert, summer baking, bake sale, potluck dessert, tropical dessert, chewy bars


