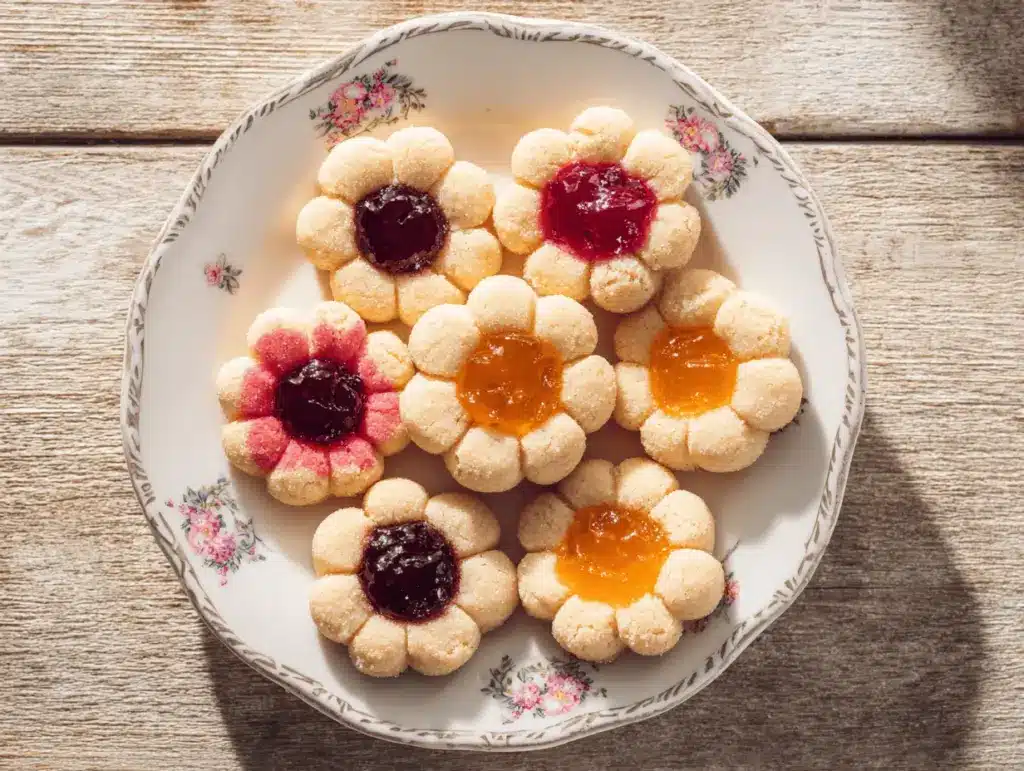
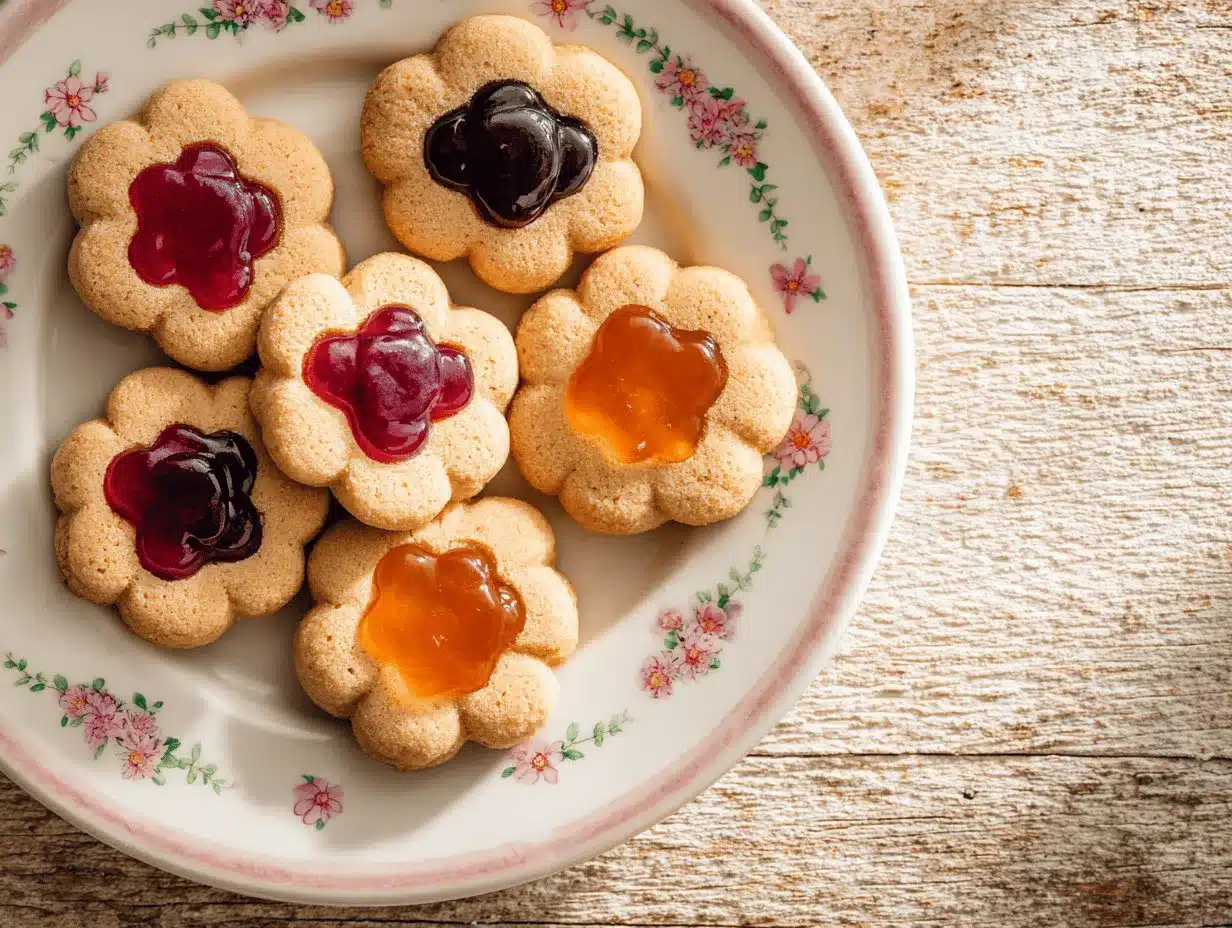
The first bite of a spring blossom thumbprint cookie is pure sunshine – crisp, buttery edges, that melt-in-your-mouth center, and a sweet pop of jam that reminds me of picking berries as a kid. You know, the kind of treat that makes your kitchen smell like hope and new beginnings. Ever since I stumbled on this recipe during a chilly March afternoon (when I desperately craved something bright and cheerful), these thumbprint cookies have been my go-to for sharing a little happiness. And honestly, who can resist the glistening jewel tones of mixed berry and apricot jam peeking out from a tender, golden cookie? They’re just as perfect for a spring picnic as they are for a cozy coffee break at home.
These spring blossom thumbprint cookies aren’t just adorable – they’re a total mood-lifter. The dough comes together with basic pantry staples, and the jams add that fruity zing (I sometimes use my homemade berry preserves when I’m feeling ambitious, but store-bought works like a charm). Best of all, you don’t need fancy equipment or pastry chef skills. If you’ve got two hands and a sweet tooth, you’re set! I’ve baked these for garden parties, Easter brunch, and even packaged them up as little thank-you gifts for neighbors. The recipe’s flexible, forgiving, and always gets people talking (and reaching for seconds!).
Spring blossom thumbprint cookies are more than a recipe for me – they’re a tradition in the making, a slice of comfort, and a celebration of the season’s best flavors. If you’re looking for something simple, beautiful, and downright delicious to brighten your day, you’ve found it. Let’s get baking!
Why You’ll Love This Spring Blossom Thumbprint Cookies Recipe
- Quick & Easy: These cookies are out of the oven in under 30 minutes, which is a lifesaver when you need a last-minute spring treat or a mid-week pick-me-up.
- Simple Ingredients: All you need are kitchen staples like butter, flour, sugar, and egg. The jams are the fun part – use what you have or get creative with flavors.
- Perfect for All Occasions: Whether you’re hosting a spring brunch, prepping snacks for a picnic, or just craving something sweet with your tea, these thumbprint cookies fit right in.
- Crowd-Pleaser: Kids love making the thumbprints (and sneaking bites of jam), and adults can’t get enough of the buttery texture and fruity filling.
- Unbelievably Delicious: The combination of slightly crisp edges, soft centers, and sweet-tart jam is the stuff of cookie dreams. Every bite feels like a flash of spring.
What sets this spring blossom thumbprint cookies recipe apart? For starters, I use a quick chill in the fridge to keep the cookies tender and help them hold their shape. I also blend in a hint of almond extract, which gives the dough a subtle floral note that totally elevates the jam flavors (I know, I said “no fancy ingredients,” but trust me, it’s magical and totally optional!). You don’t have to stick with one jam, either. Swirls of mixed berry and apricot create a rainbow on your cookie plate – and plenty of options for picky eaters.
This isn’t just another thumbprint cookie recipe. It’s one you’ll make again and again because it’s so easy, reliable, and joyful. I’ve tested it with all sorts of jams (even a dollop of lemon curd – oh wow), and the results are always bakery-worthy. These cookies bring smiles, spark conversations, and add just the right amount of whimsy to any table. Isn’t that what homemade baking is all about?
What Ingredients You Will Need
This spring blossom thumbprint cookies recipe uses simple, wholesome ingredients to deliver big flavor and a melt-in-your-mouth texture. Most of these are pantry staples, and you can easily swap jams or flavorings to suit your mood.
- For the Cookie Dough:
- Unsalted butter, softened (1 cup/226g): The foundation for that perfect buttery crumb. I always let it sit at room temperature for at least 30 minutes (Kerrygold is my go-to for flavor, but any good-quality butter works).
- Granulated sugar (2/3 cup/135g): Adds just enough sweetness without overpowering the jam filling.
- Large egg (1, room temperature): Binds the dough. If your egg’s cold, place it in warm water for 5 minutes.
- Pure vanilla extract (1 tsp/5ml): For warm, classic cookie flavor. Swap in vanilla bean paste for extra oomph.
- Almond extract (1/4 tsp/1ml, optional): Gives a lovely floral hint that pairs beautifully with fruit jams.
- All-purpose flour (2 cups/250g): The structure-maker. For a gluten-free version, I’ve had luck with King Arthur Measure for Measure flour.
- Salt (1/4 tsp/1g): Balances the sweetness and brings out all the flavors.
- For the Filling:
- Mixed berry jam (1/4 cup/80g): Look for a jam with real fruit chunks for the best flavor and texture. I’ve used Bonne Maman and my own homemade raspberry jam—both are amazing.
- Apricot jam (1/4 cup/80g): Adds a sunny, bright note. If you want, try peach or orange marmalade for a twist.
- Optional Garnish:
- Powdered sugar (for dusting): Makes the cookies look extra festive and “springy.”
- Edible flower petals or sprinkles: Totally optional, but these make your cookies Pinterest-perfect for special occasions.
Ingredient Tips: For the best thumbprint cookies, make sure your butter is really soft but not melted. If your jam is too runny, a quick simmer on the stovetop will thicken it up (just don’t let it scorch!). You can use any combination of jams – strawberry, blackberry, even fig jam is delicious. For an egg-free version, 1/4 cup (60ml) unsweetened applesauce works in a pinch.
Equipment Needed
- Mixing bowls (medium and large): I like glass so I can see if everything’s incorporated.
- Electric hand mixer or stand mixer: Either is fine – I’ve even creamed the butter and sugar by hand with a sturdy wooden spoon when the power was out. It’s a workout, but doable!
- Baking sheet(s): Lined with parchment paper for easy cleanup.
- Measuring cups and spoons: Accurate measurements are key for these cookies.
- Small spoon or cookie scoop (1-tbsp size): Helps portion the dough evenly.
- Thumb or small round measuring spoon: For making the signature “thumbprint” – the back of a rounded teaspoon works surprisingly well if you want perfect circles.
- Wire cooling rack: So the cookies cool evenly and don’t get soggy bottoms.
If you don’t have parchment paper, just grease your baking sheet with a little butter. For budget-friendly options, my $10 hand mixer from a thrift store has lasted years. Just wipe down your mixer and scoop after each use to keep them in good shape. If you love making cookies, a silicone baking mat is a worthwhile investment – I use mine all the time, and it washes up like new.
Preparation Method
-
Cream the Butter and Sugar:
In a large mixing bowl, beat 1 cup (226g) unsalted butter and 2/3 cup (135g) granulated sugar together on medium speed for about 2-3 minutes (the mixture should look pale and fluffy). If mixing by hand, it’ll take a bit longer – you’re looking for a creamy, almost whipped texture.
Tip: Butter too cold? Cut it into cubes and let it sit on the counter for 15 minutes, or microwave in 5-second bursts (watch closely!). -
Add Egg and Flavorings:
Mix in 1 large egg, 1 tsp (5ml) vanilla extract, and 1/4 tsp (1ml) almond extract if using. Beat until fully combined, scraping down the sides as needed.
Warning: If your egg is cold, the mixture may look a little curdled. No worries – it’ll come together when you add flour. -
Combine Dry Ingredients:
In a separate bowl, whisk together 2 cups (250g) all-purpose flour and 1/4 tsp (1g) salt. Add the dry mix to the wet ingredients in two additions, mixing on low just until the dough forms. Don’t overmix or your cookies will turn tough.
The dough should be soft and just a bit sticky but not wet. If it’s too loose, add another tablespoon of flour. -
Chill the Dough:
Scoop dough into 1-tablespoon portions (about 20g each) and roll into balls. Place them 2 inches (5cm) apart on a parchment-lined baking sheet. Refrigerate for 15-20 minutes. This keeps the cookies from spreading too much.
If you’re in a hurry, pop them in the freezer for 8-10 minutes instead. -
Preheat the Oven:
Set your oven to 350°F (175°C) and make sure a rack is in the center position. -
Shape the Thumbprints:
Using your thumb or the back of a rounded teaspoon, gently press an indentation into the center of each chilled dough ball. Don’t press all the way through – just deep enough to hold the jam.
If the dough cracks around the edges, just pinch it back together. Cracks add character! -
Add the Jam:
Fill each indentation with about 1/2 teaspoon (2g) of mixed berry jam or apricot jam. Don’t overfill, or the jam will ooze out during baking.
If your jam is thick, give it a quick stir or microwave it for a few seconds so it’s easier to spoon. -
Bake:
Bake the cookies in the preheated oven for 13-15 minutes, or until the edges are just turning golden and the centers are set. (My oven always runs a little hot, so I check at 12 minutes.)
Cookies will look soft – that’s perfect. They’ll firm up as they cool. -
Cool:
Let the cookies sit on the baking sheet for 2-3 minutes, then transfer them to a wire rack to cool completely.
Resist the urge to move them too soon or they might break. (Been there, done that!) -
Optional Garnish:
Once cooled, dust with powdered sugar or decorate with edible flower petals for that full “spring blossom” effect.
Troubleshooting: If your cookies are spreading too much, the dough may be too warm—chill a bit longer. If the jam bubbles over, just use a little less next time. And don’t worry if some look a little wonky—imperfect cookies are usually the tastiest.
Cooking Tips & Techniques
After years of baking (and occasionally burning) batches of thumbprint cookies, I’ve learned a few tricks that make all the difference.
- Keep It Cool: Chilling the dough is non-negotiable for pretty, plump cookies. If you skip it, your cookies might turn into flat pancakes (ask me how I know!).
- Jam Consistency Matters: Too runny, and it’ll leak; too thick, and it won’t spread nicely. If your jam is super thick, add a drop of water and mix well. For runny jams, simmer them for a minute or two.
- Don’t Overmix: Mix just until the dough comes together. Overworking = tough cookies. Trust me, gentle is better here.
- Uniform Size: Evenly sized dough balls mean even baking. I use a cookie scoop for speed, but a tablespoon works great too.
- Batch Baking: If you’re making a double batch, keep unused dough in the fridge while cookies are baking. Warm dough spreads more.
- Rotating Trays: For even results, rotate your trays halfway through baking if your oven has hot spots.
- Jam Swirls: Want a marbled look? Add a dot each of berry and apricot jam, then gently swirl with a toothpick before baking.
Biggest lesson? Don’t stress perfection—thumbprint cookies are meant to look homemade. The jam might bubble, dough might crack, but the flavors always win. If you’re baking with little helpers, let them press the thumbprints and choose the jams. Half the fun is in the making!
Variations & Adaptations
One of the best things about these spring blossom thumbprint cookies is how easy they are to customize. Here are some of my favorite ways to switch things up:
- Dietary Adaptations: For gluten-free cookies, swap the all-purpose flour for a 1:1 gluten-free blend. For a dairy-free version, use vegan butter (like Earth Balance) – I’ve done this for friends with allergies and the results are still rich and tender.
- Seasonal Jams: Try strawberry-rhubarb in early summer, or fig and orange marmalade in the fall. Lemon curd is also a dreamy filling if you want something tart and bright.
- Flavor Twists: Add a pinch of ground cardamom, cinnamon, or ginger to the dough for a spiced version. I once folded in a handful of finely chopped pistachios for crunch – huge success at a spring tea party.
- Chocolate Center: For chocolate lovers, swap the jam for a teaspoon of Nutella or dark chocolate ganache before baking. (Kids go wild for this one!)
- Nut Allergies: Omit almond extract if needed—vanilla alone is still lovely. If you want extra richness, top with a sprinkle of toasted coconut before baking.
My personal favorite? Swirling a little blackberry and apricot jam together in each cookie for a gorgeous “sunset” effect. Every batch is a little different, and that’s what makes baking these such a joy!
Serving & Storage Suggestions
These cookies are best served at room temperature, when the centers are soft and the jam is just slightly chewy. Arrange them on a pretty plate, dusted with powdered sugar, and watch them disappear at any brunch, party, or afternoon tea.
- Serving: Pair with herbal tea, a glass of cold milk, or bubbly lemonade. They look stunning alongside a fruit salad or as part of a cookie platter with other spring-inspired treats.
- Storage: Store spring blossom thumbprint cookies in an airtight container at room temperature for up to 4 days. For longer storage, refrigerate (they’ll stay fresh for about a week).
- Freezing: These cookies freeze beautifully. Place in a single layer on a tray, freeze until solid, then transfer to a zip-top bag or container. Thaw at room temperature before serving.
- Reheating: If you want to refresh the texture, pop them in a 300°F (150°C) oven for 3-4 minutes. The jam centers get gooey again—so good!
The flavors mellow and meld after a day, so if you can wait, day-old cookies are even more delicious (if there are any left, that is!).
Nutritional Information & Benefits
Each spring blossom thumbprint cookie (about 25g) contains roughly:
- Calories: 110
- Fat: 6g
- Carbohydrates: 13g
- Sugar: 6g
- Protein: 1g
Butter provides some vitamin A, and the jams offer a little fruit goodness. Using whole-fruit jams (with less added sugar) boosts antioxidants and fiber. Gluten-free and dairy-free adaptations are easy, making these cookies friendly for many diets. If allergens are a concern, skip the almond extract and check your jam labels for hidden nuts or gluten.
From a wellness standpoint, I’m all about balance – these cookies are a bit of sunshine for your soul, with a little fruit and a lot of joy in every bite.
Conclusion
Spring blossom thumbprint cookies are that rare treat—simple to make, gorgeous to look at, and absolutely delightful to eat. They bring the best of spring right to your kitchen, no matter what the weather’s doing outside. I love how easily you can swap jams, tweak the flavors, and make each batch your own. These cookies have become a staple for any gathering in my house, and I hope they’ll do the same for you.
Don’t be afraid to experiment—try new jam combos, add a sprinkle of zest, or let your kids help with the thumbprints. That’s where the magic happens! If you bake up a batch of these spring blossom thumbprint cookies, leave a comment below or share your pics and twists. I can’t wait to see how you make them yours. Happy baking, and may your kitchen always smell like fresh cookies!
Frequently Asked Questions about Spring Blossom Thumbprint Cookies
How do I keep my thumbprint cookies from spreading too much?
Chill the dough balls for at least 15-20 minutes before baking. Also, make sure your butter isn’t melted—just soft. Too-warm dough is usually the culprit for flat cookies.
Can I use other types of jam or filling?
Absolutely! Any thick fruit jam, lemon curd, or even a chocolate spread works. Just avoid very runny jams, as they tend to leak out during baking.
What’s the best way to store thumbprint cookies?
Keep them in an airtight container at room temperature for up to 4 days, or refrigerate to extend freshness. For longer storage, freeze in a single layer, then transfer to a container or bag.
Are these cookies gluten-free or dairy-free?
They can be! Substitute a 1:1 gluten-free flour blend for regular flour, and use vegan butter for a dairy-free version. I’ve tested both, and they’re still delicious.
Can I make the dough ahead of time?
Yes, you can make the dough up to 48 hours in advance. Keep it covered in the fridge, then scoop, shape, fill, and bake when you’re ready. It’s a great way to prep for parties or busy days.
PrintSpring Blossom Thumbprint Cookies
These Spring Blossom Thumbprint Cookies are buttery, tender, and filled with jewel-toned mixed berry and apricot jams. Quick to make and endlessly adaptable, they’re the perfect cheerful treat for spring gatherings or cozy coffee breaks.
- Prep Time: 20 minutes
- Cook Time: 15 minutes
- Total Time: 35 minutes
- Yield: 24 cookies 1x
- Category: Dessert
- Cuisine: American
Ingredients
- 1 cup (226g) unsalted butter, softened
- 2/3 cup (135g) granulated sugar
- 1 large egg, room temperature
- 1 teaspoon pure vanilla extract
- 1/4 teaspoon almond extract (optional)
- 2 cups (250g) all-purpose flour
- 1/4 teaspoon salt
- 1/4 cup (80g) mixed berry jam
- 1/4 cup (80g) apricot jam
- Powdered sugar, for dusting (optional)
- Edible flower petals or sprinkles, for garnish (optional)
Instructions
- In a large mixing bowl, beat the butter and granulated sugar together on medium speed for 2-3 minutes until pale and fluffy.
- Mix in the egg, vanilla extract, and almond extract (if using). Beat until fully combined, scraping down the sides as needed.
- In a separate bowl, whisk together the flour and salt. Add the dry ingredients to the wet in two additions, mixing on low just until the dough forms. Do not overmix.
- Scoop dough into 1-tablespoon portions and roll into balls. Place 2 inches apart on a parchment-lined baking sheet. Refrigerate for 15-20 minutes.
- Preheat oven to 350°F (175°C) with a rack in the center position.
- Using your thumb or the back of a rounded teaspoon, gently press an indentation into the center of each chilled dough ball.
- Fill each indentation with about 1/2 teaspoon of mixed berry or apricot jam. Do not overfill.
- Bake for 13-15 minutes, or until edges are just turning golden and centers are set.
- Let cookies cool on the baking sheet for 2-3 minutes, then transfer to a wire rack to cool completely.
- Once cooled, dust with powdered sugar or decorate with edible flower petals or sprinkles if desired.
Notes
Chill the dough to prevent spreading. Use any thick jam or even lemon curd for the filling. For gluten-free or dairy-free adaptations, use a 1:1 gluten-free flour blend and vegan butter. Swirl jams for a marbled look, and don’t worry about cracks—they add homemade charm.
Nutrition
- Serving Size: 1 cookie (about 25g)
- Calories: 110
- Sugar: 6
- Sodium: 30
- Fat: 6
- Saturated Fat: 4
- Carbohydrates: 13
- Protein: 1
Keywords: thumbprint cookies, spring cookies, jam cookies, berry cookies, apricot cookies, easy cookies, Easter cookies, picnic cookies, homemade cookies, buttery cookies


