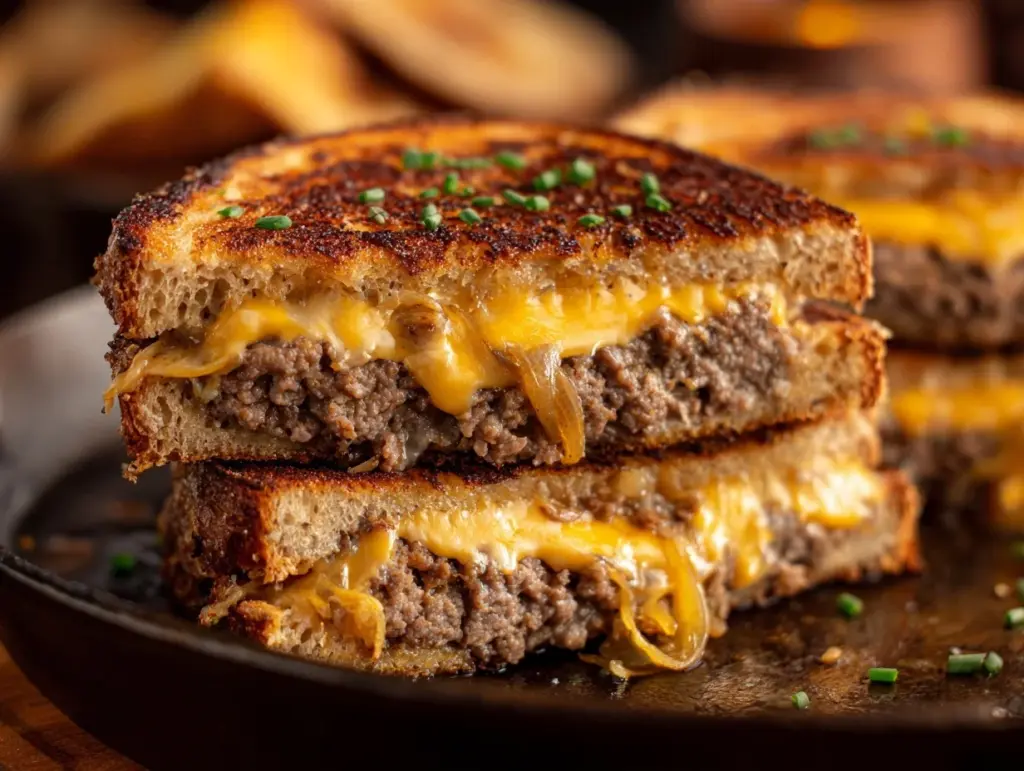
Close your eyes and picture it: sizzling beef, gooey cheese, caramelized onions, and buttery golden rye bread coming together in a single, glorious bite. That’s the magic of this patty melt recipe. Honestly, if comfort food had a Southern twang and a crispy crust, this would be it. I still remember the first time I tried a true Southern-style patty melt at a roadside diner off a sleepy highway—it was love at first crunch! The blend of juicy beef and melty cheese stuck with me, and let’s face it, there’s no better marriage than a burger and a grilled cheese sandwich.
This isn’t just any patty melt recipe, though. It’s my best Southern style grilled cheese twist, with extra attention to those rich, nostalgic flavors. After testing (and tasting!) different versions over the years, I finally landed on this one—where every layer counts, and every bite feels like a warm hug. Whether you grew up with classic diner food, or you’re craving something hearty and homemade, this recipe delivers big on flavor, texture, and that little spark of Southern hospitality.
If you’re busy, looking to feed a family, or just want a late-night treat, this patty melt recipe has you covered. The ingredients are simple, the steps are straightforward, and you’ll find that making it at home actually beats takeout—plus you get to control every delicious detail. As someone who’s made plenty of grilled sandwiches (and plenty of mistakes), I can promise you: this one’s a keeper. So grab your skillet and get ready to fall in love with the best Southern style grilled cheese you’ll ever make!
Why You’ll Love This Patty Melt Recipe
- Quick & Satisfying: Comes together in under 45 minutes, so it’s perfect for a weeknight dinner or when you need comfort food fast.
- Simple, Classic Ingredients: No hard-to-find groceries—just beef, cheese, onions, and bread you probably already have on hand.
- Perfect for Any Occasion: This Southern-style patty melt recipe is just as at home at a cozy family brunch as it is at a game-day get-together.
- Crowd-Pleaser: I’ve served this to picky kids, hungry teens, and even my foodiest friends—and not a crumb is ever left.
- Pure Comfort: The combination of juicy burger patties, caramelized onions, and perfectly toasted bread is the definition of feel-good food.
What sets this patty melt apart? For starters, it’s all about the balance. The sweet, slow-cooked onions aren’t rushed—they’re given time to get that deep, golden flavor. The cheese is generous and melts to stretchy perfection. And the beef? Seasoned just right, cooked so it stays moist inside that crisp crust. I’ve tried skipping the butter or swapping the bread, and it’s just not the same—you want that real-deal texture and taste.
I’ve made a lot of grilled sandwiches over the years, but this is the one that makes people pause and smile after the first bite. It’s not fussy or fancy, just downright delicious and comforting. If you’re after a dinner that feels like a treat but doesn’t stress you out, this patty melt recipe is the answer. Trust me, it’s the kind of meal you’ll come back to again and again—maybe even making up excuses to “need” another one.
What Ingredients You Will Need
This patty melt recipe pulls together classic, wholesome ingredients to deliver that irresistible diner flavor at home. Most are pantry or fridge staples, and you can swap in a few favorites if you like. Here’s what you’ll need:
- For the Patty:
- 1 lb (450 g) ground beef (80/20 for juicy patties; I prefer using grass-fed beef for extra flavor)
- 1 tsp kosher salt (adjust to taste)
- 1/2 tsp ground black pepper
- 1/2 tsp garlic powder
- 1/2 tsp onion powder
- 1 tsp Worcestershire sauce (adds an umami punch)
- For the Onions:
- 2 large yellow onions, thinly sliced
- 2 tbsp unsalted butter (for rich caramelization)
- Pinch of salt
- 1/2 tsp sugar (optional, but helps onions caramelize faster)
- For the Sandwich:
- 8 slices rye bread (marble rye is my go-to, but sourdough works too)
- 4 tbsp softened butter (for spreading on bread)
- 8 slices Swiss cheese (or a 50/50 mix of Swiss and sharp cheddar for extra flavor)
- Optional: 4 slices American cheese (for that classic melt)
- Dijon mustard or Thousand Island dressing (to spread, if you like a little tang)
- Pickles (for serving, optional but highly recommended)
Ingredient Tips: For the ground beef, try to avoid anything leaner than 85/15, or you might miss out on that juicy patty. Don’t worry about fancy onions—basic yellow onions will caramelize beautifully. As for cheese, Swiss is classic, but I’ve had great results with Havarti or a little smoked gouda mixed in. And if you’re gluten-free, swap in your favorite GF bread—the results are still mouthwatering. Want to keep it lighter? Use a sprouted grain bread or cook the patties in a nonstick pan with a little less butter (but let’s be real, the buttery bread is part of the Southern magic!).
Equipment Needed
You don’t have to be a professional chef to pull off this patty melt recipe, but a few reliable tools make all the difference:
- Large skillet or cast iron pan: Cast iron is my favorite for that crispy crust, but any heavy-bottomed skillet will do.
- Spatula: A sturdy, flat spatula makes flipping patties and sandwiches easy. If you have a griddle spatula, even better.
- Knife and cutting board: For slicing onions and prepping bread.
- Mixing bowl: To season and mix the ground beef.
- Measuring spoons: For spices and seasonings.
- Paper towels: To drain excess grease from the patties, if you like.
Tip: If you don’t have a cast iron pan, a nonstick skillet works just fine—just keep the heat at medium so the bread doesn’t burn. I’ve even used an electric griddle for making multiple sandwiches at once (great for feeding a crowd). And honestly, a butter knife for spreading butter is a must—makes things way less messy. After cooking, wipe down your skillet with a paper towel and a little salt to keep it seasoned and happy.
Preparation Method
-
Caramelize the Onions (20-25 minutes):
Add 2 tbsp unsalted butter to a large skillet over medium-low heat. Once melted, toss in the sliced onions and a pinch of salt. Stir occasionally, letting the onions soften and turn golden brown (about 20 minutes). If you’re impatient (like me sometimes), sprinkle in 1/2 tsp sugar to help them caramelize faster. Don’t rush—slow cooking is the secret to sweet, jammy onions here. Set aside when they’re deep golden and super tender.
-
Prepare the Beef Patties (5 minutes):
In a mixing bowl, gently combine 1 lb (450 g) ground beef, 1 tsp kosher salt, 1/2 tsp black pepper, 1/2 tsp garlic powder, 1/2 tsp onion powder, and 1 tsp Worcestershire sauce. Mix just until combined—don’t overwork it, or your patties might turn out tough. Divide into 4 equal balls and gently press into thin, oval-shaped patties (about the size of your bread slices).
-
Cook the Patties (6-8 minutes):
Wipe out the onion skillet and crank the heat up to medium-high. Add a light drizzle of oil (if needed), then sear patties for 3-4 minutes per side. You want a deep brown crust but still juicy inside. If a little fat renders out, that’s normal—just blot excess with a paper towel. Transfer cooked patties to a plate to rest.
-
Butter the Bread:
Spread softened butter over one side of each slice of rye bread. Trust me, don’t skimp here—this is what gives your patty melt its signature crunch and flavor! If your butter is cold, microwave a bit to soften (not melt) it for easier spreading.
-
Assemble the Sandwiches:
Lay 4 slices of bread, buttered side down, on a clean surface. Layer each with 1 slice Swiss cheese, a cooked beef patty, a big spoonful of caramelized onions, and (if you like) a slice of American cheese. Top with another slice of bread, buttered side up. If you’re adding mustard or dressing, spread it inside the sandwich before assembling.
-
Grill the Patty Melts (10 minutes):
Heat your skillet over medium. Working in batches if needed, place sandwiches in the pan and cook for 3-5 minutes per side, pressing gently with your spatula. The bread should be golden and crisp, cheese fully melted. Watch closely—some stoves run hot, and nobody likes burnt bread! If you’re making a lot, keep finished sandwiches warm in a low oven (about 200°F/90°C).
-
Slice and Serve:
Let sandwiches rest for a minute (the cheese is lava-hot right out of the pan!), then slice in half and serve with pickles or chips on the side.
Troubleshooting: If your cheese isn’t melting, cover the skillet for a minute or two to trap heat. If your bread browns before the cheese melts, lower the heat and give it a little more time. And if your onions start to burn, add a splash of water to deglaze the pan and keep things moving.
Cooking Tips & Techniques
- Don’t Rush the Onions: Caramelizing onions low and slow is non-negotiable for the best patty melt flavor. Cranking the heat just leads to burnt bits and raw centers. Give them at least 20 minutes, stirring now and then.
- Even Patty Size: Shape your beef patties to match the bread shape—they’ll shrink a little as they cook. Too thick, and the cheese won’t melt; too thin, and they’ll dry out. Oval works best for rye bread.
- Cheese Placement: Put cheese both under and over the patty for a “seal” that keeps everything in place and maximizes meltiness. If you love cheese pulls, try doubling up!
- Butter Matters: Use softened butter for the bread—never skip this step. Margarine or mayo works in a pinch, but real butter gives you that diner-style flavor and crispy crust.
- Temperature Control: Medium heat is your friend. Too high, and the bread burns before the cheese melts. Too low, and you’ll never get that satisfying crunch. I learned this the hard way after a few sad, soggy sandwiches.
- Multitasking: While onions caramelize, prep your patties and butter your bread. With a little rhythm, the whole process feels less like a chore and more like a fun assembly line.
My biggest fails have always been impatience—rushing the onions, flipping the sandwich too soon, or using bread that was too thin. Now, I always go for a sturdy rye, use plenty of cheese, and let that onion magic happen. If your first attempt isn’t perfect, don’t stress! Every patty melt is a learning experience, and honestly, even the “ugly” ones taste amazing.
Variations & Adaptations
The beauty of the patty melt recipe is how flexible it is. Here are my favorite spins on the classic:
- Low-Carb or Gluten-Free: Swap in your favorite gluten-free or low-carb bread. I’ve even used thick-cut cauliflower “bread” for a grain-free treat (just handle with care—it’s more fragile than rye).
- Vegetarian: Replace the beef patty with a plant-based burger or a thick portobello mushroom cap, seasoned well and grilled. Still delicious, still hearty.
- Spicy Southern: Add a dash of hot sauce or pepper jack cheese for a kick. Toss a few jalapeño slices into the onions while they caramelize if you’re feeling bold.
- Different Cooking Methods: If you don’t have a stove, you can grill the patties and toast the assembled sandwiches on a panini press or in a toaster oven—just keep an eye on the melt.
- Allergen Adjustments: Use dairy-free cheese and vegan butter if you’re avoiding dairy. For soy allergies, skip the Worcestershire sauce or use a soy-free version.
My personal favorite twist? Adding a thin layer of pimento cheese between the bread and patty—pure Southern comfort and total cheese heaven! Don’t be afraid to experiment; every version brings out a new side of this classic sandwich.
Serving & Storage Suggestions
Serving: Patty melts are best enjoyed hot from the skillet, when the cheese is extra gooey. Slice diagonally for that classic diner look, and serve with crunchy dill pickles, kettle chips, or a simple green salad. If you’re feeling fancy, a small bowl of tomato soup on the side is pure bliss.
Storage: Leftovers can be wrapped in foil and stored in the fridge for up to 2 days. To reheat, place in a nonstick skillet over medium-low heat, covered, until warmed through and the bread crisps up again (about 5 minutes per side). The microwave works in a pinch, but the bread will lose its crunch.
Freezing: I don’t recommend freezing assembled patty melts (the bread gets soggy), but you can freeze cooked patties and caramelized onions separately for up to 1 month. Assemble fresh when you’re ready to eat.
Flavor Notes: The flavors actually deepen after a day in the fridge, so don’t be surprised if your reheated patty melt tastes even richer! Just make sure to re-toast that bread for the best texture.
Nutritional Information & Benefits
Estimated Nutrition (per sandwich):
- Calories: 680
- Protein: 36g
- Carbohydrates: 44g
- Fat: 38g
- Fiber: 3g
- Sugar: 5g
*Values will vary with bread/cheese choices
Health Benefits: This patty melt recipe packs a solid dose of protein and calcium thanks to the beef and cheese. Using whole grain rye adds fiber, and onions bring antioxidants and prebiotics to the table. If you’re watching sodium or fat, opt for low-sodium cheese and leaner beef—but keep in mind, a little indulgence now and then is good for the soul.
Dietary Notes: To make it gluten-free, use gluten-free bread. For dairy-free needs, swap in your favorite dairy-free cheese and butter. Contains wheat and dairy as written.
Honestly, I treat this as a “sometimes” food—pure comfort, best enjoyed alongside a salad or veggie soup for balance!
Conclusion
This patty melt recipe is the definition of Southern comfort—crispy, cheesy, and packed with juicy, beefy flavor. It’s the sandwich I crave on rainy afternoons and the one my family requests again and again. The simple steps and easy ingredients mean anyone can pull this off, and the results are always worth it.
I love how easy it is to customize—change up the bread, add your favorite cheese, or sneak in a little heat. Every time I make it, I remember those diner memories and the joy of homemade food that tastes even better than the original. If you’re looking for a meal that brings people together and leaves everyone happy, this is it.
Give this patty melt recipe a try, then let me know what you think! Did you add a twist? Serve it for a special occasion? Leave a comment, share your creations, and tag me in your delicious grilled cheese adventures. Here’s to more cozy, cheesy meals and Southern charm in every bite!
FAQs
What kind of bread is best for a patty melt recipe?
Rye bread is traditional (especially marble rye for a little visual flair), but sourdough or hearty whole wheat works too. Just make sure it’s thick enough to hold up to the juicy filling.
Can I make patty melts ahead of time?
You can cook the patties and caramelize the onions in advance. Assemble and grill the sandwiches just before serving for the best texture and melty cheese.
What cheese melts best for patty melts?
Swiss is the classic choice, but American, cheddar, or a mix all melt beautifully. If you want extra gooeyness, use two types of cheese.
Can I make this patty melt recipe gluten-free?
Absolutely—just use your favorite gluten-free bread. Everything else stays the same, and you’ll still get that classic flavor.
Why are my onions burning instead of caramelizing?
Burnt onions usually mean the heat is too high. Keep it at medium-low, stir often, and add a splash of water if they start sticking. Patience is the real secret to perfect caramelized onions!


