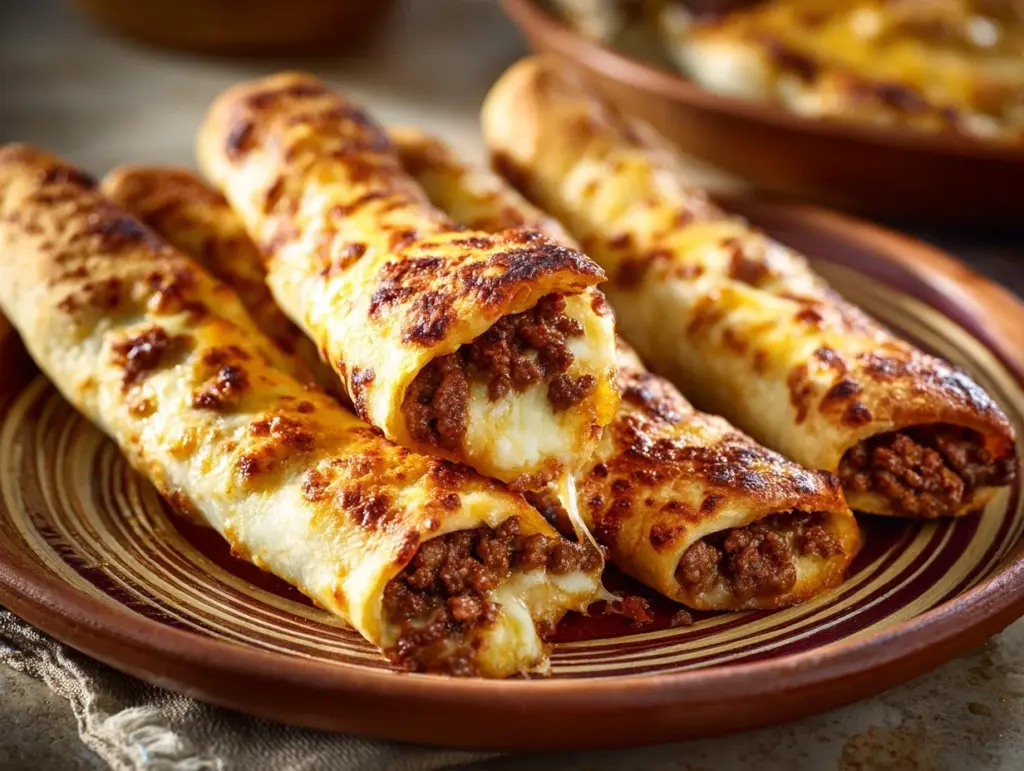
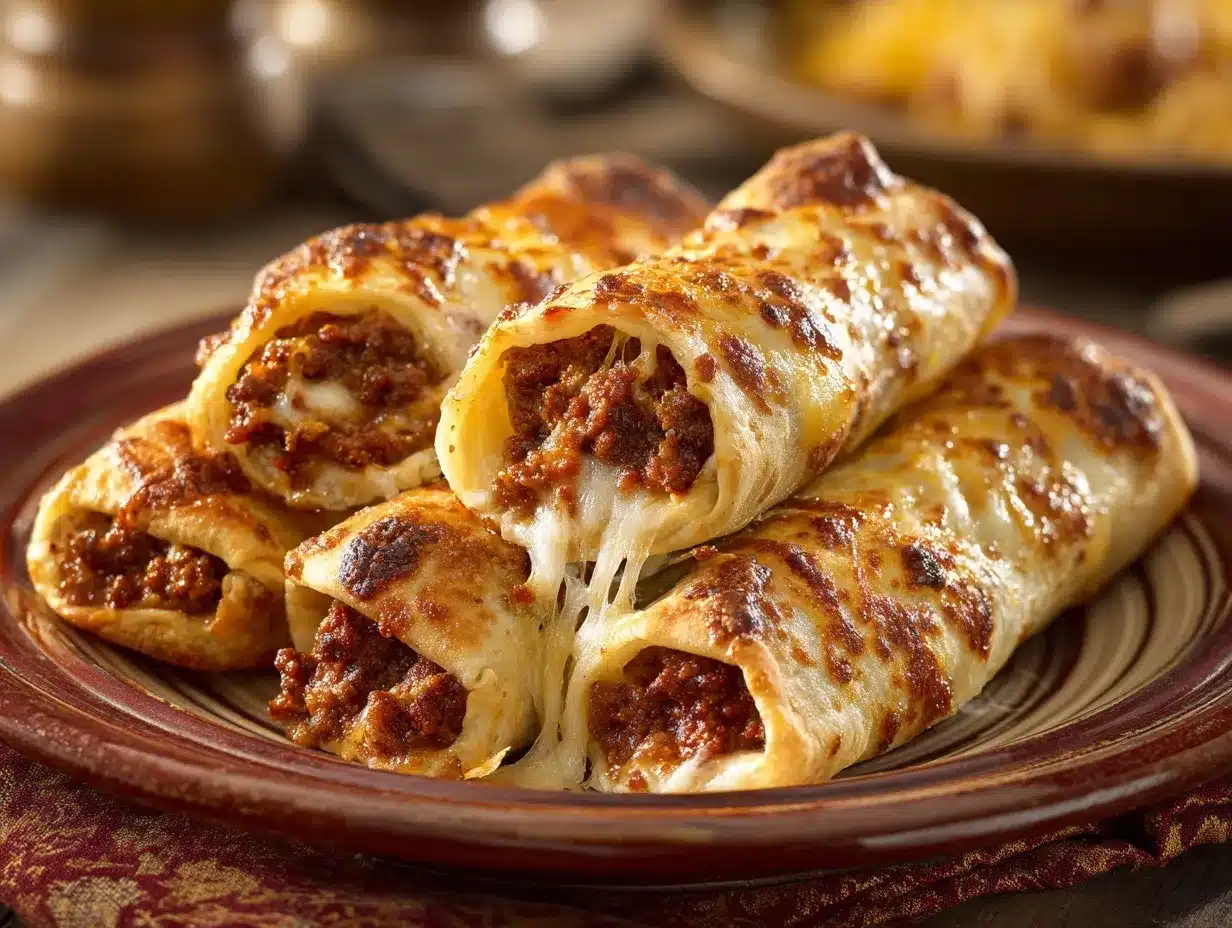
The first time I baked a batch of cheesy taco sticks, the aroma alone stopped everyone in their tracks—think sizzling taco meat, melty cheese, and golden bread, all in one bite. You know those snacks that disappear before you even get a chance to set the platter down? Yeah, that’s these. I stumbled onto the idea during a last-minute party panic, desperate for something more exciting than chips and salsa, but not so fussy I’d miss the fun.
Honestly, these cheesy taco sticks are the food equivalent of a party trick. They’re handheld, loaded with flavor, and gone in about as much time as it takes to make them. I’ve tweaked this recipe over the years—tried different cheeses, played with spice levels, even made a double batch for a family game night (spoiler: none left). There’s just something about the gooey cheese and savory taco filling wrapped up in warm, fluffy dough that brings people together.
If you’re craving a party appetizer that’s both easy and seriously irresistible, this cheesy taco sticks recipe is your new secret weapon. It’s the kind of crowd-pleaser that works for busy weeknights, tailgates, or anytime you want guests to ask for your “famous recipe.” Whether you’re feeding hungry teens, picky kids, or grown-ups who never outgrew taco night, these sticks deliver comfort and fun. As someone who’s tested more appetizers than I can count, trust me—cheesy taco sticks are always a hit. Let’s get rolling!
Why You’ll Love This Cheesy Taco Sticks Recipe
- Quick & Easy: Ready in just 30 minutes, these taco sticks are perfect for last-minute gatherings or when you don’t want to spend hours in the kitchen.
- Simple Ingredients: No specialty shopping trips needed—you probably have most of what you need in your pantry or fridge right now.
- Perfect for Parties: Handheld, dippable, and mess-free, they’re ideal for game day, potlucks, or any party where finger food rules.
- Crowd-Pleaser: I’ve never seen leftovers with these. Kids love them, adults ask for seconds, and they’re easy to customize if you’ve got picky eaters.
- Unbelievably Delicious: The combo of spiced beef, ooey-gooey cheese, and soft bread is just pure comfort. Every bite is a little fiesta!
What sets my cheesy taco sticks recipe apart? I use a special trick—rolling out the dough a bit thinner for extra crisp edges and blending two kinds of cheese for that irresistible pull. After several rounds of taste-testing (tough job, right?), I found that adding a little taco sauce inside keeps the filling moist and extra flavorful. I love that you can prep them ahead, freeze, and bake right before guests arrive—no stress.
Making these always reminds me of those cozy family nights when we’d crowd around the kitchen island, everyone reaching for another stick. There’s a reason these have become my go-to for celebrations and “just because” snacking. They’re the kind of comfort food that brings out the smiles—warm, cheesy, and totally satisfying. If you want to serve up something unforgettable (without a pile of dishes), cheesy taco sticks are the answer.
What Ingredients You Will Need
This cheesy taco sticks recipe uses straightforward, budget-friendly ingredients for maximum flavor. You’ll find most of these are pantry staples, and I’ve included tips for swapping things up if needed.
- For the Filling:
- Ground beef (1 pound / 450g, lean preferred for less grease)
- Taco seasoning (2 tablespoons, store-bought or homemade—adjust spice as you like)
- Water (1/4 cup / 60ml, to help blend the seasoning)
- Cream cheese (2 ounces / 56g, softened, for extra creaminess—optional but highly recommended!)
- Taco sauce or salsa (2 tablespoons, for moisture and tang)
- For the Cheese:
- Shredded cheddar cheese (1 cup / 113g, sharp for max flavor)
- Shredded mozzarella cheese (1/2 cup / 57g, for that stretchy, melty texture)
- (Optional) Pepper jack or Monterey Jack (swap in for a spicier kick)
- For the Dough:
- Refrigerated pizza dough (1 can, about 13.8 ounces / 390g, Pillsbury or similar)
- (Alternative) Crescent roll dough (for a flakier, buttery option)
- For Brushing:
- Butter (2 tablespoons / 28g, melted, for brushing)
- Garlic powder (1/2 teaspoon, to add a savory kick)
- Chopped fresh parsley (for garnish, optional)
- For Dipping:
- Sour cream
- Extra salsa or taco sauce
- Guacamole
A few notes: I love using Kraft or Tillamook cheddar for the best melt. If you’re gluten-free, grab a gluten-free pizza dough—works just as well. No beef? Ground turkey or chicken is a great swap. For vegetarians, try seasoned black beans and corn in place of the meat. Honestly, you can play around with the filling all day!
If you’re after a lighter version, use reduced-fat cheeses and leaner meats. And for big flavor, don’t skip the taco sauce—trust me, it makes a difference. You could even add chopped jalapeños or olives if you’re feeling adventurous. The ingredients are flexible, so don’t stress if you need to improvise.
Equipment Needed
- Baking Sheet: Standard size (13×18 inches) lined with parchment paper for easy cleanup.
- Rolling Pin: For gently flattening the dough. If you don’t have one, a clean wine bottle does the trick.
- Large Skillet: For browning the beef and mixing in the seasoning.
- Mixing Bowl: To combine the cheeses and filling.
- Pastry Brush: For brushing melted butter (a spoon works in a pinch).
- Sharp Knife or Pizza Cutter: For slicing dough into rectangles.
- Measuring Cups and Spoons: For accuracy—no guesswork here!
If you’re like me and sometimes misplace half your utensils, don’t worry. I’ve made these with just a skillet, my hands for rolling, and a butter knife for slicing. For easy cleanup, use parchment paper or a silicone baking mat—makes a huge difference. If your baking sheet is a little old (like mine), just add an extra layer of parchment to avoid sticking. And if you don’t own a pastry brush, fingers work just fine for the butter—messy, but fun!
Budget tip: Stick with basic kitchen tools—no need for anything fancy here. A nonstick skillet saves you cleanup time, too!
How to Make Cheesy Taco Sticks – Step-by-Step
-
Preheat & Prep:
Preheat your oven to 425°F (220°C). Line your baking sheet with parchment paper or a silicone mat to keep things nonstick and easy to clean. -
Cook the Taco Filling:
In a large skillet over medium-high heat, add 1 pound (450g) ground beef. Break it up with a spatula and cook until browned, about 5–7 minutes. If there’s excess grease, drain it off. -
Season & Creamify:
Stir in 2 tablespoons taco seasoning and 1/4 cup (60ml) water. Mix until the beef is evenly coated. Reduce heat to low and add 2 ounces (56g) cream cheese and 2 tablespoons taco sauce. Stir until the mixture is creamy and well blended—about 2 minutes. Remove from heat and let cool for 5 minutes (this keeps the dough from getting soggy). -
Prepare the Cheese:
In a bowl, combine 1 cup (113g) shredded cheddar and 1/2 cup (57g) mozzarella cheese. Set aside. If you like it spicy, mix in a little pepper jack. -
Roll Out the Dough:
Unroll your pizza dough on a lightly floured surface. Gently roll it out to about a 10×15-inch (25x38cm) rectangle. Use a pizza cutter or sharp knife to slice into 8 equal rectangles. -
Fill and Shape:
Spoon about 2 tablespoons of the taco filling onto the bottom third of each rectangle. Top with 2–3 tablespoons of cheese mixture. Fold the dough over the filling and pinch the seams tightly (I sometimes use a fork to crimp the edges). Roll gently into a log shape and place seam-side down on the baking sheet. -
Brush & Bake:
Melt 2 tablespoons (28g) butter in a small bowl. Stir in 1/2 teaspoon garlic powder. Brush each taco stick with the butter mixture for a golden, flavorful crust. -
Bake:
Bake for 12–15 minutes, or until the sticks are golden brown and the cheese is bubbling out the ends. If you notice uneven browning, rotate the baking sheet halfway through. -
Cool & Garnish:
Let them cool for about 5 minutes before serving (the cheese will be molten!). Sprinkle with chopped parsley if you want a pop of color. -
Serve:
Serve warm with sides of salsa, guacamole, and sour cream for dipping. Watch them vanish!
Troubleshooting: If your dough tears, just pinch it back together—nobody’s perfect. If your filling leaks out, that’s a sign you’ve overfilled (I still eat the messy ones). If you want crispier sticks, bake an extra 2 minutes.
Personal tip: Assemble ahead and refrigerate unbaked sticks for up to 8 hours. Bake just before serving for fresh, gooey results.
Cooking Tips & Techniques for Cheesy Taco Sticks
- Don’t Overstuff: I used to cram as much filling as possible, but then the sticks would burst. Stick to about 2 tablespoons filling and 2–3 tablespoons cheese per stick for the best result.
- Seal Tightly: Pinch the dough seams firmly—if they open up, the cheese will ooze out (which still tastes great but isn’t as neat). A fork is handy for extra sealing.
- Cool the Filling: Hot filling can make the dough soggy and tricky to work with. Let it cool for a few minutes before assembling.
- Spice to Taste: If you like it hot, add diced jalapeños or extra chili powder to the beef. For a milder version, stick with basic taco seasoning.
- Cheese Choices Matter: Pre-shredded cheese is convenient but hand-grated melts better and gives a richer flavor. If you’ve got time, grate your own.
- Batch Baking: If your oven runs cool, bake a few extra minutes for that deep golden color. If you’re making a double batch (highly recommended!), rotate trays for even browning.
- Keep It Simple: Don’t stress about perfect shapes—rustic is just as tasty. The first time I made these, some were lopsided and nobody cared.
- Reheat Like a Pro: Leftovers? Reheat in a toaster oven or air fryer at 350°F (175°C) for 5 minutes to keep the crust crisp.
Biggest lesson: Don’t walk away from the oven. These cook fast, and you want that cheese just bubbling—not burnt!
Variations & Adaptations
- Vegetarian: Swap the beef for a mix of seasoned black beans, corn, and diced bell peppers. Use the same cheesy filling for a meatless crowd-pleaser.
- Gluten-Free: Use gluten-free pizza dough or crescent dough (there are great store-bought options now!). All the flavor, none of the gluten.
- Spicy Southwest: Add pickled jalapeños, pepper jack cheese, and a sprinkle of chipotle powder to the filling for a smoky, spicy kick.
- Chicken Taco Sticks: Substitute ground chicken or shredded rotisserie chicken tossed in taco seasoning for a lighter twist.
- Breakfast Style: Try scrambled eggs, cooked sausage, and cheddar cheese for a brunch version. Dip in salsa for a morning treat!
I’ve tried the black bean and corn version for a vegetarian friend—honestly, it disappeared just as fast as the original. For picky eaters, stick to mild cheese and skip the salsa inside. You can also add chopped olives, green onions, or even swap in pulled pork for a BBQ spin. The options are kind of endless, so have fun with it!
Serving & Storage Suggestions
Serve cheesy taco sticks warm, straight from the oven, for the best gooey-cheese experience. Arrange them on a big platter with bowls of salsa, guac, and sour cream—people love to dip and mix.
They pair perfectly with crisp salads, tortilla chips, or a tangy corn salad if you want to round out your spread. For drinks, think iced tea, margaritas, or a cold beer.
- Storage: Store leftovers (good luck!) in an airtight container in the fridge for up to 3 days.
- Freezing: Freeze unbaked or baked sticks on a tray, then transfer to a freezer bag. Reheat from frozen at 350°F (175°C) for 10–12 minutes.
- Reheating: To keep the crust crisp, use an oven or toaster oven—not the microwave, unless you’re in a rush.
- Flavor Tip: The spices and cheese actually get more intense after a day, so leftovers are secretly awesome.
If you’re prepping for a party, assemble sticks the day before and bake fresh. They’ll taste like you spent all day in the kitchen (but you didn’t!).
Nutritional Information & Benefits
Each cheesy taco stick (based on 8 sticks per batch) has about 250 calories, 14g fat, 18g carbs, and 13g protein. These are estimates—your actual numbers may vary with ingredient brands and swaps.
Lean ground beef and cheese provide a good dose of protein, which helps keep you full at parties (no carb crashes here). If you use whole-grain or gluten-free dough, you’ll get more fiber. Subbing in turkey or beans cuts down on saturated fat and ups the nutrients.
Allergens include dairy, gluten, and possibly eggs (check your dough). For a lighter version, use low-fat cheese and lean meats. I love that you can tweak this recipe for almost any diet—easy, protein-packed, and totally satisfying.
Conclusion: Why Cheesy Taco Sticks Deserve a Spot at Your Next Party
If you’re looking for a party appetizer that’s easy, flavorful, and guaranteed to wow, cheesy taco sticks are the answer. They’re quick enough for busy nights, special enough for celebrations, and flexible for all your favorite flavors. I keep coming back to this recipe because it never lets me down—whether for game night, potlucks, or just a cozy family snack.
Don’t be afraid to make them your own—switch up the filling, try new cheeses, or even sneak in some veggies. I love seeing everyone dive in, smiles all around, and hearing “Can I get that recipe?” (best compliment ever).
Give these cheesy taco sticks a try, and let me know in the comments how you customized yours! If you snap a pic for Pinterest or Instagram, tag me—I’d love to see your party spread. Here’s to easy, cheesy, and unforgettable appetizers!
Frequently Asked Questions
Can I make cheesy taco sticks ahead of time?
Absolutely! Assemble them up to 8 hours ahead and store covered in the fridge. Bake just before serving for melty, fresh sticks.
What’s the best dough to use for taco sticks?
I like refrigerated pizza dough for its chewy texture, but crescent roll dough works for a flakier, buttery finish. Use gluten-free dough if needed.
Can I freeze taco sticks?
Yes! Freeze unbaked or baked sticks in a single layer, then transfer to a bag. Bake or reheat from frozen at 350°F (175°C) until hot and crisp.
How do I keep the filling from leaking out?
Don’t overfill, and pinch the seams tightly. If a little cheese escapes, no big deal—it’s still delicious!
Are cheesy taco sticks spicy?
They’re mild unless you add spicy cheese or extra chili. Adjust the taco seasoning and add jalapeños if you like heat, or stick with basics for a family-friendly snack.
PrintCheesy Taco Sticks

Cheesy Taco Sticks are a quick, crowd-pleasing party appetizer featuring spiced beef, gooey cheese, and golden pizza dough. Ready in just 30 minutes, they’re perfect for game day, potlucks, or family nights.
- Prep Time: 15 minutes
- Cook Time: 15 minutes
- Total Time: 30 minutes
- Yield: 8 taco sticks 1x
- Category: Appetizer
- Cuisine: Mexican-American
Ingredients
- 1 pound lean ground beef
- 2 tablespoons taco seasoning (store-bought or homemade)
- 1/4 cup water
- 2 ounces cream cheese, softened (optional but recommended)
- 2 tablespoons taco sauce or salsa
- 1 cup shredded cheddar cheese (sharp preferred)
- 1/2 cup shredded mozzarella cheese
- 1 can (13.8 ounces) refrigerated pizza dough (or crescent roll dough as alternative)
- 2 tablespoons butter, melted
- 1/2 teaspoon garlic powder
- Chopped fresh parsley (optional, for garnish)
- Sour cream (for dipping)
- Extra salsa or taco sauce (for dipping)
- Guacamole (for dipping)
Instructions
- Preheat oven to 425°F (220°C). Line a baking sheet with parchment paper or a silicone mat.
- In a large skillet over medium-high heat, cook ground beef until browned, about 5–7 minutes. Drain excess grease if needed.
- Stir in taco seasoning and water. Mix until beef is evenly coated. Reduce heat to low and add cream cheese and taco sauce. Stir until creamy and well blended, about 2 minutes. Remove from heat and let cool for 5 minutes.
- In a bowl, combine shredded cheddar and mozzarella cheese. Set aside.
- Unroll pizza dough on a lightly floured surface. Roll out to a 10×15-inch rectangle. Cut into 8 equal rectangles.
- Spoon about 2 tablespoons of taco filling onto the bottom third of each rectangle. Top with 2–3 tablespoons of cheese mixture.
- Fold dough over filling and pinch seams tightly. Roll gently into a log shape and place seam-side down on the baking sheet.
- Melt butter and stir in garlic powder. Brush each taco stick with the butter mixture.
- Bake for 12–15 minutes, or until golden brown and cheese is bubbling out the ends. Rotate baking sheet halfway through if needed.
- Let cool for 5 minutes before serving. Garnish with chopped parsley if desired.
- Serve warm with salsa, guacamole, and sour cream for dipping.
Notes
Don’t overfill the sticks to prevent bursting. Pinch seams tightly for best results. Filling can be made ahead and sticks can be assembled up to 8 hours in advance. For a vegetarian version, use seasoned black beans and corn. Use gluten-free dough if needed. Leftovers reheat best in a toaster oven or air fryer.
Nutrition
- Serving Size: 1 taco stick
- Calories: 250
- Sugar: 2
- Sodium: 550
- Fat: 14
- Saturated Fat: 7
- Carbohydrates: 18
- Fiber: 1
- Protein: 13
Keywords: cheesy taco sticks, party appetizer, taco sticks, easy appetizer, game day snacks, finger food, Mexican appetizer, pizza dough, beef taco sticks, cheese sticks