The first time I made Frankenstein Rice Crispy Treats, the kitchen looked like a mad scientist’s lab—green food coloring everywhere, chocolate melting in the microwave, and googly candy eyes peering at me from all angles. But you know what? It was totally worth it. There’s something magical about transforming a classic snack into a spooky, silly treat that kids (and adults!) can’t help but smile at. The chewy, gooey marshmallow rice crispy base, the pop of green, and those funny little faces—these treats practically scream Halloween fun.
Frankenstein Rice Crispy Treats have become my go-to for October parties and school events. They’re surprisingly easy, endlessly customizable, and, honestly, just plain adorable. Every year, as soon as the air gets crisp and pumpkin spice everything appears, I find myself reaching for the marshmallows and cereal. There’s a nostalgic comfort in the familiar flavors, but also a sense of playful creativity—like I’m getting away with edible arts and crafts!
What I love most is how these treats bring people together. Whether you’re making them with your kids, friends, or a group of rowdy teens, decorating each Frankenstein face becomes a laugh-filled memory. Plus, they’re safe for nut-free classrooms and easy to make gluten-free, so no one feels left out. After testing this recipe too many times to count (sometimes just for “quality control,” you know), I can promise you: these Frankenstein Rice Crispy Treats are the ultimate Halloween party snack. They’re sweet, soft, with a little crunch—and that monster-green color makes them totally Pinterest-worthy.
Why You’ll Love This Frankenstein Rice Crispy Treats Recipe
- Quick & No-Bake: These Frankenstein Rice Crispy Treats come together in about 20 minutes (plus a little time to set). Perfect for last-minute party prep or when you want something impressive without the oven drama.
- Simple Ingredients: No fancy, hard-to-find items here—just cereal, marshmallows, butter, chocolate, and a bit of food coloring. You probably have almost everything in your pantry right now!
- Perfect for Parties: These treats are a Halloween favorite. Stack them on a platter, and watch them disappear at classroom parties, neighborhood gatherings, or spooky movie nights.
- Kid-Friendly & Allergy-Conscious: Easy to make nut-free, and you can use gluten-free cereal if needed. It’s a treat everyone can enjoy without worry.
- Adorably Spooky: The bright green color, silly faces, and chocolate “hair” make these treats the star of any Halloween dessert table. They’re a guaranteed conversation starter!
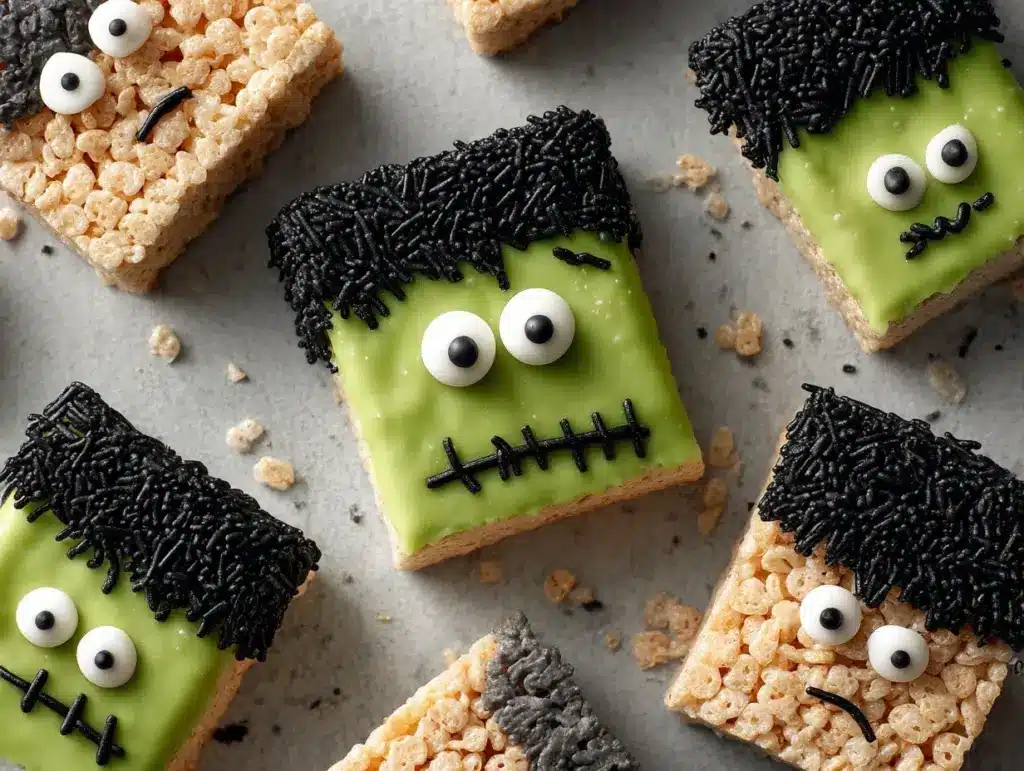
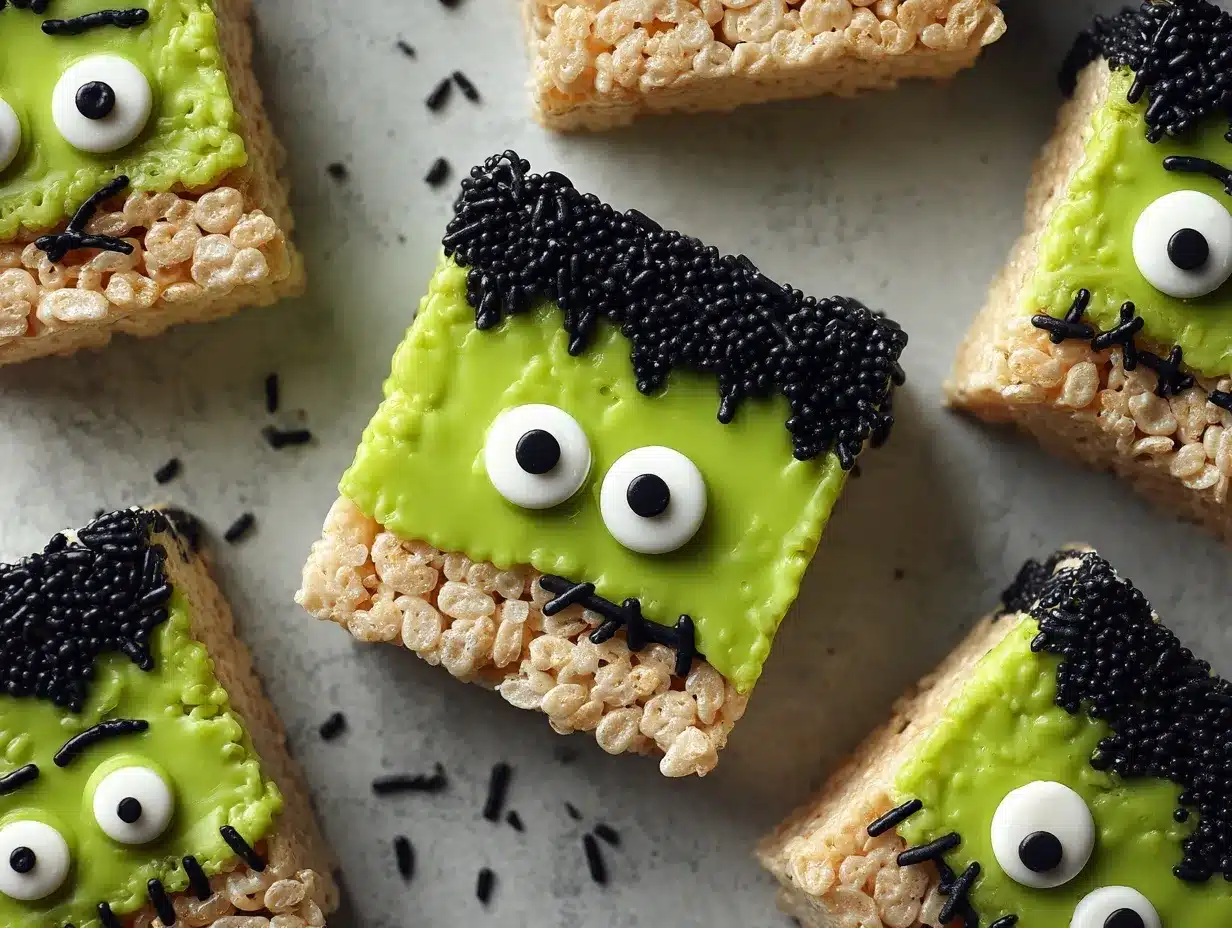
What truly sets this Frankenstein Rice Crispy Treats recipe apart is the way the classic rice crispy treat gets a ghoulish costume. I blend the marshmallows with just enough green coloring (gel works best for a vibrant pop), and use candy eyes and chocolate for faces. There’s no complicated sculpting or piping; you don’t need to be a cake artist to make these look fantastic. I’ve tested so many Halloween treats over the years, but few get the same wide-eyed, “Wow!” reaction as these. Plus, the soft, marshmallowy interior and crisp cereal crunch never fail to win over even the pickiest eaters.
Honestly, these treats are about more than just the flavor (though that’s awesome too). Making and sharing them feels like a mini celebration—an excuse to slow down, laugh, and get a little messy in the kitchen. If you’re looking for a Halloween snack that’s both easy and eye-catching, Frankenstein Rice Crispy Treats are your new monster muse.
What Ingredients You Will Need
This recipe uses everyday ingredients to create a batch of ghoulishly delicious Frankenstein Rice Crispy Treats. You’ll find most of these in your pantry or local store—no need to hunt for anything fancy. Here’s what you need:
- Unsalted Butter (1/4 cup, 56g): Gives the treats a rich, buttery flavor and helps melt the marshmallows smoothly.
- Mini Marshmallows (10 oz bag, 284g): The glue that binds everything together and gives that gooey, stretchy texture we all love. I prefer mini for easier melting, but large work in a pinch.
- Rice Crispy Cereal (6 cups, 150g): The classic base! Use your favorite brand; if you need gluten-free, go with a certified GF version.
- Green Food Coloring (about 1/4 teaspoon gel or 1-2 teaspoons liquid): Gel food coloring gives the brightest monster hue. Add a bit at a time until you get that perfect Frankenstein shade.
- Vanilla Extract (optional, 1/2 teaspoon): Adds a subtle, sweet aroma. Not essential, but I always add a splash for warmth.
- Semi-Sweet Chocolate Chips (1/2 cup, 85g): Melted for Frankenstein’s “hair” and mouth. If you only have chocolate bars, chop them up and melt gently.
- Black Decorating Gel or Icing (1 tube): For the stitches and bolts. You can use a piping bag or even a zip-top bag with a tiny snip in the corner.
- Candy Eyes (24 pieces): The finishing touch! You can find these in the baking aisle or make your own with white and black icing if you’re feeling crafty.
Ingredient Notes & Swaps:
- Dairy-Free: Use a plant-based butter and check that your marshmallows are vegan-friendly (not all are!).
- Marshmallows: If you only have large marshmallows, just chop them a bit before melting.
- Add-Ins: Stir in mini chocolate chips or crushed Oreos for a surprise inside.
- Flavor Boost: Add a pinch of salt or a few drops of almond extract for a twist.
I’ve tried a few different brands—Jet-Puffed marshmallows never let me down, and for the cereal, store brands work just as well as name brand. The decorating details are where you can get creative. Colored candies, sprinkles, and different types of chocolate all work for facial features. Don’t be afraid to use what you have; these treats are all about having fun!
Equipment Needed
- Large Pot or Dutch Oven: For melting butter and marshmallows. If you only have a medium saucepan, just stir gently and work in batches.
- Sturdy Mixing Spoon or Silicone Spatula: Nonstick is best, since the marshmallow mixture gets sticky.
- 9×13-inch Baking Pan (23x33cm): The classic size for thick, square treats. You can use an 8×8-inch (20x20cm) pan for taller monsters, but they’ll be harder to decorate.
- Parchment Paper or Nonstick Spray: To line your pan and make cleanup a breeze. I love parchment—no sticking, no mess.
- Microwave-Safe Bowl: For melting chocolate chips. If you don’t have a microwave, a heatproof bowl over simmering water works fine.
- Offset Spatula or Butter Knife: For spreading melted chocolate “hair.” A small spoon works too in a pinch.
- Piping Bag or Zip-Top Bag: For neat icing stitches and bolts. If you don’t have these, a toothpick dipped in icing can do the trick (just takes a bit longer).
Over the years, I’ve learned that a silicone spatula is a game-changer—marshmallow doesn’t stick much, and cleanup is so much easier. If your baking pan is old and scratched, line it well with parchment or foil (trust me, prying sticky treats off an old pan is not fun). For melting chocolate, I’ve used both the microwave and a double boiler—both work, but keep an eye on it so it doesn’t burn. If you’re making these with kids, set up a decorating station with all your tools in easy reach—less chaos, more fun!
Preparation Method
- Prep Your Pan: Line a 9×13-inch (23x33cm) baking pan with parchment paper or lightly coat with nonstick spray. Leave a bit of overhang if using parchment—it’ll help you lift the treats out later.
- Melt Butter: In a large pot over medium-low heat, melt 1/4 cup (56g) unsalted butter. Swirl the pan occasionally to prevent browning. This takes about 1-2 minutes.
- Add Marshmallows: Toss in 10 oz (284g) mini marshmallows. Stir constantly until melted and smooth—about 3-5 minutes. If you spot lumps, press them gently against the side of the pot.
- Add Green Food Coloring & Vanilla: Remove the pot from heat. Add your green food coloring (start with 1/4 teaspoon gel or 1-2 teaspoons liquid) and 1/2 teaspoon vanilla extract, if using. Stir well until the color is vibrant and even. Add more coloring if needed for a true Frankenstein green.
- Mix in Cereal: Pour in 6 cups (150g) rice crispy cereal. Stir quickly and gently, scraping from the bottom, until all the cereal is coated and no white spots remain. This takes a bit of muscle—work fast before it sets.
- Press Into Pan: Scrape the mixture into your prepared pan. Use a buttered spatula or wax paper to press it down evenly. Don’t press too hard or the treats will be dense. Aim for about 1-inch (2.5cm) thickness.
- Cool Completely: Let the treats set at room temperature for 30-45 minutes. If you’re in a hurry, pop them in the fridge for 15 minutes. They should feel firm and not sticky on top.
- Cut into Rectangles: Lift the slab out using parchment handles. Use a sharp, buttered knife to cut into rectangles (about 2×3 inches or 5×7.5cm) for classic Frankenstein faces.
- Melt Chocolate for Hair: In a microwave-safe bowl, melt 1/2 cup (85g) chocolate chips in 20-second bursts, stirring between each, until smooth. Let it cool slightly so it’s spreadable but not runny.
-
Decorate Frankenstein Faces:
- Dip or spread melted chocolate onto the top third of each rectangle for “hair.”
- Press two candy eyes below the chocolate hair.
- Use black decorating gel or icing to draw a mouth, stitches, and bolts on the neck.
Tip: If the chocolate drips, let it cool a bit longer, or work in a cooler spot.
- Set & Serve: Let the decorated treats set until the chocolate is firm (about 15 minutes at room temp, or 5 in the fridge).
If your mixture is sticking too much, dampen your hands with a little water or oil to press it in. For clean cuts, wipe your knife between slices. If your chocolate seizes, add a tiny bit of coconut oil and stir—it should smooth right out. And if your monsters look a little “derpy,” don’t stress—Frankenstein is supposed to be a little wonky!
Cooking Tips & Techniques
- Low & Slow: Don’t rush melting the butter and marshmallows. High heat can make them hard and chewy. Keep your heat medium-low for that perfect gooey texture.
- Coloring Technique: Add food coloring after melting for the brightest color. If you add it too soon, you might not see the true shade until you’re almost done.
- Pan Prep: Line your pan well or spray it generously. Stuck-on treats are the worst, especially when you’re excited to decorate!
- Work Fast: Once the cereal goes in, mix and press quickly. The mixture sets fast, especially in a cool kitchen.
- Chocolate Melting: Microwave in short bursts and stir often. Overheated chocolate gets lumpy. If it does, a drop of coconut oil or butter can help smooth things out.
I’ve definitely made the mistake of pressing the mixture too hard—those treats were so dense you could build a haunted house with them! Gentle pressing keeps them chewy. And don’t feel bad if your first few Frankensteins look a bit silly—each one has its own personality. If decorating with kids, set up bowls of candy eyes, sprinkles, and colored icing and let the creativity fly (just cover your surfaces, trust me). Lastly, let the chocolate set fully before stacking for parties, or you’ll have a monster mash on your hands—literally!
Variations & Adaptations
- Gluten-Free: Swap in certified gluten-free rice crispy cereal and check that your marshmallows are gluten-free. No one will know the difference!
- Dairy-Free/Vegan: Use plant-based butter and vegan marshmallows. Enjoy Life and Dandies brands work great. For the chocolate, go with a dairy-free version.
- Monster Mash-Up: Change up the faces—add fangs for vampires, orange coloring for pumpkins, or purple for little witches. Use different candies for eyes or mouths.
- Flavor Twists: Stir in a handful of mini chocolate chips, toasted coconut, or even a touch of pumpkin pie spice for a fall vibe.
- Shape It Up: Use cookie cutters to make round or heart-shaped monsters. Or, make mini treats using a muffin tin for bite-size Frankensteins.
- Personal Favorite: Sometimes I use dark chocolate and a sprinkle of sea salt for a grown-up version—still cute, but with a little “mad scientist” edge.
Don’t be afraid to experiment. I once ran out of candy eyes and used chocolate chips with a dab of white icing—no one noticed! If you’re making these for kids with allergies, double-check all your decorations. And if you’re feeling extra creative, let each guest decorate their own monster for a memorable party activity.
Serving & Storage Suggestions
Frankenstein Rice Crispy Treats are best served at room temperature, where they’re perfectly soft and chewy. Arrange them on a Halloween-themed platter or tuck them into cupcake liners for individual servings—they look super cute and stay neat for grab-and-go snacking.
If you want to make them ahead, these treats stay fresh for up to 3 days at room temp in an airtight container. To stack them, place a layer of wax or parchment paper between layers to keep the chocolate hair from sticking. For longer storage, pop them in the fridge—they’ll stay chewy for up to a week, but let them come to room temp before serving for the best texture.
You can also freeze undecorated treats for up to 2 months. Just thaw, then add the chocolate and decorations before your party. For a fun party platter, pair these with other Halloween snacks like pretzel “witch fingers” or pumpkin cupcakes, and serve with apple cider or hot cocoa for a cozy October treat. And honestly, these are great for lunchbox surprises, too—just wrap individually in plastic wrap and you’re all set!
Nutritional Information & Benefits
Each Frankenstein Rice Crispy Treat (based on 24 servings) is about 110 calories, with 2g fat, 22g carbs, and 1g protein. They’re nut-free and can be made gluten-free or dairy-free with simple swaps. Marshmallows and cereal mean these are definitely a treat, but they’re low in sodium and have no artificial preservatives if you use simple pantry brands.
Key benefits? These treats are allergy-friendly for most (nut-free, egg-free, and easy to adapt). The portion size is perfect for little hands, and—let’s be honest—the joy factor is off the charts. If you’re watching sugar, you can use a reduced-sugar cereal or try mini-sized bars. For me, these treats are about making memories, not stressing over macros. Just don’t forget to double-check labels for hidden allergens if serving to a crowd!
Conclusion
If you’re hunting for a Halloween snack that’s easy, festive, and guaranteed to get smiles, this Frankenstein Rice Crispy Treats recipe is it. With simple steps and everyday ingredients, you’ll have a tray of ghoulishly adorable bars ready for any spooky bash. Whether you stick to the classic look or dream up your own monster mash, these treats are a total win for parties, lunchboxes, or just a cozy night in with a scary movie.
Honestly, I look forward to making these every October—they never get old, and there’s always a new decorating idea to try. Don’t be afraid to play with colors, shapes, or even flavors. Your Frankensteins might look a little wild, but that’s half the fun! If you give this recipe a go, let me know in the comments how your monsters turned out. Share your twists and tag your creations—let’s see those spooky snacks come to life!
Happy Halloween and happy snacking—may your treats be sweet and your monsters friendly!
FAQs about Frankenstein Rice Crispy Treats
How far in advance can I make Frankenstein Rice Crispy Treats?
You can make them up to 3 days ahead. Store in an airtight container at room temperature for best texture.
Can I use regular marshmallows instead of mini?
Absolutely! Just chop them up a bit before melting so they melt evenly.
How do I prevent the treats from sticking to my hands or pan?
Lightly butter your hands or use wax paper to press the mixture into the pan. Parchment paper works wonders for lining the pan.
Can I freeze decorated Frankenstein Rice Crispy Treats?
It’s best to freeze them before decorating. Thaw, then add chocolate and candy eyes for the freshest look and taste.
What if I don’t have candy eyes?
No worries! Use chocolate chips with a dot of white icing or even mini M&Ms for eyes—your monsters will still look adorable.
Pin This Recipe!
Frankenstein Rice Crispy Treats

These Frankenstein Rice Crispy Treats are a fun, no-bake Halloween snack featuring gooey marshmallow rice crispy bars decorated with green food coloring, chocolate hair, and candy eyes. Perfect for parties, school events, or spooky movie nights, they’re allergy-friendly and easy to customize.
- Prep Time: 15 minutes
- Cook Time: 5 minutes
- Total Time: 45 minutes
- Yield: 24 treats 1x
- Category: Dessert
- Cuisine: American
Ingredients
- 1/4 cup (56g) unsalted butter
- 10 oz (284g) mini marshmallows
- 6 cups (150g) rice crispy cereal
- 1/4 teaspoon green gel food coloring (or 1–2 teaspoons liquid food coloring)
- 1/2 teaspoon vanilla extract (optional)
- 1/2 cup (85g) semi-sweet chocolate chips
- 1 tube black decorating gel or icing
- 24 candy eyes
Instructions
- Line a 9×13-inch baking pan with parchment paper or lightly coat with nonstick spray, leaving an overhang for easy removal.
- In a large pot over medium-low heat, melt the butter, swirling occasionally to prevent browning (about 1-2 minutes).
- Add the mini marshmallows and stir constantly until melted and smooth (about 3-5 minutes).
- Remove from heat. Add green food coloring and vanilla extract (if using), stirring until the color is vibrant and even.
- Pour in the rice crispy cereal and stir quickly and gently until all cereal is coated and no white spots remain.
- Scrape the mixture into the prepared pan. Use a buttered spatula or wax paper to press it down evenly to about 1-inch thickness. Do not press too hard.
- Let the treats set at room temperature for 30-45 minutes, or refrigerate for 15 minutes until firm and not sticky.
- Lift the slab out using parchment handles and cut into rectangles (about 2×3 inches) for Frankenstein faces.
- In a microwave-safe bowl, melt chocolate chips in 20-second bursts, stirring between each, until smooth. Let cool slightly.
- Dip or spread melted chocolate onto the top third of each rectangle for hair. Press two candy eyes below the chocolate hair. Use black decorating gel or icing to draw a mouth, stitches, and bolts.
- Let the decorated treats set until the chocolate is firm (about 15 minutes at room temperature or 5 minutes in the fridge). Serve and enjoy!
Notes
For gluten-free treats, use certified gluten-free rice crispy cereal and marshmallows. For dairy-free/vegan, use plant-based butter and vegan marshmallows. Press mixture gently for chewy bars. Let chocolate set fully before stacking. Decorate with any candies you have on hand—creativity encouraged! Store in an airtight container at room temperature for up to 3 days, or refrigerate for up to a week.
Nutrition
- Serving Size: 1 treat (1/24 of recipe)
- Calories: 110
- Sugar: 10
- Sodium: 60
- Fat: 2
- Saturated Fat: 1
- Carbohydrates: 22
- Protein: 1
Keywords: Frankenstein rice crispy treats, Halloween snacks, no-bake dessert, marshmallow treats, kid-friendly, party food, nut-free, gluten-free option, spooky treats, easy Halloween recipe


