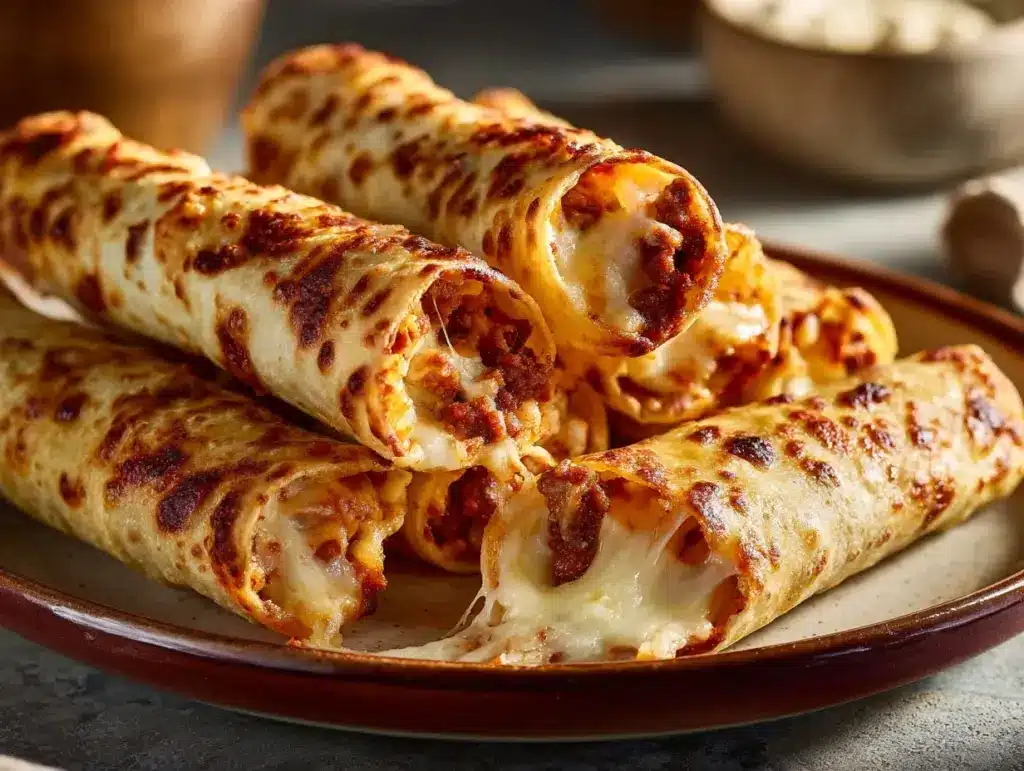
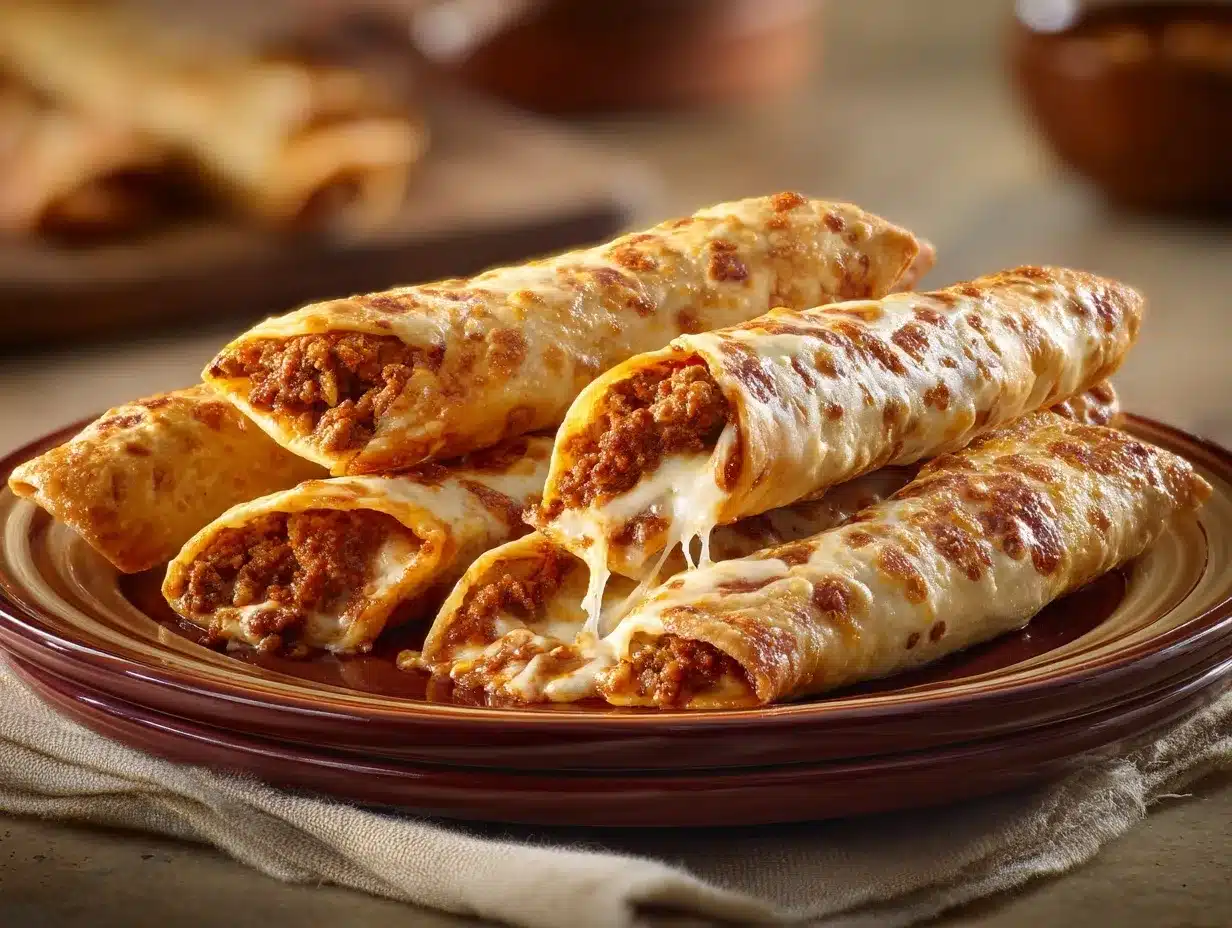
The sizzle of seasoned beef, the gooey stretch of melted cheese, and the golden crunch of fresh-baked bread—if that doesn’t make your mouth water, I’m not sure what will! I still remember the first time I whipped up these cheesy taco sticks for a last-minute game night. The kitchen smelled like a Tex-Mex dream, and every single stick disappeared before halftime. If you’re looking for a quick, fuss-free finger food that’s guaranteed to wow a hungry crowd, this is it.
I stumbled across the idea for cheesy taco sticks after a classic “what’s for dinner?” scramble—honestly, who hasn’t been there? With a pack of crescent roll dough, some leftover taco meat, and a block of cheddar, I improvised. The result? A snack that’s part taco, part breadstick, and totally addictive. It’s the kind of recipe you make once and then start craving weekly.
There’s something about cheesy taco sticks that hits the sweet spot between comfort food and party snack. They’re perfect for potlucks, family movie nights, or whenever you need to feed a crowd without breaking a sweat. Plus, they’re kid-approved, picky-eater friendly, and practically made for dipping. I’ve tested this recipe more times than I can count, tweaking the cheese blend, trying different meats, and even sneaking in veggies. No matter how you spin it, these cheesy taco sticks always steal the show.
If you’re after a recipe that’s easy, fun, and wildly delicious, look no further. Let’s get rolling—literally!
Why You’ll Love This Cheesy Taco Sticks Recipe
After years of feeding friends and family (and let’s be real, myself too) at everything from birthday parties to Super Bowl Sundays, I keep coming back to these cheesy taco sticks. Here’s why I think you’ll fall for them, too:
- Quick & Easy: These come together in about 30 minutes—no fancy kitchen tricks, just roll, fill, and bake. Perfect for busy weeknights or spontaneous gatherings.
- Simple Ingredients: You’re working with basic fridge and pantry staples—nothing you can’t find at any grocery store. I love that I can whip these up with whatever cheese or ground meat I have on hand.
- Perfect for Parties: Whether it’s game day, potluck, or a family get-together, these cheesy taco sticks are the first thing gone from the snack table. They’re easy to eat and even easier to double or triple for a crowd.
- Crowd-Pleaser: Kids, teens, adults—everyone loves these. Even my pickiest niece eats them without a single complaint (and that’s saying something!).
- Unbelievably Delicious: The combination of seasoned beef, gooey cheese, and soft bread is comfort food at its best. Add a side of salsa or ranch, and you’ll see what I mean.
What sets my cheesy taco sticks apart is a few little tricks I picked up: browning the beef with extra onion and taco seasoning for max flavor, using a blend of cheeses for the ultimate melt, and brushing the tops with garlic butter for that irresistible golden finish. They’re way more exciting than plain breadsticks, and you can tweak the fillings to suit your own taste.
Honestly, these are the kind of snacks that make you do a happy dance with every bite. They take all the best parts of taco night and turn them into a portable, dunkable treat. If you want a recipe that’s guaranteed to impress without causing stress, this is the one to bookmark!
What Ingredients You Will Need
This recipe uses simple, everyday ingredients to create bold, cheesy goodness in every bite. Most of them are pantry or fridge staples, and it’s super flexible if you need to swap or tweak. Here’s what you’ll need for these cheesy taco sticks:
- For the Filling:
- Ground beef (1 pound/450 g) – Lean is best, but use what you have. Ground turkey or chicken works, too.
- Yellow onion, finely diced (1 small) – Adds depth and a little sweetness.
- Taco seasoning (2 tablespoons/18 g) – Use your favorite brand or homemade. I’m partial to Old El Paso or Trader Joe’s blends.
- Water (1/4 cup/60 ml) – Helps the seasoning meld with the meat.
- Shredded cheese (1 1/2 cups/170 g) – Cheddar, Monterey Jack, or a Mexican blend all melt beautifully. I like to mix cheddar and pepper jack for a little kick.
- For the Dough:
- Refrigerated crescent roll dough (2 tubes, 8 oz/226 g each) – Pillsbury is my go-to, but store brand works in a pinch.
- For the Topping:
- Butter, melted (2 tablespoons/28 g) – For brushing on top.
- Garlic powder (1/2 teaspoon/2 g) – Optional, but it gives a tasty boost.
- Chopped fresh parsley or cilantro (for garnish) – Totally optional but looks so pretty.
- For Dipping (Optional, but highly encouraged):
- Salsa, ranch, or queso – Use your favorite for extra flavor.
Ingredient tips: If you’re short on time, you can use precooked taco meat or even leftover chili. Swap in ground turkey for a lighter version, or go vegetarian with black beans and corn. For gluten-free, try a gluten-free pizza dough. Don’t be afraid to play with the cheese—mozzarella, Colby Jack, or even a little cream cheese all work!
Equipment Needed
You don’t need anything fancy for cheesy taco sticks, which is part of the magic. Here’s what you’ll want to have ready:
- Baking sheet – Standard size (about 13×18 inches/33×46 cm) works well. Line with parchment for easy cleanup.
- Large skillet – For browning the beef and onions. Nonstick or cast iron is great.
- Mixing spoon or spatula – A wooden spoon or heatproof silicone spatula is perfect for breaking up the meat.
- Sharp knife or pizza cutter – For portioning the dough and slicing after baking if you want smaller sticks.
- Pastry brush – For brushing on that buttery garlic topping. If you don’t have one, use a spoon or folded paper towel.
- Parchment paper or silicone baking mat – Highly recommended for preventing sticking and easy cleanup.
If you’re working with a tight kitchen setup (been there), you can use a rimmed casserole dish instead of a baking sheet. I’ve even made these on an old cookie sheet lined with foil. Just make sure to grease well or use parchment so nothing sticks. And if you don’t have a pastry brush, a clean paper towel dipped in butter gets the job done! To keep your pans in good shape, don’t forget to soak them after use—cheesy bits come off way easier.
How to Make Cheesy Taco Sticks (Step-by-Step Method)
-
Preheat and Prep: Preheat your oven to 375°F (190°C). Line a baking sheet with parchment paper or a silicone baking mat for easy removal and cleanup.
Tip: If your oven runs hot or cold, use an oven thermometer for best results. -
Cook the Filling: In a large skillet over medium heat, add 1 pound (450 g) ground beef and 1 small diced onion. Cook, breaking up the meat, until beef is browned and onion is soft—about 6–8 minutes. Drain excess fat if needed.
Sensory cue: The beef should be crumbly and no longer pink; the onions will look translucent and smell sweet. -
Season the Meat: Sprinkle in 2 tablespoons (18 g) taco seasoning and pour in 1/4 cup (60 ml) water. Stir well and cook for another 2–3 minutes until everything is evenly coated and the mixture has thickened. Remove from heat and let cool for 5 minutes.
Troubleshooting: If the mixture looks too dry, add another splash of water; if too wet, let it simmer a bit longer. -
Prepare the Dough: Unroll the crescent roll dough onto a lightly floured surface. Pinch the seams together to create 2 large rectangles (one from each tube). Cut each rectangle into 4 equal strips, for a total of 8 strips per tube (16 strips total).
Note: If your dough feels sticky, dust with a little more flour. -
Fill and Roll: Spoon 1–2 tablespoons of the taco meat mixture along the center of each dough strip. Sprinkle generously with shredded cheese (about 1 1/2 cups/170 g total, divided). Fold the sides of the dough over the filling, pinching the seam and ends closed to seal. Place seam-side down on the prepared baking sheet.
Sensory cue: The sticks should look plump but not bursting; you want a tight seal to keep the cheese from leaking. -
Brush and Bake: Mix 2 tablespoons (28 g) melted butter with 1/2 teaspoon (2 g) garlic powder. Brush the tops of each stick with the garlic butter.
Personal tip: Don’t skip the butter—this is what gives that golden, appetizing finish! -
Bake: Bake in the preheated oven for 13–16 minutes, or until golden brown and puffed. Rotate the pan halfway through for even browning if your oven bakes unevenly.
Sensory cue: You’ll know they’re done when the tops are golden and you see a bit of cheese oozing out. -
Finish and Serve: Remove from the oven and let cool for 3–5 minutes. Sprinkle with chopped parsley or cilantro if desired. Serve warm with your favorite dips—salsa, ranch, or queso are all winners!
Warning: The filling will be hot right out of the oven—let them cool slightly before diving in!
These cheesy taco sticks are best enjoyed fresh, but I’ve stashed leftovers in the fridge for up to 3 days and they reheat beautifully. If you want to prep ahead, assemble the sticks, cover, and refrigerate up to 8 hours before baking. Just add a couple extra minutes to the bake time straight from the fridge.
Cooking Tips & Techniques for Cheesy Taco Sticks
After baking countless batches of cheesy taco sticks (sometimes two trays at once—no shame), I’ve picked up some tricks and learned a few lessons the hard way. Here are my best tips for taco stick success:
- Seal Them Well: Take the extra time to really pinch those seams and ends closed. I once rushed and ended up with a tray of “cheese volcanoes.” Delicious, but messy!
- Don’t Overfill: It’s tempting to load them up, but too much filling makes them hard to seal and more likely to burst. Stick to 1–2 tablespoons of meat and a generous pinch of cheese per stick.
- Even Sizing: Try to cut your dough strips as evenly as possible so everything bakes at the same rate. If you have one giant stick and one mini, the mini will be overdone while the big guy is still doughy.
- Cool the Filling: Let your taco meat cool for a few minutes before assembling. Hot filling can make the dough too soft and hard to handle.
- Cheese Matters: Use cheese that melts well—pre-shredded works, but shredding your own gives a creamier melt. A combo of cheddar and pepper jack is my favorite for flavor and stretch.
- Rotate the Pan: If your oven has hot spots (most do), rotate your pan halfway through baking for even browning.
- Batch Baking: If you’re making a double batch, bake one sheet at a time or swap the racks halfway through. Crowding the oven can lead to uneven baking.
One time, I tried stuffing in extra filling “for flavor,” and ended up with more on the baking sheet than in the sticks. Trust me—less is more here! And if you ever have little cracks in the dough, patch them up with leftover scraps. The garlic butter topping is what takes these from good to “can’t-stop-eating,” so don’t skip it!
Variations & Adaptations
The beauty of cheesy taco sticks is how easily you can tweak them to fit your cravings, dietary needs, or whatever’s in your fridge. Here are some of my favorite ways to switch things up:
- Vegetarian: Swap the ground beef for black beans, refried beans, or a mix of sautéed peppers, onions, and corn. You can even use plant-based crumbles—no one will miss the meat!
- Low-Carb/Keto: Use low-carb pizza dough (like Fathead dough) or even large flour tortillas instead of crescent rolls. The filling is naturally low-carb, so it’s an easy swap.
- Spicy: Add chopped jalapeños, a sprinkle of cayenne, or use pepper jack cheese for more heat. I once tossed in pickled jalapeños for a zippy twist—so good!
- Allergen-Friendly: For dairy-free, use your favorite plant-based cheese and dairy-free butter. For gluten-free, use gluten-free pizza or crescent roll dough (they’re easier to find these days!).
- Breakfast Twist: Fill with scrambled eggs, cooked sausage, and cheddar cheese for a breakfast taco stick. My family begs for these on lazy weekends.
I’ve even tried using leftover shredded chicken tossed in buffalo sauce—total crowd-pleaser! Don’t be afraid to get creative with what you have on hand. Cheesy taco sticks are super forgiving, so go ahead and make them your own.
Serving & Storage Suggestions
Serving: Cheesy taco sticks are best served warm, fresh from the oven. Arrange them on a platter with small bowls of salsa, guacamole, ranch, or queso for dipping. If you’re serving at a party, keep them on a warming tray or wrapped in foil to hold the heat.
Pair them with a crisp green salad, Mexican rice, or even a big bowl of tortilla chips and salsa for a fun meal. For drinks, I love serving them with sparkling water, iced tea, or a classic margarita if you’re feeling festive.
Storage: Leftovers (if you have any!) keep well in an airtight container in the fridge for up to 3 days. To freeze, wrap cooled taco sticks individually in foil and stash in a freezer bag. They’ll last for about 2 months. Reheat in a 350°F (175°C) oven for 8–10 minutes, or until warmed through; the microwave works in a pinch, but the bread will be softer.
Flavor note: The taco spices deepen as they sit, so leftovers are even tastier the next day. Just watch out for the cheese—it’ll be molten hot right after reheating!
Nutritional Information & Benefits
Each cheesy taco stick (based on a batch of 16) contains roughly 180 calories, 10g fat, 12g carbohydrates, and 9g protein. The protein comes mostly from the beef and cheese, making these a more filling appetizer than most breadsticks or chips.
Health benefits: Using lean ground beef or turkey keeps the saturated fat down, and you can sneak in extra veggies for a fiber boost. The cheese adds calcium and protein, while the option to add beans or veggies can make them even more nutritious.
These can be made gluten-free or dairy-free with the right ingredient swaps. If you have allergies, check labels on your dough and seasoning blends. I love that these sticks give you all the taco flavor and satisfaction in a fun, portion-controlled form—perfect for a balanced party spread!
Conclusion
Cheesy taco sticks are my go-to when I want something easy, crowd-pleasing, and just plain fun to eat. They deliver all the best parts of taco night—spiced meat, gooey cheese, warm bread—in a portable, shareable package. Whether you’re prepping for a party or just want a snack that’ll have everyone coming back for seconds, this recipe won’t let you down.
Don’t be shy about making them your own—try new fillings, up the spice, or experiment with different cheeses. That’s half the fun! I genuinely love seeing how these cheesy taco sticks bring people together and spark smiles around the table.
If you try this recipe, let me know in the comments! Got a secret filling or a wild dip to share? I’d love to hear your twist. Share your photos, pass along the recipe, and most of all—enjoy every cheesy, taco-filled bite!
Frequently Asked Questions
How do I keep the cheesy taco sticks from opening while baking?
Pinch the seams and ends tightly—don’t be afraid to press firmly! If the dough seems sticky, dust your fingers with flour. Laying them seam-side down also helps prevent leaks.
Can I make cheesy taco sticks ahead of time?
Yes! Assemble the sticks and refrigerate, covered, for up to 8 hours before baking. When ready, bake straight from the fridge, adding 2–3 minutes to the bake time if needed.
What’s the best cheese for cheesy taco sticks?
Cheddar, Monterey Jack, and Mexican cheese blends all melt well. I like mixing cheddar and pepper jack for flavor and stretch, but use what you enjoy most.
How do I make these cheesy taco sticks vegetarian?
Swap the ground beef for seasoned black beans, refried beans, or plant-based crumbles. Add sautéed veggies like peppers or mushrooms for extra flavor.
Can I freeze cheesy taco sticks?
Absolutely! Cool completely, wrap in foil, and freeze in a zip-top bag for up to 2 months. Reheat from frozen in a 350°F (175°C) oven for 12–15 minutes, or until hot and crispy.
Pin This Recipe!
Cheesy Taco Sticks

Cheesy taco sticks combine seasoned beef, gooey melted cheese, and golden crescent roll dough for an easy, crowd-pleasing appetizer. Perfect for parties, game nights, or family gatherings, these portable snacks are quick to make and irresistibly delicious.
- Prep Time: 15 minutes
- Cook Time: 15 minutes
- Total Time: 30 minutes
- Yield: 16 sticks (about 8 servings) 1x
- Category: Appetizer
- Cuisine: Tex-Mex
Ingredients
- 1 pound ground beef (lean preferred, or substitute ground turkey or chicken)
- 1 small yellow onion, finely diced
- 2 tablespoons taco seasoning
- 1/4 cup water
- 1 1/2 cups shredded cheese (cheddar, Monterey Jack, Mexican blend, or a mix)
- 2 tubes refrigerated crescent roll dough (8 oz each)
- 2 tablespoons butter, melted
- 1/2 teaspoon garlic powder (optional)
- Chopped fresh parsley or cilantro, for garnish (optional)
- Salsa, ranch, or queso, for dipping (optional)
Instructions
- Preheat your oven to 375°F (190°C). Line a baking sheet with parchment paper or a silicone baking mat.
- In a large skillet over medium heat, cook the ground beef and diced onion until the beef is browned and the onion is soft, about 6–8 minutes. Drain excess fat if needed.
- Add taco seasoning and water to the skillet. Stir well and cook for another 2–3 minutes until evenly coated and thickened. Remove from heat and let cool for 5 minutes.
- Unroll the crescent roll dough onto a lightly floured surface. Pinch seams together to create 2 large rectangles. Cut each rectangle into 4 equal strips, for a total of 8 strips per tube (16 strips total).
- Spoon 1–2 tablespoons of the taco meat mixture along the center of each dough strip. Sprinkle with shredded cheese. Fold the sides of the dough over the filling, pinching the seam and ends closed to seal. Place seam-side down on the prepared baking sheet.
- Mix melted butter with garlic powder. Brush the tops of each stick with the garlic butter.
- Bake for 13–16 minutes, or until golden brown and puffed. Rotate the pan halfway through for even browning.
- Remove from the oven and let cool for 3–5 minutes. Sprinkle with chopped parsley or cilantro if desired. Serve warm with your favorite dips.
Notes
Seal the dough well to prevent cheese leaks. Don’t overfill each stick—1–2 tablespoons of meat and a generous pinch of cheese is ideal. Let the filling cool before assembling to make the dough easier to handle. These can be made ahead and refrigerated before baking, or frozen after baking for up to 2 months. For gluten-free, use gluten-free dough; for vegetarian, substitute beans or plant-based crumbles for the meat.
Nutrition
- Serving Size: 1 stick
- Calories: 180
- Sugar: 2
- Sodium: 390
- Fat: 10
- Saturated Fat: 4
- Carbohydrates: 12
- Fiber: 1
- Protein: 9
Keywords: cheesy taco sticks, party appetizer, taco breadsticks, crescent roll snacks, easy finger food, game day snacks, Tex-Mex appetizer, kid friendly, crowd pleaser, cheese sticks