Introduction
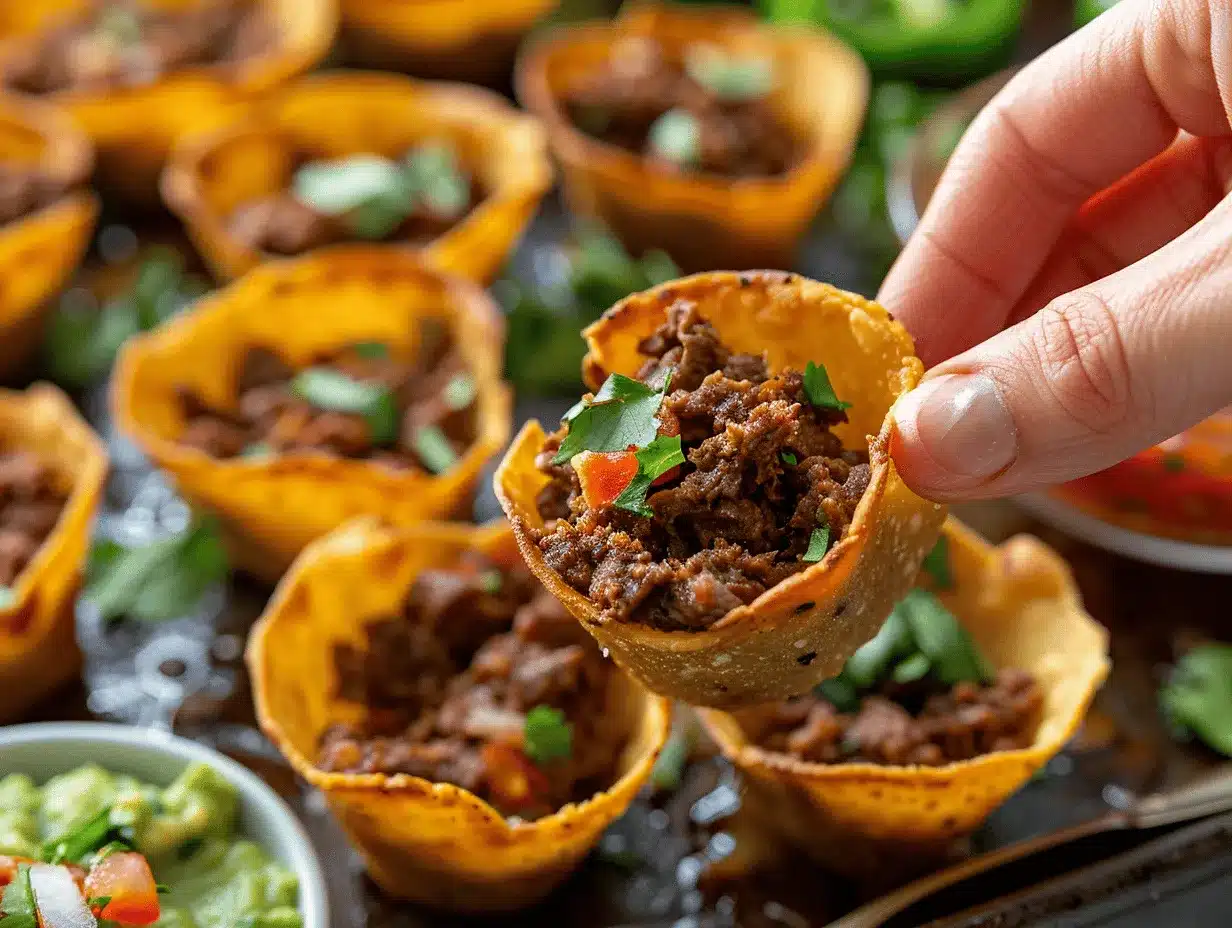
The first time I pulled a batch of crispy baked taco cups with beef and cheese out of my oven, my kitchen turned into a fiesta. The sizzling aroma of seasoned beef, bubbling cheese, and golden taco shells was downright intoxicating—honestly, my family hovered like hungry seagulls waiting for their chance to swoop in! You know how some recipes just look fun? These taco cups are the edible version of confetti: cute, poppable, and packed with flavor in every bite.
Let’s face it, sometimes classic tacos get a little messy (I’ve dropped my fair share of taco fillings onto the floor). That’s why I love this crispy baked taco cups recipe—it wraps everything up in a neat, crunchy package. I first tried making these for a game night and, after a few tweaks (extra cheese, less grease, and a secret spice blend), they became my go-to party snack. Even my picky kiddo asked for seconds, which is saying a lot!
Whether you’re hosting a birthday bash, planning a family movie night, or just craving something snacky and bold, these taco cups deliver big flavor with minimal effort. They’re loaded with juicy beef, gooey cheese, and all the taco goodness you crave—without the fuss. As someone who’s tested this recipe at least ten times (and eaten more cups than I care to admit), I can promise you: these crispy baked taco cups with beef and cheese are downright irresistible. And yes, you’ll want to pin this for your next party!
Why You’ll Love This Recipe
- Quick & Easy: Ready in under 35 minutes—perfect for last-minute get-togethers or weeknight cravings.
- Simple Ingredients: Nothing fancy here; you probably have everything on hand already (beef, cheese, tortillas, taco seasoning—the usual suspects).
- Perfect for Parties: These taco cups are the ultimate finger food for parties, potlucks, and game nights. No utensils, no mess, just pure deliciousness.
- Crowd-Pleaser: Kids and adults gobble these up every time. I’ve never had leftovers (and if you do, they reheat like a dream!).
- Unbelievably Delicious: Crunchy shells, savory beef, and melty cheese—this is comfort food with a twist. One bite and you’ll know what I mean.
What really sets these crispy baked taco cups with beef and cheese apart from basic tacos is the clever technique. Pressing tortillas into muffin tins gives you a crispy base that holds up to all sorts of toppings. I always blend my own taco seasoning (a little more cumin for warmth), and layering cheese under and over the beef makes every bite cheesy and satisfying. Plus, you can totally customize the toppings—think sour cream, salsa, jalapeños, or avocado.
Honestly, these taco cups are more than just tasty—they’re fun to make and eat. If you’re tired of the same old taco night, this recipe is a game changer. I love how it brings people together; there’s something about passing around a tray of crispy, golden cups that gets everyone excited. And if you’re like me and appreciate recipes that work every time, you’ll adore these—tested, tweaked, and approved by my toughest critics!
What Ingredients You Will Need
This recipe uses simple, wholesome ingredients to deliver bold flavor and a satisfying crunch without any fancy tricks. If you cook tacos regularly, you probably have most of these on hand—otherwise, they’re all easy to find and swap if needed.
- For the Taco Cups:
- 12 small flour tortillas (6-inch, or use corn for gluten-free option)
- 1 tablespoon olive oil (for brushing, adds extra crispiness)
- For the Beef Filling:
- 1 pound (450g) ground beef (I like 85% lean for juicy cups)
- 1 small onion, finely chopped (about 1/2 cup/80g)
- 2 cloves garlic, minced (for extra flavor)
- 2 tablespoons homemade or store-bought taco seasoning (see note below)
- 1/2 cup (120ml) tomato sauce (binds the filling, adds moisture)
- Salt and pepper to taste
- For the Cheese Layer:
- 1 1/2 cups (170g) shredded cheddar cheese (or Mexican blend, plus more for topping)
- Optional Toppings:
- Chopped fresh cilantro
- Diced tomatoes
- Shredded lettuce
- Sliced jalapeños
- Sour cream or Greek yogurt (for a protein boost)
- Avocado or guacamole
- Salsa or hot sauce
Ingredient Tips:
- For tortillas: If you want extra crispy cups, use flour tortillas and brush lightly with oil. For gluten-free, corn tortillas work, but they’re a bit more delicate—warm them first to make them pliable.
- Beef: If you prefer leaner beef, drain off excess fat after browning. Ground turkey or chicken is a tasty swap if you want a lighter version.
- Taco seasoning: You can use a packet, but I always mix my own—chili powder, cumin, paprika, garlic powder, onion powder, and a pinch of cayenne.
- Cheese: For gooey melt, cheddar is king. A Mexican blend or pepper jack adds a spicy kick.
- Add-ins: Sneak in black beans or corn for more texture (my family loves the surprise crunch!).
If you’re missing an ingredient, don’t worry. These crispy baked taco cups with beef and cheese are pretty forgiving—just keep the base and filling, and layer on whatever toppings you like.
Equipment Needed
- 12-cup muffin tin: This is crucial for shaping your taco cups. Standard size works best.
- Pastry brush: For brushing tortillas with oil. If you don’t have one, use a paper towel or your hands—it’s messy but works!
- Skillet: For browning the beef and building the filling. Nonstick or cast iron both do the job.
- Wooden spoon or spatula: For breaking up beef and stirring ingredients.
- Mixing bowls: For prepping toppings or mixing cheese.
- Measuring cups and spoons: For getting those seasoning ratios just right.
- Oven mitts: Trust me, those muffin tins get hot!
Alternatives & Tips:
- If you only have a 6-cup muffin tin, bake in batches—just keep the extra tortillas covered so they don’t dry out.
- For easy cleanup, line the muffin tin with paper muffin cups (though the edges won’t crisp up as much).
I’ve used everything from vintage muffin tins to silicone ones, and they all work. Just make sure to check for stuck-on cheese after baking—soak pans in warm water to help with clean-up. You don’t need fancy equipment; these taco cups are definitely beginner-friendly!
Preparation Method
- Preheat and Prep: Preheat your oven to 400°F (200°C). Lightly grease a 12-cup muffin tin or spray with nonstick spray.
- Prep the Tortillas: Using a pastry brush, lightly coat both sides of each tortilla with olive oil. Warm tortillas in the microwave for 15-20 seconds to make them pliable. Gently press each tortilla into the muffin tin cups, forming little bowls. If tortillas crack, just overlap the edges slightly—imperfections add character!
- Make the Beef Filling: Heat a large skillet over medium-high heat. Add ground beef and break it up with a wooden spoon. Cook for 4-5 minutes, until just browned. Add chopped onion and garlic; sauté for another 2 minutes until fragrant. Drain off excess fat if needed.
- Season the Beef: Sprinkle taco seasoning over the beef mixture and stir well. Pour in tomato sauce and mix until everything is coated. Simmer for 3-4 minutes, until most liquid has evaporated but mixture is still moist. Taste and add salt and pepper as needed.
- Layer the Cups: Sprinkle a little shredded cheese in the bottom of each tortilla cup (about 1 tablespoon/12g each). Spoon about 2 tablespoons (30g) beef mixture into each cup, pressing lightly to fill. Top with remaining cheese, dividing evenly.
- Bake: Place muffin tin on the center oven rack. Bake for 12-15 minutes, until cheese is melted and tortillas are golden and crisp around the edges. You should hear a little sizzle and smell that classic taco aroma.
- Cool and Top: Remove from oven and let cups cool in the tin for 5 minutes (they firm up as they cool). Use a spoon or small spatula to lift taco cups out—don’t worry if the edges are a little uneven.
- Add Toppings: Top each crispy baked taco cup with beef and cheese with your favorite extras: cilantro, tomatoes, lettuce, jalapeños, sour cream, avocado—go wild!
Troubleshooting:
- If your tortillas shrink during baking, press them back into the cups while warm.
- If the cheese browns too fast, tent the tin with foil for the last few minutes.
- For extra crunch, broil the cups for 1-2 minutes at the end (watch closely so they don’t burn!).
Personal tip: Prep fillings ahead and assemble just before baking to keep everything crisp and fresh. These taco cups are just as fun to make as they are to eat!
Cooking Tips & Techniques
After a few batches (and a couple of soggy cups), I picked up some tricks to make these crispy baked taco cups with beef and cheese foolproof. Here’s what I wish I’d known the first time:
- Don’t Overfill: If you stuff the cups to the brim, tortillas won’t crisp up and may tear. Stick to about 2 tablespoons of filling; it’s plenty! Trust me, less is more here.
- Cheese Under AND Over: Layering cheese on the bottom helps seal the tortilla and keeps beef juicy. A final sprinkle on top makes the cups golden and gooey.
- Warm Tortillas: Cold tortillas crack—always warm them a little before pressing into the muffin tin.
- Fat Matters: If using lean beef, don’t skip the tomato sauce for moisture. If your beef is fatty, drain it well or cups get greasy.
- Muffin Tin Placement: Bake on the center rack for even browning—too close to the top and edges may burn.
- Batch Prep: If you’re making more than 12 cups, prep the beef and cheese in advance. Tortillas can dry out, so wrap extras in a towel until ready to use.
One time, I forgot to brush oil on the tortillas—big mistake! They stuck to the tin and didn’t crisp up. Now I never skip that step. Also, if you get impatient and take them out of the oven too soon, the cups won’t hold their shape. Always let them cool for a few minutes in the tin (I learned that after a couple of taco cup collapses!).
For multitasking, prep toppings while the cups bake, and set up a little taco bar so everyone can customize their own. That way, you’re not scrambling—and everyone gets exactly what they want!
Variations & Adaptations
You can totally riff on these crispy baked taco cups with beef and cheese to suit your mood, dietary needs, or whatever’s in your fridge. Here are a few favorite tweaks:
- Dietary Swaps: Use ground turkey or chicken for a lighter version. For vegetarian, swap beef for black beans, corn, and diced bell peppers (my veggie friends rave about this combo!).
- Seasonal Flavors: In summer, add fire-roasted corn and diced zucchini to the beef. In winter, try smoked paprika and chipotle for a cozy kick.
- Cheese Choices: Pepper jack for heat, Monterey Jack for creaminess, or even crumbled queso fresco if you want some tang.
- Gluten-Free: Corn tortillas work, just be gentle when molding them—they’re a little more delicate.
- Alternative Cooking Methods: Air fryer fans, rejoice! Bake the cups in batches at 360°F (180°C) for 7-9 minutes. Crispier edges, but watch for burning.
- Custom Toppings: Set up a toppings bar—think pickled onions, hot sauces, mango salsa, or shredded lettuce. Let everyone personalize their taco cup (kids love this!).
- Personal Twist: Sometimes I add a thin layer of refried beans before the beef for extra heartiness. It makes the cups extra filling and gives them a creamy bite.
Allergen tip: For dairy-free, use vegan cheese shreds and skip the sour cream topping. If you have nut allergies, avoid adding nut-based cheese alternatives.
Bottom line: These taco cups are flexible, so don’t be afraid to experiment. It’s a great way to use up leftovers or cater to special diets without stress.
Serving & Storage Suggestions
These crispy baked taco cups with beef and cheese are best served hot, right out of the oven. The shells stay crisp and the cheese is wonderfully gooey. I like to arrange them on a big platter with toppings on the side so everyone can customize their own—think taco bar vibes!
Pair with a side of Mexican rice, chips and salsa, or a crisp green salad. For drinks, ice-cold lemonade or a tangy margarita (adults only!) completes the party mood. If you’re hosting brunch, these taco cups are a hit with scrambled eggs on the side.
Storage: Leftover cups can be cooled, then stored in an airtight container in the fridge for up to 3 days. For longer storage, freeze the cups (without toppings) on a tray, then transfer to a freezer bag—good for up to 2 months.
Reheating: Reheat in a 350°F (175°C) oven for 8-10 minutes, or pop in the air fryer for 3-4 minutes. Microwave works, but cups will soften (still tasty though!). If you want them extra crispy, heat uncovered and skip the microwave.
Flavor tip: The spices deepen after a day in the fridge—sometimes leftovers taste even better! Just add fresh toppings before serving to wake up the flavors.
Nutritional Information & Benefits
Each crispy baked taco cup with beef and cheese packs about 180 calories, 10g protein, 12g carbs, and 9g fat (estimate, will vary based on cheese and tortilla choices). A serving of two cups makes a filling snack or light meal.
Health Benefits: You get a good boost of protein from the beef and cheese. Swapping in lean meat or beans can cut down on saturated fat. Whole grain tortillas add fiber, and fresh toppings bring antioxidants and vitamins.
Dietary Considerations: Easy to adapt for gluten-free or dairy-free diets. If you have nut allergies, skip nut-based cheese alternatives. For low-carb, use low-carb wraps and lean ground meat.
From a wellness perspective, I love that you can sneak in veggies (like peppers or corn) and control the sodium by making your own taco seasoning. These cups are satisfying, portion-controlled, and fun—a win in my book!
Conclusion
If you’re looking for a party snack that’s easy, fun, and guaranteed to disappear fast, these crispy baked taco cups with beef and cheese are your answer. They’re crunchy, cheesy, and packed with savory flavor—seriously, they never last more than a few minutes at my house!
Don’t be afraid to mix things up with different fillings, cheeses, or toppings. Make these your own, and you’ll always have a crowd-pleaser ready to go. I keep coming back to this recipe because it’s stress-free and always brings people together (and let’s be real, I just love crispy, cheesy things!).
Give these taco cups a try and let me know how you make them your own—drop a comment below with your favorite flavor combos or share on Pinterest for your next celebration. Happy snacking, taco fans!
Frequently Asked Questions
Can I make these taco cups ahead of time?
Yes! Prep the beef filling and shape the tortillas in the muffin tin. Cover and refrigerate for up to 24 hours, then add cheese and bake when ready. They reheat well, too.
Can I freeze crispy baked taco cups with beef and cheese?
Definitely. Cool baked cups completely, freeze on a tray, then transfer to a freezer bag. Reheat in the oven or air fryer for best crispiness.
What tortillas work best for taco cups?
Flour tortillas crisp up nicely and hold their shape. Corn tortillas work for gluten-free, but warm them first and handle gently—they can crack.
How do I prevent taco cups from sticking to the muffin tin?
Brush or spray the tin lightly with oil and brush tortillas with oil. Let cups cool for a few minutes before lifting out with a spoon.
Can I make these vegetarian?
Absolutely! Swap the beef for black beans, corn, bell peppers, or crumbled tofu. Add your favorite spices and toppings for a delicious meat-free version.
Pin This Recipe!

Crispy Baked Taco Cups with Beef and Cheese

These crispy baked taco cups with beef and cheese are the ultimate party snack—crunchy, cheesy, and packed with savory taco flavor in every bite. Easy to make, customizable, and perfect for gatherings or family nights.
- Prep Time: 15 minutes
- Cook Time: 15 minutes
- Total Time: 30 minutes
- Yield: 12 taco cups (serves 4-6 as an appetizer or 3-4 as a meal) 1x
- Category: Appetizer
- Cuisine: Mexican-American
Ingredients
- 12 small flour tortillas (6-inch, or use corn for gluten-free option)
- 1 tablespoon olive oil (for brushing)
- 1 pound ground beef (85% lean recommended)
- 1 small onion, finely chopped (about 1/2 cup)
- 2 cloves garlic, minced
- 2 tablespoons taco seasoning (homemade or store-bought)
- 1/2 cup tomato sauce
- Salt and pepper to taste
- 1 1/2 cups shredded cheddar cheese (or Mexican blend, plus more for topping)
- Optional toppings: chopped fresh cilantro, diced tomatoes, shredded lettuce, sliced jalapeños, sour cream or Greek yogurt, avocado or guacamole, salsa or hot sauce
Instructions
- Preheat your oven to 400°F (200°C). Lightly grease a 12-cup muffin tin or spray with nonstick spray.
- Using a pastry brush, lightly coat both sides of each tortilla with olive oil. Warm tortillas in the microwave for 15-20 seconds to make them pliable. Gently press each tortilla into the muffin tin cups, forming little bowls.
- Heat a large skillet over medium-high heat. Add ground beef and break it up with a wooden spoon. Cook for 4-5 minutes, until just browned. Add chopped onion and garlic; sauté for another 2 minutes until fragrant. Drain off excess fat if needed.
- Sprinkle taco seasoning over the beef mixture and stir well. Pour in tomato sauce and mix until everything is coated. Simmer for 3-4 minutes, until most liquid has evaporated but mixture is still moist. Taste and add salt and pepper as needed.
- Sprinkle a little shredded cheese in the bottom of each tortilla cup (about 1 tablespoon each). Spoon about 2 tablespoons beef mixture into each cup, pressing lightly to fill. Top with remaining cheese, dividing evenly.
- Place muffin tin on the center oven rack. Bake for 12-15 minutes, until cheese is melted and tortillas are golden and crisp around the edges.
- Remove from oven and let cups cool in the tin for 5 minutes. Use a spoon or small spatula to lift taco cups out.
- Top each taco cup with your favorite extras: cilantro, tomatoes, lettuce, jalapeños, sour cream, avocado, salsa, or hot sauce.
Notes
For gluten-free, use corn tortillas and handle gently. For vegetarian, swap beef for black beans, corn, and bell peppers. Layer cheese under and over the beef for best results. Don’t overfill cups to ensure crispiness. Prep fillings ahead for easy assembly. Leftovers reheat well in the oven or air fryer.
Nutrition
- Serving Size: 2 taco cups
- Calories: 180
- Sugar: 1
- Sodium: 350
- Fat: 9
- Saturated Fat: 4
- Carbohydrates: 12
- Fiber: 1
- Protein: 10
Keywords: taco cups, baked tacos, party appetizer, beef taco cups, easy taco recipe, Mexican snack, finger food, game day, kid friendly, cheese, muffin tin tacos