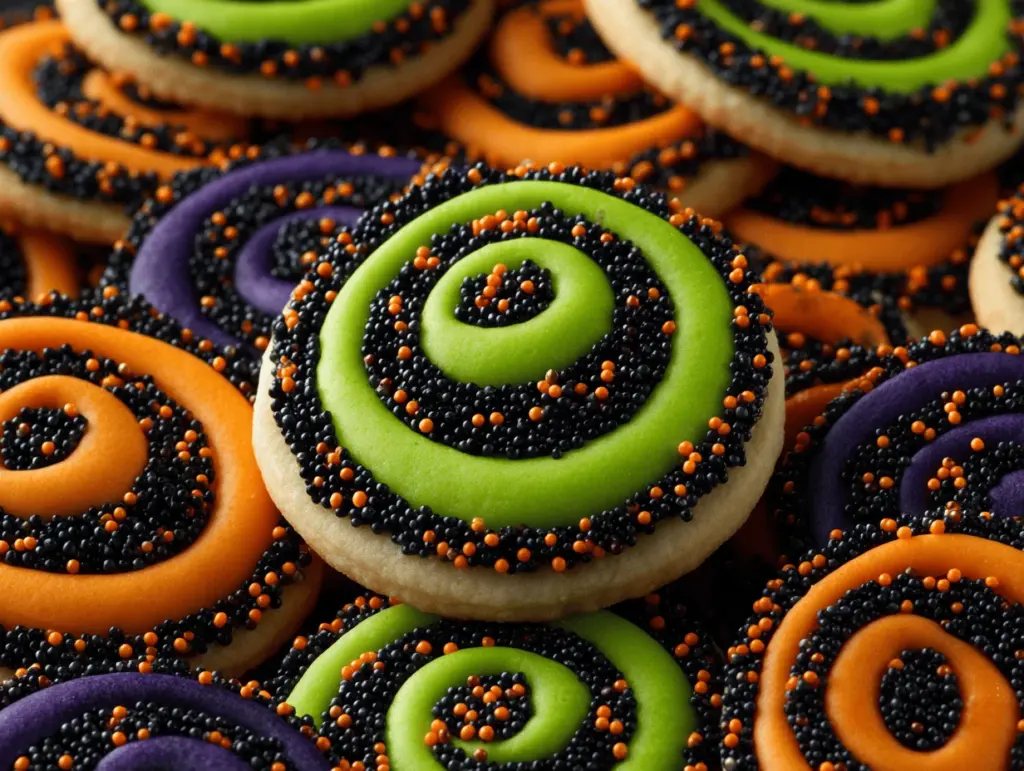
Bright orange, deep purple, and jet-black swirls—these mesmerizing Halloween swirl sugar cookies with sprinkle edges look like something straight out of a haunted bakery! The first time I made them, my kitchen was covered in a confetti explosion of sprinkles, and honestly, I didn’t mind one bit. There’s just something magical about swirling spooky colors together, then rolling the edges in crunchy, festive sprinkles that makes these cookies a must-bake every October.
I stumbled onto the idea for Halloween swirl sugar cookies one late night when I was determined to make something special for my kiddo’s class party. I wanted a treat that was easy to share, ridiculously cute, and fun to make together (without needing a pastry chef’s wizardry). After a few experimental batches—let’s just say, not every swirl was Pinterest-worthy at first—I discovered a simple technique that keeps the colors vibrant and the swirl pattern bold.
These cookies aren’t just a visual treat; they’re soft, buttery, and have that classic sugar cookie flavor you crave during the holidays. They’re perfect for busy parents who want something impressive without spending hours fussing over royal icing or piping bags. If you’re hosting a Halloween bash, looking for a classroom-safe snack, or just want to get festive at home, Halloween swirl sugar cookies with sprinkle edges are the answer. I’ve baked these dozens of times (sometimes with tiny hands “helping” and sprinkles everywhere), and they always disappear fast. Ready to swirl up some spooky magic?
Why You’ll Love This Recipe
- Quick & Easy: These Halloween swirl sugar cookies come together in about 35 minutes (plus chill time), so you can whip them up even on a busy weeknight.
- Simple Ingredients: Basic pantry staples—flour, butter, sugar, eggs—make up the dough. You’ll just need food coloring and festive sprinkles for the Halloween twist.
- Perfect for Parties: Seriously, these cookies are show-stoppers for Halloween gatherings, classroom parties, or even spooky family movie nights.
- Crowd-Pleaser: Kids (and adults!) go wild for the bright swirls and crunchy sprinkle edges. I’ve had more than one neighbor ask for the recipe after a single bite.
- Unbelievably Delicious: Soft, tender, and buttery, they have that classic sugar cookie taste but with a fun, festive upgrade.
What sets these apart? It’s all about the swirl technique. Unlike most decorated cookies, you don’t need to fuss with icing after baking. Instead, you roll out colored doughs, stack them, and roll them up like a log—slice, bake, and voila! The sprinkle edges add crunch and a pop of color that looks amazing in Halloween treat bags or on a cookie platter.
Let’s face it, Halloween baking is usually all about the looks, but these cookies deliver on flavor too. My family devours them as soon as they cool—I’ve even caught my partner sneaking a few before the party started. If you want a recipe that’s equal parts gorgeous, delicious, and totally doable, Halloween swirl sugar cookies with sprinkle edges are for you.
After testing this recipe with different color combos and sprinkles (glittery, neon, even skulls!), I can honestly say it’s foolproof and flexible. It’s the sort of treat that makes Halloween feel extra special every year.
What Ingredients You Will Need
This recipe uses simple, wholesome ingredients that create bold flavor and eye-catching texture—no fancy stuff, just classic baking staples with a Halloween twist. You’ll probably have most of these on hand already, and the few extras are easy to find at your local grocery store or craft shop.
- For the Cookie Dough:
- 2 3/4 cups (345g) all-purpose flour
- 1 teaspoon baking powder
- 1/2 teaspoon salt
- 1 cup (226g) unsalted butter, softened (let it sit out for at least 30 minutes)
- 1 1/4 cups (250g) granulated sugar
- 1 large egg, room temperature
- 2 teaspoons vanilla extract (I love Nielsen-Massey for its deep flavor)
- For the Swirl:
- Gel food coloring (black, orange, purple—gel gives the best vibrant color without watering down the dough)
- For the Sprinkle Edges:
- 1/2 cup (80g) Halloween-themed sprinkles (jimmies, nonpareils, or shaped sprinkles—Wilton or Sweetapolita brands are great)
Ingredient Tips:
- Butter: Always use unsalted for the best flavor control. If you only have salted, reduce the added salt by half.
- Food Coloring: Gel is best. Liquid food color can make the dough sticky and pale. Americolor and Wilton gel colors give vibrant results.
- Sprinkles: Choose jimmies or nonpareils for crunch. Shaped sprinkles (like skulls or pumpkins) look adorable but can melt a bit in the oven—still yummy.
- Flour: You can use a gluten-free 1:1 baking blend if needed—Bob’s Red Mill works well here.
If you want to mix things up, swap the vanilla for almond extract or use a dairy-free butter alternative. You can even use natural food color powders instead of gel for a “cleaner” version (though the color won’t be as bold). In a pinch, regular rainbow sprinkles work fine, but Halloween colors really make these cookies pop. Trust me, the right sprinkles make all the difference in the final look!
Equipment Needed
- Electric Mixer: Stand mixer or hand mixer—either works. I’ve made these by hand in a pinch, but mixing is easier and fluffier with a mixer.
- Mixing Bowls: Three medium-sized bowls for coloring dough.
- Rolling Pin: A must for getting even dough layers. If you don’t have one, a clean wine bottle works (yep, been there).
- Plastic Wrap: For chilling the dough and rolling it up tightly.
- Sharp Knife or Dough Cutter: For slicing the dough log into rounds. A serrated knife helps keep the swirls crisp.
- Baking Sheets & Parchment Paper: Parchment prevents sticking and helps cookies bake evenly.
- Small Bowls or Plates: For rolling the edges in sprinkles.
If you don’t have parchment, lightly grease your baking sheets. For chilling, I’ve used zip-top bags instead of plastic wrap, and it works okay if you seal tightly. Maintenance tip: Wash your rolling pin and bowls right after using food coloring so there’s no staining (learned that lesson the hard way!). Budget-friendly options like basic Wilton pans and off-brand mixers work just fine for this recipe—you don’t need to splurge.
Preparation Method

- Prep the Dry Ingredients (5 min): In a medium bowl, whisk together 2 3/4 cups (345g) flour, 1 teaspoon baking powder, and 1/2 teaspoon salt. Set aside.
- Cream Butter & Sugar (4 min): In a large bowl, beat 1 cup (226g) unsalted butter and 1 1/4 cups (250g) sugar until light and fluffy (about 3 minutes with mixer on medium). It should look pale and pillowy.
- Add Egg & Vanilla (2 min): Beat in 1 large egg and 2 teaspoons vanilla until fully combined. Scrape sides as needed.
- Mix in Dry Ingredients (3 min): Gradually add flour mixture to wet ingredients, mixing just until a soft dough forms. Don’t overmix—stop when no dry flour remains.
- Divide & Color Dough (10 min): Divide dough evenly into three bowls. Add gel food coloring (about 1/2 teaspoon per bowl) to make one orange, one purple, and one black. Use gloves if you don’t want colorful fingers! Mix until colors are vibrant and even.
- Roll Out Colored Doughs (10 min): On lightly floured parchment, roll each color into a rectangle about 1/4-inch (6mm) thick and 8×5 inches (20x13cm) in size. Try to keep edges straight, but don’t stress too much—imperfections add charm.
- Stack & Roll Swirl (5 min): Carefully stack the rectangles on top of each other (any order works, but I like orange on top). Trim edges for neatness if you wish. Roll up tightly into a log, starting from the shorter side, using the parchment to help lift and guide.
- Chill the Dough Log (30-60 min): Wrap the log in plastic wrap and refrigerate for at least 30 minutes (or up to overnight). Chilling helps hold the swirl and keeps slices clean.
- Slice & Add Sprinkles (10 min): Preheat oven to 350°F (175°C). Unwrap dough log and slice into 1/4-inch (6mm) rounds using a sharp knife. Pour sprinkles into a shallow bowl and gently roll the edges of each cookie in sprinkles, pressing lightly so they stick.
- Bake (10-12 min): Arrange cookies on lined baking sheets, spacing about 2 inches (5cm) apart. Bake for 10-12 minutes until edges are set and centers look dry but not browned.
- Cool & Enjoy: Let cookies cool on the pan for 5 minutes, then transfer to a wire rack. They’ll firm up as they cool.
Prep Notes: If dough cracks while rolling, just pinch and smooth with your fingers—no biggie! For extra neat swirls, chill rectangles for 10 minutes before stacking. If your sprinkles don’t stick, brush cookie edges with a touch of water or milk.
Efficiency tip: Make the dough and swirl log the night before, then slice and bake fresh for parties. The colors look best when the dough is fully chilled!
Cooking Tips & Techniques
Let’s talk cookie magic. The swirl technique can feel intimidating, but here’s what I’ve learned after a few “oops” moments:
- Dough Consistency: Soft but not sticky dough is key—if it’s too sticky, add 1 tablespoon flour at a time; too dry, mix in a teaspoon of milk.
- Color Vibrancy: Use gel colors, and don’t be shy! The dough looks much paler before baking, so aim for bold hues.
- Stacking Dough: If your rectangles aren’t perfect, just trim the edges after stacking. They’ll swirl beautifully anyway.
- Chilling: Chill the dough log well—overnight is best for defined swirls. If you rush, the colors can smear when slicing.
- Sprinkle Sticking: Roll edges as soon as you slice; if the dough is dry, a quick brush with water does the trick.
- Baking: Don’t overbake! The cookies should be just set on the edges and pale in the center. Overbaking makes them crunchy instead of soft.
- Multitasking: While the dough chills, prep your sprinkles and line baking sheets—makes assembly speedy.
Personal fail: The first time I tried this, I used liquid food color (hello, sticky mess). Lesson learned—stick with gel! Another time, I sliced the log too thin and ended up with crispy spirals. Now I always aim for 1/4-inch thick slices.
If you want perfectly round cookies, gently reshape each slice before baking. For super festive edges, use a mix of sprinkle types. Consistency tip: Weigh your flour for repeatable results—trust me, it makes a difference in texture!
Variations & Adaptations
- Gluten-Free Version: Use a 1:1 gluten-free flour blend (like Bob’s Red Mill) instead of all-purpose flour. The dough may be a tad softer, so chill longer before slicing.
- Flavor Twists: Swap vanilla for almond or orange extract for a zesty surprise. Add 1/2 teaspoon cinnamon to the dough for a “spiced” Halloween vibe.
- Vegan Adaptation: Use vegan butter and replace the egg with a flax egg (1 tablespoon flaxseed meal mixed with 2.5 tablespoons water, set for 5 minutes).
Cooking method switch: If you prefer crisper cookies, slice thinner and bake for 1-2 minutes longer. For softer cookies, slice thicker and check early.
Allergen swaps: Dairy-free butter works well, and you can use coconut oil (solid) in place of butter for a tropical hint. For nut allergies, skip almond extract and stick with vanilla.
Personal spin: I’ve tried using neon green instead of purple for a “monster” look and added candy eyes to each cookie after baking—huge hit with the kids! You can also use mini chocolate chips in the dough for bites of chocolatey surprise.
Serving & Storage Suggestions
Serve these Halloween swirl sugar cookies at room temperature for the best texture—they’re soft, tender, and the sprinkles stay crunchy. Arrange them on a Halloween-themed platter or pop them into treat bags with a spooky sticker for classroom parties.
Pair with hot cocoa or cider for a cozy dessert. They’re awesome alongside vanilla ice cream or a pumpkin spice latte (that’s my personal favorite combo!).
- Storage: Store cookies in an airtight container at room temperature for up to 5 days. They freeze well—wrap tightly and keep in the freezer for up to 2 months. Thaw at room temp for a few hours before serving.
- Reheating: To refresh, pop cookies in a 300°F (150°C) oven for 2-3 minutes. Sprinkles may soften a bit, but the flavor stays perfect.
- Flavor Development: The colors and taste are brightest on day one, but the cookies actually get a little softer and even tastier by day two!
If you’re gifting, layer with parchment between cookies to avoid color bleeding. These cookies hold their shape and swirl pattern so well—you’ll impress everyone with minimal fuss!
Nutritional Information & Benefits
Each Halloween swirl sugar cookie (based on 24 cookies per batch) contains approximately:
- Calories: 120
- Fat: 6g
- Carbs: 16g
- Protein: 1g
- Sugar: 8g
Health Benefits: Butter provides a bit of vitamin A, and using gel colors reduces extra additives compared to liquid ones. If you opt for gluten-free or vegan swaps, you can make these cookies fit most dietary needs.
Dietary Notes: The cookies are nut-free (unless you add almond extract), and can be made gluten-free or dairy-free. Sprinkles may contain soy or artificial colors—always check labels if allergies are a concern.
I love that these cookies are portion-controlled and not overly sweet, so they’re a treat that doesn’t feel heavy. They fit right into a balanced holiday routine!
Conclusion
Halloween swirl sugar cookies with sprinkle edges are the kind of treat that turns an ordinary October afternoon into a celebration. With bold colors, crunchy sprinkles, and that classic sugar cookie taste, they’re perfect for sharing, gifting, or just enjoying with a mug of cider by the window.
Don’t be afraid to play with colors, flavors, or sprinkle types—this recipe is all about fun and creativity. I look forward to baking these every year, especially with my family. They always bring a smile (and a few giggles when the sprinkles go flying!).
I’d love to hear how you make these cookies your own. Drop a comment below, share your photos, or tag me on social if you swirl up a batch. Happy haunting—and happy baking!
FAQs
Can I make Halloween swirl sugar cookies ahead of time?
Absolutely! You can prepare the dough log up to 2 days in advance. Just slice and bake when you’re ready.
What’s the best way to get vibrant colors in the swirl?
Gel food coloring works best. Use about 1/2 teaspoon per portion and mix thoroughly for bold colors.
Why do my sprinkles melt in the oven?
Some sprinkle types (like shaped sugars) melt a bit during baking. Nonpareils and jimmies hold up better. Roll edges right before baking for best results.
Can I freeze these cookies?
Yes! Freeze baked cookies in an airtight container for up to 2 months. Thaw at room temperature before serving.
What if I don’t have Halloween sprinkles?
No problem! Regular rainbow sprinkles work, or mix black, orange, and purple jimmies for a DIY Halloween look.
PrintHalloween Swirl Sugar Cookies
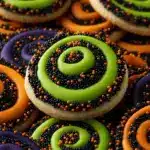
These Halloween swirl sugar cookies feature vibrant orange, purple, and black swirls with crunchy sprinkle edges. Soft, buttery, and easy to make, they’re a festive treat perfect for parties, gifting, or family baking fun.
- Prep Time: 25 minutes
- Cook Time: 12 minutes
- Total Time: 1 hour 15 minutes (includes chilling time)
- Yield: 24 cookies 1x
- Category: Dessert
- Cuisine: American
Ingredients
- 2 3/4 cups (345g) all-purpose flour
- 1 teaspoon baking powder
- 1/2 teaspoon salt
- 1 cup (226g) unsalted butter, softened
- 1 1/4 cups (250g) granulated sugar
- 1 large egg, room temperature
- 2 teaspoons vanilla extract
- Gel food coloring (black, orange, purple)
- 1/2 cup (80g) Halloween-themed sprinkles (jimmies, nonpareils, or shaped sprinkles)
Instructions
- In a medium bowl, whisk together flour, baking powder, and salt. Set aside.
- In a large bowl, beat unsalted butter and sugar until light and fluffy (about 3 minutes with mixer on medium).
- Beat in egg and vanilla extract until fully combined, scraping sides as needed.
- Gradually add flour mixture to wet ingredients, mixing just until a soft dough forms. Do not overmix.
- Divide dough evenly into three bowls. Add gel food coloring to each to make one orange, one purple, and one black. Mix until colors are vibrant and even.
- On lightly floured parchment, roll each colored dough into a rectangle about 1/4-inch thick and 8×5 inches in size.
- Stack the rectangles on top of each other. Trim edges if desired. Roll up tightly into a log, starting from the shorter side, using the parchment to help.
- Wrap the log in plastic wrap and refrigerate for at least 30 minutes (or up to overnight).
- Preheat oven to 350°F (175°C). Unwrap dough log and slice into 1/4-inch rounds using a sharp knife.
- Pour sprinkles into a shallow bowl and gently roll the edges of each cookie in sprinkles, pressing lightly so they stick.
- Arrange cookies on lined baking sheets, spacing about 2 inches apart. Bake for 10-12 minutes until edges are set and centers look dry but not browned.
- Let cookies cool on the pan for 5 minutes, then transfer to a wire rack to cool completely.
Notes
For best swirl definition, chill the dough log thoroughly before slicing. Use gel food coloring for vibrant colors. If sprinkles don’t stick, brush cookie edges with a little water or milk. Cookies can be made gluten-free or vegan with appropriate substitutions. Store in an airtight container for up to 5 days or freeze for up to 2 months.
Nutrition
- Serving Size: 1 cookie
- Calories: 120
- Sugar: 8
- Sodium: 55
- Fat: 6
- Saturated Fat: 4
- Carbohydrates: 16
- Protein: 1
Keywords: Halloween cookies, swirl sugar cookies, sprinkle edge cookies, Halloween dessert, easy sugar cookies, party cookies, festive cookies, kid-friendly baking