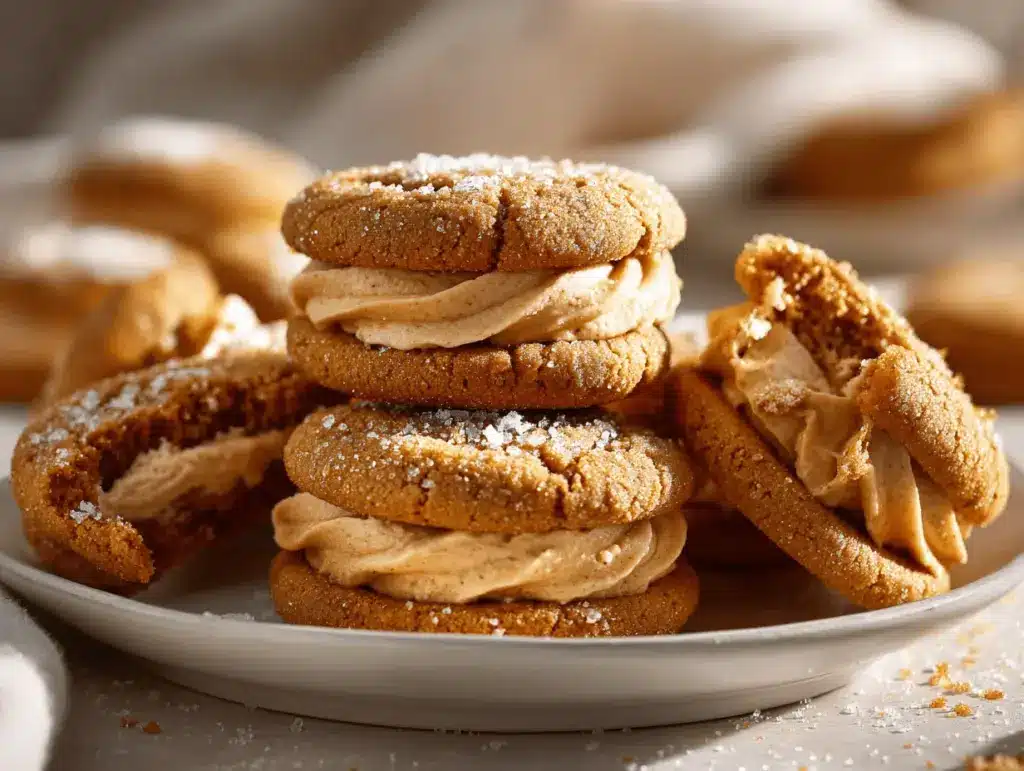
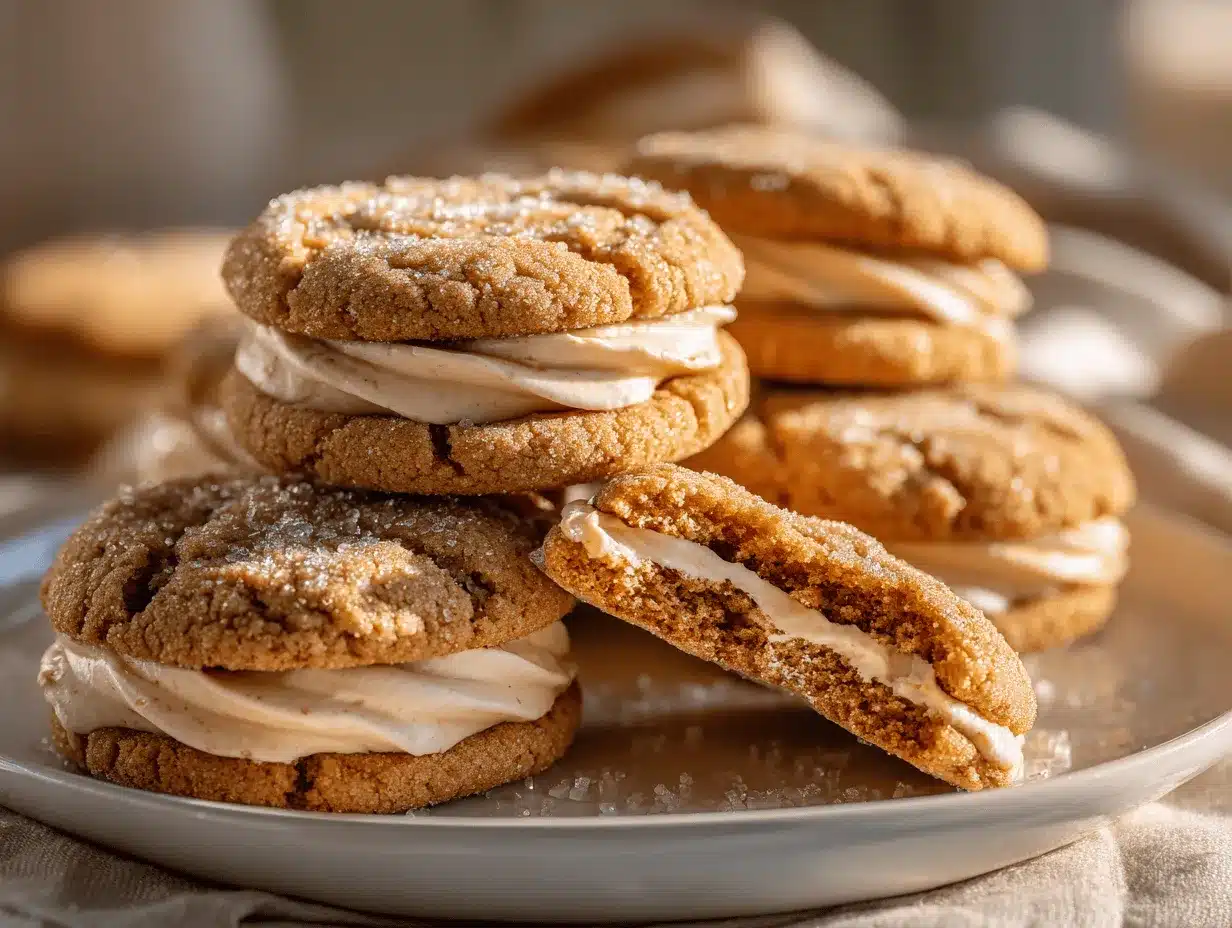
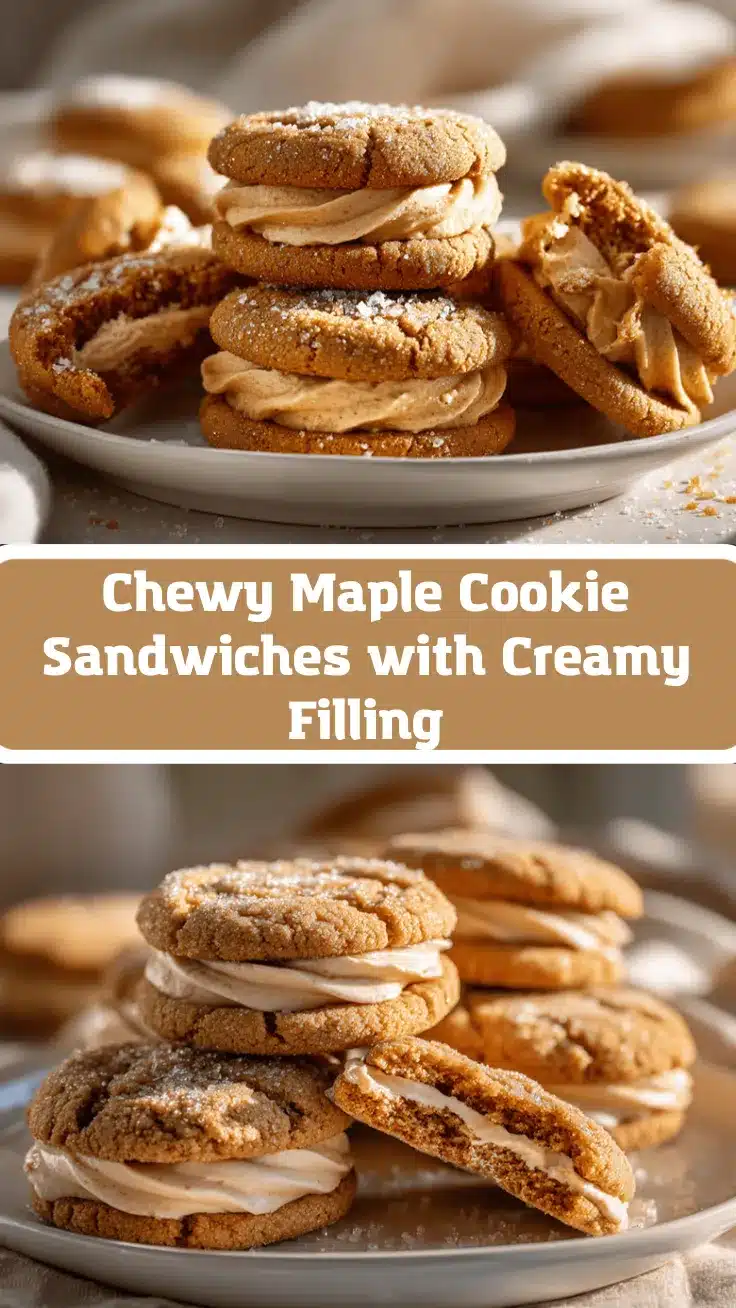
The scent of maple and brown sugar baking in my oven is one of those things that makes the whole house feel extra cozy. You know the kind of day—maybe it’s raining, maybe there’s music on, and you’re just in the mood for something that’s equal parts nostalgic and crazy good. That’s exactly what inspired these maple brown sugar cookie sandwiches with a maple cream filling. They’re chewy, sweet, and just a little bit decadent—basically everything I want in a cookie sandwich.
I first dreamed these up during a fall baking spree with my kids. We were on a mission to use up the giant jug of pure maple syrup I’d bought on a whim (because, let’s face it, who can resist those pretty glass bottles at the farmer’s market?). After a few test batches—some too crispy, some too soft—we finally hit the jackpot. The maple flavor in both the cookies and the filling is the real star here, balanced perfectly by that rich, caramel-y brown sugar. If you’re a fan of classic oatmeal cream pies or chewy snickerdoodles, these are going to feel like a grown-up upgrade.
Honestly, I bring these maple brown sugar cookie sandwiches to almost every gathering now. They’ve become my secret weapon for bake sales, holiday cookie swaps, and even “just because” treats. Not only are they easy to make with pantry staples, but they deliver major wow factor. If you love chewy cookies with a gooey, sweet filling, this recipe is about to become your new favorite. I’ve tested it more times than I can count—and I promise, it never disappoints.
Why You’ll Love This Maple Brown Sugar Cookie Sandwich Recipe
- Chewy and Soft: These cookies have the perfect texture—crisp edges, chewy middles, and a soft bite that holds up to the creamy filling. No dry, crumbly cookies here!
- Rich Maple Flavor: Pure maple syrup is the backbone of both the cookies and the filling, so every bite is packed with that signature warmth and sweetness. It’s not just a hint—it’s the main event.
- Simple Pantry Ingredients: You probably already have everything you need: flour, brown sugar, butter, eggs, pure maple syrup, and a few baking basics. No specialty shopping required.
- Perfect for All Occasions: Whether you’re looking for a show-stopping dessert for Thanksgiving, a fun weekend baking project, or a sweet surprise for a cozy night in, these cookie sandwiches fit the bill.
- Family (and Crowd) Approved: Kids go wild for the creamy maple filling, and adults always ask for the recipe. I’ve had friends text me for it after just one bite—it’s that good.
- Easy to Customize: The cookies are delicious on their own, but the maple cream filling takes them to the next level. You can even switch up the filling if you’re feeling creative (more on that later!).
What sets these maple brown sugar cookie sandwiches apart from other cookie recipes? It’s the blend of pure maple syrup and dark brown sugar, which gives a deep, natural sweetness without being cloying. I use a trick I learned in professional kitchens: letting the dough rest for a bit before baking so the flavors meld. Plus, whipping the filling with real maple syrup guarantees a silky, not-too-sweet cream that won’t ooze out the sides (because, trust me, I’ve had my fair share of messy sandwiches). There’s just something special about these cookies—they’re familiar, but with a twist that makes people stop and savor. That’s why they’ve earned a permanent spot in my recipe box.
What Ingredients You Will Need
This recipe uses a handful of simple, wholesome ingredients to deliver bold flavor and that perfect chewy texture. Here’s what you’ll need for both the cookies and the irresistible maple cream filling:
For the Maple Brown Sugar Cookies:
- All-Purpose Flour (2 1/4 cups or 280g) – The foundation for structure; unbleached is my go-to for the best crumb.
- Baking Soda (1/2 teaspoon) – Gives the cookies just enough lift without making them cakey.
- Salt (1/2 teaspoon) – Balances out the sweetness and boosts flavor.
- Unsalted Butter (3/4 cup or 170g, softened) – For that rich, buttery taste and tender texture. (Use plant-based butter for a dairy-free swap.)
- Dark Brown Sugar (1 cup or 200g, packed) – Adds deep caramel notes and moisture.
- Pure Maple Syrup (1/3 cup or 80ml) – The star ingredient! Go for grade A for a lighter flavor, or grade B for intense maple.
- Large Egg (1, room temperature) – Binds everything together.
- Vanilla Extract (2 teaspoons) – Rounds out and deepens the maple goodness.
For the Maple Cream Filling:
- Unsalted Butter (1/2 cup or 115g, softened) – The creamy base. (Vegan butter works too!)
- Powdered Sugar (2 cups or 240g, sifted) – For a fluffy, smooth texture.
- Pure Maple Syrup (3 tablespoons or 45ml) – Infuses the cream with rich maple flavor.
- Heavy Cream or Milk (1-2 tablespoons or 15-30ml) – Adjusts consistency; use plant milk for dairy-free.
- Pinch of Salt – Keeps the filling from being too sweet.
Ingredient Tips:
- Butter: I always use unsalted so I can control the salt level. If you only have salted, just skip the added salt.
- Maple Syrup: Real maple syrup makes all the difference—skip the “pancake syrup” blends. Trader Joe’s and Costco have great, budget-friendly options.
- Flour: Spoon and level your flour for the most accurate measurement. Too much flour can make the cookies dry!
- Egg: Room temperature eggs incorporate more smoothly. If you forget, just pop your egg in a bowl of warm water for 5 minutes.
- Substitutions: Gluten-free flour blends (1:1) work well; I’ve had good results with King Arthur Measure for Measure. For a nutty twist, swap 1/4 cup (30g) of flour for finely ground pecans.
Equipment Needed
You don’t need a fancy kitchen to whip up these maple brown sugar cookie sandwiches. Here’s what I use every time:
- Stand Mixer or Hand Mixer: For creaming butter and sugar. Hand mixing works in a pinch, but your arm might get tired—I’ve been there!
- Mixing Bowls: At least two—one for wet, one for dry ingredients.
- Baking Sheets: Heavy-duty, rimmed sheets help bake cookies evenly. If you only have thin pans, double them up to prevent over-browning.
- Parchment Paper or Silicone Baking Mats: Keeps cookies from sticking and makes cleanup easy.
- Measuring Cups and Spoons: For accuracy—especially with flour and maple syrup.
- Cookie Scoop (Optional): Helps portion dough evenly for uniform cookies. A tablespoon works fine if you don’t have one.
- Wire Cooling Rack: To cool cookies quickly and prevent sogginess on the bottom.
- Spatula: For transferring cookies and scraping bowls clean.
- Offset Spatula or Butter Knife: For spreading the maple cream filling smoothly.
Personal Tip: I’ve made these cookies with both a stand mixer and a $10 hand mixer from my college days—they both work! If you use silicone mats, just remember to wash them well between batches so no flavors linger. And if you’re shopping on a budget, check thrift stores for sturdy baking sheets. They last forever with a little care.
How To Make Maple Brown Sugar Cookie Sandwiches
-
Prep the Oven and Pans:
Preheat your oven to 350°F (175°C). Line two baking sheets with parchment paper or silicone baking mats. (Trust me, this saves you from stuck-on cookies and makes for easy cleanup.) -
Mix the Dry Ingredients:
In a medium bowl, whisk together 2 1/4 cups (280g) all-purpose flour, 1/2 teaspoon baking soda, and 1/2 teaspoon salt. Set aside. If you’re using a gluten-free flour blend, sift it well to prevent lumps. -
Cream the Butter and Sugar:
In the bowl of a stand mixer (or using a hand mixer), beat 3/4 cup (170g) softened unsalted butter and 1 cup (200g) dark brown sugar on medium speed for 2-3 minutes, until light and fluffy. Don’t rush this step—creaming adds air and makes the cookies chewy! -
Add Wet Ingredients:
Scrape down the bowl, then mix in 1/3 cup (80ml) pure maple syrup, 1 large egg (room temperature), and 2 teaspoons vanilla extract. Beat until smooth and well combined. The dough will look glossy at this stage. -
Combine Wet and Dry:
Gradually add the flour mixture to the wet ingredients, mixing on low just until no streaks of flour remain. Don’t overmix—overworking the dough can make cookies tough. -
Let Dough Rest (Optional but Recommended):
For the best flavor and texture, let the dough rest for 20-30 minutes at room temperature. This helps the flour hydrate and the flavors develop. If you’re in a hurry, you can skip it, but I always notice a difference. -
Scoop and Bake:
Using a medium cookie scoop or tablespoon, drop dough onto the prepared sheets, spacing 2 inches apart. Bake for 9-11 minutes, rotating pans halfway through. Cookies should be golden at the edges and set in the middle (they’ll look slightly underbaked—that’s perfect!). -
Cool Completely:
Let cookies cool on the sheet for 5 minutes, then transfer to a wire rack. Cool completely before filling, or the cream will melt and slide right off (ask me how I know!). -
Make the Maple Cream Filling:
Beat 1/2 cup (115g) unsalted butter until smooth. Add 2 cups (240g) powdered sugar (sifted), 3 tablespoons (45ml) pure maple syrup, and a pinch of salt. Beat on low until combined, then on high for 1-2 minutes until fluffy. Add 1-2 tablespoons (15-30ml) heavy cream or milk for a spreadable consistency. The filling should be thick but not stiff. -
Assemble the Sandwiches:
Pair cookies by size. Spread (or pipe) about 2 tablespoons of maple cream onto the flat side of one cookie, then gently sandwich with a second cookie. Press lightly so the filling reaches the edges. -
Set and Serve:
Let sandwiches sit for 10-15 minutes to set. This helps the cream thicken and makes them easier to eat (and less messy for little hands!).
Troubleshooting: If your dough is too sticky, chill it in the fridge for 15 minutes. If cookies spread too much, check your oven temperature (an oven thermometer is a lifesaver here!). If the filling feels runny, add more powdered sugar 1 tablespoon at a time. And don’t worry if your cookies aren’t all perfectly round—once they’re sandwiched, nobody will notice!
Cooking Tips & Techniques
After making these maple brown sugar cookie sandwiches more times than I can count, I’ve picked up a few tricks that make all the difference:
- Don’t Overbake: The cookies should look a little soft in the center when you pull them out. They’ll firm up as they cool. If you wait until they look done in the oven, they’ll be crunchy instead of chewy.
- Room Temperature Ingredients: It sounds fussy, but using room temp butter and eggs helps everything blend smoothly. Cold butter can leave chunks, and cold eggs can make the dough seize up.
- Resting the Dough: Letting the dough rest—even just 20 minutes—gives you chewier cookies with deeper flavor. It’s a little step that makes a big difference.
- Consistent Sizing: Use a cookie scoop or tablespoon to get even cookies. This ensures they bake evenly and match up for sandwiching (no lopsided pairs!).
- Spreading the Filling: If you don’t have a piping bag, a zip-top bag with the corner snipped off works great. For a rustic look, just use a butter knife.
- Maple Syrup Quality: Choose real maple syrup, not “maple-flavored” pancake syrup. The taste is worlds apart and really shines in this recipe.
- Batch Baking: If baking in batches, cool your baking sheets between rounds. Hot pans will make cookies spread too much.
I once forgot to let my cookies cool before adding the filling and ended up with a gooey, melty mess (delicious, but not exactly photo-worthy). So, patience pays off—let those cookies cool all the way! If your filling ever feels too runny, a quick chill in the fridge firms it right up. And don’t stress about perfection—homemade cookies always look (and taste) better with a little personality.
Variations & Adaptations
One of the best things about these maple brown sugar cookie sandwiches is how easy they are to customize. Here are a few of my favorite twists:
- Gluten-Free: Use a 1:1 gluten-free flour blend like King Arthur Measure for Measure. The cookies stay just as chewy and delicious—no one can tell the difference!
- Vegan: Swap in plant-based butter and use a flax egg (1 tablespoon ground flax + 2.5 tablespoons water, mixed and left to thicken) instead of a regular egg. Use plant milk in the filling. The maple flavor still shines through!
- Nutty Maple: Stir in 1/2 cup (60g) finely chopped toasted pecans or walnuts to the cookie dough for extra crunch and flavor. Maple and pecan are basically a match made in heaven.
- Chocolate Maple: Add 1/2 cup (90g) mini chocolate chips to the dough for a chocolatey twist. Or, spread a thin layer of melted dark chocolate over the filling before sandwiching the cookies.
- Spiced Maple: For a fall vibe, add 1/2 teaspoon cinnamon and a pinch of nutmeg to the dry ingredients.
Personally, I love making a batch with chopped pecans when I want a little extra texture—my husband says it tastes like a maple pecan pie in cookie form. And for friends with allergies, I’ve subbed sunflower seed butter with good results. There’s a version for everyone!
Serving & Storage Suggestions
These maple brown sugar cookie sandwiches are best enjoyed at room temperature, when the cookies are soft and the filling is creamy. For a party platter, arrange them in a single layer on a pretty plate or rustic wood board. A dusting of powdered sugar on top looks extra special for holidays or brunch.
If you want to go all out, serve with mugs of hot coffee, chai, or a big glass of cold milk. They also pair perfectly with vanilla ice cream for an over-the-top dessert. For a fall spread, try alongside apple crisp or pumpkin bars.
Storage: Keep cookie sandwiches in an airtight container at room temperature for up to 2 days, or refrigerate for up to 5 days. If stacking, place parchment between layers to prevent sticking. For longer storage, freeze sandwiches (wrapped individually) for up to 2 months—just thaw at room temp before serving. If the filling feels firm from the fridge, let cookies sit out for 20 minutes to soften. Honestly, the maple flavor gets even better after a day or two!
Nutritional Information & Benefits
Here’s an estimate for one maple brown sugar cookie sandwich (based on a batch of 16 sandwiches):
- Calories: ~260
- Fat: 11g
- Carbs: 38g
- Sugar: 23g
- Protein: 2g
Pure maple syrup isn’t just for sweetness—it brings antioxidants and minerals like manganese and zinc. Using dark brown sugar adds a smidge of iron and potassium. For those watching allergens, these can be made gluten-free or dairy-free with simple swaps. I love that these cookies feel like an indulgence, but the ingredients are ones I trust and recognize. As always, enjoy in moderation—life needs a little sweetness!
Conclusion
Maple brown sugar cookie sandwiches with maple cream filling are one of those desserts that hit all the right notes—chewy, sweet, creamy, and full of real maple flavor. They’re easy enough for a weekend baking session, but special enough to share with friends and family. I love how customizable they are, and every time I make them, I’m reminded why they’re a staple in my kitchen.
Give these a try and make them your own! Add nuts, swap the filling, or keep them classic. I’d love to hear what twists you come up with or see your cookie creations. Leave a comment, share this recipe with a fellow cookie lover, or tag me if you post your batch online. Happy baking—and don’t forget to sneak a few warm cookies before the sandwiches are assembled (chef’s treat, right?).
Frequently Asked Questions
How strong is the maple flavor in these cookies?
The maple flavor is front and center, thanks to both real maple syrup in the dough and the filling. If you want it even bolder, use grade B maple syrup or add a drop of maple extract.
Can I make the cookie dough ahead of time?
Absolutely! You can refrigerate the dough for up to 48 hours before baking. Just let it sit at room temp for 15-20 minutes so it’s scoopable.
What’s the best way to store maple brown sugar cookie sandwiches?
Keep them in an airtight container at room temp for 2 days or in the fridge for up to 5 days. For longer storage, freeze individually wrapped sandwiches and thaw as needed.
Can I use pancake syrup instead of real maple syrup?
I really recommend real maple syrup here—the flavor is much richer and more natural. Pancake syrup will work in a pinch, but the cookies won’t have the same depth.
Are there any nut-free or allergy-friendly adaptations?
Yes! These cookies are naturally nut-free and can be made gluten-free or dairy-free with simple swaps. For an egg-free version, use a flax egg. Always check your ingredient labels for hidden allergens.
Pin This Recipe!
Maple Brown Sugar Cookie Sandwiches
Chewy maple brown sugar cookies sandwiched with a creamy maple filling. These nostalgic, crowd-pleasing treats are easy to make and packed with real maple flavor—perfect for holidays, bake sales, or cozy nights in.
- Prep Time: 30 minutes
- Cook Time: 11 minutes
- Total Time: 45 minutes
- Yield: 16 cookie sandwiches 1x
- Category: Dessert
- Cuisine: American
Ingredients
- 2 1/4 cups all-purpose flour (280g)
- 1/2 teaspoon baking soda
- 1/2 teaspoon salt
- 3/4 cup unsalted butter, softened (170g)
- 1 cup dark brown sugar, packed (200g)
- 1/3 cup pure maple syrup (80ml)
- 1 large egg, room temperature
- 2 teaspoons vanilla extract
- For the Maple Cream Filling:
- 1/2 cup unsalted butter, softened (115g)
- 2 cups powdered sugar, sifted (240g)
- 3 tablespoons pure maple syrup (45ml)
- 1–2 tablespoons heavy cream or milk (15-30ml)
- Pinch of salt
Instructions
- Preheat oven to 350°F (175°C). Line two baking sheets with parchment paper or silicone baking mats.
- In a medium bowl, whisk together flour, baking soda, and salt. Set aside.
- In the bowl of a stand mixer or using a hand mixer, beat softened butter and dark brown sugar on medium speed for 2-3 minutes until light and fluffy.
- Scrape down the bowl, then mix in maple syrup, egg, and vanilla extract. Beat until smooth and well combined.
- Gradually add the flour mixture to the wet ingredients, mixing on low just until no streaks of flour remain. Do not overmix.
- Let the dough rest for 20-30 minutes at room temperature for best flavor and texture (optional but recommended).
- Using a medium cookie scoop or tablespoon, drop dough onto prepared sheets, spacing 2 inches apart.
- Bake for 9-11 minutes, rotating pans halfway through. Cookies should be golden at the edges and set in the middle (they’ll look slightly underbaked).
- Let cookies cool on the sheet for 5 minutes, then transfer to a wire rack. Cool completely before filling.
- For the maple cream filling: Beat softened butter until smooth. Add powdered sugar, maple syrup, and a pinch of salt. Beat on low until combined, then on high for 1-2 minutes until fluffy. Add heavy cream or milk as needed for a spreadable consistency.
- Pair cookies by size. Spread or pipe about 2 tablespoons of maple cream onto the flat side of one cookie, then gently sandwich with a second cookie. Press lightly so the filling reaches the edges.
- Let sandwiches sit for 10-15 minutes to set before serving.
Notes
For best results, use real maple syrup and let the dough rest before baking. Cookies should look slightly underbaked when removed from the oven for a chewy texture. Filling consistency can be adjusted with more powdered sugar or milk. Cookies can be made gluten-free or dairy-free with simple swaps. Store in an airtight container at room temperature for 2 days, or refrigerate up to 5 days. Freeze for longer storage.
Nutrition
- Serving Size: 1 cookie sandwich
- Calories: 260
- Sugar: 23
- Sodium: 90
- Fat: 11
- Saturated Fat: 7
- Carbohydrates: 38
- Protein: 2
Keywords: maple brown sugar cookies, cookie sandwiches, maple cream, chewy cookies, fall dessert, holiday cookies, easy dessert, bake sale, maple syrup, brown sugar