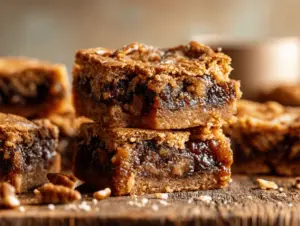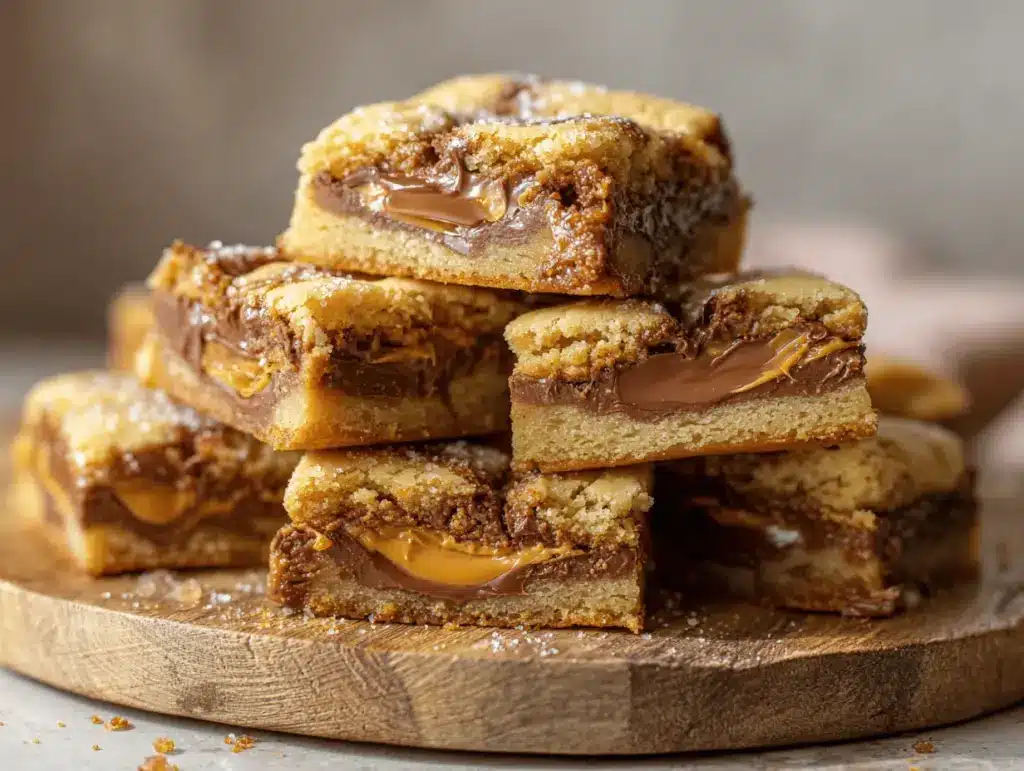
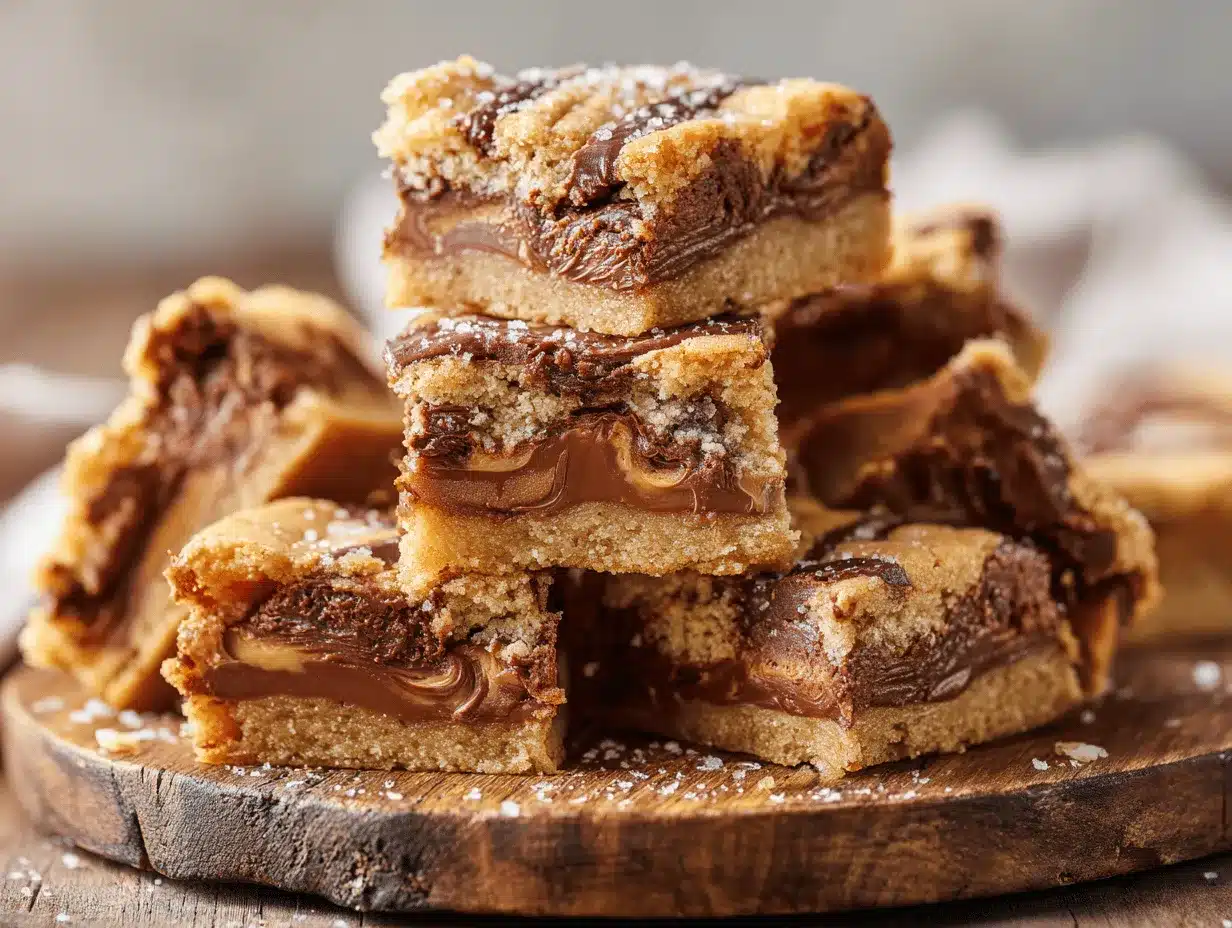
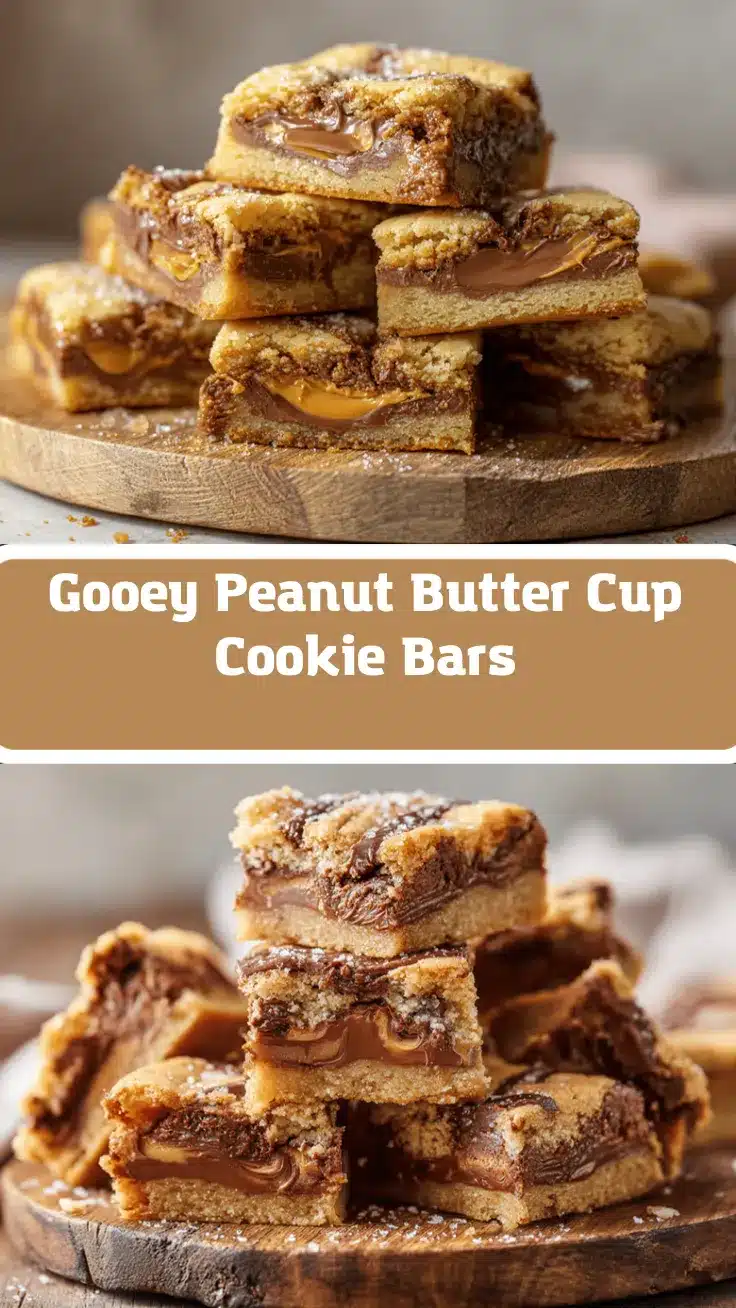
Imagine pulling a warm, golden pan from the oven—each square oozing melted chocolate and a river of creamy peanut butter. That’s exactly what you get with these stuffed peanut butter cup cookie bars, and honestly, they’re every bit as dreamy as they sound. The first time I made these, my kitchen smelled like a nostalgic blend of childhood cookie dough and the sweet promise of peanut butter cups. I couldn’t resist sneaking a taste before they even cooled (who waits for dessert to set anyway?).
The magic with these cookie bars is that they’re not just your everyday treat. They’re that perfect mashup of two comfort food favorites: soft, chewy chocolate chip cookie dough and decadent peanut butter cups—layered together and baked into the ultimate gooey dessert. I’ve baked these for birthdays, after-school snacks, and even wrapped them up for holiday gifts. Every time, they vanish faster than I can hide a few for myself! The best part? You don’t have to be a pastry chef to make them. If you can stir, layer, and wait (the hardest part!), you’re golden.
These stuffed peanut butter cup cookie bars are like a warm hug for your sweet tooth. Whether you’re baking with kids, prepping for a party, or just looking for an easy, wow-worthy dessert, this recipe hits the spot. I’ve tested it more times than I care to admit, tweaking here and there to get the texture just right—crispy edges, soft centers, and that unmistakable gooey swirl of peanut butter and chocolate. If you’re craving a treat that’s big on comfort and even bigger on flavor, you’re going to fall in love with these bars.
Why You’ll Love This Recipe
- Quick & Easy: No complicated steps—just layer, bake, and slice. You can have gooey goodness in under an hour.
- Simple Ingredients: Most are pantry staples—no fancy chocolate required, just your favorite peanut butter cups and classic cookie dough fixings.
- Perfect for Parties: These bars are a hit at potlucks, birthdays, or any time you want to impress without the stress. They travel well and slice up beautifully for sharing.
- Crowd-Pleaser: Kids beg for seconds, adults sneak thirds—there’s something about that chocolate-peanut butter combo that gets everyone grinning.
- Unbelievably Delicious: The gooey, melty center from the peanut butter cups makes every bite a little adventure. It’s next-level decadence without any fuss.
I have to say, after baking dozens of cookie bars over the years, this is hands-down my favorite. The secret? Stuffing the dough with whole peanut butter cups (not just chopped pieces) so you get thick pockets of creamy goodness in every slice. Plus, a sprinkle of flaky sea salt over the top—trust me, it makes the chocolate flavor pop and balances the sweetness just right. I’ve shared these at family reunions and even sent them to friends in care packages. I always get the same text: “You have to send me that recipe!”
This isn’t just another cookie bar. It’s the kind of treat that makes you close your eyes and savor the moment. It’s rich, nostalgic, and somehow feels both special and completely approachable. Whether you’re a peanut butter fanatic or just need an easy dessert fix, these bars never disappoint. They’re my go-to for instant comfort—and I bet they’ll become yours, too.
What Ingredients You Will Need
This recipe uses simple, trusty ingredients to deliver big, gooey flavor and that unforgettable peanut butter cup surprise in every bite. Most of these are probably already in your kitchen, and you can easily swap a few things to fit what you have on hand.
- For the Cookie Dough:
- 1 cup (226g) unsalted butter, softened (room temperature for ultra-creamy dough)
- 1 cup (200g) packed light brown sugar (adds that caramel chewiness)
- 1/2 cup (100g) granulated sugar
- 2 large eggs, room temperature
- 2 teaspoons pure vanilla extract (I love using Nielsen-Massey for pure flavor)
- 2 1/2 cups (315g) all-purpose flour (King Arthur is my go-to for consistent results)
- 1 teaspoon baking soda
- 1/2 teaspoon fine sea salt
- 1 1/2 cups (255g) semi-sweet chocolate chips (Ghirardelli or Trader Joe’s are both fabulous)
- For the Stuffing:
- 16-18 mini peanut butter cups (Reese’s work perfectly, but try Justin’s for a natural option)
- Optional Topping:
- Flaky sea salt (like Maldon, for that sweet-salty magic)
- Extra chocolate chips or chopped peanuts for a little crunch
Ingredient Tips & Substitutions:
- You can swap all-purpose flour for a 1:1 gluten-free blend (I’ve tried King Arthur’s Measure for Measure—works a charm).
- Not a fan of semi-sweet? Use milk or dark chocolate chips, or mix them up for a fun twist.
- For dairy-free, use vegan butter and a dairy-free chocolate chip (Enjoy Life is my pick).
- Try almond butter cups or sunflower butter cups if you want a nut-free version (just check for cross-contamination if allergies are a concern).
- If you’re out of brown sugar, you can swap in coconut sugar for a little molasses flavor.
Honestly, as long as you have butter, sugar, flour, eggs, chocolate chips, and peanut butter cups, you’re in business. This recipe is super forgiving—don’t stress if you need to get creative!
Equipment Needed
- 9×9-inch (23x23cm) Baking Pan: Metal pans give you crispier edges; glass works but may need a couple more minutes in the oven.
- Mixing Bowls: One large for the dough, one medium for prepping dry ingredients.
- Electric Hand Mixer or Stand Mixer: Makes creaming butter and sugar a breeze—but you can totally use a sturdy spatula and good ol’ elbow grease (I’ve done both!).
- Measuring Cups and Spoons: For accuracy; I always recommend leveling off your flour.
- Rubber Spatula: Essential for folding in chocolate chips and scraping every last bit of dough.
- Parchment Paper: For easy lifting and zero sticking—worth it, trust me.
- Offset Spatula or Butter Knife: For smoothing out the dough layers.
- Sharp Knife: For slicing clean, even bars after cooling.
If you don’t have a stand mixer, don’t sweat it—just make sure your butter is nice and soft so it creams easily. And if you don’t have parchment, a light greasing with butter or nonstick spray will do the trick. My favorite low-budget hack? Use binder clips to hold parchment in place until you pour in the dough (just remove them before baking!).
How to Make Stuffed Peanut Butter Cup Cookie Bars
-
Prep Your Pan & Ingredients (5 minutes):
- Line a 9×9-inch (23x23cm) baking pan with parchment paper, leaving an overhang for easy lifting later.
- Unwrap your peanut butter cups and set aside.
- Preheat your oven to 350°F (175°C).
-
Cream Butter & Sugars (3 minutes):
- In a large mixing bowl, beat 1 cup (226g) softened butter, 1 cup (200g) brown sugar, and 1/2 cup (100g) granulated sugar together until light and fluffy—about 2-3 minutes.
- Tip: If your butter isn’t soft enough, microwave it in 5-second bursts until just pliable (not melted!).
-
Add Eggs & Vanilla (1 minute):
- Beat in 2 large eggs, one at a time, scraping the bowl as needed.
- Mix in 2 teaspoons vanilla extract until smooth.
-
Mix Dry Ingredients (1 minute):
- In a separate bowl, whisk together 2 1/2 cups (315g) flour, 1 teaspoon baking soda, and 1/2 teaspoon salt.
- Gradually add dry ingredients to the wet mixture, mixing until just combined—don’t overbeat or the bars can get tough.
-
Fold in Chocolate Chips (30 seconds):
- Gently fold in 1 1/2 cups (255g) chocolate chips using a rubber spatula.
- The dough will be thick and a little sticky—perfect for layering.
-
Layer the Dough & Peanut Butter Cups (5 minutes):
- Press half of the cookie dough into the bottom of your prepared pan—it helps to use damp fingertips or an offset spatula.
- Arrange 16-18 mini peanut butter cups in a grid, gently pressing them into the dough. Don’t worry if there are little gaps.
- Drop spoonfuls of the remaining dough over the peanut butter cups, then gently spread to cover. It’s okay if a few peanut butter cups peek through.
-
Bake (25-30 minutes):
- Bake in the center of the oven for 25-30 minutes, or until the top is golden brown and just set—don’t overbake if you like them gooey!
- The center might look a bit soft; it will firm up as it cools.
- For extra gooey bars, pull them at the 25-minute mark.
-
Cool & Slice (at least 30 minutes):
- Let the bars cool completely in the pan (it’s tough, but so worth it for clean slices).
- Lift out using the parchment overhang and cut into 16 squares with a sharp knife.
- Tip: Wipe the knife between cuts for those picture-perfect edges!
-
Finish & Serve:
- Sprinkle with flaky sea salt if desired and enjoy warm, at room temp, or even chilled—every way is delicious.
Troubleshooting: If the bars seem underdone in the center, let them cool longer—they set up as they rest. For crisper bars, bake a few minutes longer, but don’t let the edges get too brown.
Cooking Tips & Techniques
- Don’t Overmix: Once you add the flour, mix until just combined. Overworking the dough can make the bars tough instead of tender and gooey.
- Chill for Clean Slices: If you want super-neat, bakery-style squares, chill the cooled bars in the fridge for 30 minutes before slicing. It makes a world of difference!
- Layer Evenly: Use an offset spatula or the back of a spoon to smooth the dough layers. If the top layer is sticky, dampen your fingers slightly to help spread it without pulling up the peanut butter cups.
- Check for Doneness: Look for golden brown edges and a set (but still slightly soft) center. The bars will firm up as they cool. If you like them extra gooey, it’s okay if the knife comes out with a bit of moist crumb.
- Personal Lesson Learned: One time, I got impatient and sliced too soon—hello, molten lava bars! Still tasty, but let’s just say forks were required. Patience really does pay off here.
- Batch Baking: Doubled the recipe? Use a 9×13-inch (33x23cm) pan and add a few extra minutes to the baking time. Rotate the pan halfway through for even browning.
- Flavor Boost: A pinch of espresso powder in the dough deepens the chocolate flavor (trust me, you can’t taste the coffee—just more chocolatey goodness!).
Variations & Adaptations
- Gluten-Free: Swap the all-purpose flour for a 1:1 gluten-free blend. I’ve used King Arthur’s Measure for Measure with great results—just keep an eye on bake time, as gluten-free doughs can brown a bit faster.
- Nut-Free: Use sunflower butter cups and dairy-free chocolate chips for a treat that’s safe for nut allergies. Always check labels for cross-contamination if serving to someone with allergies.
- Double Chocolate: Replace 1/4 cup of flour with unsweetened cocoa powder and use dark chocolate chips for a brownie-cookie hybrid that’s dangerously rich.
- Seasonal Swaps: In autumn, sprinkle cinnamon or pumpkin spice into the dough. For spring or summer, stir in white chocolate chips and a handful of chopped dried strawberries.
- Personal Favorite: I once layered in a swirl of raspberry jam with the peanut butter cups—think PB&J meets chocolate chip cookie. It got rave reviews and disappeared in record time!
- Different Baking Methods: No oven? Press the dough and peanut butter cups into a lined air fryer-safe pan and air fry at 325°F (165°C) for about 18-22 minutes, checking often near the end.
Serving & Storage Suggestions
These stuffed peanut butter cup cookie bars are best served slightly warm, when the chocolate is still a little gooey and the peanut butter is extra creamy. I love pairing them with a cold glass of milk or a hot cup of coffee—honestly, there’s no wrong way. For a party, cut them into small squares and pile high on a pretty platter, or serve à la mode with a scoop of vanilla ice cream for instant cheers.
Storage Tips:
- Keep bars in an airtight container at room temperature for up to 3 days—they’ll stay soft and chewy.
- For longer storage, refrigerate for up to a week. Bring to room temperature or zap in the microwave for 10-15 seconds to restore gooeyness.
- Want to freeze? Wrap bars individually in plastic wrap, place in a freezer bag, and freeze up to 3 months. Thaw overnight or reheat straight from frozen (they’re good cold, too—I’m not judging!).
Honestly, the flavors just get better as the bars sit—they develop a deeper peanut butter richness after a day or two (if they last that long!).
Nutritional Information & Benefits
Each stuffed peanut butter cup cookie bar (1/16th of the pan) is estimated at about 320 calories, with 16g fat, 38g carbs, and 5g protein. They do contain wheat, dairy, eggs, and peanuts—so keep allergies in mind!
While these are definitely a treat, you’re also getting some protein from the peanut butter and eggs, plus a little antioxidant boost from dark chocolate if you choose it. For gluten-free or dairy-free needs, the recipe adapts well (see tips above). I love these as a special snack after a long week or as a sweet reward for sharing a meal with friends. They’re a reminder that joy and balance can absolutely live together on a cookie plate.
Conclusion
There’s a reason I keep coming back to these stuffed peanut butter cup cookie bars—they’re easy, always a hit, and just plain fun to bake and eat. Whether you’re making a batch for a special occasion or just to treat yourself, these bars deliver that perfect blend of gooey, chewy, chocolatey comfort. Plus, you can totally make them your own: swap in your favorite nut butter, add a sprinkle of sea salt, or try a fun flavor twist.
I hope you’ll give these a try and let me know how you enjoy them! If you’ve got a creative variation, please share in the comments—I’m always on the lookout for new kitchen inspiration. Don’t forget to pin this recipe and spread the cookie bar love. Here’s to more gooey, joyful baking—one irresistible square at a time!
FAQs About Stuffed Peanut Butter Cup Cookie Bars
Can I use regular-sized peanut butter cups instead of mini?
Yes, you can! Just chop them into quarters and arrange evenly over the dough layer for the same gooey effect.
Do I need to chill the dough before baking?
Nope! This dough goes straight into the pan and bakes up beautifully—no waiting required.
How do I know when the bars are baked through?
Look for golden brown edges and a slightly set center. The middle will firm up as the bars cool, so don’t worry if it seems a bit soft at first.
Can I make these ahead of time?
Absolutely. Bake, cool, and store in an airtight container. They keep well for several days and taste even richer the next day.
What’s the best way to reheat the bars?
Pop individual bars in the microwave for 10-15 seconds to bring back that gooey, fresh-from-the-oven texture. So good!
Pin This Recipe!
Stuffed Peanut Butter Cup Cookie Bars
These gooey cookie bars combine soft, chewy chocolate chip cookie dough with whole mini peanut butter cups for the ultimate decadent dessert. Easy to make and always a crowd-pleaser, they’re perfect for parties, gifts, or a comforting treat at home.
- Prep Time: 15 minutes
- Cook Time: 25-30 minutes
- Total Time: 45 minutes
- Yield: 16 bars 1x
- Category: Dessert
- Cuisine: American
Ingredients
- 1 cup (226g) unsalted butter, softened
- 1 cup (200g) packed light brown sugar
- 1/2 cup (100g) granulated sugar
- 2 large eggs, room temperature
- 2 teaspoons pure vanilla extract
- 2 1/2 cups (315g) all-purpose flour
- 1 teaspoon baking soda
- 1/2 teaspoon fine sea salt
- 1 1/2 cups (255g) semi-sweet chocolate chips
- 16–18 mini peanut butter cups
- Flaky sea salt, for topping (optional)
- Extra chocolate chips or chopped peanuts, for topping (optional)
Instructions
- Line a 9×9-inch baking pan with parchment paper, leaving an overhang for easy lifting. Preheat oven to 350°F (175°C). Unwrap peanut butter cups and set aside.
- In a large mixing bowl, beat softened butter, brown sugar, and granulated sugar together until light and fluffy (about 2-3 minutes).
- Beat in eggs, one at a time, scraping the bowl as needed. Mix in vanilla extract until smooth.
- In a separate bowl, whisk together flour, baking soda, and salt. Gradually add dry ingredients to the wet mixture, mixing until just combined.
- Gently fold in chocolate chips with a rubber spatula.
- Press half of the cookie dough into the bottom of the prepared pan. Arrange peanut butter cups in a grid over the dough, gently pressing them in.
- Drop spoonfuls of the remaining dough over the peanut butter cups and gently spread to cover.
- Bake for 25-30 minutes, or until the top is golden brown and just set. For extra gooey bars, bake closer to 25 minutes.
- Let bars cool completely in the pan. Lift out using parchment and cut into 16 squares.
- Sprinkle with flaky sea salt if desired and serve warm, at room temperature, or chilled.
Notes
For clean slices, chill the cooled bars in the fridge for 30 minutes before cutting. Don’t overmix the dough after adding flour for the best texture. You can swap in gluten-free flour, dairy-free butter, or different nut butter cups as needed. Bars can be stored in an airtight container at room temperature for 3 days, refrigerated for a week, or frozen for up to 3 months.
Nutrition
- Serving Size: 1 bar (1/16th of pan)
- Calories: 320
- Sugar: 24
- Sodium: 180
- Fat: 16
- Saturated Fat: 8
- Carbohydrates: 38
- Fiber: 2
- Protein: 5
Keywords: cookie bars, peanut butter cup, chocolate chip, dessert, easy, gooey, party, potluck, kid-friendly, comfort food