
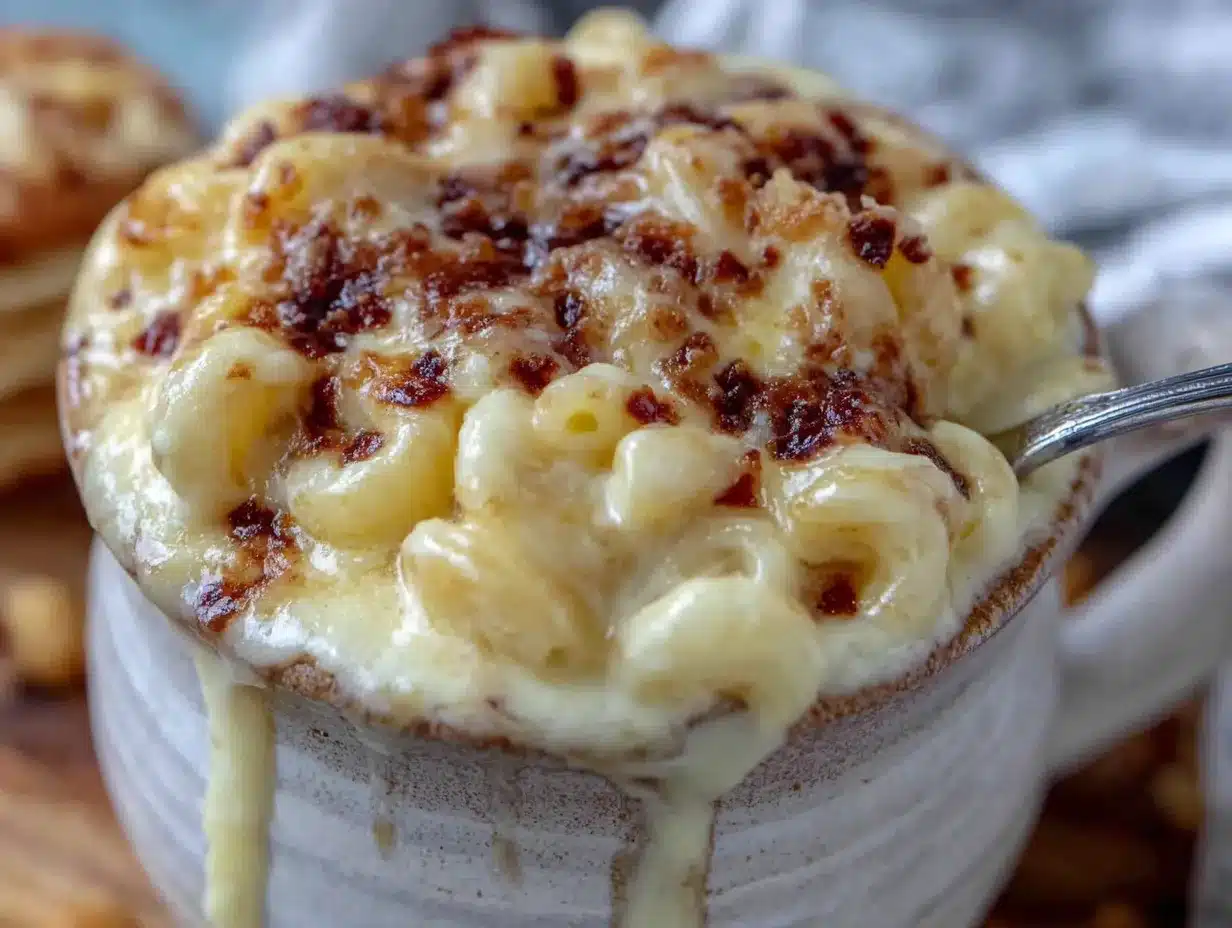
The way the cheese stretches from the spoon — that’s the whole point. Not the taste first, not the warmth, but that specific, elastic pull of melted cheddar clinging to itself before it finally breaks. I made this easy microwave mug mac and cheese for dorm rooms at 11:47 PM on a Tuesday in October, sitting cross-legged on a twin XL mattress that had definitely seen better days. The communal kitchen was three floors down and honestly, I wasn’t wearing pants. It wasn’t about gourmet cooking. It was about survival, and the desperate need for something that tasted like home when home was 800 miles away.
The first time I tried making mac and cheese in a mug, it was a disaster. I used the wrong pasta, too much water, and ended up with a sad, soupy mess that tasted like regret and lukewarm tap water. But I learned. I figured out the ratios, the right noodle shape, the exact timing that turns a microwave into a magic box instead of a punishment device. This recipe is that journey — all the trial and error, the burnt tongues, and the one perfect bowl that finally made me text my mom a photo. It’s simple. It’s forgiving. And it works when nothing else in your dorm room feels like it does.
There’s something about eating mac and cheese out of a coffee mug that changes the experience. It feels secret, like a private ritual. No plates to wash. No big pot to scrub. Just you, a spoon, and a mug full of comfort that took exactly three and a half minutes to make. That’s the kind of magic you need when you’re pulling an all-nighter, or when the dining hall closes early, or when you just need something that tastes like a hug.
Why You’ll Love This Recipe
Let me be honest with you — this isn’t fancy mac and cheese. There’s no béchamel sauce, no aged Gruyère, no breadcrumb topping that requires a kitchen torch. This is real-world, dorm-approved comfort food that actually tastes incredible. I tested this recipe seven times before I got it right. Seven mugs of pasta, some better than others, some that went straight into the trash. But this version? This one works every single time.
- Ready in Under 5 Minutes : From hungry to happy in about the time it takes to scroll through TikTok. No boiling water, no waiting for a pot to heat up.
- Simple Ingredients : You probably already have everything in your dorm room. Pasta, cheese, milk, butter. That’s it. No fancy grocery runs required.
- Perfect for Late-Night Cravings : When the dining hall is closed and the vending machine is mocking you with its sad selection of stale pretzels, this mug mac saves the day.
- Minimal Cleanup : One mug. One spoon. No pots, no pans, no colander. Your RA will be proud of you for not setting off the fire alarm.
- Completely Customizable : Add hot sauce, bacon bits, broccoli, or whatever else you have stashed in your mini-fridge. This recipe is a canvas, not a prison.
What makes this different from every other microwave mac and cheese recipe you’ve seen? It’s the method. Most recipes tell you to cook the pasta in water, drain it, then add cheese. But who has a strainer in their dorm room? I figured out a way to cook the pasta in just enough liquid that you don’t need to drain anything. The starchy water stays in the mug and actually helps the cheese sauce come together smoother. It’s a small tweak, but it changes everything. The texture is creamier, the cheese clings to every noodle, and you don’t have to figure out how to drain hot water into a sink that’s probably clogged anyway.
This is the kind of recipe that makes you feel like you’ve got it together, even when you’re eating dinner at midnight in your pajamas. It’s comfort food that doesn’t require a kitchen. And honestly, that’s exactly what dorm life needs.
What Ingredients You Will Need
This recipe uses simple, pantry-friendly ingredients that are easy to keep in a dorm room. The key is choosing the right pasta shape and the right cheese — both make a bigger difference than you’d think.
For the Mac and Cheese Base
- 1/2 cup elbow macaroni (or any small pasta shape like shells, ditalini, or cavatappi) — Small pasta cooks faster and fits better in a mug. I’ve tried spaghetti broken into pieces and it works, but elbows are truly the best.
- 1/2 cup water (plus a splash more if needed) — Tap water is fine. The starch from the pasta will help thicken the sauce.
- 1/4 cup shredded sharp cheddar cheese — Pre-shredded works in a pinch, but block cheese that you shred yourself melts much smoother. The anti-caking agents in pre-shredded cheese can make the sauce slightly grainy.
- 2 tablespoons whole milk (or any milk you have) — Adds creaminess and helps the cheese melt without separating. I’ve used oat milk and it works, though the texture is slightly thinner.
- 1 tablespoon unsalted butter — Adds richness and helps the sauce coat the pasta. Salted butter works too, just go easy on the extra salt.
For Seasoning
- Pinch of salt (about 1/8 teaspoon) — Pasta water needs salt to flavor the noodles from the inside out.
- Pinch of black pepper — Freshly ground if you have it, but pre-ground is totally fine.
- Pinch of garlic powder (optional) — This is my secret weapon. It adds a savory depth without being obviously garlicky.
- Pinch of paprika (optional) — Adds a subtle warmth and a pretty orange color to the finished dish.
I recommend using Kraft shredded sharp cheddar if you’re buying pre-shredded — it melts better than most store brands. But honestly, the best results come from a block of Cabot or Tillamook sharp cheddar that you shred yourself. It takes an extra 30 seconds but the texture difference is real. The cheese melts into a silky sauce instead of a clumpy mess.
For the pasta, Barilla elbows are my go-to. They hold their shape well and don’t get mushy in the microwave. Generic store brands work too, just check the cooking time on the box — some cheap pasta turns to paste if you microwave it too long.
If you want to get fancy, keep a bag of shredded mozzarella in your mini-fridge. Adding a tablespoon along with the cheddar gives the sauce an extra stretchy, gooey texture that’s absolutely ridiculous in the best way.
Equipment Needed
The beauty of this recipe is that you probably already have everything you need. If you’re living in a dorm room, your kitchen equipment is basically whatever fits in a plastic drawer under your bed.
- One microwave-safe mug (12 to 16 ounces is ideal) — The size matters more than you think. Too small and the pasta will bubble over. Too big and the pasta cooks unevenly. A standard coffee mug works perfectly. I use a thick ceramic mug from Target that cost me $4. Stay away from thin, delicate mugs — they can get dangerously hot in the microwave.
- One fork or spoon — For stirring and eating. A fork works better for checking if the pasta is done, but a spoon is better for eating. I use a fork for cooking and a spoon for eating. Living like royalty.
- One small cutting board (optional) — Only if you’re adding any mix-ins that need chopping. A paper towel works in a pinch.
- One microwave — Obviously. Most dorm microwaves are between 700 and 1000 watts. If yours is weaker, add 30 seconds to the cooking time. If it’s stronger, check at the 2-minute mark.
No, you don’t need a colander. No, you don’t need a pot. No, you don’t need a measuring cup — just eyeball the water level. The whole point of this recipe is that it works with the absolute minimum equipment possible. I’ve made this in a hotel room with a coffee mug from the lobby. I’ve made it in an office break room with a mug that said “World’s Best Dad” (I am not a dad). It works everywhere.
One tip: if your mug has a handle that gets hot, use a dish towel or a silicone sleeve to hold it. Some mugs have handles that trap steam and become little finger-burning ovens. Learned that one the hard way.
Preparation Method
This is the part where everything comes together. Follow these steps exactly the first time, and then feel free to experiment once you know how it works. The timing is specific to a standard 1000-watt microwave, so adjust up or down based on yours.
- Add the pasta and water to your mug. Pour in 1/2 cup of elbow macaroni and 1/2 cup of water. The water should just barely cover the pasta. If it doesn’t, add an extra tablespoon. Don’t add more than that — too much water makes the pasta mushy and dilutes the cheese sauce.
- Microwave for 2 minutes on high. Watch the mug closely. The water will bubble up and might try to escape. If it looks like it’s about to overflow, stop the microwave, stir, and continue in 30-second intervals. This is the most critical step — undercooked pasta is crunchy, overcooked pasta is sad paste.
- Stir and check the pasta. After 2 minutes, the pasta should be almost tender but still have a tiny white dot in the center when you bite one. If it’s still crunchy, microwave in 20-second bursts until al dente. If there’s still water in the mug, don’t worry — that’s the starchy liquid that will help make your sauce creamy.
- Add the butter and stir until melted. Drop in 1 tablespoon of butter and stir it into the hot pasta. The residual heat will melt it completely. This step also cools the pasta slightly so the cheese doesn’t seize up when you add it.
- Add the milk and cheese. Pour in 2 tablespoons of milk and add 1/4 cup of shredded cheddar cheese. Stir vigorously for about 15 seconds. The cheese should start melting immediately. If it looks clumpy, keep stirring — it will smooth out as the heat distributes.
- Microwave for 30 seconds more. This final blast of heat finishes melting the cheese and thickens the sauce. Watch it carefully — you want it bubbly but not boiling over.
- Stir again and add seasonings. Give it one more good stir. The sauce should be thick, creamy, and coating every piece of pasta. Add a pinch of salt, black pepper, garlic powder, and paprika if you’re using them. Stir to combine.
- Let it rest for 1 minute. I know you’re hungry. I know it smells amazing. But letting it sit for 60 seconds allows the sauce to thicken to the perfect consistency. If you eat it immediately, it will be slightly runny. Trust the process.
Sensory cue: When it’s done, the mug should be hot to the touch, the pasta should be tender but not falling apart, and the cheese sauce should be thick enough that it coats the back of your spoon. You should see small bubbles in the sauce from the final microwave burst. The smell is pure comfort — warm dairy, butter, and that slightly sharp cheddar aroma that makes your stomach growl.
One more thing — don’t walk away while the pasta is cooking. I’ve had mug mac bubble over more times than I’d like to admit. It makes a mess in the microwave that takes forever to clean, and it wastes precious cheese. Stand there and watch it like a hawk for those first two minutes.
Cooking Tips & Techniques
After making this recipe dozens of times (including some spectacular failures), I’ve learned a few tricks that make the difference between good mug mac and great mug mac.
The pasta-to-water ratio is everything. Use exactly enough water to cover the pasta, plus maybe a tablespoon extra. Too much water and you’ll have to drain it, which defeats the purpose. Too little and the pasta will be crunchy. The perfect ratio is about 1:1 by volume — half cup pasta, half cup water. The pasta absorbs most of the water as it cooks, leaving just enough starchy liquid to build the sauce.
Stirring is not optional. I learned this the hard way. If you don’t stir halfway through cooking, the pasta on top stays crunchy while the pasta on the bottom turns to mush. Set a timer for 1 minute, stir, then continue. It takes five seconds and completely changes the result.
Don’t use pre-shredded cheese if you can avoid it. I know it’s convenient. I know it’s what you have. But pre-shredded cheese is coated in cellulose and potato starch to prevent clumping, and those same ingredients prevent smooth melting. If you can shred your own cheese from a block, do it. The sauce will be silkier, creamier, and less likely to turn into a greasy mess.
Add the cheese off-heat. This is a pro tip I stole from real mac and cheese recipes. If you add the cheese while the pasta is still actively microwaving, the cheese can overheat and separate into greasy clumps. Instead, let the pasta sit for 30 seconds after cooking, add the butter first, then the cheese. The residual heat is plenty to melt everything smoothly.
Use a deeper mug, not a wider one. A tall, narrow mug keeps the pasta submerged in water while it cooks. A wide, shallow mug lets the water spread out too thin, and the pasta sits partially exposed. If your only mug is wide, use slightly more water and stir more frequently.
The biggest mistake I ever made? I tried to make this in a paper cup once. Don’t do that. Paper cups aren’t designed for microwave heat, and the cup started leaking halfway through cooking. I ended up with hot pasta water all over the microwave tray and a soggy, collapsing cup. Learn from my stupidity.
Variations & Adaptations
Once you’ve mastered the basic recipe, the possibilities are endless. Here are some of my favorite variations, tested and approved in actual dorm rooms.
Spicy Buffalo Mac: Add 1 tablespoon of buffalo sauce (Frank’s RedHot is my go-to) along with the milk and cheese. Top with a sprinkle of blue cheese crumbles if you have them. The spicy, tangy sauce cuts through the richness of the cheddar perfectly. I make this version at least once a week when I need something with a little kick.
Loaded Baked Potato Mac: Stir in 1 tablespoon of sour cream (or plain Greek yogurt) after the cheese melts, then top with crumbled bacon bits and sliced green onions. The sour cream adds tanginess and makes the sauce even creamier. This version feels fancy even though it takes the same 5 minutes.
Broccoli Cheddar Mac: Add 1/4 cup of frozen broccoli florets to the mug along with the pasta. The broccoli cooks perfectly in the same time as the pasta, and the little green trees add color and actual nutrition. My mom would approve of this version.
Vegan Mac: Use dairy-free shredded cheese (I like Daiya cheddar style), unsweetened oat milk, and vegan butter. The texture is slightly less creamy, but the flavor is still solid. Add a tablespoon of nutritional yeast for extra cheesy flavor — it’s a game changer for vegan versions.
Protein-Packed Mac: Stir in 1/4 cup of canned, drained chicken or crumbled cooked sausage after the cheese melts. This turns a side dish into a full meal that will actually keep you full through a three-hour lecture. I’ve also used leftover rotisserie chicken from the dining hall — just grab a handful when no one’s looking.
Mexican Street Corn Mac: Add 1 tablespoon of mayo, a squeeze of lime juice, and a sprinkle of chili powder and cotija cheese. Stir it all together after the cheese melts. It sounds weird, but it tastes like elote in mac and cheese form. It’s become my unexpected favorite variation.
Serving & Storage Suggestions
This recipe is designed to be eaten immediately, right out of the mug. That’s kind of the whole point. But if you somehow have leftovers (unlikely, but possible), here’s what to do.
Serving temperature: Eat it hot, straight from the microwave. Let it rest for a minute first, then dig in. The cheese sauce will be at its peak creaminess right after resting. If it cools down too much, the sauce thickens and becomes gluey.
What to serve with it: This mac is a complete meal on its own, but if you want to round it out, try it with a simple side salad or some baby carrots. I like to eat it with crispy chicken tostadas on the side for a fun contrast in textures. The crunch of the tostada against the creamy mac is surprisingly satisfying. Or, if you’re feeling extra hungry, pair it with classic burger sliders for the ultimate comfort food combo.
Storage: If you absolutely must save some, transfer the mac to an airtight container and refrigerate for up to 2 days. Don’t leave it in the mug — the ceramic will keep it cold unevenly and the cheese can develop an off flavor.
Reheating: Add a splash of milk (about 1 tablespoon) and microwave in 30-second bursts, stirring between each. The pasta will have absorbed some of the sauce overnight, so the extra milk helps restore the creamy texture. It won’t be quite as good as fresh, but it’s still pretty darn satisfying.
Flavor development: Honestly, this mac doesn’t get better with time. The cheese sauce loses its silky texture and the pasta softens further. Eat it fresh. That’s the whole point of a 5-minute recipe.
Nutritional Information & Benefits
Let’s be real — this is comfort food, not health food. But it’s not as bad as you might think, especially compared to the dining hall version or boxed mac.
Estimated nutrition per serving (basic recipe, no additions):
- Calories: ~380
- Protein: 14g
- Carbohydrates: 42g
- Fat: 18g
- Fiber: 2g
- Calcium: ~200mg (about 20% of your daily needs)
Health benefits: The cheddar cheese provides a solid amount of calcium and protein, which is good for bone health and muscle repair — useful if you’re walking across a large campus every day. The pasta gives you quick energy from carbohydrates, perfect for fueling study sessions or early morning classes. If you add broccoli or other vegetables, you’ll get some fiber and vitamins without changing the flavor much.
Dietary considerations: This recipe is vegetarian as written. To make it gluten-free, use gluten-free pasta (I like Barilla’s red lentil elbows) — the cooking time might need an extra 30 seconds. To make it lower calorie, use reduced-fat cheese and skim milk, though the texture won’t be as creamy. This recipe is not suitable for vegans without the substitutions listed above.
Potential allergens: Contains dairy (milk, cheese, butter) and gluten (pasta). If you have celiac disease or a dairy allergy, use the substitutions mentioned in the variations section.
I’m not a nutritionist, and I don’t pretend to be one. But I do believe that food should make you happy, and sometimes a bowl of mac and cheese is exactly what your brain needs to keep going. Balance it out with some fruits and vegetables during the day, and enjoy your mug mac guilt-free.
Conclusion
This easy microwave mug mac and cheese for dorm rooms isn’t going to win any culinary awards. It’s not going to be featured on a cooking show or impress a date. But it will feed you when you’re hungry, broke, and tired. It will taste like comfort when you’re stressed about finals. It will remind you that good food doesn’t require a fancy kitchen or expensive ingredients.
I’ve made this recipe in more dorm rooms than I can count, in hotel bathrooms during road trips, and in office break rooms at 2 AM during deadline season. Every time, it works. Every time, it makes me feel a little bit better about whatever situation I’m in. That’s the power of a good recipe — it’s not about the food. It’s about the feeling the food gives you.
Try it tonight. Add your own twist. Make it your own. And when you discover a variation that blows your mind, come back and tell me about it in the comments. I’m always looking for new ideas, and honestly, I love hearing about the weird combinations people come up with. One reader told me she adds crushed potato chips on top, and I haven’t made it any other way since.
Now go make yourself some mac and cheese. You deserve it.
Frequently Asked Questions
Can I use a different type of pasta?
Absolutely. Any small pasta shape works — shells, ditalini, cavatappi, or even broken spaghetti. Just make sure the pieces are small enough to cook evenly in the microwave. Larger shapes like penne or rigatoni might need an extra 30-45 seconds of cooking time.
What if I don’t have a microwave?
Unfortunately, this recipe really needs a microwave. But if you have access to a stovetop or hot plate (check your dorm rules first), you can make the same recipe in a small pot. Cook the pasta in water until al dente, drain, then add the butter, milk, and cheese off the heat. It takes about 10 minutes instead of 5, but the result is similar.
Can I make this in a paper bowl or plastic container?
No. Only use microwave-safe ceramic or glass mugs. Paper bowls can leak or catch fire. Plastic containers can melt or release harmful chemicals. A standard ceramic coffee mug is the safest and most reliable option. If you’re not sure if your mug is microwave-safe, check for a label on the bottom.
Why did my cheese sauce turn out grainy?
Grainy cheese sauce usually happens for one of two reasons: the cheese overheated and separated, or you used pre-shredded cheese with anti-caking agents. To fix it, try adding the cheese after the microwave is off and stirring more gently. If you’re using pre-shredded cheese, add a teaspoon of milk to help smooth it out.
Can I double this recipe for a bigger mug?
You can, but be careful. Doubling the ingredients might cause the mug to overflow during cooking. Use a larger microwave-safe bowl instead of a mug, and increase the cooking time by about 50%. Stir every 60 seconds to ensure even cooking. The total time for a double batch is usually around 4-5 minutes total.
Pin This Recipe!

Easy Microwave Mug Mac and Cheese Best Dorm Room Dinner

This easy microwave mug mac and cheese is the ultimate dorm room comfort food, ready in under 5 minutes with simple ingredients and minimal cleanup. Perfect for late-night cravings, it delivers creamy, cheesy goodness without a stove or colander.
- Prep Time: 2 minutes
- Cook Time: 3 minutes
- Total Time: 5 minutes
- Yield: 1 serving 1x
- Category: Main Course
- Cuisine: American
Ingredients
- 1/2 cup elbow macaroni (or any small pasta shape)
- 1/2 cup water (plus a splash more if needed)
- 1/4 cup shredded sharp cheddar cheese
- 2 tablespoons whole milk (or any milk you have)
- 1 tablespoon unsalted butter
- Pinch of salt (about 1/8 teaspoon)
- Pinch of black pepper
- Pinch of garlic powder (optional)
- Pinch of paprika (optional)
Instructions
- Add the pasta and water to your mug. Pour in 1/2 cup of elbow macaroni and 1/2 cup of water. The water should just barely cover the pasta. If it doesn’t, add an extra tablespoon.
- Microwave for 2 minutes on high. Watch the mug closely. If it looks like it’s about to overflow, stop the microwave, stir, and continue in 30-second intervals.
- Stir and check the pasta. After 2 minutes, the pasta should be almost tender but still have a tiny white dot in the center when you bite one. If it’s still crunchy, microwave in 20-second bursts until al dente.
- Add the butter and stir until melted. Drop in 1 tablespoon of butter and stir it into the hot pasta.
- Add the milk and cheese. Pour in 2 tablespoons of milk and add 1/4 cup of shredded cheddar cheese. Stir vigorously for about 15 seconds.
- Microwave for 30 seconds more. Watch it carefully — you want it bubbly but not boiling over.
- Stir again and add seasonings. Give it one more good stir. Add a pinch of salt, black pepper, garlic powder, and paprika if you’re using them. Stir to combine.
- Let it rest for 1 minute. This allows the sauce to thicken to the perfect consistency.
Notes
Use a deep mug to keep pasta submerged. Add cheese off-heat to prevent graininess. For best results, shred cheese from a block rather than using pre-shredded. Let the mac rest for 1 minute before eating to allow the sauce to thicken.
Nutrition
- Serving Size: 1 mug
- Calories: 380
- Sugar: 3
- Sodium: 450
- Fat: 18
- Saturated Fat: 10
- Carbohydrates: 42
- Fiber: 2
- Protein: 14
Keywords: microwave mac and cheese, dorm room recipe, easy mac and cheese, mug mac and cheese, quick comfort food, college meal, 5 minute recipe