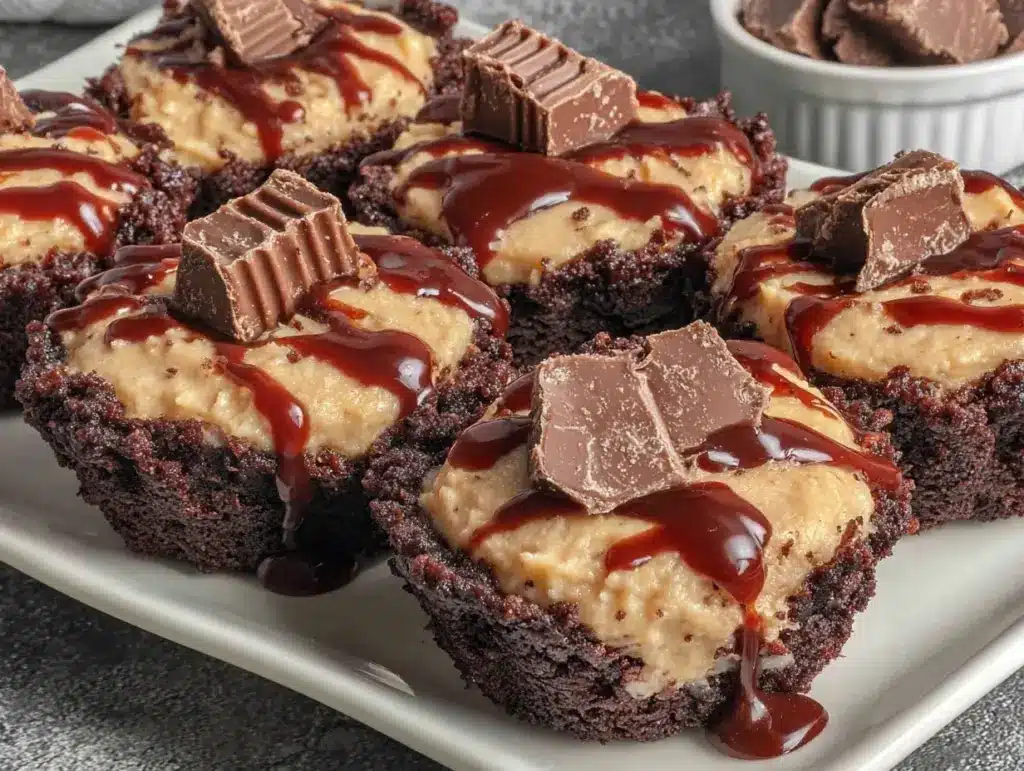
Picture this: You walk into your kitchen and the sweet, nutty smell of peanut butter mingles with the warm aroma of melted chocolate. It’s one of those scents you wish you could bottle up and keep forever. As you pop the tray of Creamy Mini Peanut Butter Pie Bites out of the fridge, the glossy chocolate drizzle glistens, catching the light just so. One bite and it’s pure bliss—creamy, dreamy, and just the right amount of rich. The first time I made these, I’ll admit I ate more than my fair share before they even made it onto the serving platter (hey, someone’s got to do the taste testing, right?).
My connection to peanut butter desserts runs deep—when I was knee-high to a grasshopper, my grandma would whip up peanut butter pies for every Sunday supper. These pie bites are my way of bottling that memory, but with a modern, mini twist. I stumbled on the idea during a rainy weekend when I was trying to whip up a treat for my kids that was easy to share, fun to eat, and, honestly, didn’t require turning on the oven. Let’s face it, sometimes you just want something quick, sweet, and guaranteed to be a crowd-pleaser. And you know what? My family couldn’t stop sneaking them off the cooling rack. These are dangerously easy to make, and they deliver pure, nostalgic comfort in every bite.
Whether you’re prepping for a potluck, adding a sweet treat to your kids’ lunchboxes, or looking to brighten up your Pinterest dessert board, these Creamy Mini Peanut Butter Pie Bites with Chocolate Drizzle fit the bill. I’ve tested them over and over (in the name of research, of course), and they’ve become a staple for family gatherings, gifting, and those “just because” moments. If you’re searching for a dessert that feels like a warm hug and tastes even better, you’re going to want to bookmark this one!
Why You’ll Love This Recipe
- Quick & Easy: Comes together in under 30 minutes (plus chilling time)—perfect for busy weeknights, last-minute guests, or spontaneous cravings.
- Simple Ingredients: No need for fancy grocery runs; chances are you’ve got everything right in your pantry and fridge.
- Perfect for Any Occasion: These mini pie bites are a hit at potlucks, birthday parties, holiday gatherings, or just a cozy night in.
- Crowd-Pleaser: Kids, adults, and everyone in between can’t resist the creamy peanut butter filling and chocolatey finish.
- Unbelievably Delicious: The texture is silky and rich, with a satisfying crunch from the cookie base and a luscious chocolate drizzle that ties it all together.
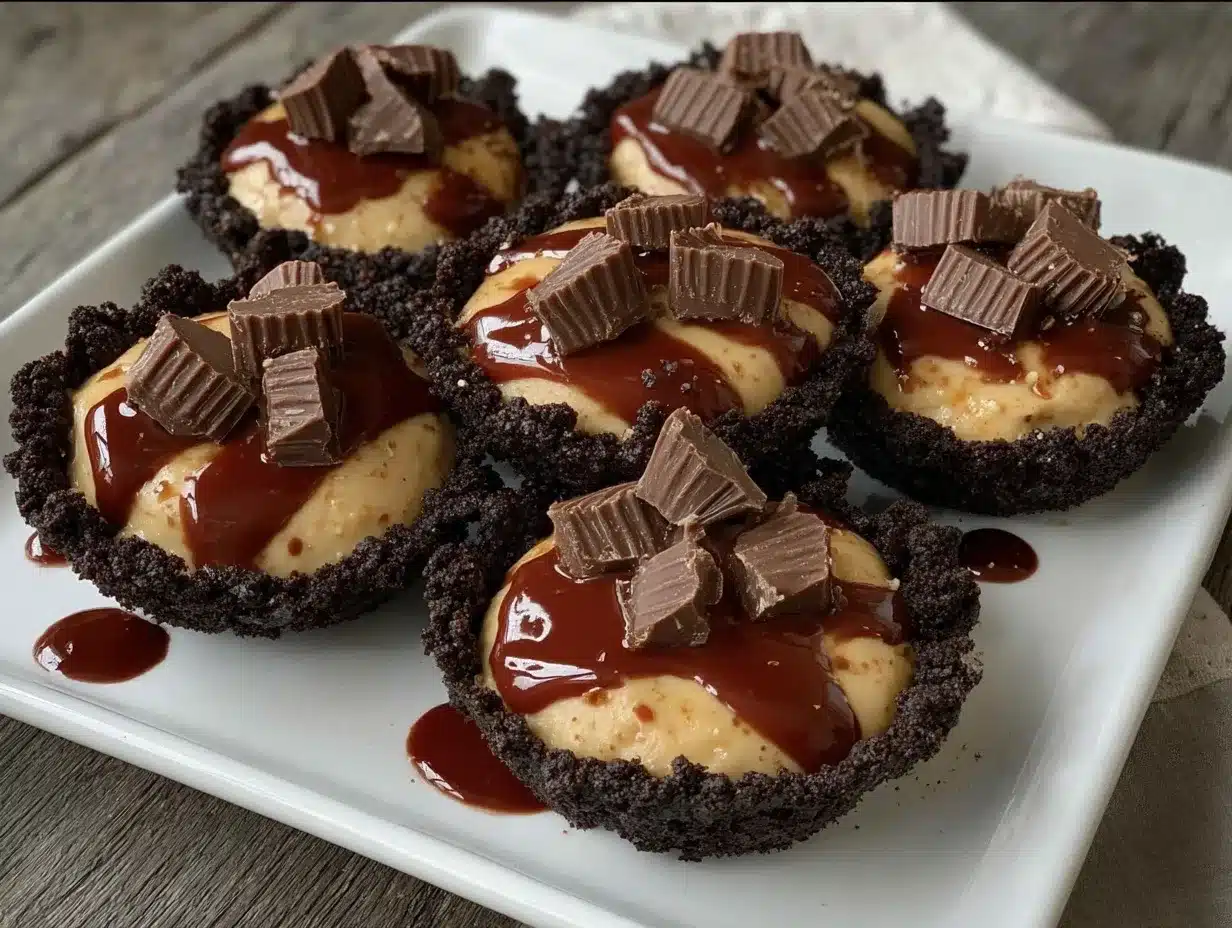
Here’s what sets these Creamy Mini Peanut Butter Pie Bites apart: I use a blend of cream cheese and whipped topping for an ultra-smooth filling (seriously, you’ll want to eat it by the spoonful). The crust is made from crushed chocolate cookies, adding just the right amount of crunch. And the chocolate drizzle? Just a little touch that makes each bite feel special. I’ve tweaked this recipe until it was just right—balancing the sweet and salty notes, making sure the filling was creamy but never heavy.
This is comfort food, reimagined. You get all that old-school peanut butter pie flavor, but with less fuss and a fun, shareable format. It’s perfect for impressing guests (without breaking a sweat), and honestly, it’s just as good as a midnight snack. I love closing my eyes after the first bite—there’s something about that creamy peanut butter and chocolate combo that feels like home.
If you’re looking for a dessert that’s easy, crowd-friendly, and utterly delicious, you’ll love this Creamy Mini Peanut Butter Pie Bites recipe. It’s my go-to for potlucks, gifting, and just treating myself after a long day.
What Ingredients You Will Need
This recipe uses simple, wholesome ingredients to deliver bold flavor and a satisfying, creamy texture—no complicated steps or hard-to-find items. If you open your pantry right now, chances are you’ve got most of what you need!
- For the Crust:
- Chocolate sandwich cookies (about 12, crushed; I like using Oreos for their classic flavor—leave the filling in for extra creaminess)
- Unsalted butter, melted (3 tablespoons / 40g; helps bind the crust and adds richness)
- For the Filling:
- Cream cheese, softened (4 oz / 115g; gives the filling structure and tang)
- Creamy peanut butter (1/2 cup / 125g; smooth works best, but you can use crunchy for extra texture)
- Powdered sugar (1/3 cup / 40g; adds sweetness without graininess)
- Vanilla extract (1 teaspoon / 5ml; pure vanilla is my favorite, but imitation works in a pinch)
- Whipped topping or heavy cream, whipped (1 cup / 240ml; I often use store-bought whipped topping for ease, but homemade whipped cream is lovely too)
- For the Chocolate Drizzle:
- Semisweet chocolate chips (1/3 cup / 60g; you can use dark or milk chocolate if you prefer)
- Coconut oil or vegetable oil (1 teaspoon / 5ml; helps the chocolate set with a nice shine)
- Optional Toppings:
- Crushed peanuts (for crunch)
- Mini chocolate chips
- Sea salt flakes (for a fancy touch)
Ingredient Tips: If you’re going gluten-free, grab gluten-free chocolate cookies. For dairy-free, swap the cream cheese and whipped topping with plant-based alternatives (I’ve tried Kite Hill cream cheese and So Delicious CocoWhip—both work). In summer, I sometimes swap the chocolate drizzle for a fresh berry puree, just to change things up. Trust me, you can make these your own with what you have!
Equipment Needed
- Mini muffin pan (24-cup; silicone pans make it super easy to pop the bites out, but metal works too)
- Mixing bowls (at least two—one for crust, one for filling)
- Hand mixer or stand mixer (makes the filling extra creamy; you can use a sturdy whisk, but it takes some elbow grease!)
- Spatula (for scraping every last bit of peanut butter goodness)
- Food processor or zip-top bag and rolling pin (for crushing cookies; either method works—sometimes I let my kids do the smashing for fun)
- Microwave-safe bowl (to melt chocolate chips)
- Spoon or small scoop (for portioning crust and filling)
- Parchment paper or mini cupcake liners (optional, but helps with easy removal and less mess)
If you don’t have a mini muffin pan, you can use regular cupcake liners on a tray and fill them about halfway. For crushing cookies, I’ve used everything from my old-school food processor to a rolling pin (and, honestly, sometimes just my hands). Maintenance tip: If you use a silicone pan, wash it with warm soapy water and let it air dry to avoid lingering odors. Budget-friendly? Most equipment is stuff you already have—no need for anything fancy, promise!
Preparation Method
- Prepare the Crust:
Crush the chocolate sandwich cookies (about 12) into fine crumbs using a food processor, or place them in a zip-top bag and smash with a rolling pin. Add 3 tablespoons (40g) melted unsalted butter and mix until evenly moistened.
Tip: The mixture should look like wet sand—if it’s too dry, add a tiny bit more melted butter.
Spoon about 1 teaspoon (5g) of the mixture into each mini muffin cup and press down firmly to form a compact base. Chill in the fridge while you make the filling (about 10 minutes). - Make the Filling:
In a mixing bowl, beat 4 oz (115g) softened cream cheese until smooth. Add 1/2 cup (125g) creamy peanut butter and 1/3 cup (40g) powdered sugar. Beat until light and fluffy—about 2-3 minutes. Scrape down the sides, add 1 teaspoon (5ml) vanilla extract, and mix for another 30 seconds.
Warning: Don’t over-mix or the filling may get too loose. It should hold soft peaks and look creamy.
Gently fold in 1 cup (240ml) whipped topping with a spatula until just combined.
Sensory cue: The filling should be pale, thick, and super creamy—like a soft mousse. - Assemble the Pie Bites:
Spoon or pipe the peanut butter filling over the chilled crusts, filling each cup almost to the top. Smooth the tops with a spoon or offset spatula. Chill in the fridge for at least 1 hour (or 30 minutes in the freezer if you’re impatient like me).
Efficiency tip: Use a small cookie scoop for even portions and less mess! - Chocolate Drizzle:
Melt 1/3 cup (60g) semisweet chocolate chips with 1 teaspoon (5ml) coconut oil in a microwave-safe bowl, heating in 20-second bursts and stirring until smooth. Let cool slightly (don’t drizzle when piping hot, or it’ll melt the filling).
Drizzle chocolate over chilled pie bites using a spoon or piping bag. If you want a thicker drizzle, double the chocolate and go wild!
Troubleshooting: If your chocolate seizes, add a few more drops of oil and stir gently. - Optional Toppings:
Sprinkle with crushed peanuts, mini chocolate chips, or sea salt flakes while the chocolate is still soft. - Chill and Serve:
Return bites to the fridge for 10 minutes to set the chocolate. Pop out of the pan or remove liners, plate up, and enjoy!
Sensory cue: The bites should be firm but creamy—hold their shape when picked up, but melt in your mouth.
Cooking Tips & Techniques
- Room Temperature Ingredients: Always use softened cream cheese for the filling; cold cream cheese can make the mixture lumpy (learned that one the hard way!).
- Cookie Crust Consistency: If the crust mixture is too dry, the bites might crumble. If it’s too wet, they’ll be greasy—aim for a texture like damp sand.
- Filling Texture: Don’t over-mix the filling after adding whipped topping; it can deflate and get runny. Fold gently until just combined.
- Chocolate Drizzle: Let the chocolate cool for a minute before drizzling—hot chocolate will melt the filling and run everywhere (trust me, I’ve had some messy batches!).
- Multitasking: While the crusts chill, make the filling to save time. You can melt chocolate while the assembled bites are chilling.
- Consistency & Success: For evenly sized bites, use a small cookie scoop. It speeds things up and gives professional-looking results.
- Common Mistakes: Skipping chill time can make the bites too soft; always let them set before serving. Overfilling the muffin cups makes them hard to remove.
- Lessons Learned: I’ve had batches where the crust was too thick and overwhelmed the filling—stick to about a teaspoon per bite for the right balance.
With these tips, your Creamy Mini Peanut Butter Pie Bites with Chocolate Drizzle will turn out picture-perfect, every time—whether it’s your first batch or your hundredth.
Variations & Adaptations
- Gluten-Free Version: Swap regular chocolate cookies for gluten-free sandwich cookies. Use certified gluten-free peanut butter if needed.
- Dairy-Free Option: Replace cream cheese and whipped topping with plant-based alternatives (like almond milk cream cheese and coconut whipped topping).
- Seasonal Twist: In summer, top with fresh berries or drizzle a berry coulis instead of chocolate. In autumn, add a pinch of cinnamon to the filling for a cozy vibe.
- Flavor Boost: Add 1 tablespoon (15g) mini chocolate chips to the filling for extra texture, or swirl in a teaspoon of honey for extra sweetness.
- Cooking Method Adaptation: No mini muffin pan? Use regular cupcake liners and fill halfway for larger bites. Or press into a small baking dish and cut into bars.
- Allergen Substitutions: For nut allergies, swap peanut butter with sunflower seed butter or cookie butter. Skip the peanut topping and use crispy rice cereal instead.
My personal favorite? Swapping out half the peanut butter for almond butter and adding a pinch of sea salt on top. It’s a little different, a little grown-up, but still totally crave-worthy.
Serving & Storage Suggestions
- Serving Temperature: Serve these Creamy Mini Peanut Butter Pie Bites chilled, straight from the fridge. They’re best cold, when the filling is set and the chocolate drizzle is firm.
- Presentation: Plate them on a pretty platter, sprinkle with extra chocolate chips or nuts, and add a dash of sea salt for that “fancy bakery” look.
- Pairings: These bites go great with a cold glass of milk, hot coffee, or even a scoop of vanilla ice cream.
- Storage: Store in an airtight container in the fridge for up to 5 days. They also freeze beautifully—just pop them in a freezer-safe container and thaw in the fridge overnight when ready to serve.
- Reheating: No need to reheat, but if you like a softer filling, let them sit at room temperature for 10 minutes before serving.
- Flavor Development: The flavors deepen as they chill—if you can wait, they’re even better on day two!
Nutritional Information & Benefits
| Serving Size | 1 mini pie bite |
|---|---|
| Calories | Approx. 110 kcal |
| Fat | 7g |
| Carbohydrates | 12g |
| Protein | 2g |
Peanut butter packs protein, healthy fats, and a dose of magnesium. The cream cheese adds a bit of calcium and creamy richness. If you go for the nut-free version, sunflower seed butter is packed with vitamin E. Gluten-free and dairy-free options make these bites easy to adapt for many diets. Just a heads-up: contains peanuts, dairy, and gluten (unless you swap for allergen-friendly ingredients).
From a wellness perspective, I love that these bites are portion-controlled and made with real ingredients—no mystery stuff, and you can tweak the sugar as needed!
Conclusion
If you’re searching for a dessert that’s easy, creamy, and guaranteed to win over any crowd, these Creamy Mini Peanut Butter Pie Bites with Chocolate Drizzle are your answer. They’re simple to make, endlessly adaptable, and just plain delicious. I love how they channel that nostalgic peanut butter pie flavor in a cute, bite-sized package (honestly, I can’t help but sneak a few every time I make a batch!).
Don’t be afraid to put your own spin on these—swap out toppings, adjust the filling, or make them gluten-free or dairy-free. If you’re ready for a dessert that’s made for sharing and perfect for any occasion, give this recipe a try! I’d love to hear how you make them your own—drop a comment below, share your pictures, or tag me with your creative variations.
Happy baking (and snacking)! Here’s to creating sweet memories—one creamy, chocolate-drizzled bite at a time.
Frequently Asked Questions
Can I make Creamy Mini Peanut Butter Pie Bites ahead of time?
Absolutely! These bites are perfect for making ahead. Just chill them in the fridge until you’re ready to serve, or freeze for longer storage.
What can I use instead of peanut butter for allergies?
Sunflower seed butter or cookie butter both work great. The flavor will change slightly, but they’re still super tasty.
Do I need a mini muffin pan for this recipe?
Nope! You can use regular cupcake liners and fill them halfway, or press the crust and filling into a small baking dish and cut into bars.
How do I keep the chocolate drizzle from getting messy?
Let the chocolate cool for a minute before drizzling, and make sure the pie bites are chilled. That way, the drizzle sets quickly and stays neat.
Can I freeze Creamy Mini Peanut Butter Pie Bites?
Yes! Freeze in a single layer, then transfer to a container once solid. Thaw in the fridge before serving—they taste just as fresh!
Pin This Recipe!
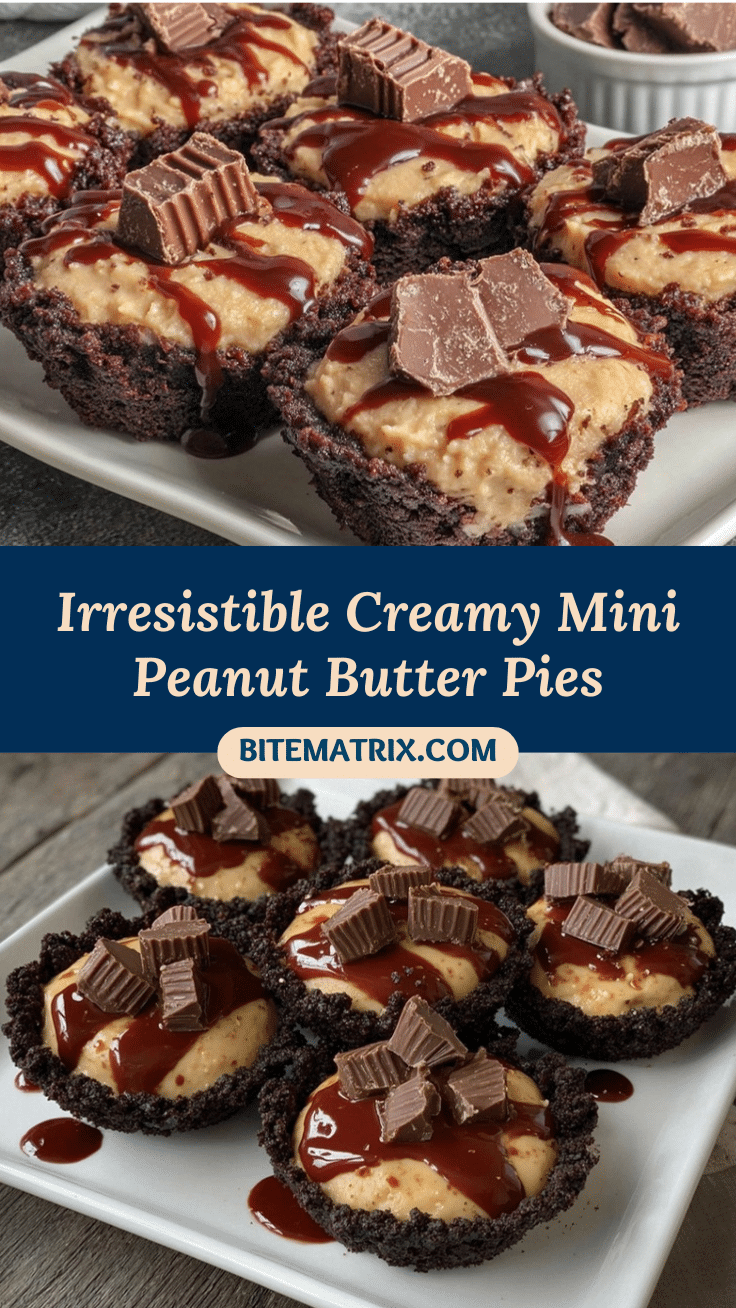
Creamy Mini Peanut Butter Pie Bites with Chocolate Drizzle
These creamy, dreamy mini peanut butter pie bites feature a crunchy chocolate cookie crust, silky peanut butter filling, and a glossy chocolate drizzle. Quick to make, no baking required, and perfect for sharing at parties or enjoying as a sweet snack.
- Prep Time: 15 minutes
- Cook Time: 0 minutes
- Total Time: 1 hour 25 minutes
- Yield: 24 mini pie bites 1x
- Category: Dessert
- Cuisine: American
Ingredients
- 12 chocolate sandwich cookies (such as Oreos), crushed, filling included
- 3 tablespoons unsalted butter, melted
- 4 oz cream cheese, softened
- 1/2 cup creamy peanut butter
- 1/3 cup powdered sugar
- 1 teaspoon vanilla extract
- 1 cup whipped topping or heavy cream, whipped
- 1/3 cup semisweet chocolate chips
- 1 teaspoon coconut oil or vegetable oil
- Optional: crushed peanuts
- Optional: mini chocolate chips
- Optional: sea salt flakes
Instructions
- Crush chocolate sandwich cookies into fine crumbs using a food processor or zip-top bag and rolling pin. Mix with melted butter until evenly moistened.
- Spoon about 1 teaspoon of the mixture into each mini muffin cup and press down firmly to form a compact base. Chill in the fridge for about 10 minutes.
- In a mixing bowl, beat softened cream cheese until smooth. Add peanut butter and powdered sugar; beat until light and fluffy (2-3 minutes). Scrape down sides, add vanilla extract, and mix for another 30 seconds.
- Gently fold in whipped topping until just combined.
- Spoon or pipe the peanut butter filling over the chilled crusts, filling each cup almost to the top. Smooth the tops. Chill in the fridge for at least 1 hour (or 30 minutes in the freezer).
- Melt chocolate chips with coconut oil in a microwave-safe bowl, heating in 20-second bursts and stirring until smooth. Let cool slightly.
- Drizzle chocolate over chilled pie bites using a spoon or piping bag.
- Sprinkle with optional toppings (crushed peanuts, mini chocolate chips, sea salt flakes) while chocolate is still soft.
- Return bites to the fridge for 10 minutes to set the chocolate. Remove from pan or liners, plate, and enjoy!
Notes
Use softened cream cheese for a smooth filling. For gluten-free, use GF cookies; for dairy-free, swap cream cheese and whipped topping for plant-based alternatives. Chill time is essential for firm bites. Let chocolate cool before drizzling to avoid melting the filling. Bites can be made ahead and freeze well.
Nutrition
- Serving Size: 1 mini pie bite
- Calories: 110
- Sugar: 8
- Sodium: 70
- Fat: 7
- Saturated Fat: 3
- Carbohydrates: 12
- Fiber: 1
- Protein: 2
Keywords: peanut butter pie bites, mini dessert, chocolate drizzle, no bake, party treat, easy dessert, creamy peanut butter, Oreo crust, kid friendly, potluck dessert


