“You won’t believe this,” my neighbor said as she handed me a little jar at the block party last summer. It was creamy, dreamy, and packed with Oreo goodness — honestly, I didn’t expect much from a tiny jar, but that bite made me rethink my dessert game entirely. That moment stuck with me, especially since my own graduation celebration was just around the corner. I mean, who has time to fuss over layered cakes with frosting disasters? Not me. So I set out to recreate that magic in a way that fits busy schedules and last-minute party plans.
One evening, while juggling a cracked mixing bowl and a phone call from my cousin asking for dessert ideas, this no-bake Oreo cheesecake jar recipe came together like a charm. It’s the kind of recipe that doesn’t just satisfy a sweet tooth but also brings a little sense of accomplishment — you know, that “I made this” feeling without turning the kitchen upside down.
Maybe you’ve been there, staring at the clock on a graduation day, hoping for something simple yet special. These cheesecake jars are exactly that: creamy, rich, and packed with texture — all without heating up the oven or pulling out the fancy cake pans. Plus, they’re perfect for serving in small portions, which means less waste and more smiles at the party table.
Whether you’re a seasoned baker or someone who thinks “cheesecake” requires professional skills, this recipe is designed to make you look like a dessert pro — no stress, just sweet success. I keep coming back to it for celebrations because it’s reliable, crowd-pleasing, and honestly, a little bit addictive.
Why You’ll Love This Creamy No-Bake Graduation Oreo Cheesecake Jars Recipe
From my many tests in the kitchen, here’s why this recipe is a winner every single time:
- Quick & Easy: Ready in under 30 minutes, perfect for those last-minute party preps or when you just want to chill and enjoy the festivities.
- Simple Ingredients: No fancy or hard-to-find items here. Most are pantry staples like cream cheese, Oreos, and whipped topping.
- Perfect for Parties: These jars are an ideal grab-and-go treat at graduations, potlucks, or casual get-togethers — no slicing or messy plates involved.
- Crowd-Pleaser: Kids and adults alike rave about the creamy texture paired with crunchy Oreo bits — it’s a flavor combo that rarely misses.
- Unbelievably Delicious: The cheesecake filling is silky smooth thanks to the no-bake method, and the Oreo crust adds that perfect chocolate crunch.
What sets this apart from other no-bake cheesecakes? It’s the layering technique and the way the crushed Oreos are folded gently into the creamy filling, giving the jars a delightful texture contrast in every spoonful. Plus, the jars themselves make the dessert feel extra festive — like a little celebration in each serving.
Honestly, this recipe isn’t just good — it’s the kind of treat that makes you pause and savor, even amidst the chaos of party prep. It’s comfort food that’s approachable, fuss-free, and always invites a second helping.
What Ingredients You Will Need
This recipe uses straightforward ingredients that come together to create a rich, velvety cheesecake experience with the iconic Oreo twist. Most of these are probably sitting in your pantry or fridge already, which is a relief when you’re scrambling for dessert ideas.
- Oreos: 24 cookies, crushed (I prefer using the classic Oreo cookies for that authentic chocolaty crunch)
- Unsalted Butter: 5 tablespoons, melted (helps bind the crust and adds richness)
- Cream Cheese: 16 oz (450 g), softened (room temperature for smooth blending; Philadelphia brand works great here)
- Powdered Sugar: ¾ cup (90 g), sifted (for sweetness without any graininess)
- Vanilla Extract: 1 teaspoon (adds depth to the creamy filling)
- Heavy Whipping Cream: 1 cup (240 ml), chilled (whipped to soft peaks for that airy texture; you can substitute with canned coconut cream for dairy-free)
- Mini Oreo Cookies: Optional, for garnish (adds a cute finishing touch on top of each jar)
Pro tip: When crushing Oreos, I like to pulse them in a food processor until there are some fine crumbs but still a few chunky bits — that way, you get texture without it being too gritty.
For a seasonal twist, you could swap the standard Oreos for mint or peanut butter-flavored ones, but honestly, the classic flavor is pretty unbeatable here.
Equipment Needed
- Mixing Bowls: At least two — one for the crust mix and one for the cheesecake filling.
- Electric Hand Mixer or Stand Mixer: Essential for whipping cream and cream cheese smoothly.
- Food Processor or Rolling Pin: To crush the Oreos; a food processor makes it faster, but a rolling pin and zip-top bag work just fine.
- Measuring Cups and Spoons: For accuracy in ingredients.
- Spoons or Small Spatulas: For folding and layering the cheesecake mixture.
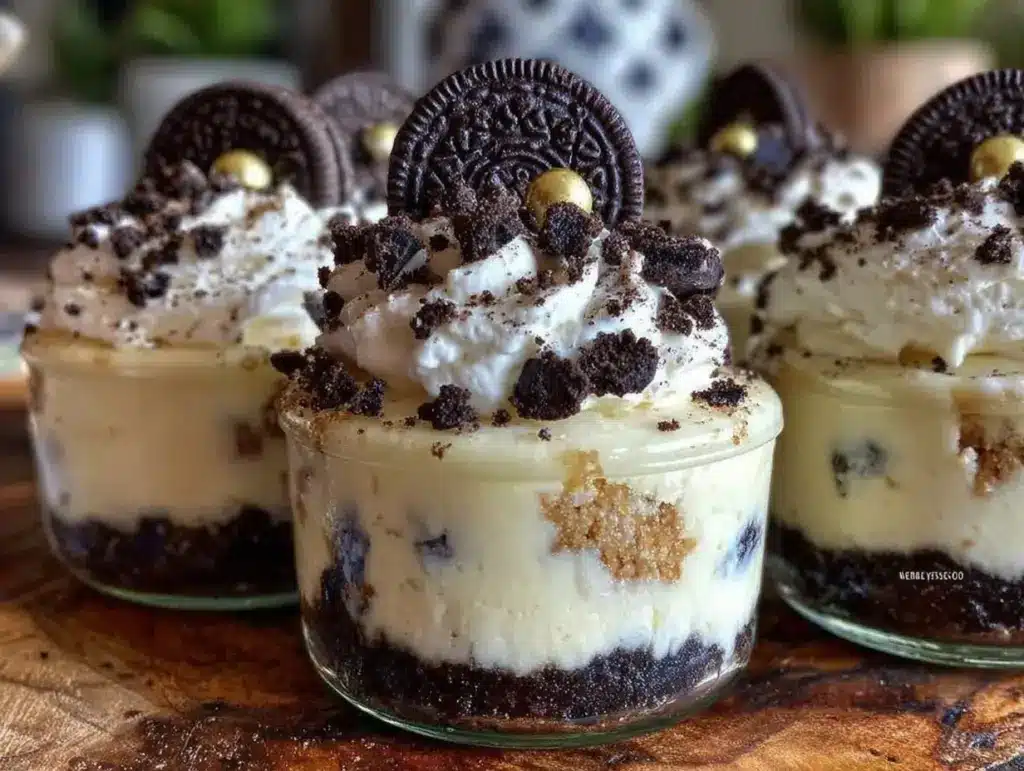
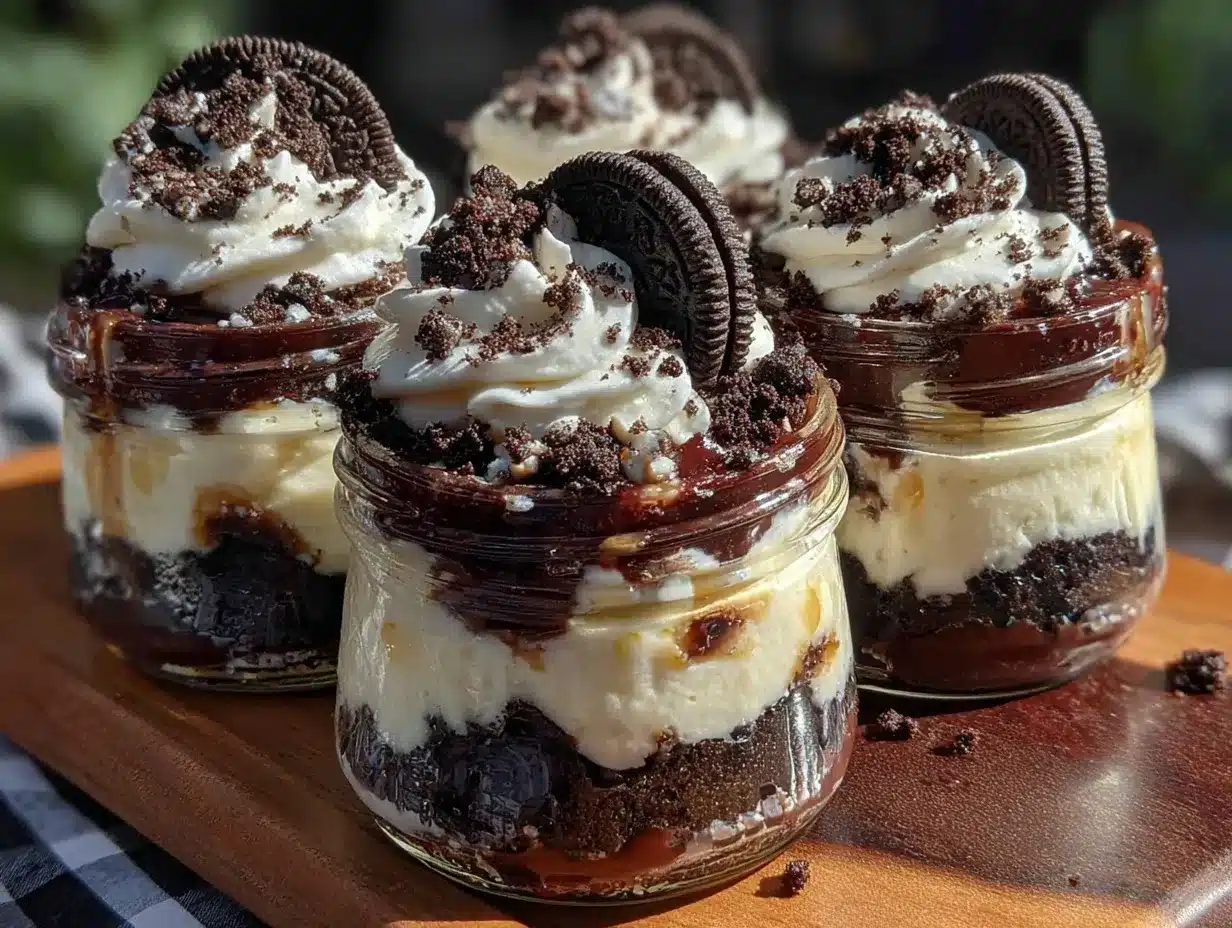
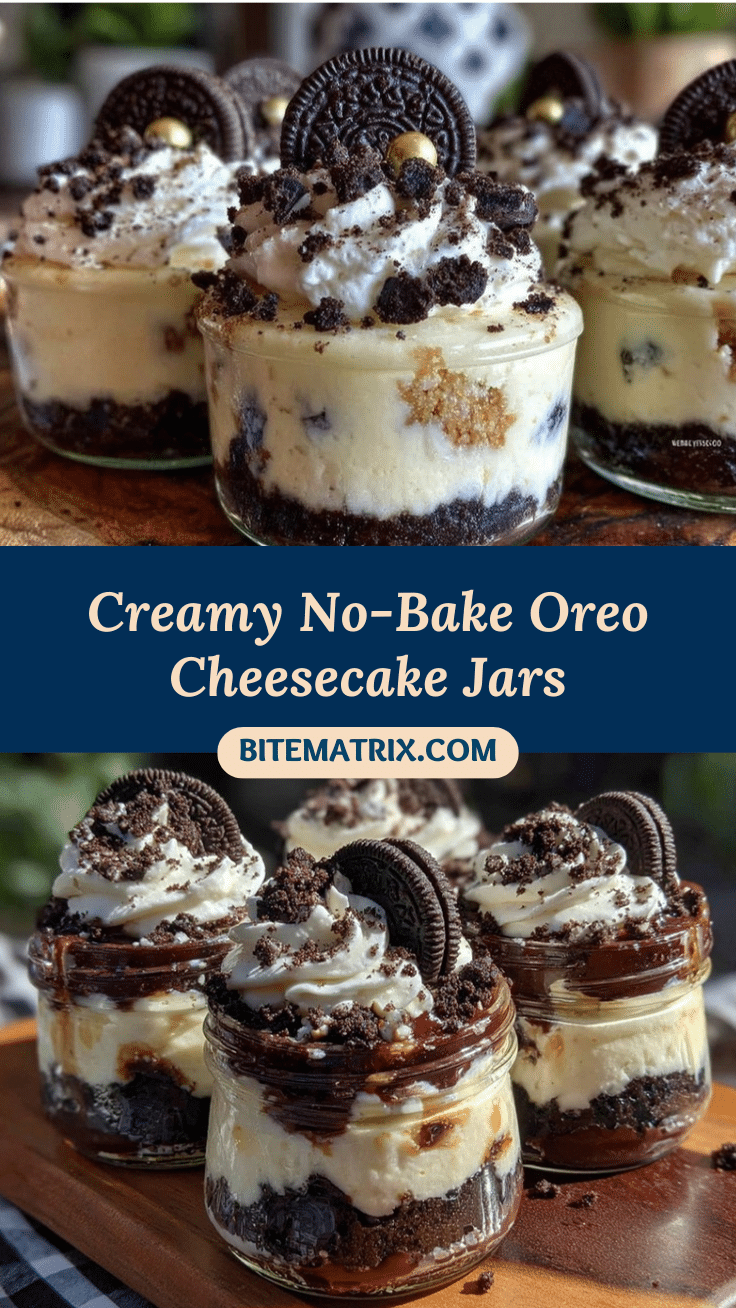
- Jars or Small Glasses: Mason jars or any clear small jars to serve the cheesecake. I’ve used recycled jam jars before — budget-friendly and charming!
For those who don’t own a mixer, whipping cream by hand is possible, though it takes a bit more elbow grease. Also, if you want to skip the jars, small dessert cups or even ramekins work well.
Preparation Method
- Prepare the Oreo Crust: Crush 24 Oreo cookies until you have about 1 ½ cups (150 g) of crumbs. Mix these crumbs with 5 tablespoons (70 g) melted unsalted butter until fully combined. It should look like wet sand. (Tip: If your mixture feels too dry, add a bit more melted butter, one teaspoon at a time.)
- Layer the Crust: Spoon about 2 tablespoons (30 g) of the Oreo crust into the bottom of each jar, pressing gently with the back of the spoon to form an even base. This step gives you that satisfying crunch in every bite. Set the jars aside.
- Make the Cheesecake Filling: In a large bowl, beat the softened cream cheese (16 oz/450 g) with ¾ cup (90 g) powdered sugar and 1 teaspoon vanilla extract until smooth and creamy. (Pro tip: Use room-temperature cream cheese for no lumps.)
- Whip the Cream: In a separate chilled bowl, whip 1 cup (240 ml) heavy whipping cream until soft peaks form. You’ll know it’s ready when the cream holds its shape but still looks silky.
- Combine Filling and Cream: Gently fold the whipped cream into the cream cheese mixture, preserving the airiness. Fold in about 1 cup (100 g) of crushed Oreos (reserve a handful for garnish). Be careful not to overmix or you’ll lose that light texture.
- Assemble the Jars: Spoon the cheesecake filling over the Oreo crust in each jar, filling to the top. Smooth the surface gently with a spoon.
- Chill: Cover the jars with lids or plastic wrap and refrigerate for at least 4 hours, ideally overnight, to let the cheesecake set and flavors meld.
- Garnish and Serve: Before serving, sprinkle the reserved crushed Oreos or mini Oreos on top for that extra festive look.
Note: If your filling feels too thick after chilling, let it sit at room temperature for 10 minutes before serving for easier scooping.
Cooking Tips & Techniques
Here’s what I’ve learned from many attempts with no-bake cheesecake jars that might save you some kitchen headaches:
- Room Temperature Ingredients Matter: Cream cheese that’s too cold won’t mix smoothly, leading to lumps. Let it soften naturally; avoiding the microwave prevents uneven melting.
- Folding is Key: When combining whipped cream with the cream cheese mixture, fold gently to keep the cheesecake light and fluffy. Stirring too hard will deflate the cream.
- Crust Consistency: The Oreo crust should hold together when pressed but not be oily or soggy. Melted butter binds it, so measure carefully.
- Chill Time Isn’t Optional: The flavor and texture improve after a few hours in the fridge. Patience pays off here.
- Multitasking Tips: While the cheesecake chills, prep your party setup or make a simple drink pairing. This recipe’s ease frees up your time.
- Common Mistake: Using low-fat cream cheese or whipped topping substitutes can result in a less creamy, less stable filling. Full-fat ingredients really make a difference.
Variations & Adaptations
- Gluten-Free Option: Swap standard Oreos with gluten-free sandwich cookies. The rest of the recipe stays the same.
- Fruit Twist: Add a layer of fresh sliced strawberries or raspberries between the crust and filling for a bright contrast.
- Peanut Butter Swirl: Gently fold ¼ cup (60 g) creamy peanut butter into the cheesecake filling before assembling for a nutty surprise.
- Vegan Version: Use dairy-free cream cheese and coconut whipped cream; replace Oreos with vegan-certified cookies.
- Chocolate Lovers: Mix mini chocolate chips into the filling or drizzle melted chocolate on top just before serving.
Personally, I once tried adding a pinch of cinnamon to the crust for a subtle warmth — it’s a small change but gave the jars a cozy vibe perfect for a fall graduation party.
Serving & Storage Suggestions
Serve these cheesecake jars chilled, straight from the refrigerator. The creamy texture is best enjoyed cold, with each bite offering that satisfying smoothness and Oreo crunch. They look adorable on a dessert table, especially when tied with a little ribbon or topped with a festive graduation cap decoration.
Pair them with a light, bubbly drink like sparkling lemonade or an iced coffee for balance. For a grown-up crowd, a splash of coffee liqueur on the side complements the chocolatey notes beautifully.
Store leftovers covered in the fridge for up to 3 days. If you want to keep them longer, freeze the jars (without garnish) for up to 1 month. To thaw, place in the fridge overnight and add fresh toppings before serving.
Flavors actually blend and mellow a bit after sitting overnight, so if you can prepare ahead, that’s even better. Just watch out — they might disappear fast once guests get a taste!
Nutritional Information & Benefits
Each jar (serving size about 1 cup/240 ml) contains roughly:
- Calories: 350-400
- Fat: 28g (mostly from cream cheese and butter)
- Carbohydrates: 28g (from Oreos and sugar)
- Protein: 5g
While this is definitely a treat, it includes calcium and protein from the cream cheese and cream. Using full-fat dairy results in a richer mouthfeel and helps with satiety, meaning a little goes a long way.
For those watching sugar or dairy intake, consider swapping ingredients as mentioned in the variations. Gluten-free and vegan adaptations make this recipe accessible to more diets without losing that creamy, indulgent feel.
Conclusion
This creamy no-bake graduation Oreo cheesecake jars recipe is a delightful mix of simplicity and indulgence, perfect for celebrating milestones without the fuss. It’s approachable enough for beginners yet impressive enough to earn compliments from family, friends, and even that picky aunt who claims she’s “not much of a dessert person.”
Feel free to tweak the flavors, add your favorite toppings, or even try one of the variations to make it your own. I keep coming back to this recipe because it hits all the right notes: creamy, crunchy, sweet, and just a bit nostalgic.
If you try it out, I’d love to hear how it went! Drop a comment below, share your photo, or tell me about your favorite twist on this classic. Happy celebrating, and here’s to sweet moments in small jars!
FAQs About Creamy No-Bake Graduation Oreo Cheesecake Jars
Can I make these cheesecake jars ahead of time?
Absolutely! They actually taste better after chilling overnight. Just keep them covered in the fridge until ready to serve.
Do I need to use a mixer for the filling?
An electric mixer helps achieve the smooth, fluffy texture, but you can whisk by hand if you’re up for some arm exercise.
Can I use other cookies besides Oreos?
Yes! Chocolate sandwich cookies work well, or try vanilla sandwich cookies for a different twist.
How long do these jars keep in the fridge?
They stay fresh for up to 3 days when covered properly. Beyond that, the texture might change.
Is there a dairy-free version of this recipe?
Yes, swap cream cheese and whipping cream with dairy-free alternatives like vegan cream cheese and coconut whipped cream.
Pin This Recipe!
Creamy No-Bake Graduation Oreo Cheesecake Jars

A quick and easy no-bake Oreo cheesecake served in jars, perfect for graduation parties and last-minute celebrations. Creamy, rich, and packed with Oreo crunch without the need for an oven.
- Prep Time: 15 minutes
- Cook Time: 0 minutes
- Total Time: 4 hours 15 minutes
- Yield: 8 servings 1x
- Category: Dessert
- Cuisine: American
Ingredients
- 24 Oreo cookies, crushed
- 5 tablespoons unsalted butter, melted
- 16 oz (450 g) cream cheese, softened
- 3/4 cup (90 g) powdered sugar, sifted
- 1 teaspoon vanilla extract
- 1 cup (240 ml) heavy whipping cream, chilled
- Mini Oreo cookies (optional, for garnish)
Instructions
- Crush 24 Oreo cookies until you have about 1 ½ cups (150 g) of crumbs. Mix these crumbs with 5 tablespoons (70 g) melted unsalted butter until fully combined. It should look like wet sand. If mixture feels too dry, add more melted butter, one teaspoon at a time.
- Spoon about 2 tablespoons (30 g) of the Oreo crust into the bottom of each jar, pressing gently with the back of the spoon to form an even base. Set the jars aside.
- In a large bowl, beat the softened cream cheese (16 oz/450 g) with ¾ cup (90 g) powdered sugar and 1 teaspoon vanilla extract until smooth and creamy.
- In a separate chilled bowl, whip 1 cup (240 ml) heavy whipping cream until soft peaks form.
- Gently fold the whipped cream into the cream cheese mixture, preserving the airiness. Fold in about 1 cup (100 g) of crushed Oreos (reserve a handful for garnish). Be careful not to overmix.
- Spoon the cheesecake filling over the Oreo crust in each jar, filling to the top. Smooth the surface gently with a spoon.
- Cover the jars with lids or plastic wrap and refrigerate for at least 4 hours, ideally overnight, to let the cheesecake set and flavors meld.
- Before serving, sprinkle the reserved crushed Oreos or mini Oreos on top for garnish.
Notes
Use room temperature cream cheese for smooth blending. Fold whipped cream gently to keep the filling light and fluffy. Chill for at least 4 hours or overnight for best texture. If filling is too thick after chilling, let sit at room temperature for 10 minutes before serving. For gluten-free, use gluten-free sandwich cookies. For vegan, use dairy-free cream cheese and coconut whipped cream with vegan cookies.
Nutrition
- Serving Size: About 1 cup (240 ml)
- Calories: 375
- Sugar: 20
- Sodium: 220
- Fat: 28
- Saturated Fat: 17
- Carbohydrates: 28
- Fiber: 1
- Protein: 5
Keywords: no-bake cheesecake, Oreo cheesecake, graduation dessert, party dessert, easy cheesecake jars, no oven dessert