“Is this really edible?” was the question I kept getting when I first brought out the Delicious Kitty Litter Cake Gross Out Dessert at a friend’s party. Honestly, I was skeptical myself—how could something that looks like a tray of kitty litter be anything but a gag? But as soon as someone took a bite and their face lit up with surprise, I knew this recipe was a keeper. The whole idea came from a late-night text thread with my mischievous cousin, who dared me to make a dessert that looked totally gross but tasted amazing. I’m not really a baker, but this one stuck with me after I made it three times in a week (yes, three times!). It’s the kind of recipe that sneaks up on you, making you grin a little before you dig in and then charming you with its sweet, creamy layers.
What I love most is that it’s a perfect conversation starter, especially for parties where you want to bring a little surprise without too much fuss. Plus, the mix of textures and flavors—crumbly, creamy, sweet, a tiny bit salty—just works so well together. It’s like comfort food got a fun, cheeky makeover. The best part? You don’t have to be a pro chef to pull this off. After a few tries, I figured out some tricks that make it almost foolproof, and I’m sharing those with you here. This cake isn’t just a dessert; it’s a little moment of delight wrapped in a playful disguise.
By the end, you might find yourself making it for every party, just like I did when I first realized how much people loved it. It’s funny how something that looks so strange can turn out to be a crowd favorite, but hey, that’s the magic of the Delicious Kitty Litter Cake Gross Out Dessert. I’m glad it found its way into my recipe box, and I think you’ll be glad too.
Why You’ll Love This Recipe
After testing this recipe multiple times and sharing it at various gatherings, I can confidently say it’s a standout dessert for several reasons. Here’s why the Delicious Kitty Litter Cake Gross Out Dessert might just become your go-to party treat:
- Quick & Easy: You can have this quirky dessert ready in about 30 minutes—perfect when you need a last-minute party hit or a fun surprise for kids’ events.
- Simple Ingredients: No need to hunt down specialty items. Most of the ingredients are pantry staples or easily found at any grocery store.
- Perfect for Parties: Whether it’s a Halloween bash, a kid’s birthday, or a casual get-together, this gross-out dessert sparks curiosity and laughter before anyone even takes a bite.
- Crowd-Pleaser: Kids love the silly factor, and adults appreciate the delicious combo of flavors and textures.
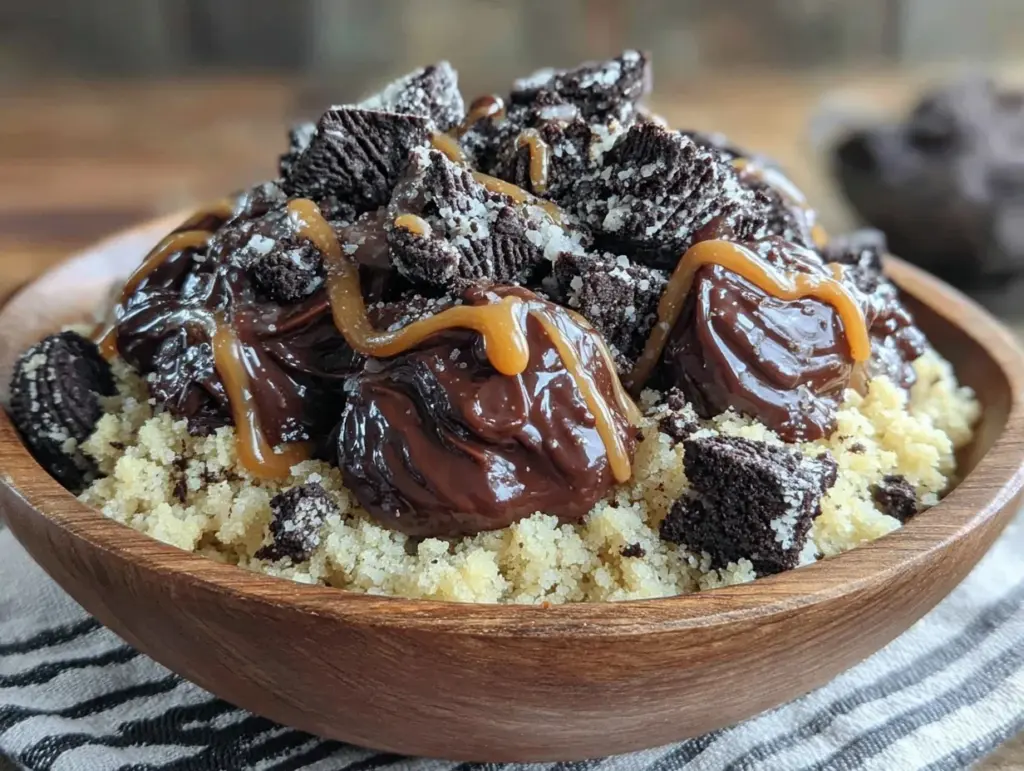
- Unbelievably Delicious: The crumbly cookie base layered with creamy pudding and topped with crushed candies creates a unique taste that’s both nostalgic and fresh.
This isn’t just another layered dessert. The secret lies in the crushed cookie crumbs that mimic kitty litter but are actually sweet and buttery, plus the addition of gummy “worms” that add a playful, chewy surprise. I’ve tried versions with different pudding flavors and cookie types, and the classic vanilla pudding with crushed shortbread cookies always wins for the best balance. It’s a little bit silly, a little bit unexpected, and honestly, just a lot of fun to make and share. Plus, it pairs well with other crowd favorites—if you’re planning a party menu, consider pairing it with some Italian sub sandwich skewers or a refreshing strawberry basil lemonade pitcher to balance out the sweetness.
What Ingredients You Will Need
This dessert uses simple, wholesome ingredients to deliver bold flavor and satisfying texture without the fuss. Most are pantry staples, and you can easily swap a few to suit dietary needs or preferences.
- Crushed Cookies (for the “litter”): 4 cups of crushed vanilla wafers or shortbread cookies (I prefer Keebler vanilla wafers for the right crumbly texture)
- Instant Vanilla Pudding Mix: 2 (3.4 oz / 96 g) packages, prepared according to package instructions with 3 cups (720 ml) of cold milk (whole or 2% works best for creaminess)
- Whipped Topping: 2 cups (480 ml) of whipped cream or store-bought whipped topping (like Cool Whip) to keep it light and fluffy
- Gummy Worms: About 1 cup (150 g) for the fun “gross” effect—feel free to use other gummy candies if preferred
- Optional Mix-ins: 1/2 cup (75 g) mini chocolate chips or crushed nuts for extra texture
- Butter: 4 tablespoons (56 g) unsalted, melted (to help bind the cookie crumbs slightly)
- Powdered Sugar: 2 tablespoons (15 g), to sweeten the crumb mixture just a bit more if desired
For substitutions, if you need gluten-free, almond flour or gluten-free vanilla cookies work well. You can swap the dairy milk with almond or oat milk as long as the pudding mix is compatible or use a dairy-free pudding alternative. If gummy worms aren’t your thing, colorful sprinkles or small candy pieces can serve as a fun topping instead. The key is to keep the “gross-out” look while making it totally edible and tasty.
Equipment Needed
- Large Mixing Bowl: For combining the cookie crumbs and other ingredients.
- Medium Bowl: To prepare the pudding mix.
- 9×13-inch Baking Dish or Clear Glass Container: Ideal for assembling the layers so the “kitty litter” effect shows through.
- Measuring Cups and Spoons: For accuracy, especially with pudding and cookie crumbs.
- Spatula or Spoon: To spread layers evenly.
- Plastic Wrap or Lid: To cover the dessert while chilling.
If you don’t have a 9×13-inch dish, any clear container or trifle bowl works fine—you want something shallow enough to see the layers clearly. Crushing cookies can be done with a food processor or by placing them in a sealed plastic bag and using a rolling pin or even a heavy pan, which is a great budget-friendly method. Personally, I’ve found using a glass dish helps with presentation, especially when serving guests who get a kick out of the “gross” visual effect.
Preparation Method
- Prepare the pudding: In a medium bowl, whisk together the instant vanilla pudding mix and 3 cups (720 ml) of cold milk until thickened, about 2 minutes. Set aside for a few minutes to firm up.
- Crush the cookies: Place 4 cups of vanilla wafers or shortbread cookies in a large resealable plastic bag. Use a rolling pin or heavy pan to crush into fine crumbs with some small chunks remaining for texture. Transfer crumbs to a large mixing bowl.
- Add buttery sweetness: Pour 4 tablespoons (56 g) of melted unsalted butter over the crumbs and sprinkle in 2 tablespoons (15 g) of powdered sugar. Mix gently until crumbs are evenly coated and slightly clump together—this helps mimic kitty litter texture.
- Layer the dessert: In your 9×13-inch dish, spread about one-third of the cookie crumb mixture evenly over the bottom.
- Add pudding layer: Spoon half of the prepared pudding over the crumbs and spread gently with a spatula.
- Whipped topping layer: Spread 1 cup (240 ml) of whipped cream over the pudding layer, smoothing it out carefully.
- Repeat layers: Add another third of the cookie crumbs over the whipped topping, followed by the remaining pudding and whipped topping.
- Top layer: Finish by sprinkling the remaining cookie crumbs on top to resemble fresh kitty litter. Scatter gummy worms strategically across the surface for that playful, “gross” effect.
- Chill: Cover the dish with plastic wrap and refrigerate for at least 2 hours, ideally 4, allowing the layers to set and flavors to meld.
- Serve: Use a large spoon to scoop portions, making sure to get a bit of each layer. Watch your guests’ reactions—they won’t forget this dessert anytime soon!
Pro tip: If the cookie crumbs seem too dry before layering, add a touch more melted butter. When spreading pudding, go slow and gentle to keep the layers neat. If you want to make it ahead, assemble it the night before and chill. The flavors deepen, and the texture is perfect by party time.
Cooking Tips & Techniques
Making the Delicious Kitty Litter Cake Gross Out Dessert isn’t complicated, but a few insider tips can prevent rookie mistakes. First, don’t skip chilling the pudding before layering—it really helps it hold its shape and prevents the crumbs from getting soggy too fast. I learned this the hard way after my first attempt was a bit runny.
When crushing cookies, leave some small chunks instead of pulverizing everything into powder. That chunkiness mimics real kitty litter texture and adds a satisfying crunch. Also, melting the butter before mixing ensures even coating of the crumbs, which prevents them from being dusty and dry.
For the gummy worms, don’t add them too early during chilling; they tend to sink or get too soft if left overnight. Add them just before serving for the best visual impact. And if you’re pressed for time, store-bought whipped topping works fine, but fresh whipped cream adds a fresher taste and texture.
Multitasking tip: While the pudding sets, prep your garnish or even arrange a simple side like a fresh cucumber dill salad to balance out richer party foods. This dessert pairs well with savory treats, such as the beer can chicken recipe I love for casual gatherings.
Variations & Adaptations
This recipe is very forgiving and lends itself well to customization, depending on your audience or dietary needs. Here are some ideas I’ve tried or would recommend:
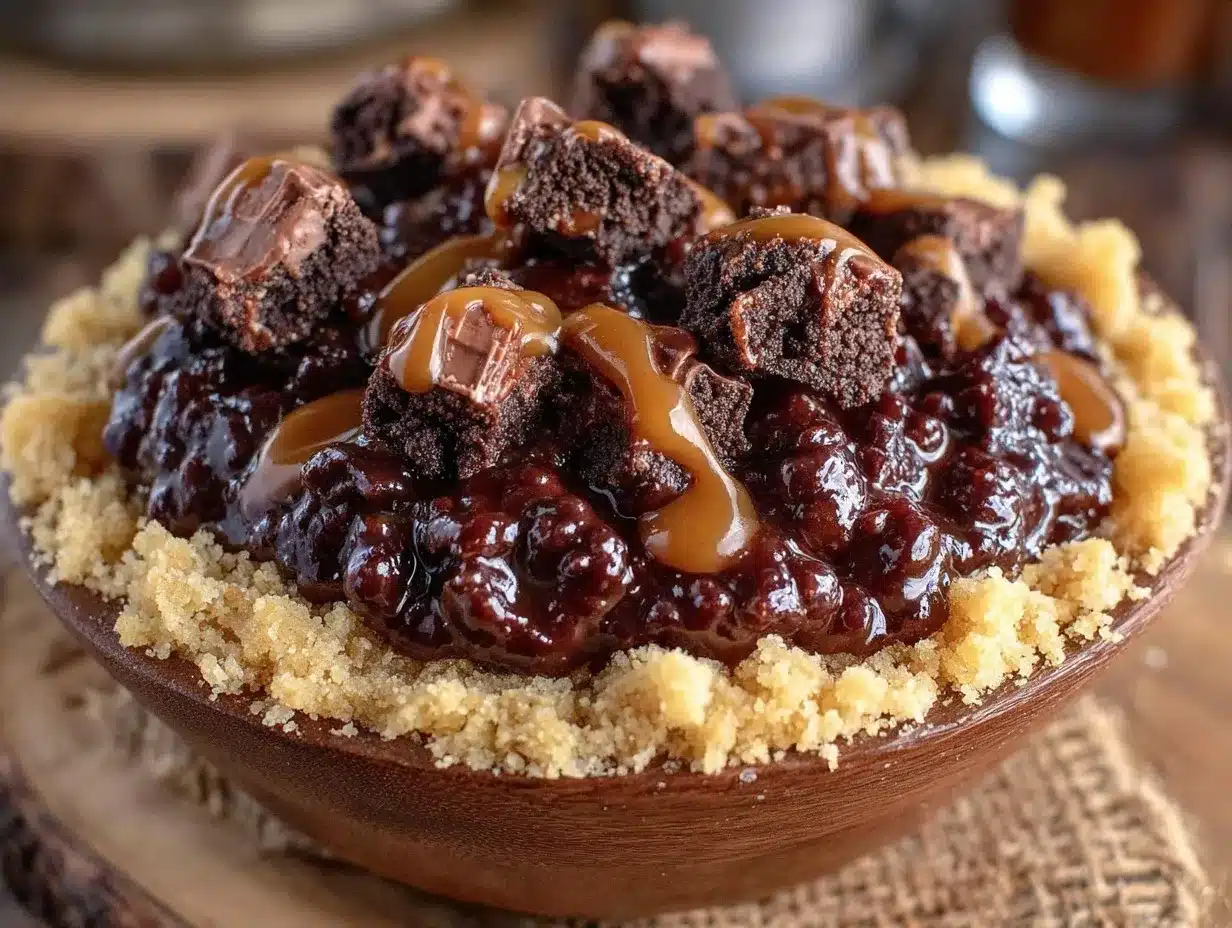
- Chocolate Kitty Litter Cake: Use chocolate pudding instead of vanilla and swap vanilla wafers for crushed chocolate sandwich cookies (like Oreos) for a richer flavor.
- Fruit-Infused Version: Fold in fresh or frozen berries (blueberries or raspberries) into the pudding layer for a fruity surprise. This adds a fresh twist and brightens the dessert visually.
- Gluten-Free Option: Use gluten-free vanilla cookies or almond flour crumbs and ensure your pudding mix is gluten-free.
- Dairy-Free Adaptation: Prepare dairy-free pudding with coconut or almond milk and substitute whipped topping with coconut whipped cream.
- Personal Twist: Once, I tried adding a thin layer of crushed peanut brittle between the pudding and whipped cream layers for an extra crunch and subtle caramel flavor—it was a hit!
Serving & Storage Suggestions
Serve this dessert chilled for the best texture and freshness. It looks fantastic in a clear dish, so guests can see the layers and get a kick out of the goofy “kitty litter” effect before digging in. Presentation tip: add a few gummy worms peeking out on top just before serving to maintain their chewy texture.
It pairs well with light, savory dishes, so if you’re planning a full menu, think about balancing its sweetness with something like a fresh taco pasta salad or some grilled veggies.
To store, cover the dish tightly with plastic wrap and refrigerate for up to 3 days. The flavors meld and improve after sitting overnight. Avoid freezing as the texture of pudding and whipped topping can change and become watery upon thawing.
When reheating, it’s best to enjoy this dessert cold, but if you want to soften it slightly, let it sit at room temperature for 15 minutes before serving.
Nutritional Information & Benefits
This dessert is definitely on the indulgent side but includes some redeeming qualities. The vanilla pudding provides calcium, and using real whipped cream keeps the fat content more natural compared to some artificial toppings. Since it uses simple ingredients, you can control sugar levels by choosing low-sugar pudding mixes or cutting back on powdered sugar.
For those watching their carbs, swapping cookies for almond flour crumbs and using sugar-free pudding can make this dessert more diet-friendly. Remember, it contains common allergens like dairy, gluten (unless substituted), and gelatin in gummy worms, so adjust accordingly for guests.
While it’s not a health food, this recipe offers a fun way to bring people together and enjoy a playful treat without fussing over complex baking techniques. Sometimes, that’s just the kind of nourishment we need.
Conclusion
The Delicious Kitty Litter Cake Gross Out Dessert is a quirky, fun recipe that’s surprisingly easy to make and always gets laughs and compliments. It’s perfect for anyone looking to add a little whimsy to their dessert lineup without spending hours in the kitchen. I love how it brings people together—kids and adults alike—celebrating a shared moment of surprise and enjoyment.
Feel free to tweak the layers, swap ingredients, or make it your own. If you’ve got a sweet tooth and a sense of humor, this recipe will fit right in with your favorites. And when you do make it, I’d love to hear how it turned out or what fun variations you tried. Sharing recipes like this is what keeps the kitchen lively and unpredictable!
So, why not give this delightfully gross treat a shot? It’s one of those dishes that’s way more fun than it sounds—and the perfect conversation piece for your next gathering.
FAQs
- What cookies work best for the kitty litter cake? Vanilla wafers or shortbread cookies give the best crumbly texture and neutral sweetness. For chocolate lovers, crushed Oreos are a great alternative.
- Can I make this dessert ahead of time? Yes! Assemble it the night before and refrigerate. Just add gummy worms right before serving to keep them fresh and chewy.
- Is this recipe gluten-free? It can be if you use gluten-free cookies and pudding mix. Check labels to be sure.
- Can I use fresh whipped cream instead of store-bought? Absolutely. Fresh whipped cream adds a lighter, fresher taste but requires more attention to keep it whipped.
- What’s a good occasion to serve kitty litter cake? It’s great for Halloween parties, kids’ birthdays, or any casual gathering where you want to surprise and delight guests with something playful.
Pin This Recipe!
Delicious Kitty Litter Cake Gross Out Dessert

A quirky and fun dessert that looks like kitty litter but tastes delicious, perfect for parties and gatherings. It features layers of crushed cookies, creamy vanilla pudding, whipped topping, and gummy worms for a playful surprise.
- Prep Time: 15 minutes
- Cook Time: 0 minutes
- Total Time: 2 hours 15 minutes
- Yield: 12 servings 1x
- Category: Dessert
- Cuisine: American
Ingredients
- 4 cups crushed vanilla wafers or shortbread cookies (Keebler vanilla wafers preferred)
- 2 (3.4 oz / 96 g) packages instant vanilla pudding mix
- 3 cups cold milk (whole or 2%)
- 2 cups whipped cream or store-bought whipped topping (like Cool Whip)
- 1 cup gummy worms (about 150 g)
- 1/2 cup mini chocolate chips or crushed nuts (optional)
- 4 tablespoons unsalted butter, melted (56 g)
- 2 tablespoons powdered sugar (15 g)
Instructions
- Prepare the pudding: In a medium bowl, whisk together the instant vanilla pudding mix and 3 cups (720 ml) of cold milk until thickened, about 2 minutes. Set aside to firm up.
- Crush the cookies: Place 4 cups of vanilla wafers or shortbread cookies in a large resealable plastic bag. Use a rolling pin or heavy pan to crush into fine crumbs with some small chunks remaining. Transfer crumbs to a large mixing bowl.
- Add buttery sweetness: Pour 4 tablespoons (56 g) of melted unsalted butter over the crumbs and sprinkle in 2 tablespoons (15 g) of powdered sugar. Mix gently until crumbs are evenly coated and slightly clump together.
- Layer the dessert: Spread about one-third of the cookie crumb mixture evenly over the bottom of a 9×13-inch dish.
- Add pudding layer: Spoon half of the prepared pudding over the crumbs and spread gently with a spatula.
- Whipped topping layer: Spread 1 cup (240 ml) of whipped cream over the pudding layer, smoothing it out carefully.
- Repeat layers: Add another third of the cookie crumbs over the whipped topping, followed by the remaining pudding and whipped topping.
- Top layer: Finish by sprinkling the remaining cookie crumbs on top to resemble fresh kitty litter. Scatter gummy worms strategically across the surface.
- Chill: Cover the dish with plastic wrap and refrigerate for at least 2 hours, ideally 4, to allow layers to set and flavors to meld.
- Serve: Use a large spoon to scoop portions, ensuring each serving has a bit of each layer.
Notes
If cookie crumbs seem too dry before layering, add a touch more melted butter. Add gummy worms just before serving to keep them chewy and prevent sinking. Assemble the night before and chill for best flavor and texture. Use gluten-free cookies and pudding for gluten-free version; use dairy-free pudding and whipped topping for dairy-free adaptation.
Nutrition
- Serving Size: 1/12th of the cake
- Calories: 280
- Sugar: 25
- Sodium: 180
- Fat: 12
- Saturated Fat: 7
- Carbohydrates: 38
- Fiber: 1
- Protein: 3
Keywords: kitty litter cake, gross out dessert, party dessert, layered dessert, vanilla pudding dessert, gummy worms dessert, easy dessert, kid-friendly dessert


