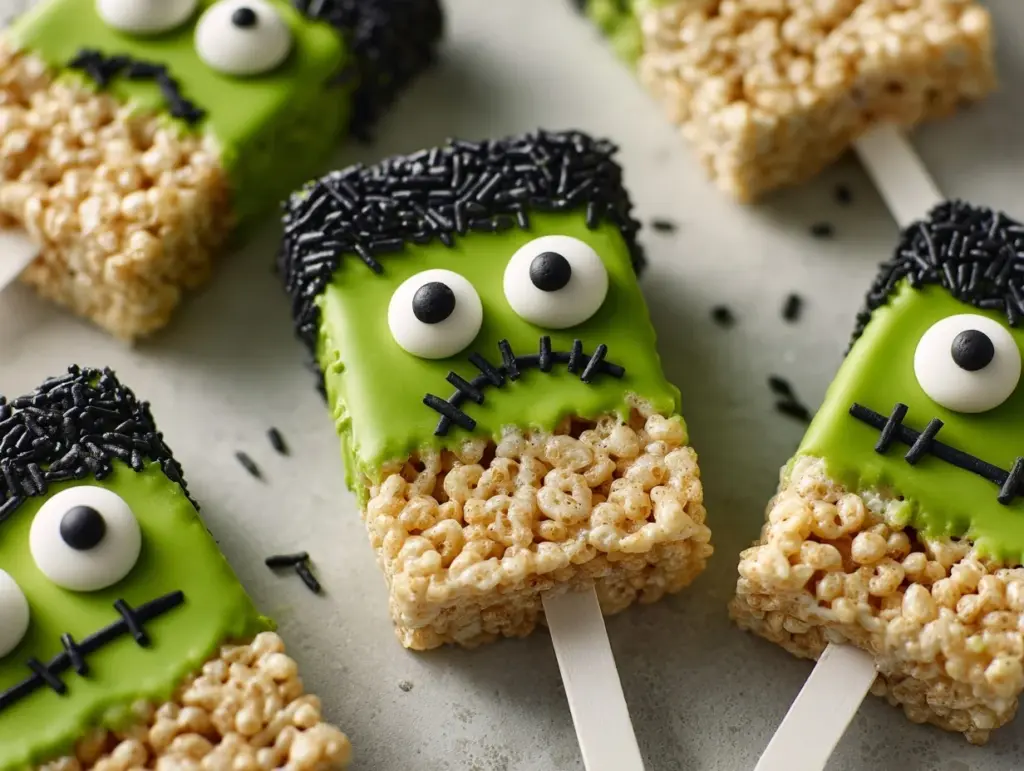
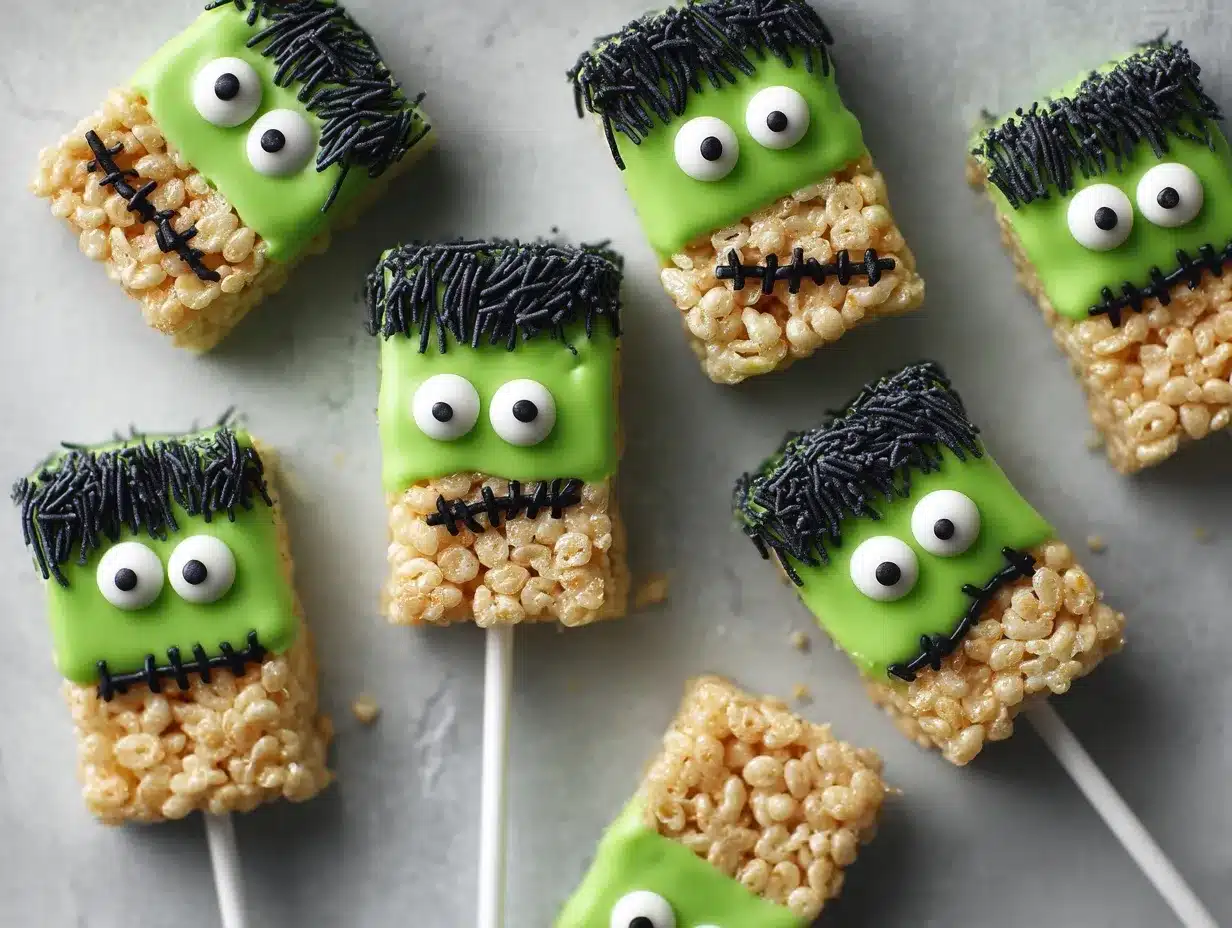
Green gooey monsters, one-eyed ghouls, and silly grins on a stick—yep, that’s exactly the kind of chaos that happens when I whip up Monster Halloween Rice Krispies Pops. The smell of melted butter and marshmallows hits you first, then the snap-crackle-pop of the cereal, and suddenly the kitchen feels like a mad scientist’s lab (plus, a little sticky). This recipe is one my family waits for all year—especially my nieces, who take their monster decorating duties very seriously. Honestly, if you want a party treat that’s both a showstopper and a total blast to make, these Monster Halloween Rice Krispies Pops are your golden ticket.
I first stumbled onto this idea while scrambling to make something festive for a classroom Halloween party. I had exactly zero time and less patience, but I did have a box of Rice Krispies and a half-empty bag of marshmallows. With a little food coloring and a bag of candy eyes, it was instant spooky magic. Now, it’s tradition: every October, we pull out the sprinkles, candy melts, and get wild with monster designs. These pops are perfect for busy parents, last-minute entertainers, or honestly anyone who loves edible crafts. Plus, they’re super kid-friendly—no baking, no sharp knives, just pure silly fun (and a little sugar rush, let’s face it).
If you’re looking for a Halloween treat that’s easy, adorable, and guaranteed to make everyone smile, you’ve found it. These Monster Halloween Rice Krispies Pops are not just cute—they’re chewy, crunchy, and impossible to resist. I’ve tested these over and over, tweaking colors, coatings, and decorations, and every batch disappears faster than you can say “trick or treat.” Whether you’re making them for a spooky party, handing them out at a bake sale, or simply treating yourself, I promise this recipe will be the monster hit of the season.
Why You’ll Love This Recipe
- Quick & Easy: No need to spend hours in the kitchen—these Monster Halloween Rice Krispies Pops come together in about 30 minutes (decorating included!). Perfect for last-minute party prep or weeknight fun.
- Simple Ingredients: Just cereal, marshmallows, butter, and a handful of candies. You probably have most of it already, and you can swap in whatever extras you like.
- Perfect for Parties: Whether it’s a school event, Halloween bash, or neighborhood get-together, these pops are a guaranteed crowd-pleaser. They look amazing on a treat table and double as edible party favors.
- Kid-Approved & Kid-Friendly: Decorating is half the fun. Little hands love sticking on candy eyes and drawing monster mouths. Minimal mess—maximum giggles.
- Unbelievably Fun & Delicious: The classic chewy Rice Krispies treat gets a spooky-cute upgrade. The combo of sweet marshmallow, crunchy cereal, and a candy coating is comfort food in disguise.
Here’s what sets this Monster Halloween Rice Krispies Pops recipe apart: I use a little extra butter for extra chewiness, and I let everyone go wild with their own monster designs. No two pops ever look the same, which makes it even more fun. Over the years, I’ve learned to keep a stash of edible markers and colored candy melts on hand for wild creativity. These aren’t just treats—they’re little edible art projects.
Honestly, these pops are the reason I look forward to Halloween almost as much as the kids. They’re a great way to bring everyone together, creative chaos and all. Plus, there’s something about seeing a tray of goofy monster pops that makes even the grumpiest grown-up smile. From personal experience (and a lot of party testing), these Monster Halloween Rice Krispies Pops are the treat everyone remembers long after the candy corn is gone.
What Ingredients You Will Need
This recipe uses easy, everyday ingredients to whip up a batch of Monster Halloween Rice Krispies Pops that are as playful as they are tasty. Most are pantry staples, and the rest are easy to find in any grocery store—no hunting for weird specialty items here. Here’s what you’ll need:
- For the Rice Krispies Treats:
- 6 cups (150g) Rice Krispies cereal (or any crispy rice cereal)
- 4 cups (240g) mini marshmallows (fresh is best—stale marshmallows don’t melt as smoothly)
- 4 tablespoons (56g) unsalted butter (adds chewiness and flavor)
- 1/2 teaspoon vanilla extract (optional, but I like the extra warmth)
- Pinch of salt (balances the sweetness—trust me, don’t skip it!)
- For the Monster Decorations:
- Assorted candy melts (green, purple, orange, black—Wilton or Ghirardelli work great)
- Edible candy eyes (goofy, large, small—mix it up for personality)
- Sprinkles (Halloween shapes, colored sugar, or classic jimmies)
- Edible food markers (for mouths, scars, or silly expressions—optional but loads of fun)
- Chocolate chips or black gel icing (perfect for drawing monster features)
- For Assembly:
- Popsicle sticks or lollipop sticks (essential for the “pop” factor)
- Cooking spray or butter (for greasing hands and pans—keeps things from sticking)
Ingredient tips: I usually grab name-brand Rice Krispies for the crispiest texture, but store brands work in a pinch. For candy melts, I love Wilton’s because they melt smoothly and the colors pop. If you want to make these gluten-free, just double-check your cereal and candy eyes—some brands sneak in wheat. Don’t have popsicle sticks? Skewers or even sturdy paper straws do the job.
Feel free to get creative with the decorations! Swapping out colors for your favorite monsters, using dairy-free butter or marshmallows, or adding crushed cookies for “monster hair” is totally fair game. The ingredient list is super flexible, so you can adapt it for allergies or preferences (and I promise, the monsters will still look adorable).
Equipment Needed
- Large saucepan or Dutch oven: For melting marshmallows and butter together. A heavy-bottomed pan helps prevent scorching.
- Wooden spoon or silicone spatula: For stirring the gooey mixture. I always grab a silicone spatula—easy cleanup and nothing sticks.
- 9×13-inch (23x33cm) baking pan: To press the Rice Krispies mixture into an even layer before cutting into bars. You can use a smaller pan for thicker pops if you like.
- Cooking spray or extra butter: For greasing pans and hands (trust me, marshmallow sticks to everything).
- Parchment paper or wax paper: To line the pan and make lifting out the treats a breeze.
- Sharp knife or bench scraper: For cutting perfect rectangles or squares. I’ve used both—just grease the blade first.
- Popsicle sticks or lollipop sticks: Essential for holding the pops. In a pinch, sturdy paper straws work too.
- Microwave-safe bowls: For melting candy melts in different colors.
- Baking sheet: For setting decorated pops while the candy coating hardens.
If you don’t have a baking pan, you can shape the mixture by hand on a lined tray—it’s rustic but works. For the candy melts, a double boiler also does the trick if microwaves aren’t your style. And honestly, don’t stress about tools—these pops are all about fun, not perfection. Just keep some warm soapy water nearby for sticky hands!
Preparation Method
-
Prep your workspace: Line a 9×13-inch (23x33cm) pan with parchment paper, letting a little hang over the edges for easy lifting. Lightly grease the paper and your spatula with cooking spray or butter. Set out your popsicle sticks and decorations.
Tip: I always have a damp cloth handy for sticky fingers. -
Melt the butter and marshmallows: In a large saucepan over low heat, melt 4 tablespoons (56g) unsalted butter. Add 4 cups (240g) mini marshmallows and stir constantly until completely melted and smooth, about 3-4 minutes. If using, stir in 1/2 teaspoon vanilla extract and a pinch of salt. Remove from heat.
Warning: Don’t walk away—marshmallows can burn quickly! -
Add the cereal: Pour in 6 cups (150g) Rice Krispies cereal and gently fold until every piece is coated. Work quickly before the mixture cools.
Sensory cue: It should look glossy, with no dry spots. -
Press into the pan: Transfer the mixture to your prepared pan. With greased hands or a spatula, press it firmly and evenly into all corners. Don’t mash too hard or the pops get dense—just enough to hold together.
Tip: A piece of parchment paper makes pressing easier (and less messy). -
Cool and cut: Let the treats cool for 15-20 minutes at room temperature. Lift out of the pan and cut into 12 rectangles (or whatever size/shape you like). Each should be about 1×4 inches (2.5x10cm) if you want classic “pop” size.
If the knife sticks, grease it lightly between cuts. - Insert sticks: Carefully push a popsicle stick about halfway into the bottom of each rectangle. If any crack, just gently press the treat back together.
-
Decorate your monsters: Melt candy melts in separate bowls according to package instructions (usually microwave in 20-second bursts, stirring often). Dip each pop halfway or fully, then place on a parchment-lined baking sheet. Decorate with candy eyes, sprinkles, and edible markers as desired. Work in batches so the coating doesn’t set before you add decorations.
Personal tip: Let kids go wild with the designs—wonky eyes and crooked mouths are the best part! -
Let set: Allow decorated pops to sit at room temperature until the candy coating hardens, about 15 minutes. If you’re in a hurry, pop them into the fridge for 5-10 minutes.
Sensory cue: The coating should be dry to the touch.
That’s it! You now have a batch of adorable, chewy, and perfectly spooky Monster Halloween Rice Krispies Pops ready to party. If you want to make them ahead, they stay fresh for several days in an airtight container—just layer with parchment to keep the monsters looking their best.
Cooking Tips & Techniques
After years of sticky fingers and a few monster fails, I’ve learned some tricks to make Monster Halloween Rice Krispies Pops foolproof every time:
- Don’t overheat the marshmallows: Keep the heat low and stir constantly. High heat makes the treats hard and crunchy instead of chewy.
- Work quickly: Once the cereal is mixed in, you have a few minutes before the mixture sets. Prep your pan and tools ahead of time for smooth sailing.
- Grease everything: Marshmallow mixture sticks to hands, spoons, and pans. Use butter or cooking spray on your hands and spatula to keep things moving (and to avoid sticky chaos).
- Use fresh marshmallows: Old or stale marshmallows won’t melt smoothly. Trust me, I learned this the hard way when a batch turned grainy.
- Cut shapes creatively: If you want round or monster-head shapes, use cookie cutters while the mixture is still a bit warm. Just remember to grease the cutters!
- Decorate in small batches: If you’re making lots of pops, dip and decorate a few at a time so the candy coating doesn’t set before you stick on the eyes and sprinkles.
- Let kids decorate: Honestly, the “imperfect” monsters are always the most memorable. I let everyone make their own monster pop—it’s way more fun than aiming for Pinterest perfection.
- Re-melt candy melts as needed: If the melted candy starts to thicken, pop it back in the microwave for 10 seconds and stir again.
If you hit a snag—like treats falling apart or candy coating cracking—just patch it up with a dab of melted chocolate or an extra sprinkle. Monsters aren’t meant to be flawless! The secret to success is just to keep it playful and not sweat the small stuff.
Variations & Adaptations
- Allergy-Friendly Monsters: Use gluten-free crispy rice cereal and vegan marshmallows (like Dandies) for a gluten-free, dairy-free version. For nut allergies, double-check all candies and decorations for hidden allergens.
- Seasonal Swaps: Make Christmas elves, Valentine’s hearts, or Easter bunnies by changing candy melt colors and decorations. This basic pop recipe works for any holiday—just switch up the theme!
- Flavor Twists: Add a tablespoon of peanut butter or cookie butter when melting the marshmallows for a different flavor. Or, stir in a handful of mini chocolate chips just before pressing the mixture into the pan (they’ll melt a bit—yum!).
- Different Shapes: Use cookie cutters to create monster heads, pumpkins, or ghosts. I’ve even made “Frankenstein heads” by cutting thick rectangles and adding pretzel sticks for “bolts.”
- Cooking Method: No stove? You can melt the butter and marshmallows in the microwave—just use a large microwave-safe bowl and heat in 30-second bursts, stirring each time until melted and smooth.
My favorite twist? Adding a drop of peppermint extract for “minty monsters” or swirling in a bit of cocoa powder for chocolate Rice Krispies pops. The kids love to invent their own monster personalities, and honestly, so do I!
Serving & Storage Suggestions
Serve your Monster Halloween Rice Krispies Pops at room temperature, arranged upright in a mason jar or poked into a foam block for a “monster bouquet” effect. They make a perfect centerpiece for Halloween treat tables. For a party, wrap each pop in clear cellophane and tie with a ribbon for instant party favors (they travel great in lunchboxes, too).
Got leftovers? Store the pops in an airtight container at room temperature for up to 4 days. If your kitchen gets warm, keep them in the fridge, but let them come to room temperature before eating for the best texture. To freeze, wrap each pop tightly in plastic wrap and freeze for up to 2 months—just thaw at room temp before serving.
Reheating isn’t usually necessary, but if the treats get a tad hard, a quick 5 seconds in the microwave softens them right up. Over time, the flavors meld and the marshmallowy goodness somehow gets even better. Honestly, they rarely last more than a day or two at my house!
Nutritional Information & Benefits
Each Monster Halloween Rice Krispies Pop (based on 12 pops per batch) contains roughly:
- Calories: 160
- Fat: 4g
- Carbohydrates: 30g
- Protein: 1g
- Sugar: 15g
These treats are nut-free (if you pick allergy-safe decorations), and you can make them gluten-free by choosing the right cereal and marshmallows. The pops are a fun way to get kids involved in the kitchen and are naturally portion-controlled thanks to the sticks. Just remember, candy melts and decorations add extra sugar—so save these for parties and special occasions.
I love that you can adjust the recipe for dietary needs—vegan, gluten-free, or low-dairy versions all work. Plus, they’re a cheerful break from traditional candy bars, and sometimes that’s just what you need on a spooky night!
Conclusion
If you’re hunting for a Halloween treat that’s as simple as it is delightful, Monster Halloween Rice Krispies Pops truly check all the boxes. They’re easy, endlessly customizable, and bring out everyone’s creative (and slightly spooky) side. Whether you’re making these for a classroom bash, family movie night, or just because you love monsters, this recipe will put a smile on everyone’s face.
Don’t be afraid to get wild with the decorations—let your kids, friends, or even your inner child take the lead. Some of my best memories are from the messiest, silliest monster pops! If you try these Monster Halloween Rice Krispies Pops, I’d love to hear what wild designs you come up with. Drop a comment, share a photo, or tell me about your favorite monster creation.
So grab your cereal, gather your little monsters, and get popping—because Halloween is all about fun, laughter, and a little sweet mischief. Happy haunting, and happy snacking!
FAQs about Monster Halloween Rice Krispies Pops
Can I make these treats ahead of time?
Absolutely! Monster Halloween Rice Krispies Pops can be made up to 3 days ahead. Just store them in an airtight container at room temperature. They’re party-ready whenever you need them.
What if I don’t have candy melts?
No worries! You can use melted white chocolate, chocolate chips, or even tinted icing as a coating. The decorations will stick just as well, and the monsters will still look adorable.
How do I keep the treats from sticking to my hands?
The trick is to grease your hands (and any utensils) with a little butter or cooking spray before handling the marshmallow mixture. Parchment paper helps too!
Can I make these gluten-free or vegan?
Yes! Use gluten-free crispy rice cereal and vegan marshmallows, plus allergy-friendly decorations, for a gluten-free and vegan-friendly batch. Always double-check ingredient labels to be sure.
What’s the best way to package these for parties?
Wrap each Monster Halloween Rice Krispies Pop in clear cellophane and tie it with a festive ribbon. They look great on a platter, but individually wrapped pops are perfect for party favors or trick-or-treaters.
Pin This Recipe!

Monster Halloween Rice Krispies Pops

These Monster Halloween Rice Krispies Pops are chewy, crunchy, and decorated with spooky-cute monster faces—perfect for Halloween parties, bake sales, or edible crafts with kids. Quick to make and endlessly customizable, they’re a guaranteed crowd-pleaser and a blast to decorate.
- Prep Time: 10 minutes
- Cook Time: 5 minutes
- Total Time: 30 minutes
- Yield: 12 pops 1x
- Category: Dessert
- Cuisine: American
Ingredients
- 6 cups (150g) Rice Krispies cereal (or any crispy rice cereal)
- 4 cups (240g) mini marshmallows
- 4 tablespoons (56g) unsalted butter
- 1/2 teaspoon vanilla extract (optional)
- Pinch of salt
- Assorted candy melts (green, purple, orange, black)
- Edible candy eyes
- Sprinkles (Halloween shapes, colored sugar, or classic jimmies)
- Edible food markers (optional)
- Chocolate chips or black gel icing
- Popsicle sticks or lollipop sticks
- Cooking spray or butter (for greasing hands and pans)
Instructions
- Line a 9×13-inch pan with parchment paper, letting some hang over the edges. Lightly grease the paper and your spatula with cooking spray or butter. Set out popsicle sticks and decorations.
- In a large saucepan over low heat, melt the butter. Add mini marshmallows and stir constantly until completely melted and smooth, about 3-4 minutes. Stir in vanilla extract and a pinch of salt if using. Remove from heat.
- Pour in Rice Krispies cereal and gently fold until every piece is coated. Work quickly before the mixture cools.
- Transfer the mixture to the prepared pan. With greased hands or a spatula, press it firmly and evenly into all corners. Don’t press too hard.
- Let the treats cool for 15-20 minutes at room temperature. Lift out of the pan and cut into 12 rectangles (about 1×4 inches each).
- Carefully push a popsicle stick about halfway into the bottom of each rectangle.
- Melt candy melts in separate bowls according to package instructions. Dip each pop halfway or fully, then place on a parchment-lined baking sheet. Decorate with candy eyes, sprinkles, and edible markers as desired.
- Allow decorated pops to sit at room temperature until the candy coating hardens, about 15 minutes. For faster setting, refrigerate for 5-10 minutes.
- Serve or store in an airtight container, layered with parchment, for up to 4 days.
Notes
Use fresh marshmallows for best texture. Grease hands and utensils to prevent sticking. Let kids decorate for maximum fun—imperfect monsters are the most memorable! For gluten-free or vegan versions, use appropriate cereal and marshmallows. Store in an airtight container for up to 4 days or freeze for up to 2 months.
Nutrition
- Serving Size: 1 pop
- Calories: 160
- Sugar: 15
- Sodium: 90
- Fat: 4
- Saturated Fat: 2.5
- Carbohydrates: 30
- Protein: 1
Keywords: Halloween, Rice Krispies, pops, treats, party, kid-friendly, no bake, monster, spooky, edible crafts