The first time I made these salted caramel Rice Krispie treats, my kitchen smelled like a candy shop—warm, buttery, and just a little bit salty-sweet. It was the kind of moment where you want to stick your finger in the pot and taste before it’s even cooled (and, okay, maybe I did). These bars are pure nostalgia, but with a grown-up twist that honestly makes them impossible to resist.
I stumbled onto the idea for salted caramel Rice Krispie treats after a friend challenged me to “fancy up” classic cereal bars for a potluck. Let’s face it, everyone loves the original, but once you drizzle in homemade salted caramel? Wow, it’s a whole new level. The sea salt cuts through the sweetness, making each bite pop. Over the years, I’ve tweaked this recipe for the perfect balance—chewy, gooey, just the right amount of crunch, and that signature salty finish.
If you’re on the hunt for a unique dessert bar that’s both easy and totally show-stopping, this salted caramel Rice Krispie treats recipe is about to become your new go-to. It’s perfect for busy parents, potluck enthusiasts, or anyone who wants to impress without spending hours in the kitchen. I’ve made this recipe more times than I can count, and every batch disappears faster than the last. Trust me—there’s something magical about that sticky caramel mingling with crisp cereal and buttery marshmallow. Let’s get into the sticky details (don’t worry, I’ll walk you through every step so they turn out perfectly every time)!
Why You’ll Love This Salted Caramel Rice Krispie Treats Recipe
- Quick & Easy: You can whip these up in under 30 minutes—honestly, that’s including cleanup. Perfect for when you need a last-minute dessert that still feels special.
- Simple Ingredients: No bizarre ingredients here. Everything’s classic, pantry-friendly, and easy to find. Even the salted caramel comes together with just a few basics.
- Perfect for Any Occasion: These bars are a hit at birthday parties, bake sales, or even holiday gatherings. They look fancy but secretly couldn’t be easier.
- Crowd-Pleaser: I’ve served these to kids, adults, picky eaters—everyone loves them. The salty-sweet combo is just unbeatable.
- Unbelievably Delicious: Imagine the classic Rice Krispie treat, but richer, buttery, with hints of golden caramel and a little sparkle from flaky sea salt. It’s comfort food that feels a bit elevated (but in a totally relaxed way).
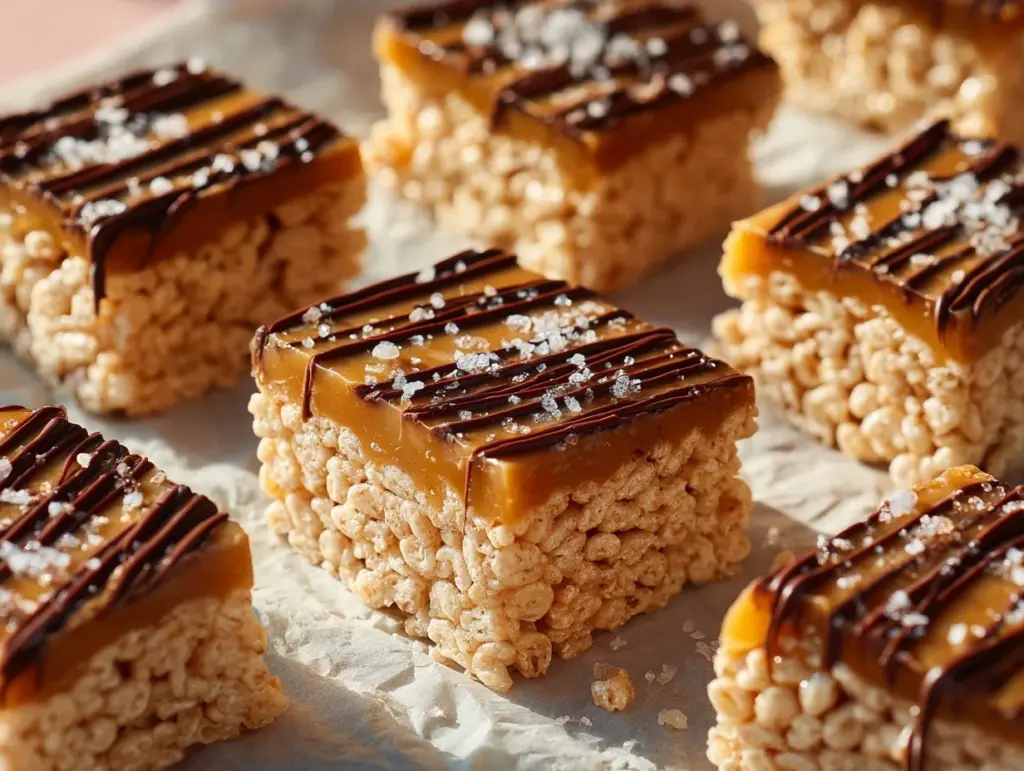
What sets this salted caramel Rice Krispie treats recipe apart is the homemade caramel. I take the time to let the sugar caramelize to that perfect amber—no shortcuts, but also no stress. The result? Bars that are soft, chewy, and just a little sticky, with that unmistakable layer of caramel flavor. I’ve found that blending the caramel right into the marshmallow base (instead of just drizzling on top) makes every bite extra decadent. And don’t skip the flaky salt! It’s what makes these bars sing.
This isn’t just another cereal bar—it’s the kind you’ll crave after a tough day, or the one your friends will ask you to bring again (and again). If you’re ready for a treat that feels both nostalgic and a little bit luxe, you’re going to fall head over heels for these salted caramel Rice Krispie treats.
What Ingredients You Will Need for Salted Caramel Rice Krispie Treats
This recipe uses straightforward ingredients for a rich, chewy, and totally addictive treat. Most are pantry staples, and you can swap a few based on what you have. Here’s what you’ll need:
- For the Caramel:
- Granulated sugar – 1 cup (200g) (for that deep caramel flavor)
- Unsalted butter – 6 tablespoons (85g), cut into cubes (adds richness, helps the caramel shine)
- Heavy cream – 1/2 cup (120ml) (makes the caramel silky and pourable)
- Fine sea salt – 1/2 teaspoon (brings out the caramel’s flavor and balances the sweetness)
- For the Rice Krispie Treats Base:
- Rice Krispies cereal – 6 cups (150g) (classic crunch, I usually go with the original, but any crisp rice cereal works)
- Mini marshmallows – 1 1/2 bags, about 9 cups (400g) (they melt smoother and faster than large ones)
- Unsalted butter – 4 tablespoons (56g) (for that buttery chew; plus a little more for greasing your pan)
- Vanilla extract – 1 teaspoon (just gives everything a warm, bakery-fresh aroma)
- Flaky sea salt – for topping (Maldon is my favorite—those big flakes look and taste amazing)
Optional Swaps & Tips:
- Use coconut oil instead of butter for a dairy-free version (I’ve tried it—still delicious!)
- Substitute vegan marshmallows if needed (Dandies work great, just melt them slowly)
- If you’re short on time, you can use store-bought caramel sauce, but homemade tastes so much better (and it’s easier than you think!)
- For extra crunch or a twist, toss in a handful of toasted chopped pecans or mini chocolate chips.
Most of these ingredients are probably hanging out in your pantry or fridge right now. If you want to get fancy, you can even brown the butter for a nutty, toasty flavor. But honestly, even the basic version is pretty much irresistible. Just don’t forget the flaky salt—trust me, it makes everything pop!
Equipment Needed
- Large saucepan or Dutch oven – for melting the marshmallows and caramel. I use a heavy-bottomed pot so nothing scorches.
- Heatproof spatula or wooden spoon – for stirring (I like silicone spatulas because they don’t stick as much and are easy to clean).
- 9×13-inch (23x33cm) baking pan – for shaping your bars. If you want thicker bars, use a 9×9-inch (23x23cm) square pan.
- Parchment paper – makes lifting the bars out a breeze. You can use foil greased with butter if that’s what you have.
- Measuring cups and spoons – for accuracy (especially with the caramel; you don’t want to eyeball it).
- Small saucepan – for making the caramel if you want to keep things separate (I usually just use one big pot to save dishes).
Don’t stress if you don’t have a fancy candy thermometer for the caramel—I rarely use one. Just watch the color carefully, and you’ll be fine. If you’re working with kids or don’t want to mess with sticky pots, you can get away with a nonstick pan (cleaning is a little easier, in my experience). For budget-friendly options, those basic aluminum baking pans work just as well as glass or ceramic.
Just give your utensils a quick butter or oil rub before mixing the sticky stuff—it’s a little trick I picked up after getting marshmallow goo everywhere more than once!
How to Make Salted Caramel Rice Krispie Treats

- Prep Your Pan: Line a 9×13-inch (23x33cm) baking pan with parchment paper, leaving a bit of overhang for easy removal. Lightly butter the paper for extra insurance against sticking.
- Make the Salted Caramel: In a medium saucepan over medium heat, pour in 1 cup (200g) sugar. Let the sugar melt, swirling the pan occasionally (don’t stir yet). Once it starts to turn a deep amber color and all the sugar is melted (about 5-7 minutes), add 6 tablespoons (85g) unsalted butter. It’ll bubble up like crazy—totally normal. Stir with a heatproof spatula until smooth, then slowly whisk in 1/2 cup (120ml) heavy cream. Let it bubble for 1-2 minutes until smooth. Take off the heat and stir in 1/2 teaspoon fine sea salt. Set aside to cool slightly.
- Melt the Marshmallows: In a large, heavy-bottomed pot, melt 4 tablespoons (56g) unsalted butter over low heat. Add 9 cups (400g) mini marshmallows, stirring constantly until completely melted and smooth (about 3-4 minutes). Don’t rush this step—a low, gentle heat stops the marshmallows from burning or getting rubbery.
- Combine Caramel and Marshmallow: Pour the slightly cooled caramel into the melted marshmallow mixture. Stir well until fully combined and glossy. If your caramel has thickened a bit, just warm it for a few seconds before adding.
- Add Vanilla: Stir in 1 teaspoon vanilla extract until incorporated.
- Fold in the Cereal: Remove the pot from the heat. Add 6 cups (150g) Rice Krispies cereal. Use a buttered spatula or spoon to fold everything together until the cereal is evenly coated. Don’t over-mix, or you’ll lose some crunch.
- Transfer to the Pan: Scrape the mixture into your prepared baking pan. Using a piece of buttered parchment or lightly greased hands, gently press the mix into an even layer. Don’t pack it down too hard, or your bars will be tough.
- Finish with Salt: Sprinkle a generous pinch or two of flaky sea salt (Maldon or similar) evenly over the top while still warm. The salt will stick and add that signature finish.
- Cool and Slice: Let the bars cool at room temperature for at least 30 minutes (or chill in the fridge for 15 minutes if you’re in a hurry). Once firm, lift out using the parchment paper and slice into squares or bars with a sharp knife.
Troubleshooting Notes:
- If your caramel seizes or gets grainy, add a splash more cream and gently heat until smooth again.
- Too sticky? Chill the bars a bit longer before slicing. Too hard? Next time, use a touch less cereal or marshmallow.
- If marshmallows aren’t melting smoothly, add a tablespoon of butter or cream and keep stirring—patience is key!
My personal tip: Taste a little of the caramel-marshmallow mix before you fold in the cereal (chef’s treat!). And don’t be shy with the flaky salt—you know you want that sweet-salty punch in every bite.
Pro Cooking Tips and Techniques for Perfect Treats
- Low and Slow is Key: Both the marshmallows and caramel do best if you use gentle heat. Rushing leads to burnt sugar and tough bars—trust me, I’ve learned this the hard way.
- Don’t Over-Pack: Press the mixture into the pan gently, just enough to hold together. If you press too firmly, you’ll lose that signature chewy texture.
- Keep Tools Greased: Butter or oil your spatula and hands before handling the mixture. Marshmallow is sticky stuff, and greased tools are a lifesaver.
- Use Fresh Marshmallows: Stale marshmallows don’t melt as smoothly and can make your bars tough. (Yes, I’ve tried with old marshmallows. Not worth it!)
- Watch the Caramel: Caramel is all about color—aim for a dark golden amber. If it’s too pale, it’ll taste bland; too dark, and it’ll get bitter.
- Multitasking Tip: Start melting your butter and marshmallows as soon as your caramel is off the heat. This saves time and means everything comes together while the caramel is still pourable.
- Troubleshooting Consistency: If your mixture is too runny, add a bit more cereal; if it’s too dry, add a handful of extra melted marshmallows.
I once tried to rush the caramel and ended up with a burnt mess—so now I always keep an eye on the pan and resist the urge to crank up the heat. And honestly, the biggest secret is to taste as you go (just not too much, or you won’t have enough for the pan!).
Variations & Adaptations
- Gluten-Free Version: Use certified gluten-free crispy rice cereal and double-check your marshmallows and caramel ingredients. I’ve done this for friends with celiac—no one could tell the difference.
- Chocolate Swirl: Drizzle melted dark or milk chocolate over the bars before adding the final sprinkle of salt. The chocolate-caramel combo is ridiculously good.
- Nutty Crunch: Stir in 1/2 cup (60g) chopped toasted pecans, almonds, or peanuts for a little extra crunch and flavor.
- Holiday Spices: Add 1/2 teaspoon cinnamon or pumpkin pie spice to the marshmallow mixture for a cozy autumn spin.
- Vegan/Dairy-Free: Use plant-based butter, coconut cream instead of heavy cream, and vegan marshmallows. I’ve tried this swap—still sticky, chewy, and so satisfying.
For a fun twist, I once swapped in cocoa crispy cereal and added a layer of caramel between two thinner layers of treats. It was a hit at my nephew’s birthday! The beauty of this recipe is how easy it is to make your own. If someone has a nut allergy, just leave out the nuts, and you’re still left with that classic salty-sweet magic.
Serving & Storage Suggestions
These salted caramel Rice Krispie treats are best served at room temperature, where the caramel is soft and gooey, and the cereal has that perfect chewy bite. Stack squares on a pretty plate, or wrap individually in wax paper for a bake sale or lunchbox treat. If you want to get extra fancy, finish with an extra drizzle of caramel and a pinch more sea salt right before serving.
Pair them with a cold glass of milk, a hot cup of coffee, or even a scoop of vanilla ice cream for an over-the-top dessert. I love packing these bars for picnics—they travel well and don’t melt or crumble like cookies.
To store, keep bars in an airtight container at room temperature for up to 4 days. For longer storage, you can freeze them (layered with parchment paper) for up to 1 month. Thaw at room temperature before serving. If they get a bit too firm, pop them in the microwave for 10 seconds to bring back that ooey-gooey texture. And honestly, the flavors deepen after a day or two—if you can resist eating them all at once!
Nutritional Information & Benefits
Each salted caramel Rice Krispie treat bar (when cut into 20 squares) contains roughly:
- Calories: 180
- Total Fat: 6g
- Carbohydrates: 30g
- Protein: 1g
- Sugar: 17g
- Sodium: 140mg
While these dessert bars are definitely a treat, they’re made with simple, recognizable ingredients—no preservatives or artificial flavors. The sea salt not only balances the sweetness but also provides trace minerals. You can make them gluten-free or dairy-free with a few swaps, and there are no eggs or nuts in the base recipe (perfect for many allergies—just check your marshmallows and cereal labels).
I love that you get a portion-controlled treat that feels indulgent but isn’t heavy. For me, they’re the ultimate “sweet tooth fix” with a little extra comfort.
Conclusion
If you’re craving a dessert bar that stands out—something salty, sweet, chewy, and just a little bit nostalgic—these salted caramel Rice Krispie treats are the answer. The homemade caramel might feel like an extra step, but it’s so worth it for that deep, buttery flavor. Plus, you can customize them a hundred ways to suit your cravings or dietary needs.
I’ve made these for everything from birthday parties to rainy-day movie nights, and they never last long. Honestly, there’s just something about that gooey caramel with the crisp cereal and sea salt that makes you want “just one more.”
Give this recipe a try, and let me know how you put your own spin on it! Drop a comment below, share your favorite mix-ins, or tag me with your creations. I love seeing how these treats brighten up your day. Happy snacking, and may your bars always be perfectly salty-sweet!
Frequently Asked Questions
How do I keep my Rice Krispie treats soft and chewy?
The key is to melt the marshmallows on low heat and avoid over-packing the mixture into your pan. Use fresh marshmallows and don’t overcook the caramel or marshmallow base.
Can I make these salted caramel Rice Krispie treats ahead of time?
Absolutely! They actually taste even better a day later as the flavors meld. Just store them airtight at room temperature.
What’s the best way to cut these bars without sticking?
Use a sharp knife greased with a little butter or oil, and wipe it clean between cuts. Chilling the bars for 10-15 minutes helps, too.
Can I use store-bought caramel sauce instead of homemade?
Yes, in a pinch. Just look for a high-quality thick caramel sauce and stir in a pinch of sea salt for that signature flavor.
How do I make these treats gluten-free or vegan?
Use certified gluten-free crispy rice cereal and vegan marshmallows. Swap the butter for plant-based margarine and use coconut cream for the caramel.
Pin This Recipe!

Salted Caramel Rice Krispie Treats

These Salted Caramel Rice Krispie Treats are a nostalgic, chewy dessert bar with a grown-up twist—homemade salted caramel blended right into the marshmallow base and finished with flaky sea salt. Perfect for potlucks, parties, or whenever you need an easy, show-stopping treat.
- Prep Time: 15 minutes
- Cook Time: 10 minutes
- Total Time: 25 minutes
- Yield: 20 bars 1x
- Category: Dessert
- Cuisine: American
Ingredients
- 1 cup granulated sugar
- 6 tablespoons unsalted butter, cut into cubes (plus more for greasing pan)
- 1/2 cup heavy cream
- 1/2 teaspoon fine sea salt
- 6 cups Rice Krispies cereal
- 9 cups mini marshmallows (about 1 1/2 bags)
- 4 tablespoons unsalted butter
- 1 teaspoon vanilla extract
- Flaky sea salt, for topping
Instructions
- Line a 9×13-inch baking pan with parchment paper, leaving overhang for easy removal. Lightly butter the paper.
- In a medium saucepan over medium heat, melt 1 cup sugar, swirling occasionally (do not stir) until deep amber, about 5-7 minutes.
- Add 6 tablespoons butter to the melted sugar (it will bubble), then stir until smooth.
- Slowly whisk in 1/2 cup heavy cream. Let bubble for 1-2 minutes until smooth. Remove from heat and stir in 1/2 teaspoon fine sea salt. Set aside to cool slightly.
- In a large heavy-bottomed pot, melt 4 tablespoons butter over low heat. Add 9 cups mini marshmallows and stir constantly until melted and smooth, about 3-4 minutes.
- Pour the slightly cooled caramel into the melted marshmallow mixture. Stir until fully combined and glossy.
- Stir in 1 teaspoon vanilla extract.
- Remove from heat and fold in 6 cups Rice Krispies cereal with a buttered spatula until evenly coated.
- Scrape mixture into prepared pan. Gently press into an even layer with buttered parchment or greased hands (do not pack too hard).
- Sprinkle generously with flaky sea salt while still warm.
- Let cool at room temperature for at least 30 minutes (or chill in fridge for 15 minutes).
- Lift out using parchment and slice into squares or bars with a sharp, greased knife.
Notes
For best results, use fresh marshmallows and melt them slowly over low heat. Don’t over-pack the mixture into the pan to keep the bars chewy. You can make these gluten-free by using certified gluten-free crispy rice cereal and vegan by swapping in plant-based butter, coconut cream, and vegan marshmallows. Store in an airtight container at room temperature for up to 4 days or freeze for up to 1 month.
Nutrition
- Serving Size: 1 bar (1/20th of recipe)
- Calories: 180
- Sugar: 17
- Sodium: 140
- Fat: 6
- Saturated Fat: 4
- Carbohydrates: 30
- Protein: 1
Keywords: salted caramel, rice krispie treats, dessert bars, easy dessert, potluck, marshmallow, caramel, no bake, sweet and salty, kid friendly