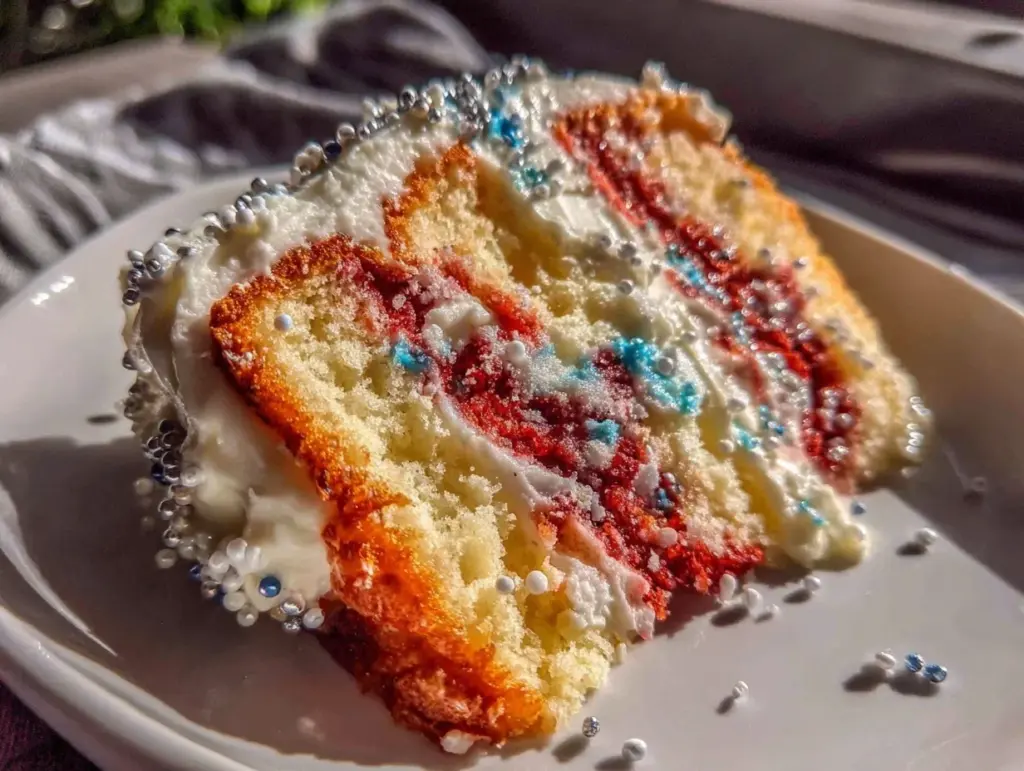
“Are you seriously making a tie dye cake for the Fourth of July?” my niece asked, eyebrows raised as I pulled the layers out of the oven. Honestly, I wasn’t sure if the red, white, and blue batter swirled together would actually bake into something worth eating or just look like a mess. But what started as a last-minute experiment on a busy summer afternoon turned into a staple for every celebration since. The vibrant red white blue tie dye cake has a way of catching eyes and stealing the show without needing hours of fuss.
That afternoon, there was the faint scent of vanilla and butter dancing in the kitchen, mixing with the summer heat humming through the open window. I remember thinking, “Well, if this doesn’t work, at least the kids will have fun helping me swirl the colors.” But when I sliced into the cake and saw those playful bursts of color—honestly, it felt like a little party right there on the plate. The best part? It’s not just for Independence Day; it’s become my go-to for any gathering that needs a bit of festive flair.
Since then, this vibrant red white blue tie dye cake has been requested for birthdays, potlucks, and even neighborhood block parties. It’s that kind of recipe that makes you smile quietly, knowing you’ve got a crowd-pleaser that’s both easy and impressive. No fancy tools, no stress—just a splash of color and a whole lot of sweet celebration.
Why You’ll Love This Recipe
Having made this vibrant red white blue tie dye cake multiple times, I can confidently say it’s a winner for so many reasons. From the ease of prep to the eye-catching results, here’s why this recipe stands out:
- Quick & Easy: You’ll have the batter ready in about 15 minutes and the whole cake baked within 40 minutes. Perfect for those last-minute party plans.
- Simple Ingredients: No need to hunt down specialty items. Most of these are pantry staples, so you can whip it up anytime you feel like adding a pop of color to your dessert table.
- Perfect for Celebrations: Whether it’s a patriotic holiday, a summer barbecue, or a festive birthday, this cake’s red, white, and blue theme fits right in.
- Crowd-Pleaser: Kids and adults alike get excited to see the tie dye effect inside. Plus, it’s moist and tender, which always earns second helpings.
- Unbelievably Delicious: The vanilla-flavored sponge is light and fluffy, with just enough sweetness to satisfy without being overwhelming.
What sets this apart from other colorful cakes is the way the colors are layered and swirled to create that signature tie dye look. I use gel food coloring for vibrant hues without thinning the batter, and the technique of layering the batter in concentric circles creates those beautiful, unpredictable patterns. It’s not just pretty; it’s also a texture and flavor treat that keeps people coming back for more.
This isn’t your average birthday cake or simple layer cake—it’s a celebration in every slice. The best part? You don’t have to be a professional baker to pull off the effect. Trust me, you’ll be proud showing this off at your next summer get-together or holiday feast.
What Ingredients You Will Need
This recipe uses simple, wholesome ingredients to deliver bold color and a moist, tender crumb without the fuss. Most are common staples, and a few tips on colors and brands help get the best results.
- For the Cake Batter:
- All-purpose flour – 2 ½ cups (315 g), sifted (provides structure)
- Baking powder – 2 ½ teaspoons (leavening agent for a fluffy cake)
- Salt – ½ teaspoon (balances sweetness)
- Unsalted butter – 1 cup (227 g), softened (I prefer Land O’Lakes for a creamy texture)
- Granulated sugar – 1 ¾ cups (350 g) (sweetness and tenderness)
- Large eggs – 4, room temperature (for richness and lift)
- Whole milk – 1 cup (240 ml), room temperature (adds moisture)
- Pure vanilla extract – 2 teaspoons (for classic flavor)
- For the Colors:
- Red gel food coloring – about 1 teaspoon (gel colors work better than liquid; I use AmeriColor brand)
- Blue gel food coloring – about 1 teaspoon (same brand for consistency)
- White batter remains uncolored
- For the Frosting: (optional but recommended)
- Buttercream frosting – about 3 cups (720 g) (homemade or store-bought, depending on your time)
- Fresh berries or edible stars for garnish (optional; adds a festive touch)
If you want a dairy-free version, swap whole milk for almond or oat milk, and use dairy-free butter. For a gluten-free twist, use a 1:1 gluten-free baking flour blend instead of all-purpose flour. In summer, fresh strawberries or blueberries on top make a refreshing garnish, but this cake also pairs nicely with a fresh cucumber dill salad like the one in this fresh cucumber dill salad recipe for a balanced summer meal.
Equipment Needed
Here’s what you’ll want to have ready before you start baking this vibrant red white blue tie dye cake:
- Two 9-inch (23 cm) round cake pans – I recommend non-stick or well-greased and lined with parchment paper to prevent sticking.
- Mixing bowls – at least two (one for batter, one for coloring separate portions).
- Electric hand mixer or stand mixer – makes creaming the butter and sugar much easier and faster.
- Measuring cups and spoons – precise measurements matter here for good texture.
- Rubber spatula – for folding and scraping down the sides.
- Toothpick or skewer – to test cake doneness.
- Cooling racks – essential for letting your cakes cool evenly.
If you don’t have two cake pans, you can bake in batches, but the timing will slightly change. I learned the hard way that swapping out pans mid-bake tends to change the texture, so patience pays off here. For frosting, a simple offset spatula helps smooth the buttercream without tearing the cake layers. Budget-friendly tip: silicone baking mats and reusable parchment paper liners can save time and waste.
Preparation Method
- Preheat and prep: Set your oven to 350°F (175°C). Grease and line your two 9-inch cake pans with parchment paper. This prevents the layers from sticking and keeps edges clean. (5 minutes)
- Mix dry ingredients: In a medium bowl, sift together 2 ½ cups flour, 2 ½ teaspoons baking powder, and ½ teaspoon salt. Sifting avoids clumps and ensures even rising. Set aside. (5 minutes)
- Cream butter and sugar: Using a hand or stand mixer, beat the softened butter and 1 ¾ cups sugar on medium speed until pale and fluffy—about 3-5 minutes. This step is key for light texture. (5 minutes)
- Add eggs: Crack in the eggs one at a time, beating well after each addition. If batter looks curdled, don’t worry—it will smooth out once flour and milk go in. (3 minutes)
- Incorporate vanilla and milk: Mix in 2 teaspoons vanilla extract. Then alternate adding the dry ingredients and 1 cup milk in three parts, starting and ending with dry ingredients. Mix on low speed just until combined—avoid overmixing to keep the cake tender. (5 minutes)
- Divide and color: Portion the batter evenly into three bowls. Leave one bowl white, add red gel coloring to the second, and blue gel coloring to the third. Stir gently to get vibrant colors without deflating the batter. (5 minutes)
- Layer the batter: In the prepared pans, spoon about 2 tablespoons of white batter in the center. Next, add 2 tablespoons of red batter right on top in the center of the white batter. Then 2 tablespoons of blue batter on top of that. Repeat this layering process until all batter is used up in each pan. The batter will naturally spread out and create the tie dye effect. Don’t swirl or mix—just let the colors layer. (10 minutes)
- Bake: Place pans on the middle rack and bake for 35-40 minutes. Check doneness by inserting a toothpick into the center—it should come out clean or with a few moist crumbs. (35-40 minutes)
- Cool: Let cakes cool in the pans for 10 minutes, then turn out onto cooling racks. Cool completely before frosting to avoid melting the buttercream. (30-40 minutes)
- Frost and decorate: Once cooled, spread your favorite buttercream between layers and over the top and sides. Garnish with fresh berries or edible stars for a festive look. (15-20 minutes)
If you notice the colors blending too much when layering, try chilling the colored batter for 5 minutes before layering; it firms up slightly and keeps the colors distinct. I’ve also found that letting the buttercream soften at room temperature for about 15 minutes before frosting makes spreading easier and smoother.
Cooking Tips & Techniques
Making a vibrant red white blue tie dye cake that looks as good as it tastes is easier when you keep a few things in mind:
- Use gel food coloring: Gel colors give you intense hues without watering down the batter. Liquid colors can thin the batter, affecting texture.
- Don’t overmix: Once you add flour, mix just until combined. Overmixing develops gluten and can make the cake dense.
- Layer batter carefully: Place batter gently in the center of the pan. The batter spreads outward naturally, creating the tie dye effect. Avoid swirling, which can muddy the colors.
- Room temperature ingredients: Butter, eggs, and milk at room temp blend better, giving a smooth batter and even rise.
- Check oven temp: If your oven runs hot, your cake may brown too fast and dry out. Use an oven thermometer for accuracy and tent with foil if needed.
- Cooling matters: Completely cool the layers before frosting to prevent the buttercream from melting and sliding off.
One time, I forgot to soften the butter and ended up with lumpy batter—lesson learned! Also, layering the batter cold (after a quick chill) helps keep the colors from bleeding together. When frosting, a crumb coat (thin layer of frosting) helps trap crumbs and gives a cleaner finish once you add the final coat.
Variations & Adaptations
This vibrant red white blue tie dye cake is pretty flexible and invites a few fun tweaks to suit your taste or dietary needs.
- Dairy-Free Version: Use dairy-free butter and substitute milk with unsweetened almond or oat milk. The texture remains tender, and the colors still pop.
- Chocolate Twist: Add ¼ cup (25 g) cocoa powder to the white batter portion for a subtle chocolate layer that contrasts beautifully with the red and blue.
- Flavor Variations: Swap vanilla extract with almond or coconut extract for a different flavor profile. Lemon zest added to the batter gives a bright, fresh note perfect for summer.
- Different Shapes: Use a bundt pan or cupcakes to make individual tie dye treats. Cupcakes are especially great for parties and portion control.
- Natural Food Coloring: Use beet juice powder for red and butterfly pea powder for blue if you prefer natural dyes. The colors are softer but still festive.
I once made this cake as cupcakes for a neighborhood block party, swapping vanilla for coconut extract and topping with toasted coconut flakes—huge hit! For a quick summer dessert spread, pairing these cupcakes with easy no-bake strawberry cheesecake cups from this recipe made the table look so inviting.
Serving & Storage Suggestions
This vibrant red white blue tie dye cake is best served at room temperature to enjoy the full flavor and tender crumb. Here are some tips to serve and store it right:
- Serving: Slice with a sharp serrated knife to get clean cuts that show off the tie dye pattern. Serve with a dollop of whipped cream or alongside fresh berries for a refreshing contrast.
- Presentation: For festive occasions, add edible stars or sprinkles on the frosting. A dusting of powdered sugar adds a delicate touch if you prefer less sweet decoration.
- Storage: Store leftover cake covered in an airtight container in the refrigerator for up to 4 days. Bring to room temp before serving for the best texture.
- Freezing: Wrap individual slices tightly in plastic wrap and place in a freezer-safe bag for up to 2 months. Thaw overnight in the fridge, then bring to room temp.
- Flavor development: The flavors mellow and blend nicely after a day, making this cake a great make-ahead option for parties.
For a light summer meal, this cake goes surprisingly well with a fresh watermelon feta mint salad like the one in this recipe. The sweet, tart, and savory notes balance the richness of the cake perfectly.
Nutritional Information & Benefits
Here’s an approximate breakdown per slice (1/12th of the cake):
| Calories | 350 kcal |
|---|---|
| Fat | 15 g |
| Saturated Fat | 9 g |
| Carbohydrates | 48 g |
| Sugar | 30 g |
| Protein | 4 g |
This cake provides quick energy from carbohydrates and some protein from eggs and butter. Using real butter adds vitamin A and healthy fats, while the eggs contribute essential nutrients like choline. It’s not a health food, but it’s a balanced treat for special occasions.
For those with dietary concerns, this cake can be adapted to gluten-free and dairy-free versions without losing its charm. Just be mindful of food coloring sensitivities. The recipe contains common allergens like eggs, dairy, and gluten, so always inform your guests accordingly.
Conclusion
The vibrant red white blue tie dye cake holds a special place in my kitchen for its joyful colors and simple, delicious flavor. It’s proof that you don’t need complicated steps or fancy ingredients to make something truly festive and memorable. Whether you’re celebrating Independence Day, a birthday, or just feel like brightening up your dessert plate, this cake fits the bill.
I love how customizable it is—you can tweak the flavors, colors, and presentation to suit your mood and occasion. Plus, it’s just plain fun to make and watch those colors come alive while baking.
Give this recipe a try and make your next celebration a little sweeter and a lot more colorful. I’d love to hear how your tie dye cake turns out and any creative spins you put on it. Happy baking and celebrating!
Frequently Asked Questions
Can I make this cake ahead of time?
Yes! The cake layers can be baked and cooled a day in advance. Wrap them tightly in plastic wrap and store at room temperature or in the fridge. Frost just before serving for best results.
What type of food coloring works best for this cake?
Gel food coloring is best because it provides vibrant colors without thinning the batter. Liquid food coloring can make the batter too runny and affect texture.
Can I use a different pan size?
You can use other pan sizes, but baking times will vary. For example, a 9×13-inch pan will require less baking time and the cake will be thinner. Adjust accordingly and check doneness with a toothpick.
How do I prevent colors from bleeding together?
Layer the batter carefully, spooning each color gently into the center. Avoid swirling the colors once layered. Chilling the colored batter for a few minutes before layering can also help keep colors distinct.
Is this recipe suitable for cupcakes?
Absolutely! Use cupcake liners and fill each about 2/3 full with alternating colors to create mini tie dye cupcakes. Bake for about 18-22 minutes at 350°F (175°C).
Pin This Recipe!
Vibrant Red White Blue Tie Dye Cake

A quick and easy patriotic celebration dessert featuring a moist vanilla sponge with vibrant red, white, and blue tie dye layers. Perfect for Independence Day, birthdays, and festive gatherings.
- Prep Time: 15 minutes
- Cook Time: 40 minutes
- Total Time: 1 hour 10 minutes
- Yield: 12 servings 1x
- Category: Dessert
- Cuisine: American
Ingredients
- 2 ½ cups (315 g) all-purpose flour, sifted
- 2 ½ teaspoons baking powder
- ½ teaspoon salt
- 1 cup (227 g) unsalted butter, softened
- 1 ¾ cups (350 g) granulated sugar
- 4 large eggs, room temperature
- 1 cup (240 ml) whole milk, room temperature
- 2 teaspoons pure vanilla extract
- About 1 teaspoon red gel food coloring (AmeriColor brand recommended)
- About 1 teaspoon blue gel food coloring (AmeriColor brand recommended)
- About 3 cups (720 g) buttercream frosting (optional)
- Fresh berries or edible stars for garnish (optional)
Instructions
- Preheat oven to 350°F (175°C). Grease and line two 9-inch round cake pans with parchment paper.
- In a medium bowl, sift together flour, baking powder, and salt. Set aside.
- Using a mixer, beat softened butter and sugar on medium speed until pale and fluffy, about 3-5 minutes.
- Add eggs one at a time, beating well after each addition.
- Mix in vanilla extract. Alternate adding dry ingredients and milk in three parts, starting and ending with dry ingredients. Mix on low speed just until combined.
- Divide batter evenly into three bowls. Leave one white, add red gel coloring to second, and blue gel coloring to third. Stir gently.
- In each prepared pan, spoon 2 tablespoons of white batter in center, then 2 tablespoons red batter on top, then 2 tablespoons blue batter on top of that. Repeat layering until all batter is used. Do not swirl.
- Bake on middle rack for 35-40 minutes. Test doneness with toothpick; it should come out clean or with a few moist crumbs.
- Cool cakes in pans for 10 minutes, then transfer to cooling racks and cool completely before frosting.
- Frost with buttercream and decorate with fresh berries or edible stars if desired.
Notes
Use gel food coloring for vibrant colors without thinning the batter. Avoid overmixing after adding flour to keep cake tender. Chill colored batter briefly before layering to prevent colors from bleeding. Let cakes cool completely before frosting to avoid melting buttercream. For dairy-free version, substitute milk and butter with dairy-free alternatives. For gluten-free, use a 1:1 gluten-free flour blend.
Nutrition
- Serving Size: 1 slice (1/12th of c
- Calories: 350
- Sugar: 30
- Fat: 15
- Saturated Fat: 9
- Carbohydrates: 48
- Protein: 4
Keywords: tie dye cake, patriotic cake, red white blue cake, Fourth of July dessert, vanilla sponge cake, celebration cake, easy cake recipe


