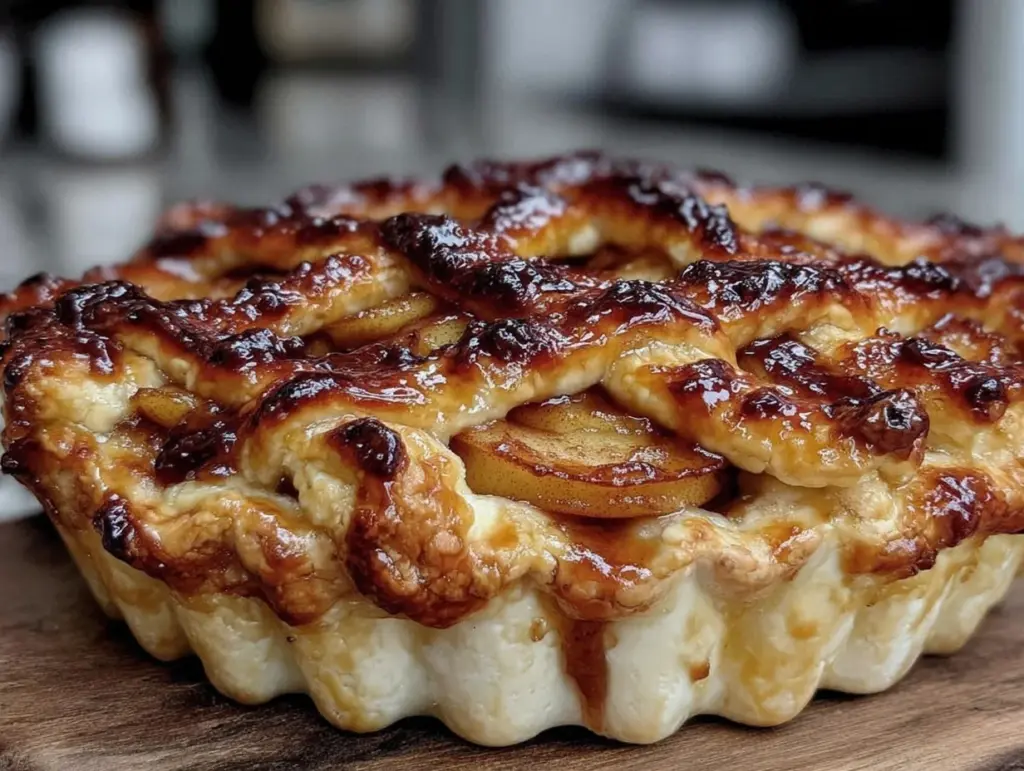
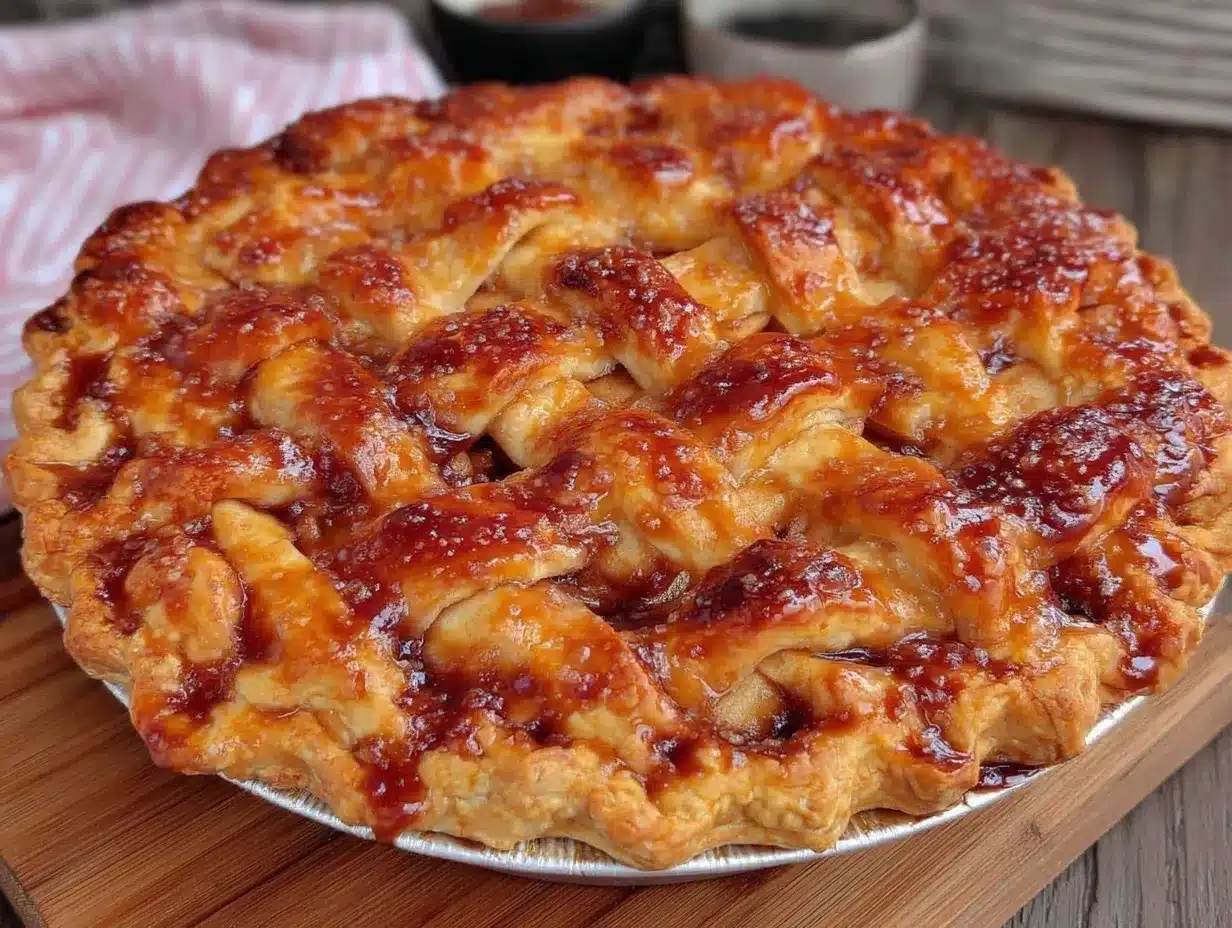
Let me tell you, the first time the sweet, spiced aroma of apples, cinnamon, and butter drifted through my kitchen as Grandma’s apple pie baked, I knew I was in for something special. There’s something honest and heartwarming about that scent—it’s like autumn in every breath, swirling with anticipation and memories. The sight of that golden, flaky lattice crust peeking through bubbling apple filling is enough to make you pause, take a deep breath, and just smile. You know you’re onto something truly special—something that feels like home.
Years ago, when I was knee-high to a grasshopper, I’d watch my grandma deftly roll out dough on her kitchen table, flour dusting the air like fairy-tale snow. She’d let me help weave the lattice (I’d sneak a pinch of dough when she wasn’t looking, of course). Each time she baked this apple pie, it was the highlight of any family gathering—no fancy tricks, just pure, nostalgic comfort. Honestly, I wish I’d discovered her little crust secret ages ago; it would’ve saved me from so many soggy-bottomed pies in my early baking days!
My family can’t resist sneaking slices off the cooling rack—sometimes before it’s even cooled. Last Thanksgiving, the pie disappeared before the turkey was carved. It’s a recipe that’s proven its worth time and again, whether at cozy potlucks, birthday dinners, or just a rainy weekend when you need a pick-me-up. The apples melt into buttery sweetness, and that flaky lattice crust… well, it’s dangerously easy and always gets rave reviews. Honestly, this apple pie recipe is now a staple for family gatherings and gifting—tested (multiple times, in the name of research, of course!) and ready for you to bookmark. Trust me, every bite feels like a warm hug, and you’re going to want to share this one with everyone.
Why You’ll Love This Apple Pie Recipe
Let’s face it—there are a million apple pie recipes out there, but Grandma’s version with a flaky lattice crust stands out for more reasons than I can count. Over years of baking, tweaking, and taste-testing, I’ve gathered little tricks that take this pie from good to unforgettable. Here’s why you’ll absolutely love making (and eating) it:
- Quick & Easy: Comes together in just over an hour—no need for endless chilling or complicated techniques. Perfect for busy weeknights or when those last-minute dessert cravings hit.
- Simple Ingredients: You don’t need fancy or expensive groceries—just pantry staples and fresh apples you can grab at any market.
- Perfect for Every Occasion: This apple pie is a showstopper at holiday dinners, potlucks, cozy Sunday brunches, or as a sweet treat for your kids after school.
- Crowd-Pleaser: Kids, adults, and even picky eaters always go back for seconds. It’s a guaranteed hit for both family and friends.
- Unbelievably Delicious: The combination of tender apples, warm spices, and a buttery, flaky lattice crust is pure comfort food. Every bite makes you close your eyes and sigh with happiness.
What sets this apple pie recipe apart? It’s all about Grandma’s crust trick—using a blend of butter and shortening for unbeatable flakiness, and just a splash of vinegar for tenderness. I also use a mix of tart and sweet apples to create a filling that’s perfectly balanced, not too mushy and not too firm (trust me, I’ve learned the hard way!). If you’ve ever struggled with soggy bottoms or bland flavor, this recipe solves those woes. It’s my best version after years of trial and error, with just the right amount of spice and sweetness.
For me, this isn’t just about pie—it’s about creating moments. Whether you’re impressing guests without breaking a sweat or turning an ordinary evening into something memorable, this apple pie recipe delivers every time. It’s comfort food, reimagined for real life: faster, easier, and every bit as satisfying as you remember.
What Ingredients You Will Need
This apple pie recipe uses simple, wholesome ingredients to deliver bold flavor and that crave-worthy, flaky lattice crust without any fuss. Most of these are pantry staples, and you can swap or substitute as needed, depending on what you have on hand.
For the Flaky Lattice Crust:
- 2 1/2 cups (310g) all-purpose flour (King Arthur is my go-to for consistent results)
- 1/2 cup (115g) unsalted butter, chilled and cubed (adds richness and flavor)
- 1/2 cup (95g) vegetable shortening, chilled (Helps with flakiness—Grandma swore by Crisco)
- 1/4 cup (60ml) ice water (start with this; add more, 1 tablespoon at a time, if needed)
- 1 tablespoon (15ml) apple cider vinegar (for extra tenderness—don’t skip!)
- 1 teaspoon (5g) salt
- 1 tablespoon (13g) granulated sugar (just a touch to balance the crust flavor)
For the Apple Filling:
- 6-7 medium apples (about 2 3/4 lbs/1.2kg), peeled, cored, and sliced (use half tart like Granny Smith, half sweet like Honeycrisp or Fuji for best flavor)
- 2/3 cup (135g) granulated sugar
- 1/4 cup (30g) light brown sugar, packed (adds extra caramel notes)
- 2 tablespoons (16g) all-purpose flour (helps thicken the filling—no runny pies!)
- 1 tablespoon (8g) cornstarch (optional, for extra thickening)
- 1 1/2 teaspoons ground cinnamon
- 1/4 teaspoon ground nutmeg
- 1/4 teaspoon ground allspice (optional, but I love the depth it adds)
- 1/8 teaspoon salt
- 1 tablespoon (15ml) lemon juice (keeps apples bright and balances sweetness)
- 2 tablespoons (28g) unsalted butter, cut into small pieces (dot on top before baking)
For Brushing & Sprinkling:
- 1 large egg, beaten (for egg wash, makes the crust shiny and golden)
- 1 tablespoon (15ml) milk (mix with egg for a softer crust color)
- 1 tablespoon (12g) coarse sugar (for sprinkling—adds sparkle and crunch)
Ingredient Tips & Substitutions:
- Gluten-Free Option: Substitute all-purpose flour with a 1:1 gluten-free blend (Bob’s Red Mill works well)
- Vegan Version: Swap butter for vegan margarine and use coconut oil instead of shortening; brush crust with non-dairy milk
- Fruit Swap: In summer, add fresh berries or swap in pears for a twist
- Sugar: Use coconut sugar for a deeper, less refined sweetness
Honestly, don’t stress if you don’t have every spice—cinnamon alone will still taste amazing. For apples, mixing varieties is key; you’ll get that perfect sweet-tart balance and avoid a mushy filling. If you’re short on time, pre-made pie dough works in a pinch (though Grandma would probably raise an eyebrow at that one!).
Equipment Needed
- 9-inch (23cm) pie dish (ceramic or glass holds heat best for crisp crusts)
- Large mixing bowls (one for the dough, one for the apples)
- Rolling pin (wooden or marble—honestly, I’ve used a wine bottle in a pinch!)
- Pastry cutter or fork (for cutting butter into the flour; a food processor works too)
- Sharp paring knife or apple corer (for prepping apples)
- Measuring cups and spoons
- Pastry brush (for egg wash; silicone brushes are easiest to clean)
- Plastic wrap or parchment paper (for chilling and rolling dough)
- Baking sheet (to catch drips—trust me, you don’t want burnt sugar on your oven floor)
If you’re missing a pastry cutter, use two knives or your fingertips (just work quickly to keep the butter cold). For budget-friendly pie pans, thrift stores are goldmines—some of my favorite pie plates are vintage finds. Maintenance tip: Always dry your rolling pin thoroughly to keep it from warping. And if you’re new to lattice weaving, a pizza cutter makes straight lines super easy!
Preparation Method
-
Prepare the Pie Dough:
Prep Time: 15 minutes, Chill: 30 minutes
In a large bowl, whisk together flour, salt, and sugar. Add chilled butter and shortening, tossing to coat. Using a pastry cutter or fork, work the fat into the flour until it looks like coarse crumbs with pea-sized bits. Drizzle in vinegar and ice water, 1 tablespoon at a time, mixing gently until the dough just comes together. (Don’t overwork, or the crust gets tough.) Divide dough in half, shape into disks, wrap in plastic, and chill for at least 30 minutes. -
Prep the Apple Filling:
Prep Time: 15 minutes
Peel, core, and slice apples about 1/4-inch (0.6cm) thick. Toss with lemon juice in a large bowl. Add sugar, brown sugar, flour, cornstarch, cinnamon, nutmeg, allspice, and salt. Mix until apples are coated. (If your apples are super juicy, add an extra tablespoon of flour.) -
Roll Out the Bottom Crust:
Prep Time: 10 minutes
On a lightly floured surface, roll one dough disk into a 12-inch (30cm) circle, about 1/8-inch (3mm) thick. Fit into your pie dish, letting excess hang over the edge. (If it cracks, patch it with scraps—no biggie.) Sprinkle a little flour over the bottom to prevent sogginess. -
Fill the Pie:
Prep Time: 5 minutes
Spoon apple mixture into the crust, mounding slightly in the center. Dot with butter pieces. (This melts into the filling for amazing flavor.) -
Make the Lattice Crust:
Prep Time: 15 minutes
Roll out the second dough disk into another 12-inch (30cm) circle. Cut into 1-inch (2.5cm) wide strips using a knife or pizza cutter. Lay half the strips horizontally across the pie. Fold back every other strip, then lay a strip vertically, alternating over and under to weave the lattice. (Don’t stress if it’s not perfect—rustic is beautiful!) Trim any excess, fold edges under, and crimp with your fingers or a fork. -
Egg Wash & Sprinkle:
Prep Time: 2 minutes
Beat egg with milk. Brush over the crust, then sprinkle with coarse sugar. (This gives a gorgeous golden finish and crunch.) -
Bake:
Bake Time: 50-60 minutes
Place pie on a baking sheet and bake at 400°F (200°C) for 20 minutes. Lower heat to 375°F (190°C) and bake another 30-40 minutes, until crust is golden and filling bubbles. If edges brown too quickly, cover with foil. (The pie should smell sweet and spicy—the juices should bubble up through the lattice.) -
Cool:
Cool Time: 2 hours
Let pie cool for at least 2 hours before slicing. (This sets the filling, so it’s not runny.)
Troubleshooting: If the crust feels dry, add more ice water, 1 teaspoon at a time. For a crisp bottom, bake on the lowest oven rack. If the lattice weaves get messy, just patch with scraps—no one minds!
Efficiency Tips: Make dough and prep apples ahead; assemble and bake when ready. Use parchment to roll dough for easy transfer. And always taste your apples before baking—adjust sugar if they’re extra tart or sweet.
Cooking Tips & Techniques
- Keep Everything Cold: Cold butter and shortening are your best friends for flaky crust. If your kitchen is warm, chill your mixing bowl and utensils for extra insurance.
- Don’t Overwork the Dough: Mix just until it sticks together. Over-mixing is the number one culprit for tough pie crusts (I’ve made that mistake more times than I care to admit!).
- Lattice Weaving: If you’re new to lattice, work slowly and use a ruler for straight strips. Or just let it be rustic—imperfections add charm!
- Prevent Soggy Bottoms: Sprinkle a little flour or crushed graham crackers on the bottom dough. Baking on a hot oven rack helps, too.
- Apple Choice: Mixing tart and sweet apples gives the best flavor and texture. Don’t use all soft apples, or the filling will turn mushy.
- Juice Control: If your apples are ultra-juicy, let them sit with sugar for 10 minutes, then drain off excess liquid before mixing with thickener.
- Timing: Start with the crust, then prep apples while dough chills. Multitasking makes the process smoother, and you’ll have time for a coffee break in between.
- Personal Lesson: Once, I forgot to chill the dough and ended up with a greasy, dense crust—don’t skip chilling, even if you’re in a hurry!
- Consistency: Use the same brand of flour and butter for best results. Small changes can affect texture (I learned this after an “off” pie when I switched brands).
Honestly, it takes practice to get that perfect golden crust and juicy filling, but with these tips, you’re well on your way. If things don’t look Instagram-perfect, don’t sweat it—the taste wins every time!
Variations & Adaptations
- Gluten-Free Apple Pie: Use your favorite 1:1 gluten-free flour in place of all-purpose. Add an extra tablespoon of ice water if dough feels crumbly. The crust won’t be quite as flaky, but the flavor still shines.
- Vegan Version: Swap butter and shortening for vegan alternatives, and brush the crust with coconut or almond milk. Use coconut sugar for a richer, caramel taste. I’ve done this for my vegan friends, and it’s always a hit!
- Seasonal Fruit Twist: Mix in a cup of fresh berries (blueberries or raspberries are amazing in summer) or swap half the apples for ripe pears in the fall.
- Flavor Boost: Add a splash of vanilla extract or a sprinkle of cardamom to the filling for extra warmth. A handful of chopped walnuts or pecans in the filling gives a delightful crunch.
- Different Cooking Methods: Bake in a cast iron skillet for a rustic look, or use mini pie tins for individual servings (great for parties or gifting).
- Allergen Substitutions: For nut allergies, skip the optional nuts and use oat or coconut flour if needed. For dairy-free, stick to plant-based fats and milk for the wash.
My personal favorite? Adding a handful of fresh cranberries at Thanksgiving for a tart pop of color and flavor. It’s a fun twist that always gets compliments!
Serving & Storage Suggestions
- Serve Warm or at Room Temperature: Apple pie is best enjoyed slightly warm, with a scoop of vanilla ice cream or a dollop of whipped cream. If you’re feeling fancy, drizzle with caramel sauce!
- Presentation Tips: For Pinterest-worthy slices, let the pie cool completely before cutting. Wipe your knife between cuts for clean edges.
- Pairings: Serve with hot coffee, spiced tea, or mulled cider. For brunch, pair with a cheddar omelet or crisp bacon.
- Storage: Cover leftovers loosely with foil and keep at room temperature for up to 2 days. For longer storage, refrigerate up to 5 days. The flavors deepen overnight—sometimes it tastes even better the next day!
- Freezing: Fully baked pie can be wrapped tightly and frozen for up to 2 months. Thaw overnight in the fridge and warm in a 350°F (175°C) oven for 15 minutes before serving.
- Reheating: Heat slices in the oven for crisp crust, or microwave for 30 seconds if you’re impatient (we’ve all been there).
Honestly, if you have leftovers (which is rare in my house), they make the best midnight snack. The crust stays flaky, and the filling gets even more flavorful as it sits.
Nutritional Information & Benefits
Each slice of this homemade apple pie (1/8 of a 9-inch pie) offers roughly 320 calories, 15g fat, 45g carbs, and 2g protein. The apples deliver a healthy dose of fiber, vitamin C, and antioxidants, especially if you leave a bit of the peel on. Using half the sugar or swapping for coconut sugar can lower the glycemic load.
This apple pie recipe can easily be adapted for gluten-free, dairy-free, or vegan diets (just follow the substitutions above). Major allergens include wheat, dairy, and eggs, but these are simple to swap out. From a wellness perspective, I see this pie as a treat that brings joy and comfort—sometimes, that’s just as important as the nutritional stats. As always, enjoy in moderation and savor every bite!
Conclusion
If you’re looking for the best cozy homemade apple pie recipe with a flaky lattice crust, this is the one you’ll want to make again and again. It’s a recipe packed with tradition, love, and just the right amount of buttery flakiness and spice. Whether you’re baking for a holiday, sharing with friends, or just craving something sweet, it’s sure to earn a spot in your family’s favorites.
Feel free to adjust the spices and apple varieties to suit your tastes—this pie is all about making it your own. Honestly, I love this recipe for its simplicity and soul-soothing nostalgia. I hope you give it a try, and if you do, please drop a comment, share your photos, or tell me about your own special twists!
Happy baking, and may your kitchen always be filled with the scent of warm apples and fresh pie!
FAQs
Can I make the pie dough ahead of time?
Absolutely! Pie dough can be made up to 2 days in advance and stored tightly wrapped in the fridge. You can also freeze it for up to a month—just let it thaw in the fridge overnight before rolling out.
What are the best apples for apple pie?
I recommend using a mix of tart and sweet apples, like Granny Smith and Honeycrisp, for the best flavor and texture. Avoid using all soft apples, as they can make the filling mushy.
How do I prevent a soggy bottom crust?
Sprinkle a bit of flour or crushed graham crackers on the bottom before adding the filling, and bake on the lowest oven rack. Preheating your baking sheet also helps!
Can I freeze the baked apple pie?
Yes! Cool the pie completely, wrap tightly in foil or plastic wrap, and freeze for up to 2 months. Thaw overnight in the fridge, then reheat in the oven before serving.
Is this recipe easy for beginners?
Definitely! The steps are straightforward, and even if your lattice isn’t perfect, the pie will taste amazing. Just follow the tips above for best results, and enjoy the process!
Pin This Recipe!

Apple Pie Recipe: Best Cozy Homemade Lattice Crust Guide

This classic apple pie features a buttery, flaky lattice crust and a perfectly spiced apple filling. It’s a nostalgic, crowd-pleasing dessert that’s easy enough for beginners and guaranteed to bring comfort and joy to any gathering.
- Prep Time: 1 hour 12 minutes
- Cook Time: 50-60 minutes
- Total Time: 2 hours 12 minutes
- Yield: 8 servings 1x
- Category: Dessert
- Cuisine: American
Ingredients
- 2 1/2 cups all-purpose flour
- 1/2 cup unsalted butter, chilled and cubed
- 1/2 cup vegetable shortening, chilled
- 1/4 cup ice water (add more, 1 tablespoon at a time, if needed)
- 1 tablespoon apple cider vinegar
- 1 teaspoon salt
- 1 tablespoon granulated sugar
- 6–7 medium apples (about 2 3/4 lbs), peeled, cored, and sliced (half tart like Granny Smith, half sweet like Honeycrisp or Fuji)
- 2/3 cup granulated sugar
- 1/4 cup light brown sugar, packed
- 2 tablespoons all-purpose flour
- 1 tablespoon cornstarch (optional)
- 1 1/2 teaspoons ground cinnamon
- 1/4 teaspoon ground nutmeg
- 1/4 teaspoon ground allspice (optional)
- 1/8 teaspoon salt
- 1 tablespoon lemon juice
- 2 tablespoons unsalted butter, cut into small pieces
- 1 large egg, beaten
- 1 tablespoon milk
- 1 tablespoon coarse sugar
Instructions
- Prepare the Pie Dough: In a large bowl, whisk together flour, salt, and sugar. Add chilled butter and shortening, tossing to coat. Using a pastry cutter or fork, work the fat into the flour until it looks like coarse crumbs with pea-sized bits. Drizzle in vinegar and ice water, 1 tablespoon at a time, mixing gently until the dough just comes together. Divide dough in half, shape into disks, wrap in plastic, and chill for at least 30 minutes.
- Prep the Apple Filling: Peel, core, and slice apples about 1/4-inch thick. Toss with lemon juice in a large bowl. Add granulated sugar, brown sugar, flour, cornstarch, cinnamon, nutmeg, allspice, and salt. Mix until apples are coated.
- Roll Out the Bottom Crust: On a lightly floured surface, roll one dough disk into a 12-inch circle, about 1/8-inch thick. Fit into your pie dish, letting excess hang over the edge. Sprinkle a little flour over the bottom to prevent sogginess.
- Fill the Pie: Spoon apple mixture into the crust, mounding slightly in the center. Dot with butter pieces.
- Make the Lattice Crust: Roll out the second dough disk into another 12-inch circle. Cut into 1-inch wide strips. Lay half the strips horizontally across the pie. Fold back every other strip, then lay a strip vertically, alternating over and under to weave the lattice. Trim any excess, fold edges under, and crimp.
- Egg Wash & Sprinkle: Beat egg with milk. Brush over the crust, then sprinkle with coarse sugar.
- Bake: Place pie on a baking sheet and bake at 400°F for 20 minutes. Lower heat to 375°F and bake another 30-40 minutes, until crust is golden and filling bubbles. If edges brown too quickly, cover with foil.
- Cool: Let pie cool for at least 2 hours before slicing.
Notes
For best results, keep all fats and dough cold. Mix tart and sweet apples for balanced flavor. Sprinkle flour or crushed graham crackers on the bottom crust to prevent sogginess. If apples are very juicy, drain excess liquid before adding thickener. Pie dough can be made ahead and frozen. For gluten-free or vegan adaptations, see ingredient substitutions. Let pie cool fully for clean slices.
Nutrition
- Serving Size: 1 slice (1/8 of a 9-
- Calories: 320
- Sugar: 25
- Sodium: 220
- Fat: 15
- Saturated Fat: 7
- Carbohydrates: 45
- Fiber: 4
- Protein: 2
Keywords: apple pie, lattice crust, homemade pie, classic dessert, fall baking, Thanksgiving, comfort food, easy pie recipe, best apple pie, family recipe


