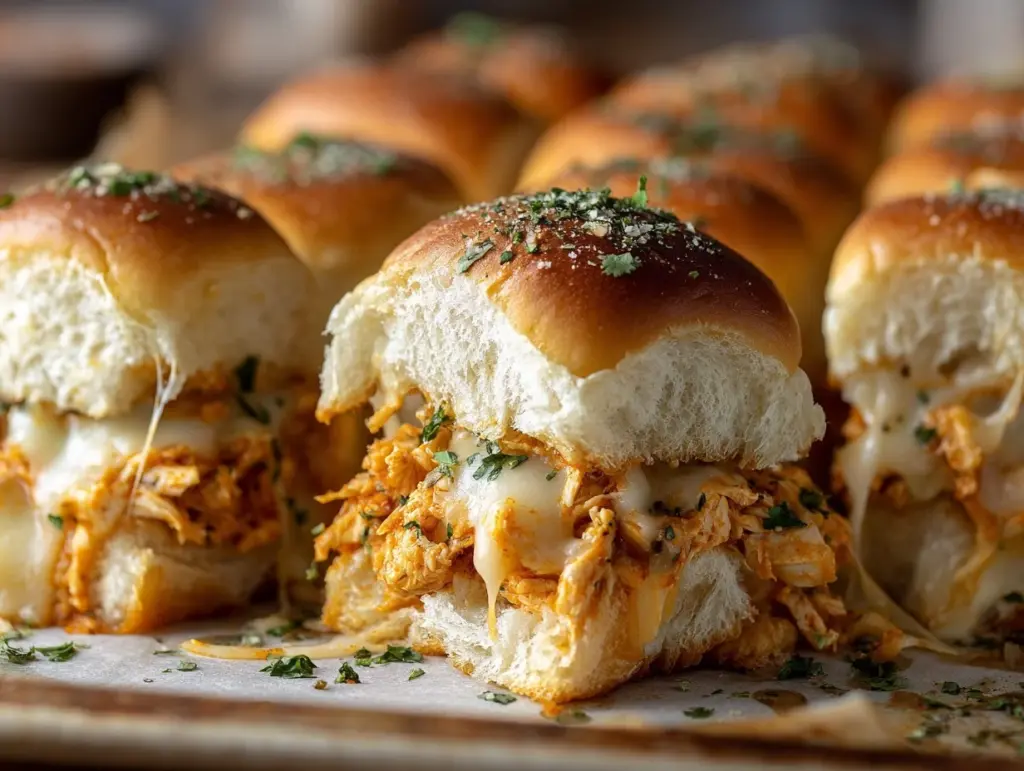
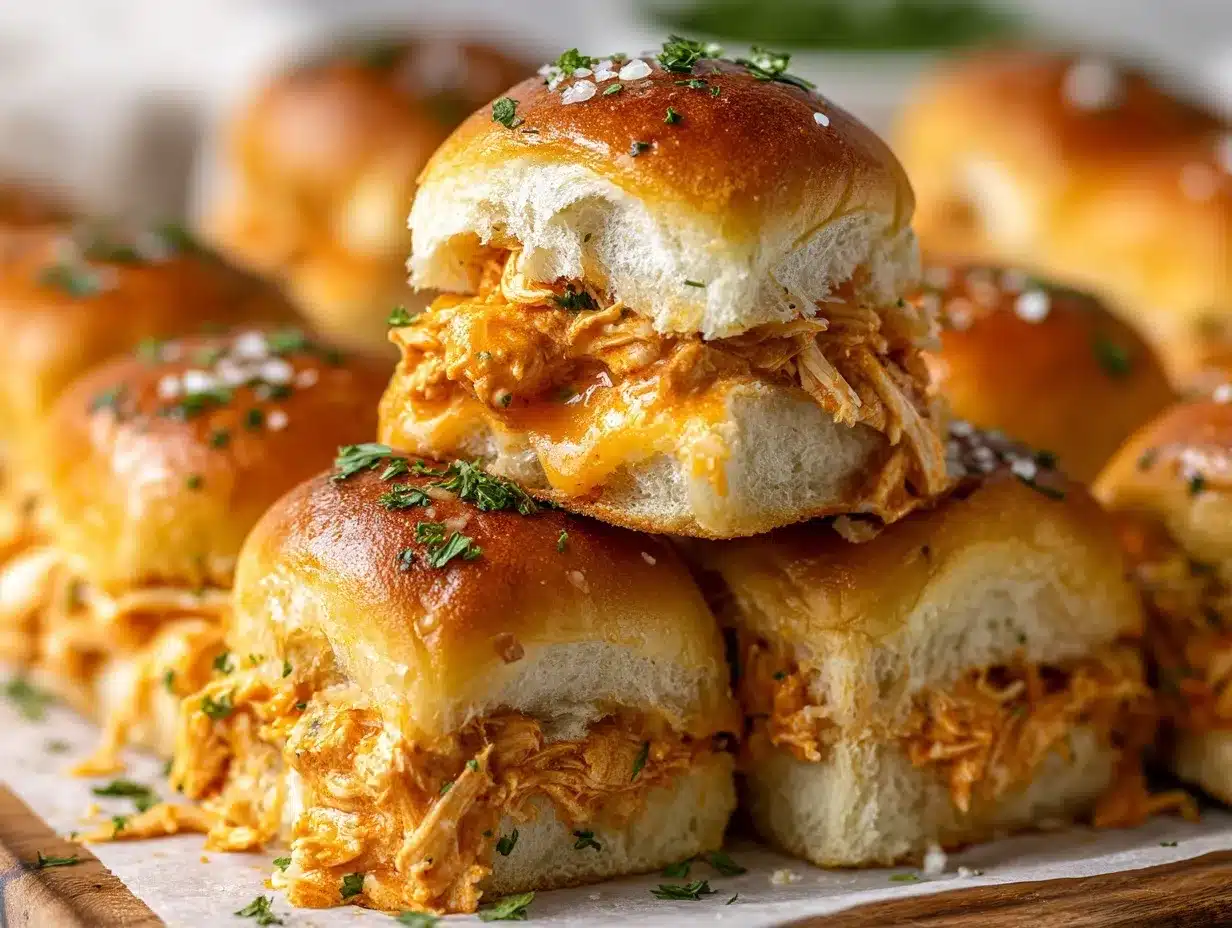
Let’s be honest—there’s something about the smell of bubbling cheese and spicy buffalo sauce that just calls to you from across the room. The first time I made these Buffalo Chicken Sliders, my kitchen turned into a mini tailgate party. I could barely keep my hands off the tray long enough to snap a photo! You know those recipes that just feel right for every occasion? That’s this one. Whether you’re hosting a rowdy game day, a cozy movie night, or you just want to spice up a weeknight dinner, these sliders are a total game-changer.
I stumbled on the original idea during a last-minute scramble before a Super Bowl party (because, of course, I’d forgotten to plan ahead). We had leftover rotisserie chicken, a half-bottle of buffalo sauce, and a bag of shredded cheese. The result? Buffalo Chicken Sliders that disappeared before halftime. Since then, I’ve made these at least a dozen times—tweaking, testing, and perfecting. They’re now a staple in my house for two reasons: they’re seriously delicious, and they’re so darn easy.
If you love classic buffalo chicken but want something easier to share and way less messy than wings, you’ll fall hard for this Buffalo Chicken Sliders recipe. It’s perfect for big families, picky eaters, or anyone who wants a high-protein, gooey, satisfying bite. Trust me, I’ve tested every shortcut and swap out there (as a busy parent and a food blogger, I kind of have to!). These sliders are the real deal—cheesy, spicy, and guaranteed to be the first thing gone at your next gathering.
Why You’ll Love This Buffalo Chicken Sliders Recipe
After countless rounds of recipe testing (and plenty of messy fingers), I can honestly say these Buffalo Chicken Sliders are a crowd-pleaser every single time. Here’s why you’ll find yourself making them again and again:
- Quick & Easy: You can pull these together in under 30 minutes—prep included! No slow cooker marathon or fancy gadgets needed. Perfect for last-minute cravings or unexpected guests.
- Simple Ingredients: Nothing weird here. Just classic pantry staples, leftover or rotisserie chicken, your favorite buffalo sauce, and cheese. You probably have everything on hand already.
- Perfect for Parties & Game Day: These sliders are made for sharing! Pile them on a platter and watch them disappear at tailgates, birthday parties, potlucks, or family movie nights.
- Customizable Heat: Not everyone loves fiery hot food, right? You control the level of spice. Make them mild for the kids or bring the heat for your spice-loving friends.
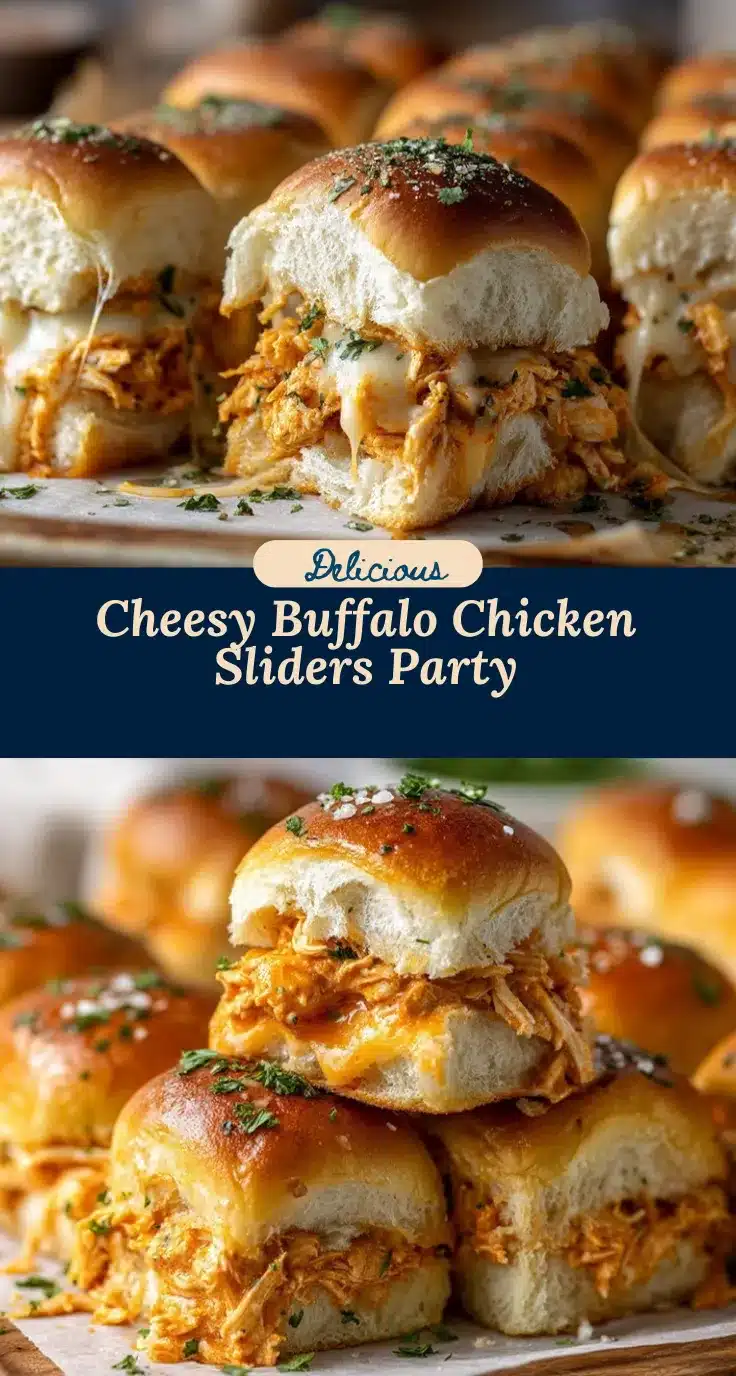
- Seriously Cheesy & Satisfying: The cheese melts into every nook and cranny, holding all that juicy buffalo chicken together. The buns get just a little toasty on the edges—total flavor bomb.
- Mess-Free Finger Food: Unlike wings, these sliders are easy to eat and even easier to serve. No sauce-soaked napkins or orange fingers required.
- Tested & Family-Approved: After making these for everything from birthday dinners to lazy Sunday lunches, I can confidently say they win over kids, grandparents, and picky eaters alike.
What really sets this recipe apart? It’s the way the flavors balance out—zesty buffalo sauce, cool ranch (or blue cheese) drizzle, gooey cheese, and soft, buttery buns. I blend the chicken with sauce and cheese before assembling so every bite is packed with flavor. And let’s face it, anything that gets people gathered around the table, talking and laughing, is already a win in my book.
So, whether you’re looking for an easy appetizer that’ll make you the MVP of the party or just want to shake up your dinner routine, these Buffalo Chicken Sliders are your new go-to. Warning: You might want to double the batch. They vanish fast!
What Ingredients You Will Need
This Buffalo Chicken Sliders recipe keeps things simple but doesn’t skimp on flavor. Most of these ingredients are pantry staples or easy finds at any grocery store. Here’s what you need for the ultimate cheesy, spicy sliders:
-
For the Chicken Filling:
- 2 cups shredded cooked chicken (leftover, rotisserie, or poached; about 280g—rotisserie adds extra flavor and saves time!)
- 1/2 cup buffalo wing sauce (120ml; I love Frank’s RedHot, but use your favorite)
- 2 tablespoons ranch or blue cheese dressing (30ml; adds creaminess and cools the heat, optional but recommended)
- 1 cup shredded mozzarella cheese (110g; melts beautifully for that gooey texture)
- 1 cup shredded cheddar cheese (110g; sharp cheddar brings bold flavor)
- 1/4 cup green onions, finely sliced (about 15g; for a fresh bite)
-
For the Sliders:
- 12 slider buns or Hawaiian rolls (soft, slightly sweet, about 400g total)
- 2 tablespoons unsalted butter, melted (28g; for brushing on top)
- 1/2 teaspoon garlic powder (for the butter topping—adds a little zip)
- 1 tablespoon sesame seeds (optional; for sprinkling on top, adds crunch)
-
Optional Add-Ons:
- Extra ranch or blue cheese dressing for drizzling or dipping
- Thinly sliced celery or pickles for a classic crunch
- Crumbled blue cheese for a bolder flavor hit on top
Ingredient Tips: If you’re buying chicken just for this, grab a rotisserie chicken—it’s juicy and shreds easily. For a gluten-free version, use gluten-free slider buns. If you need dairy-free, swap in vegan cheese and plant-based butter (the flavor’s still fantastic). For those who love experimenting, try mixing in a touch of smoked paprika or even a little honey to the buffalo sauce for a sweet-heat variation.
I’ve also swapped in pepper jack cheese for extra kick, and it’s a fun twist! Don’t be afraid to get creative with whatever you have on hand.
Equipment Needed
One of my favorite things about this Buffalo Chicken Sliders recipe is how fuss-free it is when it comes to equipment. Here’s all you’ll need:
- Baking dish or sheet pan: A 9×13-inch (23x33cm) glass or ceramic baking dish works best, but a rimmed sheet pan or even a disposable foil tray will do the trick.
- Mixing bowls: At least one medium bowl for tossing the chicken and cheese mixture together. I use two if I’m prepping toppings separately.
- Measuring cups and spoons: For accuracy—especially with the buffalo sauce and butter. No need for a scale unless you’re doubling or tripling the recipe.
- Sharp knife or bread knife: To easily slice the slider buns in half horizontally.
- Pastry brush (optional): For brushing melted butter on the buns. If you don’t have one, a spoon or even clean fingers work in a pinch!
- Aluminum foil: For tenting the sliders as they bake—keeps them moist and melty.
Honestly, I’ve made these in everything from a well-loved Pyrex dish to a thrift-store metal pan. If you’re feeding a crowd, disposable pans make cleanup a breeze. Just keep your tools simple, and you’ll be ready to go!
Preparation Method
-
Preheat and Prep:
- Preheat your oven to 350°F (175°C). Lightly grease a 9×13-inch (23x33cm) baking dish with a bit of butter or nonstick spray.
- If using rotisserie chicken, shred it by hand or with two forks. You want bite-sized, even pieces—about 2 cups (280g).
-
Mix the Filling:
- In a medium mixing bowl, combine the shredded chicken, buffalo sauce (1/2 cup/120ml), ranch or blue cheese dressing (2 tbsp/30ml if using), mozzarella (1 cup/110g), cheddar (1 cup/110g), and half of the green onions.
- Stir until everything is evenly coated and the cheeses start sticking the mixture together. It should smell spicy and cheesy—yum!
- Troubleshooting tip: If it looks dry, add a splash more buffalo sauce or dressing. Too wet? Add a little more cheese.
-
Assemble the Sliders:
- Carefully slice the slider buns in half horizontally (like a big sandwich). Place the bottom halves in your prepared baking dish.
- Spread the chicken mixture evenly across the buns. Press down gently so it’s all tucked in.
- Place the top halves of the buns over the filling.
-
Add the Butter Topping:
- Melt 2 tablespoons (28g) butter and stir in 1/2 tsp garlic powder. Brush this mixture generously over the tops of the slider buns.
- Sprinkle with sesame seeds if you like extra crunch.
-
Bake:
- Cover the dish loosely with aluminum foil (tent it so it doesn’t stick to the cheese).
- Bake for 15 minutes, then uncover and bake for another 8-10 minutes, or until the tops are golden and the cheese is bubbling at the edges.
- Look for: Cheese should be melty, and the tops should feel slightly crisp when tapped.
-
Garnish and Serve:
- Remove from the oven and let the sliders cool for 5 minutes before slicing. This helps everything set up (and keeps your fingers safe!).
- Scatter the remaining green onions on top, and drizzle with extra ranch or blue cheese dressing if you like.
- Serve warm—best enjoyed fresh!
Personal tip: If you want to prep ahead, assemble the sliders up to the baking step, cover, and refrigerate for up to 24 hours. Add 5 extra minutes to baking time if starting cold. Leftovers reheat beautifully, too!
Cooking Tips & Techniques
Over the years, I’ve picked up a few tricks to make these Buffalo Chicken Sliders come out perfect every time—no soggy bottoms, no dried-out chicken!
- Don’t Overload the Filling: More filling isn’t always better. Too much, and the sliders will get messy and hard to eat. Stick to about 2 cups (280g) chicken for 12 buns.
- Even Cheese Distribution: Mix the cheeses right in with the chicken so every bite is gooey. Layering cheese only on top can cause the sliders to separate.
- Keep It Covered (at First): Tenting with foil for the first part of baking keeps the buns soft and helps the cheese melt fully. Uncover at the end for a golden finish.
- Watch the Oven: Every oven runs a bit differently. Check your sliders at the 20-minute mark to avoid over-browning.
- Use Fresh Buns for Best Texture: Day-old buns can get soggy. If you’re using softer Hawaiian rolls, you might want to toast the bottom halves for 2-3 minutes before assembling.
- Make-Ahead Tip: Mix the chicken and sauce the night before for deeper flavor—just assemble and bake when you’re ready.
- Personal Lesson: The first time I made these, I used way too much sauce and ended up with a swimming-pool situation in my baking dish. So now, I always start with less and add a splash as needed. You can always add more, but you can’t take it out!
If you’re multitasking (and who isn’t?), prep your toppings and sides while the sliders bake. It’s an easy way to get everything on the table hot and ready at once. And if a bun or two sticks to the pan? Don’t sweat it. Just loosen with a spatula and call it “rustic.”
Variations & Adaptations
One of the best things about this Buffalo Chicken Sliders recipe is how easy it is to tailor. Here are a few of my favorite ways to mix things up:
- Spicy BBQ Chicken Sliders: Skip the buffalo sauce and use your favorite barbecue sauce instead. Add a touch of hot sauce if you want a hint of heat. Great for guests who want less spice.
- Low-Carb or Gluten-Free: Swap the slider buns for lettuce cups or gluten-free rolls. I’ve even tried cloud bread (egg-based)—surprisingly tasty and light!
- Vegetarian Buffalo Cauliflower Sliders: Roast bite-sized cauliflower florets, toss them in buffalo sauce, and use them in place of chicken. My vegetarian friends rave about this version.
- Seasonal Additions: In fall, I sometimes add thin apple slices for a sweet crunch. In summer, a little fresh corn right in the filling is awesome.
- Cheese Swaps: Pepper jack for extra spice, smoked gouda for a twist, or even a sharp provolone. Mix and match to suit your crew!
- Allergen-Friendly: Use vegan cheese and plant-based dressing for dairy-free sliders, and check bun ingredients for allergens.
- My Personal Go-To: I love adding a thin layer of pickled jalapeños before baking. It’s not for everyone, but if you’re a heat-seeker, you’ll love the kick!
Don’t be afraid to experiment—the base recipe is forgiving, and there’s lots of room for creativity. Just keep the ratios roughly the same for the best texture.
Serving & Storage Suggestions
Serve these Buffalo Chicken Sliders warm, right out of the oven, for maximum gooeyness and flavor. I like to pile them high on a big serving platter, sprinkle with extra green onions, and offer a side of ranch or blue cheese dressing for dipping.
- Serving Ideas: These pair perfectly with carrot and celery sticks (classic buffalo style!), a crisp salad, or even sweet potato fries. For a heartier spread, add potato chips or mac and cheese cups.
- Beverage Pairings: Cold beer, sparkling lemonade, or a simple iced tea all balance out the spicy kick. For the kids, milk or a fruity punch is great.
- Storage: Keep leftovers in an airtight container in the fridge for up to 3 days. The buns will soften but the flavor stays strong!
- Reheating: Reheat in a 300°F (150°C) oven for 10 minutes (covered), or microwave individual sliders for 30 seconds. The oven keeps them crispier, but the microwave is fast.
- Make-Ahead Note: Assemble sliders a day ahead, store covered in the fridge, and bake just before serving. Perfect for party prep!
Honestly, these sliders are just as tasty cold the next day—great for lunchboxes or game-day leftovers!
Nutritional Information & Benefits
Each Buffalo Chicken Slider (based on 12 sliders per recipe) is approximately:
- Calories: 210
- Protein: 13g
- Carbohydrates: 15g
- Fat: 11g
- Fiber: 1g
- Sugar: 3g
Thanks to the chicken and cheese, these sliders are a good source of protein—helpful for keeping you full at parties or as a meal. Using rotisserie chicken cuts down on saturated fat compared to fried wings, and you can control the sodium by picking a lower-salt buffalo sauce. If you need gluten-free, just use GF buns. Allergens to watch: dairy (cheese), gluten (buns), and egg (some dressings).
From a wellness standpoint, I love these because they’re portion-friendly—you get all the satisfaction of buffalo chicken without overdoing it. Plus, you can always add more veggies on the side!
Conclusion
Buffalo Chicken Sliders are the kind of recipe that turns any gathering into a party. They’re easy, cheesy, spicy, and totally irresistible—whether you’re feeding a crowd or just your own family. I love how flexible this recipe is; you can tweak the heat, swap the cheese, or sneak in a few extras and it still turns out great every single time.
If you haven’t tried making these yet, you’re in for a treat. Trust me, once you see everyone reaching for “just one more,” you’ll know you’ve got a new favorite on your hands. Feel free to make it your own—add your family’s favorite toppings, change up the cheese, or go gluten-free if needed.
I’d love to hear how these Buffalo Chicken Sliders worked out for you! Drop a comment, share your creative twists, or tag me on Pinterest with your party photos. Here’s to more gatherings, more laughs, and more cheesy, spicy bites!
Frequently Asked Questions
Can I make Buffalo Chicken Sliders ahead of time?
Absolutely! Assemble everything up to the baking step, cover, and refrigerate for up to 24 hours. Bake just before serving, adding 5 extra minutes if they’re cold from the fridge.
What’s the best chicken to use for these sliders?
Rotisserie chicken is my go-to for convenience and flavor, but any cooked, shredded chicken works—poached, baked, or even leftover grilled chicken.
How spicy are these Buffalo Chicken Sliders?
It depends on your buffalo sauce! Use mild for less heat or mix in extra hot sauce for a fiery kick. You can always add more sauce at the table for spice lovers.
Can I freeze Buffalo Chicken Sliders?
Yes! Wrap baked, cooled sliders tightly and freeze for up to 2 months. Reheat from frozen in a 325°F (160°C) oven, covered, for about 20 minutes.
What toppings go well with Buffalo Chicken Sliders?
Classic celery and carrot sticks, extra green onions, ranch or blue cheese dressing, and even sliced pickles or jalapeños are all delicious additions.
Pin This Recipe!
Buffalo Chicken Sliders

These Buffalo Chicken Sliders are cheesy, spicy, and perfect for parties, game day, or a fun family dinner. Made with shredded chicken, buffalo sauce, and gooey cheese on soft slider buns, they’re quick, easy, and always a crowd-pleaser.
- Prep Time: 10 minutes
- Cook Time: 25 minutes
- Total Time: 35 minutes
- Yield: 12 sliders 1x
- Category: Appetizer
- Cuisine: American
Ingredients
- 2 cups shredded cooked chicken (rotisserie, leftover, or poached; about 280g)
- 1/2 cup buffalo wing sauce (120ml)
- 2 tablespoons ranch or blue cheese dressing (optional, 30ml)
- 1 cup shredded mozzarella cheese (110g)
- 1 cup shredded cheddar cheese (110g)
- 1/4 cup green onions, finely sliced (about 15g), divided
- 12 slider buns or Hawaiian rolls (about 400g)
- 2 tablespoons unsalted butter, melted (28g)
- 1/2 teaspoon garlic powder
- 1 tablespoon sesame seeds (optional)
- Extra ranch or blue cheese dressing for drizzling or dipping (optional)
- Thinly sliced celery or pickles (optional)
- Crumbled blue cheese (optional)
Instructions
- Preheat your oven to 350°F (175°C). Lightly grease a 9×13-inch baking dish with butter or nonstick spray.
- Shred the cooked chicken by hand or with two forks into bite-sized pieces.
- In a medium mixing bowl, combine shredded chicken, buffalo sauce, ranch or blue cheese dressing (if using), mozzarella, cheddar, and half the green onions. Stir until evenly coated.
- Slice the slider buns in half horizontally. Place the bottom halves in the prepared baking dish.
- Spread the chicken mixture evenly over the buns and press down gently. Place the top halves of the buns over the filling.
- Melt the butter and stir in garlic powder. Brush the mixture over the tops of the buns. Sprinkle with sesame seeds if desired.
- Cover the dish loosely with aluminum foil. Bake for 15 minutes, then uncover and bake for another 8-10 minutes, until the tops are golden and cheese is bubbling.
- Remove from oven and let cool for 5 minutes before slicing.
- Scatter remaining green onions on top and drizzle with extra dressing if desired. Serve warm.
Notes
For gluten-free sliders, use gluten-free buns. For dairy-free, substitute vegan cheese and plant-based butter. You can prep the sliders up to the baking step and refrigerate for up to 24 hours; add 5 minutes to baking time if cold. Leftovers reheat well in the oven or microwave. Don’t overload the filling to avoid soggy sliders. Try adding pickled jalapeños or swapping cheeses for variety.
Nutrition
- Serving Size: 1 slider
- Calories: 210
- Sugar: 3
- Sodium: 480
- Fat: 11
- Saturated Fat: 5
- Carbohydrates: 15
- Fiber: 1
- Protein: 13
Keywords: buffalo chicken sliders, party appetizer, game day, cheesy sliders, easy chicken sliders, spicy chicken, finger food, tailgate recipe