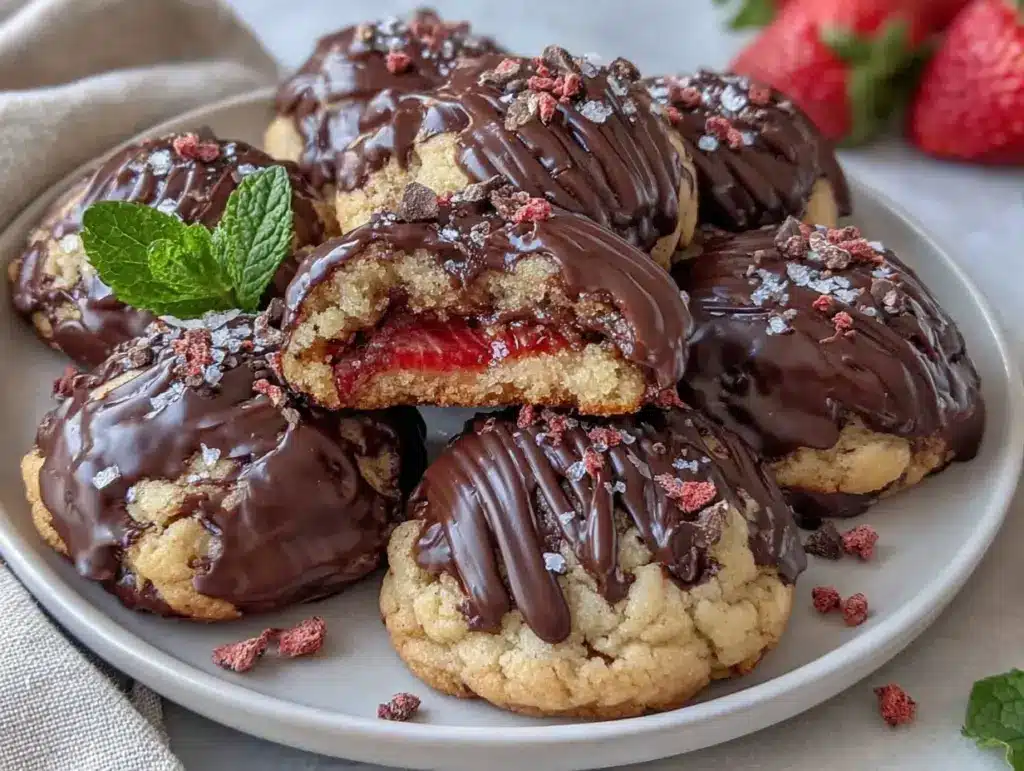
Let me tell you, the moment you pull a tray of Chocolate Covered Strawberry Cookies from the oven, the whole house transforms. The warm, sweet aroma of melting chocolate and vibrant strawberries drifts through each room—it’s the kind of scent that makes everyone pause whatever they’re doing and wander into the kitchen with hopeful eyes. Honestly, these cookies are nothing short of magical. That first bite? Oh, it’s a revelation—soft, fudgy chocolate exterior giving way to a gooey, strawberry-laced center. And, if I’m being honest, the first time I made them, I was instantly hooked (and so was my family). It’s that rare kind of moment where you pause, take a deep breath, and just smile because you know you’re onto something truly special.
I stumbled across the idea for these cookies years ago while trying to recreate the flavors of chocolate-covered strawberries for a friend’s birthday. Back then, I was knee-high to a grasshopper and determined to impress. My grandma always said, “If you want something done right, put a little love (and a lot of chocolate) into it.” So, I did. Over the years, I’ve tweaked and tested this recipe more times than I care to admit—in the name of research, of course. Now, it’s a staple at family gatherings, birthdays, and every Valentine’s Day.
My family can’t stop sneaking these cookies off the cooling rack (and I can’t really blame them). Whether it’s the pure, nostalgic comfort or the dangerously easy method, these Chocolate Covered Strawberry Cookies always get rave reviews. They’re perfect for potlucks, make an adorable sweet treat for your kids, and let’s face it, they’ll brighten up any Pinterest cookie board. If you’re searching for a cookie that feels like a warm hug and tastes like your favorite candy, you’re going to want to bookmark this one. Trust me—these cookies have soul.
Why You’ll Love This Recipe
If you’re anything like me, you crave recipes that combine the thrill of indulgence with the simplicity of home baking. These Chocolate Covered Strawberry Cookies with Gooey Centers are exactly that—comforting, impressive, and surprisingly easy. After years of recipe trials and more than a few chocolate smudges on my apron, I can say with confidence, you’ll be making these again and again.
- Quick & Easy: Ready in under 30 minutes—great for those spontaneous cravings or when you need a last-minute dessert.
- Simple Ingredients: No fancy grocery runs required. You probably have everything you need right in your pantry (maybe minus the strawberries, but they’re worth the trip!).
- Perfect for Any Occasion: They shine at brunches, potlucks, cozy family dinners, birthday parties, or even a quiet night in with a cup of tea.
- Crowd-Pleaser: Kids love the gooey strawberry center and adults swoon over the rich chocolate shell. They disappear fast—don’t say I didn’t warn you!
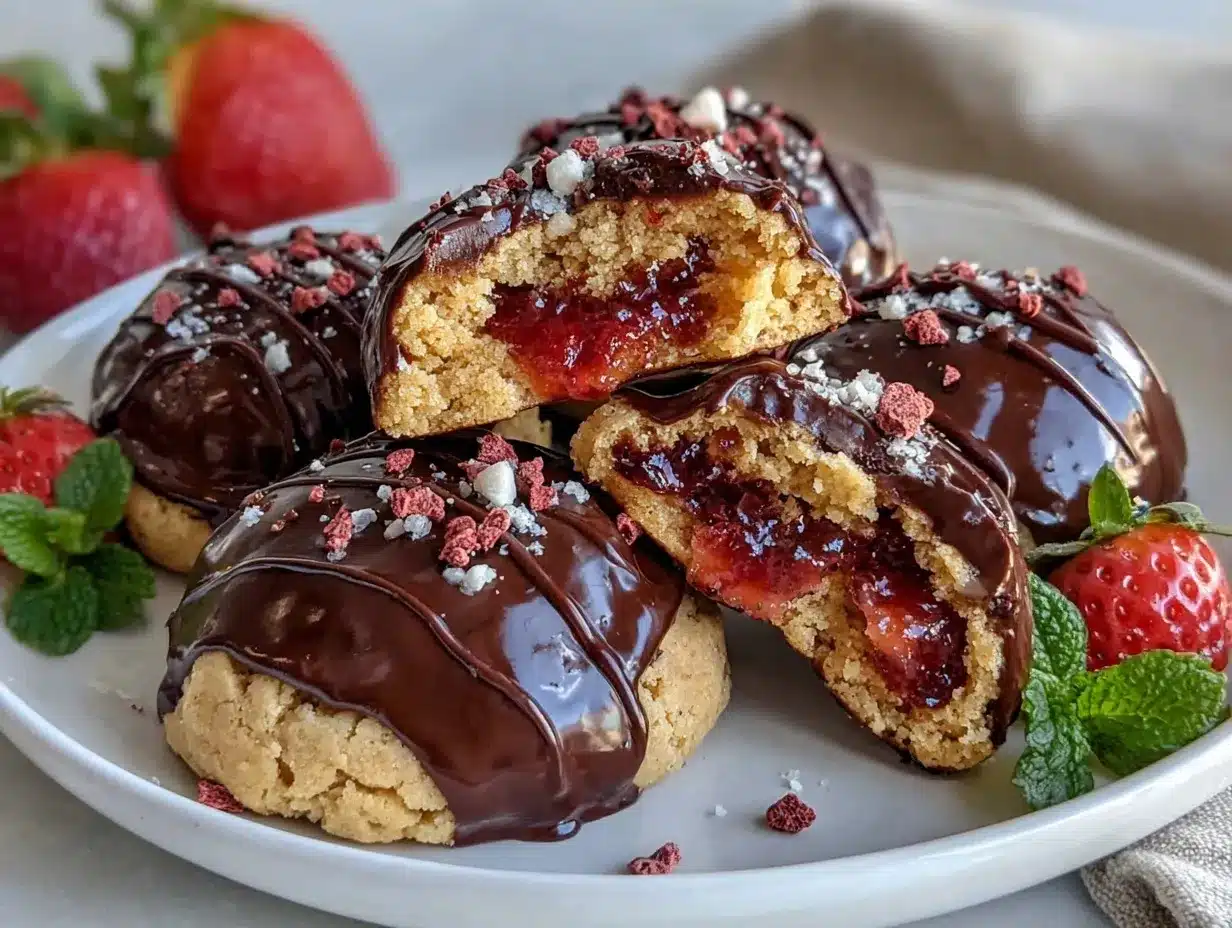
- Unbelievably Delicious: The flavor combo is pure joy: rich cocoa, sweet berries, and a melt-in-your-mouth center. It’s like biting into a chocolate-covered strawberry with every cookie.
What sets this recipe apart? For starters, the gooey center—most chocolate-strawberry cookies are simply flavored, but here, you get a real strawberry burst tucked inside. I use a double-layer technique that keeps the strawberries moist and the chocolate shell perfectly crisp. Plus, a dash of espresso powder (my secret weapon) amplifies the chocolate flavor without making the cookies taste like coffee.
This isn’t just another cookie recipe—it’s a celebration in every bite. Whether you’re impressing guests or treating yourself, these cookies deliver that close-your-eyes contentment. It’s comfort food reimagined: indulgent, easy, and packed with soul-soothing satisfaction. You’ll find yourself reaching for seconds (and maybe thirds) before you know it.
What Ingredients You Will Need
These Chocolate Covered Strawberry Cookies rely on a handful of everyday ingredients to create bold flavors and irresistible textures. Most are pantry staples, so you won’t be running all over town for specialty items. And, you know, the recipe is flexible—easy to adjust for what you have on hand. Let’s break it down:
- For the Cookie Dough:
- 1 cup (226g) unsalted butter, softened (adds richness and softness)
- 1 cup (200g) granulated sugar
- 3/4 cup (150g) brown sugar, packed (for chewiness and flavor)
- 2 large eggs, room temperature
- 2 teaspoons vanilla extract (pure, if possible)
- 2 1/4 cups (280g) all-purpose flour (King Arthur is my go-to for consistent results)
- 3/4 cup (70g) unsweetened cocoa powder (Dutch-processed creates a deeper chocolate flavor)
- 1 teaspoon baking soda
- 1/2 teaspoon salt
- 1/2 teaspoon espresso powder (optional, but it makes the chocolate pop)
- For the Gooey Strawberry Centers:
- 1 cup (170g) fresh strawberries, diced small (frozen works, but fresh gives better texture)
- 2 tablespoons strawberry preserves (for extra gooeyness and flavor)
- 1 tablespoon sugar (helps macerate strawberries)
- 1/2 teaspoon cornstarch (thickens the filling)
- For the Chocolate Coating:
- 1 1/2 cups (270g) semi-sweet chocolate chips (Ghirardelli melts beautifully)
- 2 teaspoons coconut oil or vegetable oil (for smooth, shiny coating)
If you need substitutions, swap in gluten-free flour (like Bob’s Red Mill 1-to-1) for a celiac-friendly batch. Dairy-free butter works too—just make sure it’s unsalted. If strawberries aren’t in season, you can use raspberry preserves or even cherry jam for a twist. And for those watching sugar, coconut sugar replaces brown sugar well, though the flavor will be slightly different.
A few extra notes: If you’re feeling fancy, sprinkle a little flaky sea salt on top after coating! It really brings out the flavors. And honestly, this recipe is forgiving—just use the best chocolate you can find and ripe berries for the ultimate result.
Equipment Needed
You don’t need a professional kitchen for these Chocolate Covered Strawberry Cookies. Most tools are probably already in your cabinets, but I’ll share a few tips and alternatives just in case.
- Mixing bowls (large and medium)
- Electric mixer (stand or hand-held; I’ve used both—hand mixer works if you don’t have a stand)
- Spatula and wooden spoon (for gentle mixing)
- Baking sheets (lined with parchment paper for easy clean-up)
- Cookie scoop (helps with uniform size, but a tablespoon works too)
- Small saucepan (for melting chocolate coating)
- Wire cooling rack (not essential, but helps keep cookies crisp while cooling)
- Small bowl (for macerating strawberries)
If you don’t own a cookie scoop, no worries—just use two spoons to shape the dough. For melting chocolate, a microwave-safe bowl works in a pinch instead of a saucepan. And parchment paper? You can use silicone baking mats (mine have survived years of cookie baking). For budget-friendly options, check out your local dollar store or thrift shop—sometimes you find treasures!
As for maintenance: If you use silicone mats or non-stick pans, avoid metal utensils to keep them scratch-free. Hand-wash mixing bowls if you want them to last longer (I learned this the hard way with my favorite glass bowl). These little things make baking easier, trust me.
Preparation Method
Ready to make the best Chocolate Covered Strawberry Cookies with gooey centers? Follow these steps for perfect results every time. I’ve included the little details and time estimates (because, let’s face it, nobody likes surprises).
-
Prep the Strawberry Center (5 minutes):
In a small bowl, combine diced strawberries, strawberry preserves, sugar, and cornstarch. Stir gently until well mixed. Let sit for 10 minutes; this helps the strawberries release their juices and become extra gooey. If you’re using frozen berries, thaw first and pat dry. -
Mix the Cookie Dough (10 minutes):
In a large mixing bowl, beat the softened butter, granulated sugar, and brown sugar until light and fluffy (about 2 minutes with an electric mixer). Add eggs one at a time, mixing well after each. Stir in vanilla extract. -
Combine Dry Ingredients (2 minutes):
In a separate bowl, whisk together flour, cocoa powder, baking soda, salt, and espresso powder. I always sift the cocoa powder—it prevents lumps and creates a smoother dough. -
Form the Dough (3 minutes):
Gradually add the dry ingredients to the wet mixture. Mix on low until just combined. Don’t overmix—it can make the cookies tough. The dough should be thick and slightly sticky. -
Shape and Fill Cookies (10 minutes):
Using a cookie scoop (or tablespoon), scoop out a ball of dough (about 2 tablespoons/30g). Flatten slightly in your palm, add about 1 teaspoon of strawberry filling to the center, and fold dough around it to seal. Roll gently into a ball. Place on lined baking sheet, spacing about 2 inches/5cm apart.
Prep note: If dough feels sticky, chill for 10-15 minutes before shaping. -
Bake (10 minutes):
Preheat your oven to 350°F (175°C). Bake cookies for 10-12 minutes, until edges are set but centers are still soft (they’ll firm up as they cool). Watch for cracking—don’t worry, it’s normal! The gooey center may peek out a bit (that’s a good sign). -
Cool (10 minutes):
Allow cookies to cool on baking sheet for 5 minutes, then transfer to a wire rack. They’ll finish setting up and get slightly crisp edges. -
Chocolate Coating (5 minutes):
In a small saucepan (or microwave-safe bowl), melt chocolate chips with coconut oil over low heat, stirring until smooth. Dip cooled cookies halfway into melted chocolate or drizzle on top. Place back on rack or parchment to set.
Personal tip: If you want a thicker chocolate shell, double dip after the first layer sets! -
Serve:
Once chocolate is set (about 15 minutes in the fridge), enjoy immediately or store for later. The gooey center is best when cookies are just slightly warm.
Troubleshooting: If cookies spread too much, chill dough longer. If strawberry filling leaks, make sure edges are well sealed. If chocolate seizes, add a smidge more coconut oil. Don’t worry, even imperfect cookies taste amazing!
Cooking Tips & Techniques
Here’s where a little experience goes a long way. Over the years, I’ve learned a few tricks (and endured a few kitchen mishaps) that can help you nail these Chocolate Covered Strawberry Cookies every single time.
- Seal the Dough Well: If you don’t fully enclose the strawberry filling, it can leak. Pinch the edges together and roll gently to make sure the filling stays inside.
- Don’t Overbake: These cookies are best with gooey centers. If you bake until fully set, they’ll lose that magical texture. Pull them out when edges look firm but centers still seem soft.
- Use Quality Chocolate: Cheap chocolate chips can taste waxy and don’t melt as smoothly. Ghirardelli or Guittard are my favorites for coating.
- Watch Your Timing: Prep the strawberry filling first so it’s ready when you shape the cookies. While dough chills, melt your chocolate coating—makes multitasking easy.
- Cookie Scoop Size: If you use a smaller scoop, reduce baking time by 2 minutes. Bigger cookies need a little longer but are extra gooey.
- Rescue Overly Sticky Dough: If dough feels too soft, add a tablespoon of flour or chill for 10 minutes. Humidity can make a big difference (who knew?).
- Personal Story: Once, I forgot the cornstarch in the filling and ended up with a mess of jammy bottoms—still tasty, but a little wild. Always double-check the filling ingredients.
- Consistency: Chill dough if you want perfect, bakery-style cookies. It helps prevent spreading and keeps the gooey center intact.
A little patience and careful assembly go a long way here. I’ve burned a few batches (distracted by the kids), but these cookies are forgiving. Trust your senses—the smell, the texture, and the look—more than just the timer.
Variations & Adaptations
Chocolate Covered Strawberry Cookies are delicious as-is, but sometimes a little twist makes them even better. Here are a few favorite ways to change things up:
- Gluten-Free Version: Substitute all-purpose flour with a 1-to-1 gluten-free baking blend. I’ve baked these for celiac friends using Bob’s Red Mill—it works perfectly.
- Seasonal Swap: Out of strawberries? Use raspberries, blueberries, or even diced cherries. Each fruit brings a new flavor to the gooey center.
- Nutty Twist: Add 1/2 cup (60g) chopped toasted almonds or hazelnuts to the dough for crunch and richness.
- Dairy-Free: Use plant-based butter and dairy-free chocolate chips (Enjoy Life is a reliable brand).
- Jammy Centers: For a stronger fruit flavor, swap the fresh berries for all preserves or jam. Apricot and raspberry work like a charm.
Taste preference? If you like extra-dark chocolate, use bittersweet chips for the coating. For sweeter cookies, increase the preserves or add white chocolate chips to the dough. Allergies? Omit nuts and double-check chocolate brands for cross-contamination warnings.
Personally, I’ve tried them with cherry preserves and a white chocolate drizzle for a fun holiday twist—my kids went wild for that version. Don’t be afraid to experiment!
Serving & Storage Suggestions
Serving these Chocolate Covered Strawberry Cookies is half the fun. For best flavor, enjoy them slightly warm—the gooey center is at its peak! Arrange cookies on a pretty plate, sprinkle with powdered sugar, or drizzle extra melted chocolate for a Pinterest-worthy finish.
Pair them with fresh berries, whipped cream, or a scoop of vanilla ice cream for an indulgent dessert. They go perfectly with a hot mug of tea, coffee, or a tall glass of milk (milk mustache optional).
Store leftovers in an airtight container at room temperature for up to 3 days. If you want to keep them longer, pop them in the fridge (they’ll stay fresh for about a week). For freezing, layer cookies between parchment paper in a sealed container—thaw before serving or reheat in the microwave for 10 seconds to restore that gooey magic.
A little note: Flavors tend to deepen after a day or two. The chocolate gets richer, the strawberry more intense. If you can resist eating them all at once, they’re even better the next day!
Nutritional Information & Benefits
Each Chocolate Covered Strawberry Cookie (based on a batch of 18) contains roughly:
- Calories: 220
- Fat: 11g
- Carbohydrates: 30g
- Protein: 3g
- Sugar: 18g
Strawberries are packed with vitamin C and antioxidants, while cocoa powder provides a little magnesium boost. These cookies can be adapted for gluten-free or dairy-free diets. Watch for allergens—wheat, egg, dairy, and chocolate are all present, so plan substitutions as needed.
From a wellness perspective, these cookies are a treat—meant for sharing and celebrating. A little indulgence is good for the soul, especially when you know exactly what’s inside. Enjoy in moderation and savor every gooey bite!
Conclusion
Chocolate Covered Strawberry Cookies with gooey centers are worth every minute in the kitchen. They bring together nostalgia, comfort, and a touch of magic—perfect for any occasion or just because. The recipe is easy to personalize (trust me, I’ve tried a dozen versions), so don’t be afraid to make it your own.
I absolutely love how these cookies turn a simple afternoon into something memorable. If you give them a try, let me know how they turn out! Drop a comment, share your photos, or tell me your favorite adaptation—I love seeing everyone’s creativity.
Here’s to cookies that taste like happiness—go on, bookmark this recipe and bake up a batch soon. You’ll be glad you did!
FAQs
How do I keep the strawberry filling from leaking out?
Seal the cookie dough carefully around the filling. Pinch the edges and roll gently—if a little leaks, that’s okay, but a good seal helps keep the gooey center inside.
Can I use frozen strawberries instead of fresh?
Yes! Just thaw them first and pat dry to avoid extra moisture. Frozen berries work well, especially out of season.
How long will these cookies stay fresh?
Stored at room temperature, they’re best within 3 days. In the fridge, they’ll last up to a week, and you can freeze them for up to 2 months.
Can I make these cookies gluten-free?
Absolutely. Substitute the all-purpose flour with a 1-to-1 gluten-free blend. The texture remains soft and delicious.
What’s the best way to melt chocolate for coating?
Use a double boiler or microwave in short bursts, stirring after each. Add coconut oil for a smooth, shiny finish—never let water mix in, or the chocolate may seize.
Pin This Recipe!

Chocolate Covered Strawberry Cookies – Easy Gooey Centers

These cookies feature a soft, fudgy chocolate exterior with a gooey, strawberry-laced center, reminiscent of classic chocolate-covered strawberries. Quick to make and perfect for any occasion, they combine rich cocoa and sweet berries for a truly indulgent treat.
- Prep Time: 20 minutes
- Cook Time: 10-12 minutes
- Total Time: 30-35 minutes
- Yield: 18 cookies 1x
- Category: Dessert
- Cuisine: American
Ingredients
- 1 cup (226g) unsalted butter, softened
- 1 cup (200g) granulated sugar
- 3/4 cup (150g) brown sugar, packed
- 2 large eggs, room temperature
- 2 teaspoons vanilla extract
- 2 1/4 cups (280g) all-purpose flour
- 3/4 cup (70g) unsweetened cocoa powder (Dutch-processed preferred)
- 1 teaspoon baking soda
- 1/2 teaspoon salt
- 1/2 teaspoon espresso powder (optional)
- 1 cup (170g) fresh strawberries, diced small
- 2 tablespoons strawberry preserves
- 1 tablespoon sugar
- 1/2 teaspoon cornstarch
- 1 1/2 cups (270g) semi-sweet chocolate chips
- 2 teaspoons coconut oil or vegetable oil
Instructions
- In a small bowl, combine diced strawberries, strawberry preserves, sugar, and cornstarch. Stir gently until well mixed. Let sit for 10 minutes to macerate.
- In a large mixing bowl, beat softened butter, granulated sugar, and brown sugar until light and fluffy (about 2 minutes). Add eggs one at a time, mixing well after each. Stir in vanilla extract.
- In a separate bowl, whisk together flour, cocoa powder, baking soda, salt, and espresso powder. Sift cocoa powder for a smoother dough.
- Gradually add dry ingredients to wet mixture. Mix on low until just combined. Do not overmix.
- Using a cookie scoop or tablespoon, scoop out about 2 tablespoons of dough. Flatten slightly, add about 1 teaspoon of strawberry filling to the center, and fold dough around to seal. Roll gently into a ball and place on lined baking sheet, spacing 2 inches apart.
- If dough is sticky, chill for 10-15 minutes before shaping.
- Preheat oven to 350°F (175°C). Bake cookies for 10-12 minutes, until edges are set but centers are still soft.
- Cool cookies on baking sheet for 5 minutes, then transfer to wire rack.
- In a small saucepan or microwave-safe bowl, melt chocolate chips with coconut oil over low heat, stirring until smooth. Dip cooled cookies halfway or drizzle on top. Let set.
- Once chocolate is set (about 15 minutes in fridge), serve slightly warm or store for later.
Notes
Seal the dough well around the strawberry filling to prevent leaks. Use quality chocolate for best results. Chill dough if too sticky or if cookies spread too much. For gluten-free, substitute flour with a 1-to-1 blend. Cookies are best slightly warm and flavors deepen after a day. Sprinkle flaky sea salt on top for extra flavor.
Nutrition
- Serving Size: 1 cookie
- Calories: 220
- Sugar: 18
- Sodium: 120
- Fat: 11
- Saturated Fat: 6
- Carbohydrates: 30
- Fiber: 2
- Protein: 3
Keywords: chocolate covered strawberry cookies, gooey center cookies, easy chocolate cookies, strawberry dessert, homemade cookies, valentine's day cookies, kid-friendly cookies, potluck dessert


