
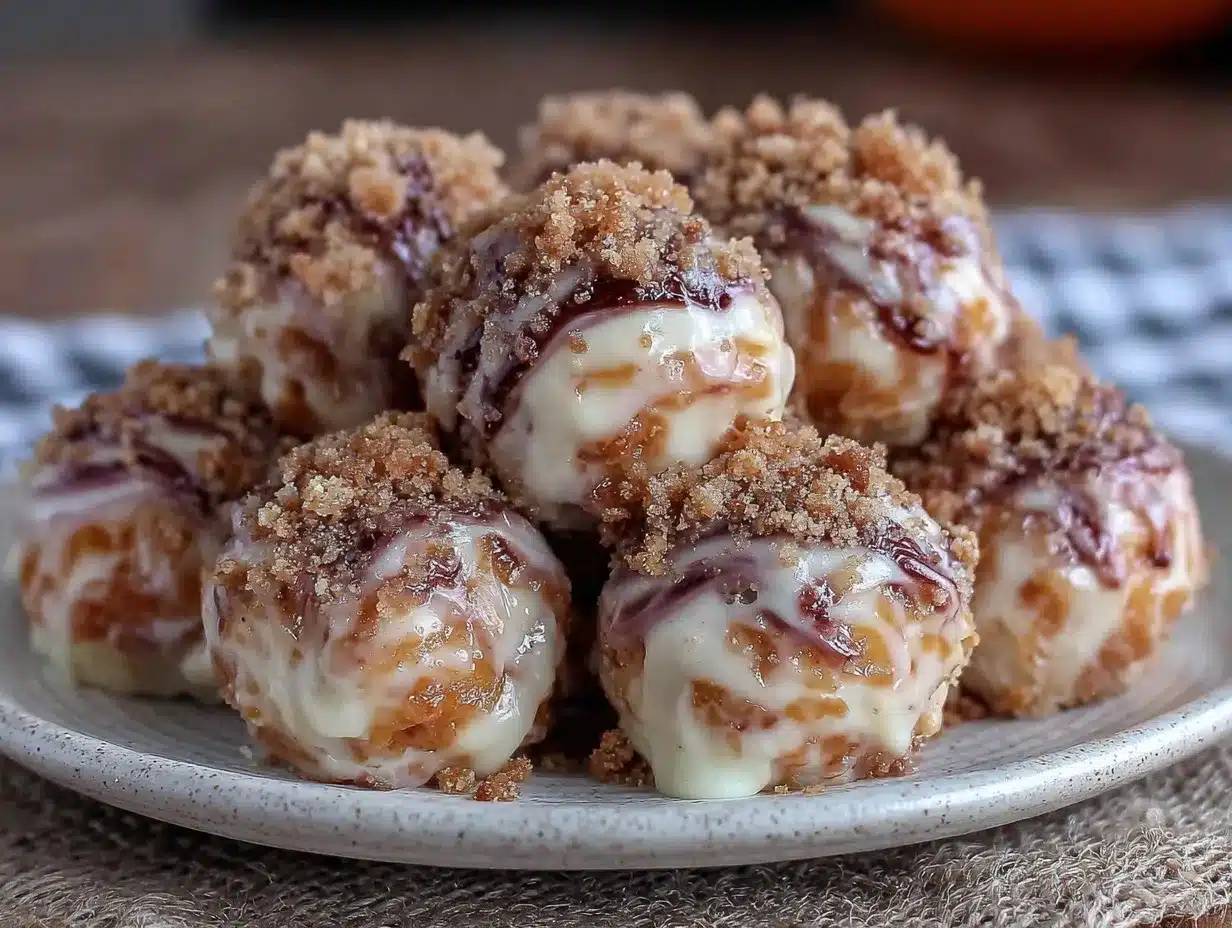
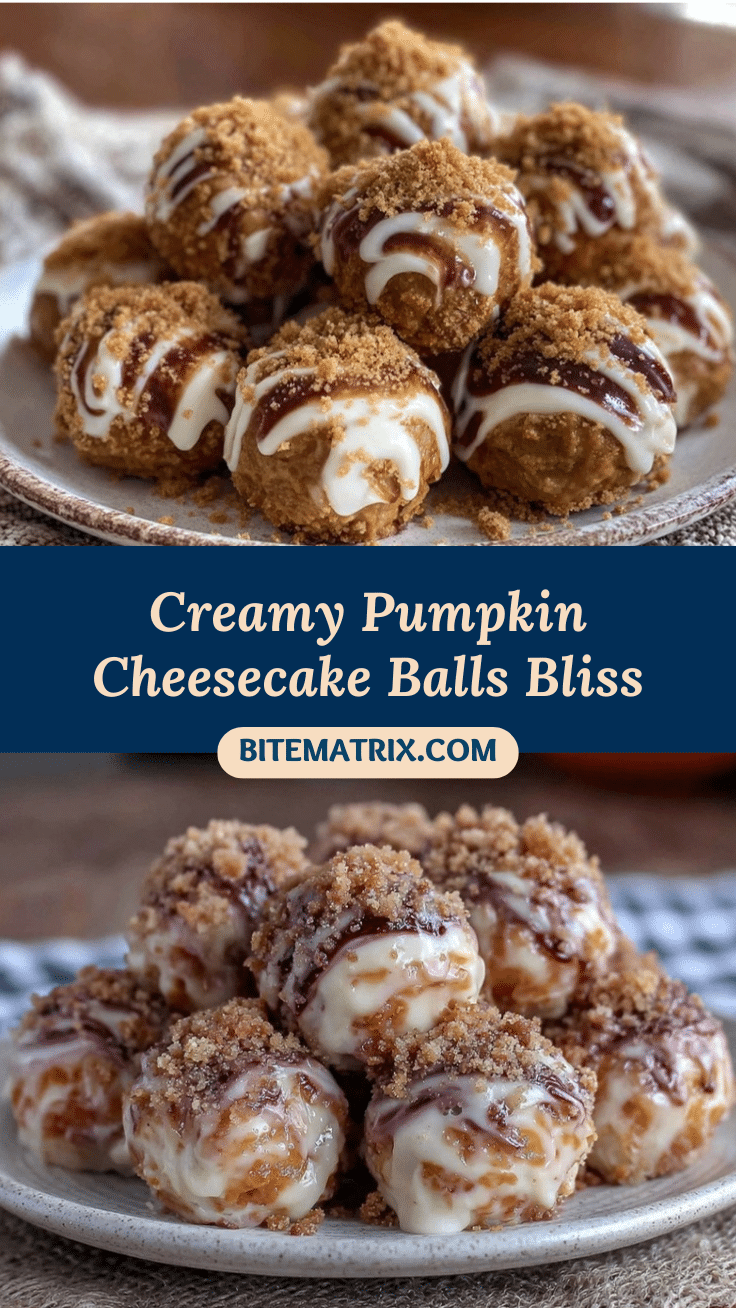
Let me just say, the moment the scent of cinnamon, nutmeg, and pumpkin wafted through my kitchen for the first batch of these Creamy Pumpkin Cheesecake Balls, I knew fall had truly arrived. It’s this warm, sweet aroma that practically wraps around you like your favorite cozy sweater, making you want to linger in the kitchen a little longer than usual. When I first rolled these little bites in graham cracker crumbs and popped one in my mouth (okay, maybe two), I was instantly hooked. The creamy, tangy cheesecake inside paired with that nostalgic pumpkin spice flavor—it was the kind of moment where you pause, take a deep breath, and just smile because you know you’re onto something truly special.
Years ago, when I was knee-high to a grasshopper, my grandma used to bake pumpkin pies that could make even the grumpiest uncle crack a grin. These Creamy Pumpkin Cheesecake Balls? They were born out of a rainy weekend, trying to capture that same cozy, autumnal feeling in a recipe that’s dangerously easy and bite-sized (let’s face it, sometimes you just want a poppable treat!). Honestly, I wish I’d stumbled upon this idea years ago—it’s pure, nostalgic comfort but with a modern twist.
My family couldn’t stop sneaking these off the cooling rack (and I can’t really blame them). I even caught my teenager stashing a few in her lunchbox for school. These pumpkin cheesecake balls have quickly become a staple for family gatherings, gifting, and those “just because” moments. They’re perfect for potlucks, a sweet after-school treat for your kids, or just to brighten up your Pinterest dessert board. And trust me, after testing this recipe more times than I care to admit (in the name of research, of course), I can say with confidence—this is one fall dessert you’re going to want to bookmark. It feels like a warm hug in every bite.
Why You’ll Love This Creamy Pumpkin Cheesecake Balls Recipe
Having baked my way through countless fall desserts (seriously, my kitchen turns into a test lab every September), I can say this recipe is a true winner. Here’s what makes these Creamy Pumpkin Cheesecake Balls stand out in the pumpkin patch—and why you’ll want them on repeat this season:
- Quick & Easy: These come together in under 30 minutes (minus chilling time), so you can whip up a batch even if you’re short on time.
- Simple Ingredients: No fancy grocery runs required. Most of what you need is likely already in your pantry or fridge.
- Perfect for Fall Gatherings: Whether it’s a cozy dinner, Halloween party, or Thanksgiving potluck, these are always a hit. Pinterest-worthy too!
- Crowd-Pleaser: Both kids and adults rave about the creamy center and crunchy graham exterior. They disappear fast—fair warning!
- Unbelievably Delicious: The blend of tangy cream cheese, sweet pumpkin puree, and warming spices creates a next-level comfort food experience.
What makes this recipe different from the rest? I use a special technique: draining the pumpkin puree and blending the cream cheese until ultra-smooth. It’s a little trick I picked up after a few lumpy batches (we’ve all been there). The result is a perfectly creamy interior with just the right balance of pumpkin and spice. Plus, you can easily swap in gluten-free graham crackers or dairy-free cream cheese—making this recipe totally customizable.
This isn’t just another pumpkin dessert—it’s the kind of treat that makes you close your eyes after the first bite. Whether you want to impress guests without fuss or just turn a simple fall night into something memorable, these balls deliver that soul-soothing satisfaction every time. Honest moment: I’ve caught myself sneaking one out of the fridge more than once!
What Ingredients You Will Need
This recipe uses simple, wholesome ingredients to deliver bold flavor and satisfying texture without the fuss. If you bake often, most of these will feel like old friends. Here’s what you’ll need to make dreamy Creamy Pumpkin Cheesecake Balls:
- For the Cheesecake Filling:
- 8 oz (225g) cream cheese, softened (full-fat works best for extra creaminess)
- 1/2 cup (120g) pumpkin puree (Libby’s is my go-to, but homemade works too—just drain it well!)
- 1/2 cup (60g) powdered sugar (adds a silky texture)
- 1/2 tsp vanilla extract (pure vanilla makes a big difference)
- 1/2 tsp ground cinnamon
- 1/4 tsp ground nutmeg
- 1/4 tsp ground ginger (optional, but I love the subtle warmth)
- Pinch of salt
- For the Coating:
- 1 cup (100g) graham cracker crumbs (honey or cinnamon flavor—gluten-free options available)
- 2 tbsp (28g) unsalted butter, melted (helps the crumbs stick and adds richness)
- Optional Add-Ins:
- 1/4 cup (35g) mini chocolate chips (for a burst of chocolate, if you want a twist)
- 2 tbsp (20g) finely chopped pecans or walnuts (for crunch)
Ingredient tips: If you need to make these dairy-free, swap in a plant-based cream cheese and dairy-free butter. For sugar-free, try monk fruit or stevia-based powdered sweeteners. And if pumpkin isn’t your thing (hard to imagine, but I get it), you can swap it for mashed sweet potato or butternut squash puree. These ingredients are pretty forgiving, so feel free to experiment.
Trusted brands I use: Philadelphia cream cheese for consistency, Libby’s pumpkin puree for flavor, and Honey Maid graham crackers for that classic crunch. For spices, McCormick is my pantry staple, but anything fresh works wonders. If you’re making these in summer, honestly, you can swap in fresh berries in place of pumpkin for a whole different vibe. Pantry staples, seasonal swaps, and easy substitutions—this recipe is all about working with what you’ve got.
Equipment Needed
You don’t need a fancy kitchen setup for these Creamy Pumpkin Cheesecake Balls (thank goodness!). Here’s what I use—plus a few tips for budget-friendly swaps:
- Mixing bowl (large enough for all the filling)
- Hand mixer or stand mixer (makes the filling super smooth; a sturdy whisk will do in a pinch)
- Rubber spatula (for scraping every last bit of creamy goodness)
- Baking sheet or tray (for chilling and setting the balls)
- Parchment paper or wax paper (keeps sticking to a minimum and cleanup easy)
- Cookie scoop or tablespoon (for even sizes—my cookie scoop has seen more action than I’d like to admit!)
- Small bowl (for your graham cracker crumbs)
If you don’t own a mixer, don’t sweat it. Just let the cream cheese sit out until it’s super soft, then mash with a spoon and whisk. For graham cracker crumbs, a zip-top bag and rolling pin work just as well as a food processor. I’ve used my hands more than once in a pinch—sometimes old-school methods are best. Maintenance tip: If you use a cookie scoop, wash and dry it right away to keep the mechanism smooth. And parchment paper? I buy it in bulk—it saves so much time.
Preparation Method
Let’s get rolling! Here’s a step-by-step guide for making Creamy Pumpkin Cheesecake Balls. I’ll include all my “learned the hard way” tips along the way.
- Prepare your workspace: Line a baking sheet with parchment or wax paper. This is your chill zone—makes cleanup a breeze.
- Mix the filling: In a large bowl, combine 8 oz (225g) softened cream cheese, 1/2 cup (120g) pumpkin puree, and 1/2 cup (60g) powdered sugar. Beat with an electric mixer (or sturdy whisk) for about 2 minutes until the mixture is smooth and creamy. If using a hand mixer, start on low to avoid powdered sugar clouds (trust me, it gets messy!).
- Add flavor: Mix in 1/2 tsp vanilla extract, 1/2 tsp ground cinnamon, 1/4 tsp ground nutmeg, 1/4 tsp ground ginger (optional), and a pinch of salt. Beat for another minute until fully incorporated. The filling should be thick, creamy, and smell like fall in a bowl.
- Mix in optional add-ins: If you’re feeling adventurous, fold in 1/4 cup (35g) mini chocolate chips or 2 tbsp (20g) finely chopped nuts. Use a rubber spatula for gentle mixing—don’t overwork it.
- Chill the mixture: Cover the bowl and refrigerate for at least 1 hour. (If you’re impatient, 30 minutes will do, but they won’t roll as neatly.) The filling firms up as it chills—this is key for perfect balls.
- Prepare coating: While the filling chills, stir together 1 cup (100g) graham cracker crumbs and 2 tbsp (28g) melted butter in a small bowl. The mixture should resemble wet sand—perfect for sticking.
- Scoop and roll: Using a cookie scoop or tablespoon, portion out the chilled filling into balls (about 1-inch/2.5cm diameter). Roll each ball between your palms until smooth—work quickly, as the warmth of your hands can soften the filling.
- Coat the balls: Roll each ball in the graham cracker crumb mixture, pressing lightly so the crumbs stick. Place on the prepared baking sheet.
- Chill again: Transfer the tray to the fridge and chill for another 30-60 minutes, until firm. (If you’re making these ahead, you can chill overnight—flavors get even better.)
- Serve: Once set, serve cold or at room temp. The outside should be slightly crisp, the inside creamy and dreamy.
Prep notes: If your filling feels too soft, add a touch more powdered sugar. Too stiff? Stir in a spoonful of pumpkin puree. Common issue: mixture too sticky—chill longer or dust your hands with powdered sugar. Sensory cue: The filling should be thick, creamy, and hold its shape when scooped. Personal tip: I like to set up an assembly line—scooping, rolling, coating. Makes the process speedy and fun!
Cooking Tips & Techniques
Here are some of my favorite pro tips for perfect Creamy Pumpkin Cheesecake Balls (plus a few kitchen fails I’ve learned from):
- Softened cream cheese matters: If your cream cheese isn’t soft, you’ll get lumps. Let it sit at room temp for at least 30 minutes. Microwave for 10 seconds if you’re in a hurry.
- Drain your pumpkin puree: Excess moisture leads to runny filling. Place puree in a paper towel-lined bowl for 10 minutes to soak up extra liquid. Don’t skip this—learned the hard way!
- Don’t overmix: Mix just until smooth. Overmixing can make the filling too runny. The mixture should be thick and creamy, not soupy.
- Chill for firmer balls: If you’re short on time, pop the mixture in the freezer for 20 minutes. But don’t forget it—frozen balls won’t coat well.
- Assembly line setup: Scoop, roll, coat—having everything laid out keeps things clean and efficient. Makes it easy for kids to help, too (mine love the rolling part!)
- Coating consistency: The graham cracker crumbs should be damp, not soggy. If too dry, add a splash more melted butter. If too wet, mix in more crumbs.
- Common mistakes: If the balls melt or flatten while chilling, the filling was too warm or wet. Just roll them again and chill longer. If crumbs don’t stick, gently press them in with your palms.
- Recipe success: For best texture, make these a day ahead. The flavors meld and the coating crisps up nicely. Trust me, they taste even better the next day!
Timing tip: I prep the filling while making dinner, then roll and coat after. Multitasking at its tastiest! For consistent results, measure everything—eyeballing works in a pinch, but I’ve found that precision gives you the best creamy texture every time.
Variations & Adaptations
One of the best things about Creamy Pumpkin Cheesecake Balls is how easily you can switch them up. Here are a few of my favorite variations:
- Gluten-Free: Swap regular graham crackers for a gluten-free brand. The flavor’s just as good, and everyone can enjoy a bite (I’ve brought these to celiac-friendly parties—no complaints!)
- Dairy-Free: Use plant-based cream cheese and vegan butter for a totally dairy-free treat. Earth Balance and Kite Hill cream cheese work well—just as creamy, honestly!
- Nutty Crunch: Roll the balls in finely chopped pecans or walnuts instead of graham cracker crumbs. Adds a rustic, autumnal crunch that’s hard to resist.
- Chocolate Coating: Dip the chilled balls in melted dark or white chocolate instead of crumbs. The shell adds a decadent twist (kids LOVE this version).
- Spice It Up: Add a pinch of clove or allspice for a deeper spice profile. Or use pumpkin pie spice for extra oomph.
If you want to bake these instead, you can place the balls on a lined tray and bake at 325°F (160°C) for 10 minutes—though honestly, I prefer them chilled. For a holiday vibe, sprinkle crushed peppermint over the coating. My personal favorite adaptation? Adding a splash of maple syrup to the filling for a subtle, caramelized sweetness. Feel free to experiment—this recipe’s a blank canvas for your fall cravings!
Serving & Storage Suggestions
These Creamy Pumpkin Cheesecake Balls are best served chilled—straight from the fridge for maximum creaminess. I like to pile them high on a pretty plate, dust with a little extra cinnamon, and garnish with a few toasted pecans for a festive touch. Perfect for dessert trays, party platters, or sneaky fridge raids.
Pair with a mug of hot apple cider, strong coffee, or chai tea for the ultimate fall treat. They’re also lovely alongside a scoop of vanilla ice cream or a drizzle of caramel sauce (Pinterest-worthy, honestly!).
To store, keep the balls in an airtight container in the fridge for up to 5 days. They’ll hold their shape and flavor beautifully. For longer storage, freeze in a single layer on a tray, then transfer to a zip-top bag—thaw in the fridge before serving. Reheat? Not needed—these are meant to be enjoyed cold for that creamy texture. Flavors deepen as they sit, so making them ahead is never a bad idea.
Nutritional Information & Benefits
Each Pumpkin Cheesecake Ball contains approximately:
- Calories: 90
- Fat: 5g
- Carbs: 10g
- Protein: 2g
- Sugar: 7g
Pumpkin puree is packed with vitamin A, fiber, and antioxidants—giving these treats a little nutritional boost. Cream cheese adds calcium and a touch of protein, while the spices bring anti-inflammatory benefits. If using gluten-free or dairy-free options, adjust macros accordingly. Allergens include dairy and gluten (unless substituted). From a wellness perspective, these balls satisfy sweet cravings without being over-the-top rich. Just right for a little indulgence!
Conclusion
There’s something magical about Creamy Pumpkin Cheesecake Balls—they’re the perfect blend of creamy comfort and festive fall flavor. If you’re looking for an easy fall dessert idea that’s sure to impress, this is the recipe to try. Customize to your heart’s content, make them ahead, and watch them disappear (I promise, they’ll be gone before you know it!).
I love this recipe because it brings all the nostalgia of pumpkin pie, but in a fun, modern, bite-sized form. It’s become a go-to for family gatherings and cozy nights in. Give it a whirl, then let me know how yours turn out! Drop a comment below with your favorite adaptations, share your photos, or tag me if you post on Pinterest—let’s make fall sweeter together. Happy baking, friends!
Frequently Asked Questions
Can I make Creamy Pumpkin Cheesecake Balls ahead of time?
Absolutely! They taste even better after chilling overnight. Just keep them in the fridge until you’re ready to serve.
What can I use instead of graham cracker crumbs?
Try crushed vanilla wafers, digestive biscuits, or finely chopped nuts for a different texture and flavor.
Can I freeze these cheesecake balls?
Yes, freeze them in a single layer, then transfer to a zip-top bag. Thaw in the fridge before serving for the best texture.
Is it possible to make these gluten-free?
Definitely! Just swap in gluten-free graham crackers or cookies for the coating.
How long will Creamy Pumpkin Cheesecake Balls last?
Stored in an airtight container in the fridge, they’ll stay fresh for up to 5 days. You can freeze them for up to 2 months.
Pin This Recipe!
Creamy Pumpkin Cheesecake Balls

These Creamy Pumpkin Cheesecake Balls are a quick, easy, and festive fall dessert featuring a creamy pumpkin cheesecake filling rolled in graham cracker crumbs. Perfect for gatherings, gifting, or a cozy treat, they deliver all the nostalgia of pumpkin pie in a modern, bite-sized form.
- Prep Time: 15 minutes
- Cook Time: 0 minutes
- Total Time: 1 hour 30 minutes (including chilling)
- Yield: 18 balls 1x
- Category: Dessert
- Cuisine: American
Ingredients
- 8 oz cream cheese, softened
- 1/2 cup pumpkin puree, drained
- 1/2 cup powdered sugar
- 1/2 tsp vanilla extract
- 1/2 tsp ground cinnamon
- 1/4 tsp ground nutmeg
- 1/4 tsp ground ginger (optional)
- Pinch of salt
- 1 cup graham cracker crumbs
- 2 tbsp unsalted butter, melted
- 1/4 cup mini chocolate chips (optional)
- 2 tbsp finely chopped pecans or walnuts (optional)
Instructions
- Line a baking sheet with parchment or wax paper.
- In a large bowl, combine softened cream cheese, pumpkin puree, and powdered sugar. Beat with an electric mixer or whisk for about 2 minutes until smooth and creamy.
- Mix in vanilla extract, cinnamon, nutmeg, ginger (if using), and a pinch of salt. Beat for another minute until fully incorporated.
- Fold in mini chocolate chips or chopped nuts if desired.
- Cover the bowl and refrigerate the mixture for at least 1 hour (30 minutes minimum if short on time).
- While the filling chills, stir together graham cracker crumbs and melted butter in a small bowl until the mixture resembles wet sand.
- Using a cookie scoop or tablespoon, portion out the chilled filling into 1-inch balls. Roll each ball between your palms until smooth.
- Roll each ball in the graham cracker crumb mixture, pressing lightly so the crumbs stick. Place on the prepared baking sheet.
- Chill the coated balls in the fridge for another 30-60 minutes, until firm. (Can chill overnight for best flavor and texture.)
- Serve cold or at room temperature.
Notes
For best results, drain pumpkin puree to avoid runny filling. Chill mixture thoroughly for easy rolling. Substitute gluten-free graham crackers or dairy-free cream cheese and butter for dietary needs. Optional add-ins like chocolate chips or nuts add variety. Balls taste even better after chilling overnight and can be frozen for up to 2 months.
Nutrition
- Serving Size: 1 ball
- Calories: 90
- Sugar: 7
- Sodium: 60
- Fat: 5
- Saturated Fat: 3
- Carbohydrates: 10
- Fiber: 1
- Protein: 2
Keywords: pumpkin cheesecake balls, fall dessert, easy pumpkin recipe, bite-sized dessert, no bake, holiday treat, party food, kid friendly, Thanksgiving dessert, pumpkin spice


