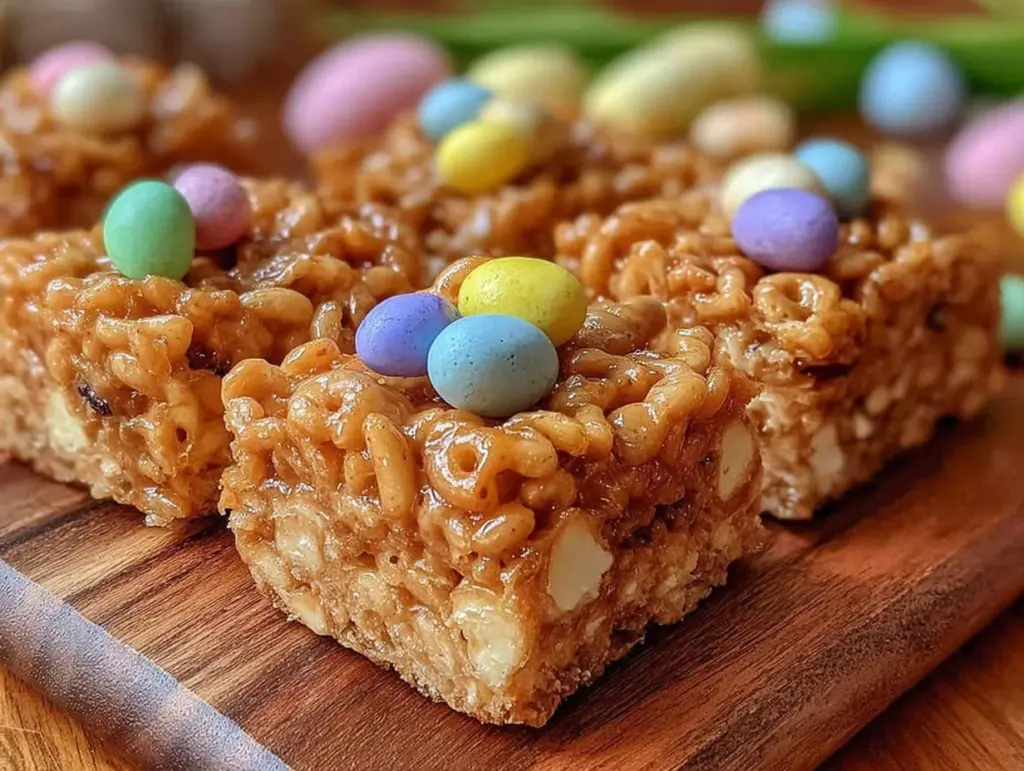
“I wasn’t expecting much when my neighbor, Carol, handed me a plate of these quirky little nests last Easter Monday. Honestly, I thought it was just another Rice Krispie treat. But the moment I sank my teeth into that crispy, buttery base crowned with colorful candy eggs, I was hooked. The way the marshmallows held the shape just right while staying soft inside—that’s a magic trick I’ve tried to replicate ever since. You know that feeling when a simple childhood snack gets a festive makeover that feels both nostalgic and fresh? That’s exactly what these Crispy Bird’s Nest Rice Krispie Treats do.”
It was one of those sunny spring afternoons, with kids running around and the scent of fresh blooms in the air. Carol was casually assembling these nests, no fuss, just piling on the Rice Krispie magic and topping with pastel candy eggs. I managed to crack an egg-shaped candy right off the nest, making a bit of a mess (classic me, right?). But that little imperfect moment made this treat even more memorable. Since then, I’ve brought these nests to potlucks, Easter brunches, and just-for-fun weekend snacks. They’re a simple, sweet way to celebrate the season and bring a little joy to the table.
Maybe you’ve been there—wanting a dessert that’s quick, playful, and reminds you of carefree days. These Crispy Bird’s Nest Rice Krispie Treats with Candy Eggs fit that bill perfectly, and I can’t wait to share the recipe with you.
Why You’ll Love This Recipe
Having tested this recipe multiple times in my kitchen (and yes, sometimes with sticky fingers and a few candy casualties), I can vouch for its charm. Here’s why these bird’s nest treats stand out:
- Quick & Easy: Ready in under 30 minutes, these treats come together fast—ideal for last-minute celebrations or when you need a sweet fix right now.
- Simple Ingredients: No need for specialty stores; just grab marshmallows, butter, Rice Krispies, and your favorite candy eggs.
- Perfect for Spring & Easter: Their festive look makes them a hit at holiday brunches, kids’ parties, or even as a cheerful snack on any day.
- Crowd-Pleaser: Both kids and adults love the crunchy-soft texture combo and the playful candy topping.
- Unbelievably Delicious: The butter and marshmallow blend gives a rich, chewy base that contrasts perfectly with the crisp cereal and smooth candy shells.
What makes this recipe different? It’s the little details—the way you mold the nests to cradle the candy eggs just right, and the perfect balance of marshmallow stickiness and cereal crunch. Plus, I love sneaking in a pinch of vanilla extract to deepen the flavor. It’s not your basic Rice Krispie treat; it’s a festive, fun dessert that brings smiles every time.
What Ingredients You Will Need
This recipe uses simple, wholesome ingredients to deliver bold flavor and a satisfying texture without much fuss. Most are pantry staples, and the candy eggs can be swapped for any small, colorful treats you prefer.
- Unsalted butter – 3 tablespoons (helps bind and adds richness)
- Mini marshmallows – 4 cups (about 120 grams; use fresh for best melt)
- Rice Krispies cereal – 6 cups (about 180 grams; classic or gluten-free if needed)
- Vanilla extract – 1 teaspoon (optional but recommended for depth)
- Candy eggs – 1 cup (choose pastel-colored chocolate or peanut butter eggs; I like Reese’s for a peanutty surprise)
Ingredient tips: Use a good-quality butter like Kerrygold for a creamier flavor. Look for small or mini marshmallows—they melt quicker and make the treats easier to shape. Seasonal candy eggs work best for the nest look, but you can also swap for jelly beans or mini chocolate chips if you want a twist.
Equipment Needed
- Large saucepan or pot: For melting butter and marshmallows together gently.
- Wooden spoon or heatproof spatula: Essential for stirring the sticky marshmallow mixture without scraping the pan too hard.
- Large mixing bowl: To combine the cereal with the melted marshmallow mixture.
- Non-stick baking sheet or parchment paper: To set the nests without sticking.
- Measuring cups and spoons: For accurate ingredient amounts.
- Butter or non-stick spray: To grease hands for shaping the nests (trust me, this helps a lot!).
If you don’t have a wooden spoon, a silicone spatula works well too. I recommend greasing your hands in advance to avoid marshmallow sticking when shaping. For budget-friendly options, store brands of cereal and marshmallows work just fine—no need to splurge here!
Preparation Method
- Prep your workspace: Lightly grease a large baking sheet with butter or line it with parchment paper. Also, grease your hands lightly to make shaping easier later. (5 minutes)
- Melt the butter: In a large saucepan over low heat, melt 3 tablespoons of unsalted butter until fully liquid but not browned. (3 minutes)
- Add marshmallows: Toss in 4 cups of mini marshmallows to the melted butter. Stir continuously with a wooden spoon until the marshmallows are completely melted and smooth. Remove from heat. (5-7 minutes)
- Flavor boost: Stir in 1 teaspoon of vanilla extract for extra depth. This step is optional but trust me, it makes a difference. (30 seconds)
- Mix in cereal: Immediately add 6 cups of Rice Krispies cereal to the marshmallow mixture. Stir gently but thoroughly to coat all the cereal without crushing it. The texture should be sticky but airy. (2-3 minutes)
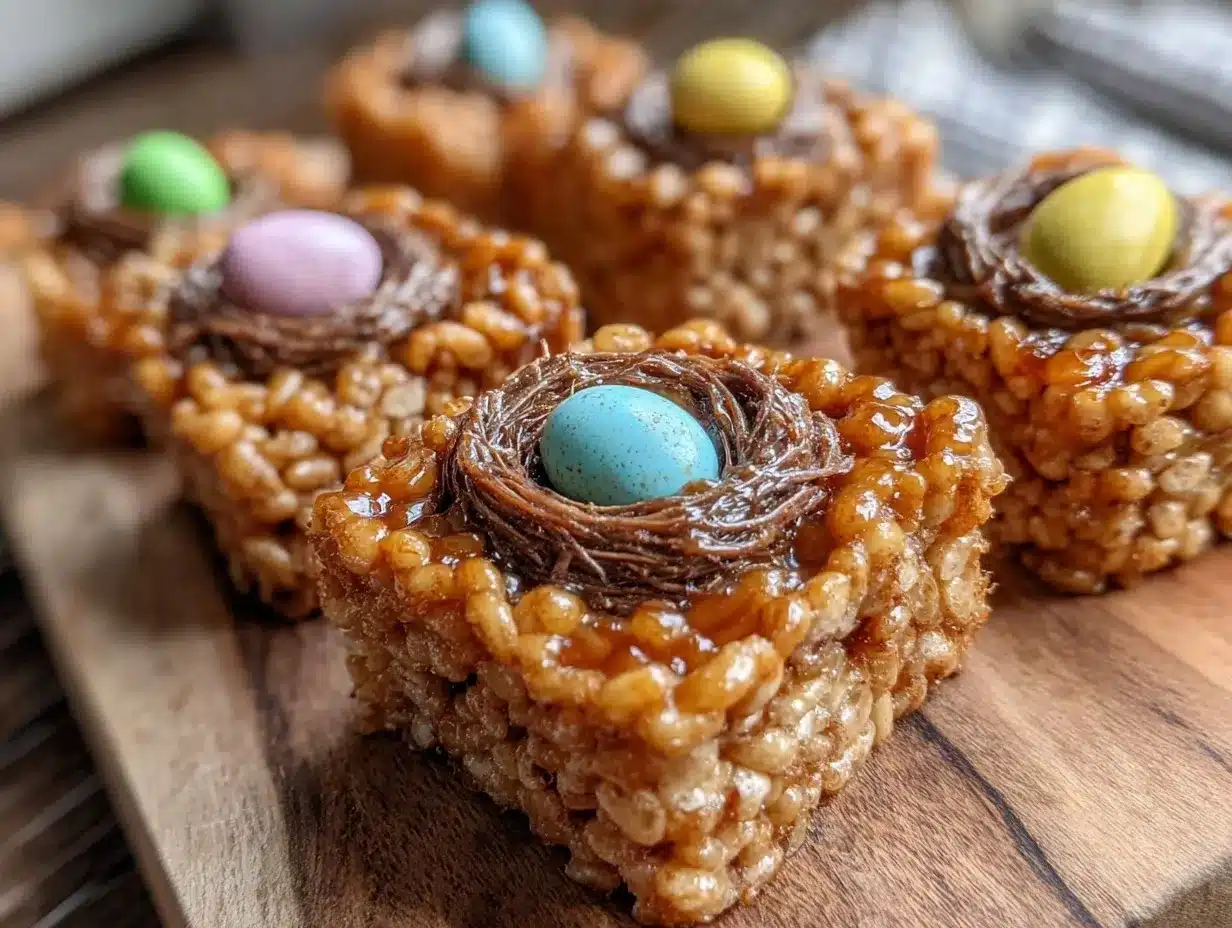
- Form the nests: Using greased hands, scoop about 2 tablespoons of the mixture at a time and shape it into small round nests on your prepared baking sheet. Make a shallow well in the center of each nest to hold the candy eggs. (15-20 minutes)
- Add candy eggs: Press 3-4 candy eggs gently into each nest’s center. Don’t push too hard or the nest may break. (5 minutes)
- Set the nests: Let the nests cool completely at room temperature, about 30 minutes, so they firm up but stay chewy inside. (30 minutes)
- Serve: Once set, carefully transfer the nests to a serving platter. They’re best enjoyed the same day but can be stored overnight. (Immediately after cooling)
Pro tips: Keep the heat low when melting marshmallows to avoid burning. If marshmallows start to harden too fast while shaping, dip your hands in warm water and quickly continue forming nests. The shallow wells should be just right to hold candy eggs without collapsing.
Cooking Tips & Techniques
Getting the perfect Crispy Bird’s Nest Rice Krispie Treats takes a bit of practice, but here’s what I’ve learned:
- Low and slow melting: Marshmallows burn easily. Keep the heat gentle, stir often, and remove from heat as soon as melted.
- Timing is key: Work quickly once marshmallows are melted. If the mixture cools too much, it gets harder to shape.
- Grease hands generously: This little step saved me from countless sticky messes. Warm water works if you forget.
- Don’t crush the cereal: Stir gently to keep that signature crispness.
- Shaping nests: Use a small spoon or your fingers to create wells. If they crack, press them gently back together while still warm.
- Multitasking: While nests cool, clean up your mixing tools to save time.
My first batch was a hot, gooey disaster with marshmallows sticking everywhere. But after a few tries, I realized that patience and buttered hands are the secret weapons. Honestly, these tips will make your process smoother—and your nests prettier.
Variations & Adaptations
Want to mix it up? Here are some fun ideas to tweak the Crispy Bird’s Nest Rice Krispie Treats:
- Flavor twist: Add ½ teaspoon of cinnamon or pumpkin spice to the melted marshmallows for a seasonal flair.
- Nut-free option: Use allergy-friendly candy eggs like yogurt-covered raisins or fruit snacks instead of chocolate.
- Gluten-free swap: Use gluten-free crispy rice cereal to keep it safe for sensitive diets.
- Vegan adaptation: Substitute vegan marshmallows and use coconut oil instead of butter. The texture will be a bit different but still tasty.
- Chocolate base: Mix in ½ cup of mini chocolate chips with the cereal for an extra chocolaty nest.
One time, I swapped candy eggs for tiny gummy bears for a colorful surprise. It was a hit with the kids but a bit less “nest-like.” Feel free to experiment and make these treats your own.
Serving & Storage Suggestions
These nests are best served at room temperature so the marshmallow base stays soft but firm enough to hold shape. Arrange them on a bright platter to highlight the pastel candy eggs—perfect for springtime tables.
Pair with fresh fruit or a simple glass of milk for a balanced snack. They’re also a playful dessert for kids’ parties or Easter brunch spreads.
Storage: Store leftovers in an airtight container at room temperature for up to 2 days. Avoid refrigeration, which can make them hard and chewy in a bad way.
If you want to keep them longer, freeze the nests individually wrapped in plastic wrap for up to 2 weeks. Thaw at room temperature before serving.
Reheating isn’t really necessary, but a few seconds in the microwave can soften them if they’ve hardened too much—just watch closely!
Flavors mellow a bit after a day, making the nests even easier to bite into. If you’re making these for an event, a few hours ahead is perfect.
Nutritional Information & Benefits
While these Crispy Bird’s Nest Rice Krispie Treats are definitely a sweet treat, here’s a rough idea of what you’re getting per nest (makes about 12):
| Calories | ~150-180 kcal |
|---|---|
| Fat | 5-7 g (mostly from butter) |
| Carbohydrates | 25-30 g (from marshmallows, cereal, candy) |
| Protein | 1-2 g |
Health notes: The cereal provides some iron and B vitamins, and the butter adds a touch of fat for satiety. Marshmallows and candy eggs are mostly sugar, so these are best enjoyed in moderation as a fun treat.
For gluten-free needs, just pick certified gluten-free cereals. Switching to vegan marshmallows keeps it dairy-free. I always remind myself that a little indulgence now and then is part of a balanced lifestyle.
Conclusion
These Crispy Bird’s Nest Rice Krispie Treats with Candy Eggs have earned a spot in my seasonal favorites because they’re as fun to make as they are to eat. The combination of crunchy cereal, gooey marshmallow, and colorful candy eggs makes every bite a little celebration.
Feel free to customize the candy, add flavors, or try different cereals to match your taste and dietary needs. Honestly, the process is just as sweet as the result.
If you give this recipe a try, I’d love to hear how your nests turned out or what fun twists you added. Share your stories, photos, or questions in the comments below—let’s make this a joyful kitchen conversation. Happy nesting!
Frequently Asked Questions
Can I use regular-sized marshmallows instead of mini?
Yes, but it may take longer to melt and result in a slightly denser texture. Cutting regular marshmallows into smaller pieces can help them melt evenly.
What if I don’t have candy eggs? What else works?
Mini chocolate chips, jelly beans, gummy candies, or even small fruit pieces like blueberries can be great alternatives.
How do I keep the nests from sticking to the pan?
Grease your baking sheet or use parchment paper. Also, greasing your hands before shaping the nests prevents sticking.
Can I make these ahead of time?
Yes! They hold up well for a day or two at room temperature. For longer storage, freeze them wrapped individually.
Is there a vegan version of this recipe?
Absolutely! Use vegan marshmallows and a plant-based butter substitute. The texture will be slightly different but still delicious.
Pin This Recipe!
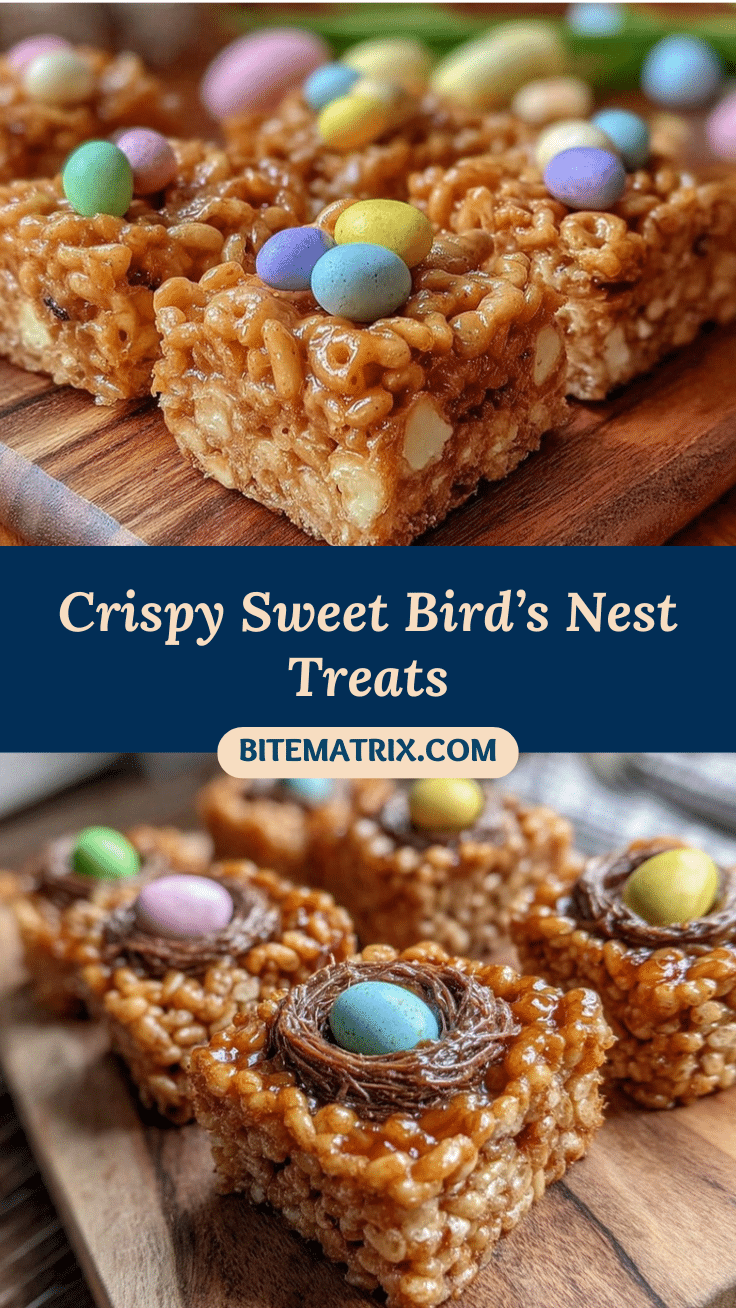
Crispy Bird’s Nest Rice Krispie Treats

A quick and easy festive dessert featuring a crispy, buttery Rice Krispie base shaped into nests and topped with colorful candy eggs. Perfect for Easter and spring celebrations.
- Prep Time: 10 minutes
- Cook Time: 15 minutes
- Total Time: 40 minutes
- Yield: 12 nests 1x
- Category: Dessert
- Cuisine: American
Ingredients
- 3 tablespoons unsalted butter
- 4 cups mini marshmallows (about 120 grams)
- 6 cups Rice Krispies cereal (about 180 grams; classic or gluten-free)
- 1 teaspoon vanilla extract (optional)
- 1 cup candy eggs (pastel-colored chocolate or peanut butter eggs)
Instructions
- Lightly grease a large baking sheet with butter or line it with parchment paper. Grease your hands lightly to make shaping easier. (5 minutes)
- In a large saucepan over low heat, melt 3 tablespoons of unsalted butter until fully liquid but not browned. (3 minutes)
- Add 4 cups of mini marshmallows to the melted butter. Stir continuously with a wooden spoon until the marshmallows are completely melted and smooth. Remove from heat. (5-7 minutes)
- Stir in 1 teaspoon of vanilla extract for extra depth (optional). (30 seconds)
- Immediately add 6 cups of Rice Krispies cereal to the marshmallow mixture. Stir gently but thoroughly to coat all the cereal without crushing it. (2-3 minutes)
- Using greased hands, scoop about 2 tablespoons of the mixture at a time and shape it into small round nests on the prepared baking sheet. Make a shallow well in the center of each nest to hold the candy eggs. (15-20 minutes)
- Press 3-4 candy eggs gently into each nest’s center. Don’t push too hard or the nest may break. (5 minutes)
- Let the nests cool completely at room temperature, about 30 minutes, so they firm up but stay chewy inside. (30 minutes)
- Once set, carefully transfer the nests to a serving platter. They’re best enjoyed the same day but can be stored overnight.
Notes
Keep heat low when melting marshmallows to avoid burning. Grease hands generously to prevent sticking when shaping nests. Work quickly once marshmallows are melted to shape nests before mixture hardens. Use gluten-free cereal for gluten-free needs and vegan marshmallows plus plant-based butter for a vegan version. Store leftovers in an airtight container at room temperature for up to 2 days or freeze individually wrapped for up to 2 weeks.
Nutrition
- Serving Size: 1 nest
- Calories: 165
- Sugar: 18
- Sodium: 90
- Fat: 6
- Saturated Fat: 3.5
- Carbohydrates: 28
- Fiber: 0.5
- Protein: 1.5
Keywords: Rice Krispie treats, bird’s nest dessert, Easter dessert, candy eggs, marshmallow treats, easy homemade candy, spring dessert


