Introduction
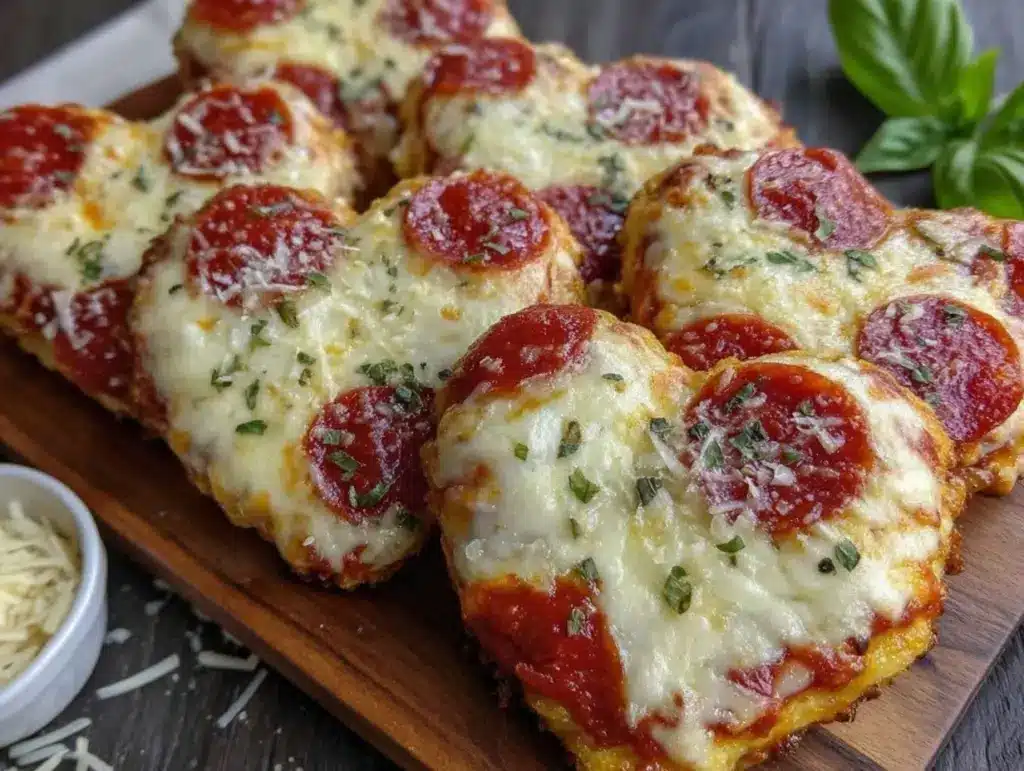
Let me tell you, the smell of melting mozzarella and zesty pizza sauce floating through my kitchen is enough to make anyone’s tummy rumble. Picture this: golden, crispy little heart shaped mini pizzas, each one just the right size to pop into your mouth. The edges snap with crunch, the centers ooze with cheese, and the colors—vivid reds, greens, and creamy whites—just pop off the baking sheet. It’s a real showstopper, trust me.
The first time I made these crispy heart shaped mini pizzas, it was a rainy Saturday and I wanted something fun for my kids’ sleepover (honestly, I was looking for an easy win). As soon as those little hearts came out of the oven, everyone crowded around the tray—there was a moment where I paused, took a breath, and just grinned, because I knew I’d stumbled onto something truly special. When I was knee-high to a grasshopper, pizza night meant big, cheesy pies and sticky fingers. Now, I get to recreate that pure, nostalgic comfort—but with a cuter, shareable twist.
My family couldn’t stop sneaking these off the cooling rack. Even my husband, who swears he’s “watching carbs,” kept coming back for seconds (and thirds). These heart shaped mini pizzas have become our go-to for family gatherings, birthday parties, and even holiday potlucks. If you’re looking for a recipe that’s dangerously easy and guaranteed to brighten up your Pinterest feed, you’re in the right place. Honestly, I wish I’d discovered this years ago—it feels like a warm hug and you’re going to want to bookmark this one. I’ve tested it more times than I care to admit (all in the name of research, of course) and now it’s become a staple for gifting, sharing, and snacking.
Why You’ll Love This Recipe
Crispy heart shaped mini pizzas aren’t just adorable—they’re addictive. After dozens of batches and more than a few kitchen mishaps, I can confidently say these little bites are the real deal. I’ve made them for birthdays, game nights, and even as a surprise after-school treat. Every time, they disappear faster than I can bake them!
- Quick & Easy: You can whip up a batch in under 30 minutes—perfect for last-minute get-togethers or when hunger strikes out of nowhere.
- Simple Ingredients: No fancy grocery trips needed. Most of the ingredients are likely hanging out in your pantry or fridge right now.
- Perfect for Parties: These mini pizzas are made for sharing. Whether it’s Valentine’s Day, a birthday, or just a fun Saturday night, they fit right in.
- Crowd-Pleaser: Kids and adults both go wild for these. I’ve even had picky eaters ask for seconds (which, let’s face it, is basically a miracle).
- Unbelievably Delicious: The texture is spot-on—crispy edges, gooey cheese, and the perfect sauce-to-crust ratio. Each bite is pure comfort food joy.
What makes my crispy heart shaped mini pizzas stand out is the attention to detail. I use a simple technique: brushing the crusts with a bit of olive oil and a sprinkle of garlic powder before baking. It makes all the difference! You can shape them with a cookie cutter for that adorable heart look, and the toppings are totally customizable. I’ve tried gluten-free and dairy-free versions, too, and they turn out just as tasty.
This isn’t just another mini pizza recipe—it’s the kind that makes you close your eyes and savor the first bite. It’s healthier (no deep frying), faster, and every batch brings smiles all around. Whether you want to impress guests or just jazz up snack time, these crispy heart shaped mini pizzas will make any moment special.
What Ingredients You Will Need
This recipe uses simple, wholesome ingredients to deliver bold flavor and that satisfying crunch without any fuss. Most of these are pantry staples, and you can easily swap things out to suit your needs.
- For the Base:
- 1 package refrigerated pizza dough (about 13.8 oz / 390 g) – You can use homemade dough if you’re feeling fancy
- All-purpose flour, for dusting (helps with rolling and cutting)
- For the Sauce:
- 1/2 cup (120 ml) pizza sauce – I love Rao’s for its rich tomato flavor
- Optional: 1 tablespoon tomato paste (for extra punch)
- For the Cheese:
- 1 cup (110 g) shredded mozzarella cheese – Full-fat melts best
- 1/4 cup (25 g) grated Parmesan cheese (adds sharpness)
- For the Toppings:
- 1/4 cup (30 g) mini pepperoni slices or diced regular pepperoni
- 1/4 cup (30 g) chopped bell peppers (red and green for color)
- 2 tablespoons (12 g) sliced black olives
- 2 tablespoons (12 g) chopped fresh basil or parsley (optional, for garnish)
- For the Crust:
- 2 tablespoons (30 ml) olive oil (brushes the edges, ups the crunch)
- 1/2 teaspoon garlic powder (mix with oil for flavor)
- Pinch of salt (for sprinkling)
- Substitutions & Notes:
- Use gluten-free pizza dough for allergies—Bob’s Red Mill makes a good one
- Dairy-free cheese (like Violife or Daiya) works if you’re avoiding dairy
- Swap toppings for your favorites—try mushrooms, spinach, or pineapple!
- In summer, use fresh tomatoes instead of sauce for a lighter taste
- If you want a lower-carb option, try using a thin tortilla or flatbread as the base
I usually stick with what’s on hand, but a sprinkle of fresh herbs can really brighten things up. Don’t be shy—mix and match!
Equipment Needed

Here’s what I use every time I make crispy heart shaped mini pizzas. You probably own most of these already, but I’ll toss in a few alternatives just in case.
- Heart-shaped cookie cutter (about 3 inches / 7.5 cm wide) – This gives the classic look, but you can use a knife to cut shapes if you’re handy
- Baking sheet – Any sturdy, rimmed sheet works. If yours is a bit warped (mine sure is), just line it with parchment paper for even baking
- Rolling pin – Or a clean wine bottle… I’ve used both in a pinch!
- Parchment paper or a silicone baking mat – Prevents sticking and helps with crispiness
- Pastry brush – For brushing olive oil on the crust. If you don’t have one, just use the back of a spoon
- Small bowl – For mixing garlic powder and oil
- Measuring cups and spoons – Accuracy matters for cheese and sauce
I’ve tried making these on pizza stones, but honestly, a regular baking sheet works best for crisp edges. For easy cleanup, parchment paper is my best friend. Don’t worry if you don’t have a cookie cutter—just cut out hearts freehand. My first batch was all wobbly, but they tasted just as good! A rolling pin can be replaced with anything round (I’ve used a mason jar, no shame). Budget tip: Dollar store cookie cutters work fine—just check the edges aren’t too sharp.
Preparation Method
- Preheat Your Oven: Set your oven to 425°F (220°C). Line a baking sheet with parchment paper or a silicone baking mat. This helps prevent sticking and ensures a crispy base.
- Prepare the Dough: Lightly flour your work surface. Roll out the pizza dough to about 1/4 inch (6 mm) thick. If the dough springs back, let it rest for 5 minutes—this relaxes the gluten. Use your heart-shaped cookie cutter to cut out as many hearts as you can. Gather scraps, reroll, and repeat until all dough is used.
- Transfer to Baking Sheet: Arrange the heart shaped mini pizzas on the prepared baking sheet, leaving about 1 inch (2.5 cm) between each. If they stick, use a thin spatula to transfer—they’re delicate before baking!
- Brush the Crusts: In a small bowl, mix olive oil and garlic powder. Brush edges of each heart with the mixture. Sprinkle a pinch of salt around the edges (this helps with flavor and crunch).
- Add Sauce: Spoon about 1 teaspoon (5 ml) of pizza sauce onto each heart, spreading gently but leaving the edges bare for a crispy ring. If you like it saucy, add a touch more—but don’t overload, or you’ll get soggy bottoms.
- Top with Cheese: Sprinkle shredded mozzarella over each mini pizza, about 1 tablespoon (7 g) per heart. Add a touch of Parmesan for extra flavor.
- Add Toppings: Place mini pepperoni slices, bell peppers, olives, or any toppings you like. Don’t crowd the hearts—less is more for a crispy bite. I like to add a pinch of dried oregano or Italian seasoning here.
- Bake: Slide the tray into the oven and bake for 10-12 minutes, or until the edges are golden and cheese is bubbling. Keep an eye out—smaller pizzas bake fast! Rotate the pan halfway through for even browning.
- Cool and Garnish: Let the mini pizzas sit for 3-4 minutes after baking. This helps the cheese set and makes them easier to pick up. Top with chopped basil or parsley for a pop of freshness.
- Serve: Transfer to a serving platter and dig in while warm. If you’re making ahead, keep them on a wire rack so the bottoms stay crisp.
If you find your dough sticking, dust with more flour. For extra crunch, bake the hearts on the lower oven rack. If the cheese browns too quickly, tent with foil. I’ve burned a few batches by getting distracted—set a timer, it’s worth it! These crisp up even more as they cool.
Cooking Tips & Techniques
I’ve learned a few tricks over the years to guarantee the crunch and flavor you want in crispy heart shaped mini pizzas. First off, don’t overload the toppings. More isn’t always better—too much cheese or sauce leads to soggy middles. When I first tried this recipe, I went topping wild, and the result was a floppy mess. Stick to a light hand for best results.
Bake on parchment paper for easy removal and crispier bottoms. If you have a convection oven, use it! The hot air circulation makes the edges even crunchier. For extra flavor, always brush the crusts with a mix of olive oil and garlic powder—it’s a game changer. If you want a golden cheese top, broil for 1 minute at the end, but watch closely.
I’ve also found that letting the dough rest after cutting helps keep the shapes intact during baking. If your hearts look “puffy,” don’t panic—that’s just the dough doing its thing (they’ll flatten as they cool). Multitasking tip: Prep all your toppings while the oven preheats, and lay out all hearts before saucing—saves a ton of time. If you’re baking more than one tray, rotate halfway through for even crisping.
For consistency, use the same amount of cheese and sauce on each heart. It’s tempting to eyeball, but measuring keeps every bite perfect. If you want an extra crispy finish, sprinkle a little cornmeal on the baking sheet before arranging the dough. Trust me, once you nail your method, these mini pizzas will turn out perfect every time.
Variations & Adaptations
One of the best things about crispy heart shaped mini pizzas is how easy they are to customize. I’ve tried dozens of versions—some for dietary needs, some just for fun.
- Gluten-Free: Swap the regular dough for a gluten-free pizza base. Bob’s Red Mill is reliable, but homemade works too. Just roll gently, as gluten-free can be fragile.
- Dairy-Free: Use shredded vegan cheese and a dairy-free pizza sauce. I like Violife mozzarella—it melts surprisingly well.
- Seasonal Twist: In summer, top with sliced cherry tomatoes, fresh basil, and a drizzle of balsamic glaze. In winter, try roasted butternut squash and sage.
- Flavor Boost: Add a sprinkle of chili flakes, smoked paprika, or even a dab of pesto beneath the cheese for a grown-up kick.
- Cooking Method: You can air fry these at 400°F (205°C) for 7-8 minutes—just check halfway through. For a grill version, cook on indirect heat until cheese melts.
- Allergen Swap: Omit pepperoni for vegetarians, or use turkey pepperoni for a lighter bite. Nut allergies? Skip pesto and go with olive oil/herb blend.
- Personal Favorite: My favorite variation is using caramelized onions and goat cheese. It’s tangy, sweet, and pairs perfectly with the crispy crust.
Everyone in my family has a different favorite, so don’t be afraid to experiment. Just remember—keep toppings light for best crispiness!
Serving & Storage Suggestions
Crispy heart shaped mini pizzas are best served fresh and warm, right off the baking sheet. Arrange them on a colorful platter for parties—they look great stacked or fanned out. For extra flair, sprinkle fresh herbs or drizzle a little olive oil just before serving.
If you’re hosting, pair these mini pizzas with a simple green salad, sparkling lemonade, or even a light Pinot Grigio for adults. They’re perfect for dipping in ranch, marinara, or garlic butter, too. For kids, serve with fruit kabobs or crunchy veggie sticks.
To store leftovers, let the pizzas cool completely. Place in an airtight container and refrigerate for up to 3 days. For longer storage, freeze in a single layer, then transfer to a freezer bag (up to 2 months). To reheat, bake at 350°F (175°C) for 5-7 minutes or pop in the air fryer for a couple minutes—they crisp right back up. The flavors actually deepen overnight, so leftovers can be even tastier!
Nutritional Information & Benefits
Each crispy heart shaped mini pizza clocks in at around 90 calories, with about 4g protein, 7g carbs, and 5g fat (give or take with toppings). The base recipe is pretty balanced, and you get calcium from mozzarella, antioxidants from tomato sauce, and fiber from veggies.
These mini pizzas can easily be made gluten-free or dairy-free, and you control the sodium by choosing low-salt sauce and cheese. Watch out for pepperoni if you need to avoid nitrates. If you’re focused on wellness, top with fresh greens or use whole wheat dough. Personally, I love how satisfying these are for a snack—they fill you up with just a few bites and you don’t feel weighed down.
Conclusion
If you’re searching for a snack that’s fun, easy, and totally crave-worthy, crispy heart shaped mini pizzas tick all the boxes. They’re perfect for parties, family nights, or just whenever you need a little cheesy comfort. I love that you can tweak them for any diet or occasion, and honestly—they make every meal feel like a celebration.
Don’t be afraid to mix up toppings, try new cheeses, or experiment with gluten-free and vegan options. I’ve made these a hundred different ways, and each batch brings smiles and happy bellies. If you have a favorite flavor combo, let me know—I’m always game for new ideas!
So go ahead, grab your heart-shaped cutter and give these crispy heart shaped mini pizzas a whirl. If you try them, please leave a comment, share your twist, or tag me on social—let’s make snack time more fun, one mini pizza at a time!
FAQs
Can I make crispy heart shaped mini pizzas ahead of time?
Absolutely! You can prep them up to 24 hours in advance. Just cover and refrigerate before baking. Bake right before serving for best crunch.
What’s the best way to keep mini pizzas crispy?
Cool them on a wire rack after baking. If storing, reheat in the oven or air fryer—never microwave, as it makes them soggy.
Can I use store-bought pizza dough?
Yes! Store-bought dough works great and saves time. Just let it sit at room temp for 10 minutes before rolling.
How do I cut out hearts without a cookie cutter?
Use a sharp knife to cut hearts freehand, or make a template from parchment paper. They don’t need to be perfect—rustic shapes taste just as good!
Are crispy heart shaped mini pizzas good for kids’ parties?
Definitely. Kids love the fun shapes and customizable toppings. Plus, they’re easy for little hands to grab and eat!
Pin This Recipe!

Crispy Heart Shaped Mini Pizzas

These adorable heart shaped mini pizzas feature a crispy crust, gooey cheese, and customizable toppings, making them the perfect party snack or family treat. Quick to prepare and irresistibly delicious, they’re sure to be a crowd-pleaser at any gathering.
- Prep Time: 15 minutes
- Cook Time: 12 minutes
- Total Time: 27 minutes
- Yield: 24 mini pizzas 1x
- Category: Snack
- Cuisine: American
Ingredients
- 1 package refrigerated pizza dough (about 13.8 oz)
- All-purpose flour, for dusting
- 1/2 cup pizza sauce
- 1 tablespoon tomato paste (optional)
- 1 cup shredded mozzarella cheese
- 1/4 cup grated Parmesan cheese
- 1/4 cup mini pepperoni slices or diced regular pepperoni
- 1/4 cup chopped bell peppers (red and green)
- 2 tablespoons sliced black olives
- 2 tablespoons chopped fresh basil or parsley (optional, for garnish)
- 2 tablespoons olive oil
- 1/2 teaspoon garlic powder
- Pinch of salt
Instructions
- Preheat oven to 425°F (220°C). Line a baking sheet with parchment paper or a silicone baking mat.
- Lightly flour your work surface. Roll out pizza dough to about 1/4 inch thick. Use a heart-shaped cookie cutter to cut out hearts, rerolling scraps as needed.
- Arrange hearts on the prepared baking sheet, leaving about 1 inch between each.
- Mix olive oil and garlic powder in a small bowl. Brush edges of each heart with the mixture and sprinkle a pinch of salt around the edges.
- Spoon about 1 teaspoon of pizza sauce onto each heart, spreading gently but leaving edges bare.
- Sprinkle shredded mozzarella and a touch of Parmesan over each mini pizza.
- Add mini pepperoni, bell peppers, olives, or desired toppings. Optionally, sprinkle dried oregano or Italian seasoning.
- Bake for 10-12 minutes, or until edges are golden and cheese is bubbling. Rotate pan halfway through for even browning.
- Let mini pizzas cool for 3-4 minutes after baking. Top with chopped basil or parsley if desired.
- Serve warm. For make-ahead, cool on a wire rack to keep bottoms crisp.
Notes
Don’t overload toppings for best crispiness. For gluten-free or dairy-free, substitute dough and cheese as needed. Bake on parchment for easy removal. Cool on wire rack to keep bottoms crisp. For extra crunch, sprinkle cornmeal on baking sheet before arranging dough.
Nutrition
- Serving Size: 1 mini pizza
- Calories: 90
- Sugar: 1
- Sodium: 180
- Fat: 5
- Saturated Fat: 2
- Carbohydrates: 7
- Fiber: 1
- Protein: 4
Keywords: mini pizzas, heart shaped pizza, party snack, kid friendly, crispy pizza, easy appetizer, Valentine’s Day, finger food, customizable toppings


