“I never thought a simple mix-up in the kitchen could lead to something as unforgettable as this cake,” my friend Lisa confessed last weekend as we sat surrounded by crumbs and laughter. It all started on a chilly Thursday afternoon when I was supposed to bake a single-layer chocolate cake for a casual get-together. But as fate would have it, I grabbed three different cocoa powders by mistake and decided to throw caution to the wind. The oven timer dinged just as my phone rang, and I forgot to check the middle layer. When I finally sliced into the cake, I was stunned by the rich layers of chocolate that melted into each other like a well-kept secret. Honestly, it was one of those rare moments when a happy accident turns into a recipe you want to keep close for years.
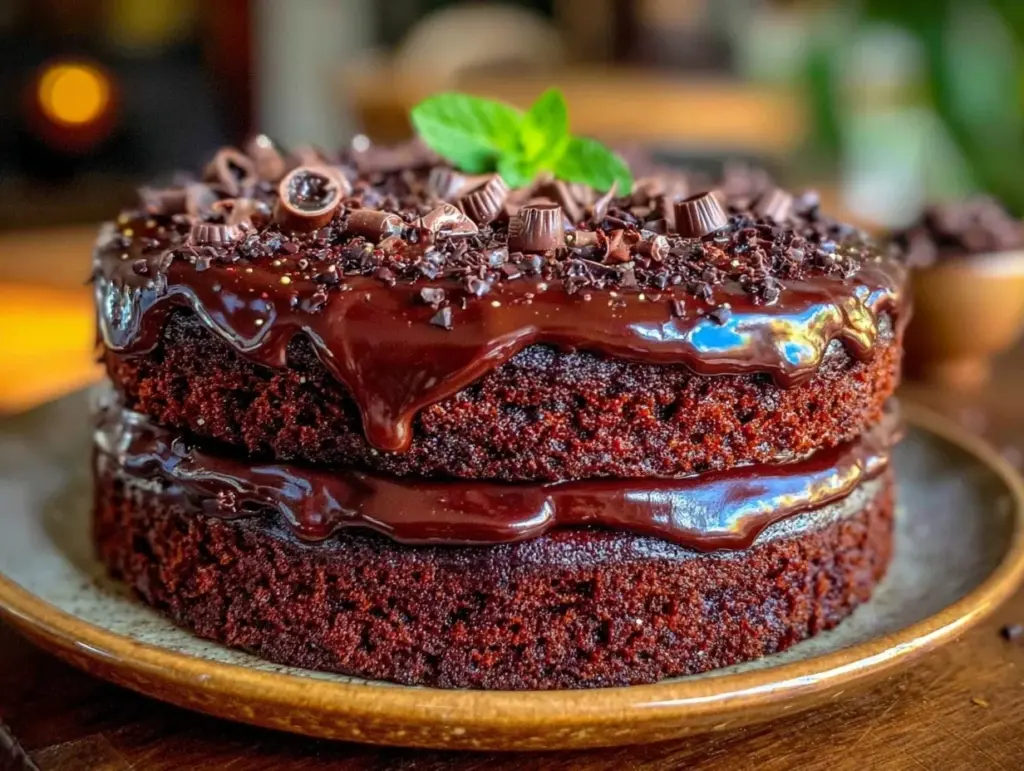
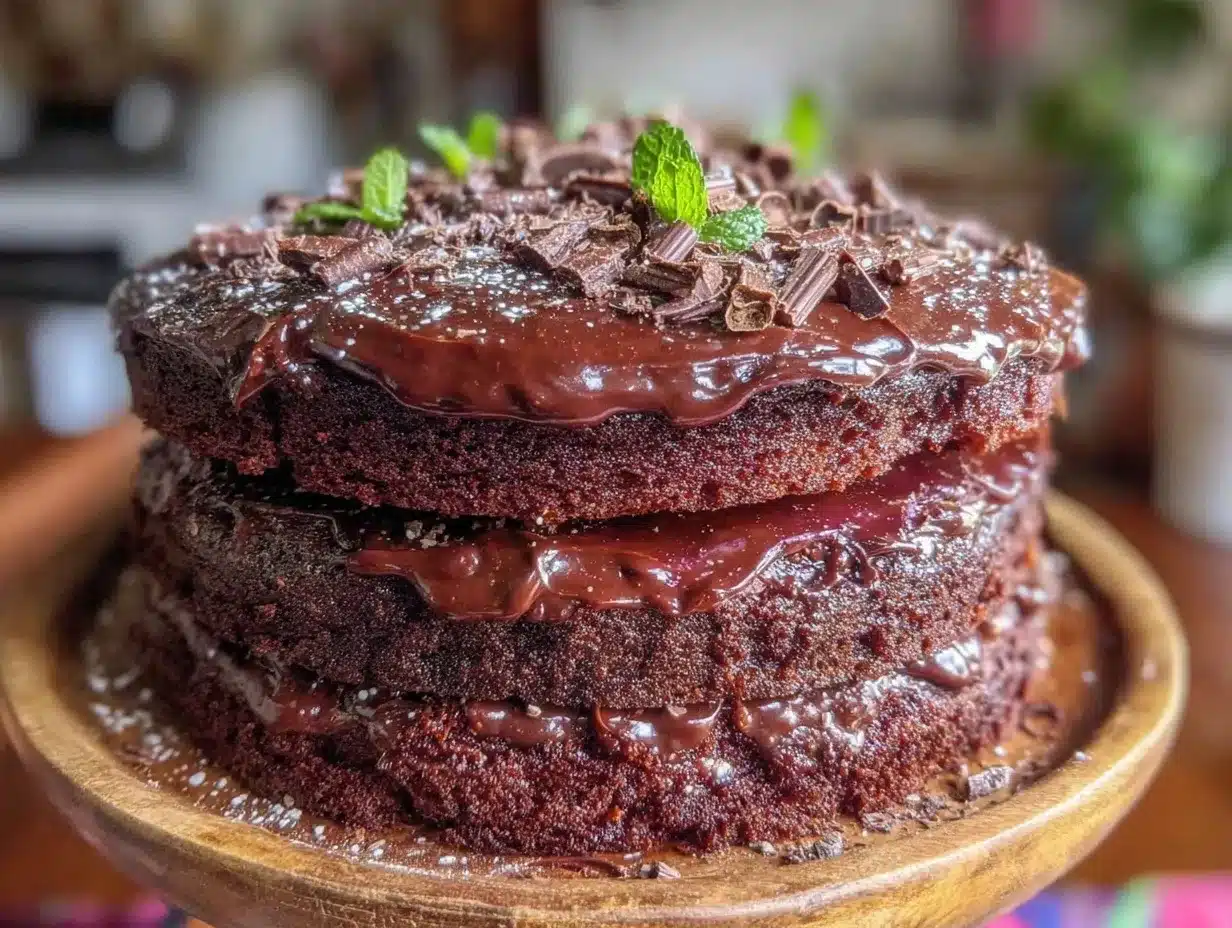
You know that feeling when a dessert not only tastes incredible but also feels like a celebration just waiting to happen? That’s what this decadent three-layer chocolate celebration cake does. It’s not just for birthdays or fancy parties—sometimes, the best celebrations are the ones you throw for yourself on a random Tuesday night. I mean, who said you can’t have a little luxury with your evening tea or coffee?
Maybe you’ve been there, staring at your pantry, wondering if you can pull off a showstopper without the fuss. This cake fits perfectly in those moments—rich, moist, and layered with velvety frosting that’s smooth as silk. Plus, there’s that slight crack on the top layer I swear adds character, even if it wasn’t intentional. This cake stuck with me because it reminds me of the simple joys of baking, the thrill of a little kitchen chaos, and the joy of sharing something delicious with people who matter.
Why You’ll Love This Recipe
This decadent three-layer chocolate celebration cake isn’t just another chocolate cake; it’s the result of countless kitchen trials, a few burnt edges, and a whole lot of chocolate love. I’ve tested and tweaked this recipe until it hits that sweet spot between rich flavor and light texture, making it a total crowd-pleaser. Here’s why it might just become your new favorite:
- Quick & Easy: Ready in about 1 hour and 30 minutes, including baking and cooling. Perfect when you want something impressive without the marathon.
- Simple Ingredients: Uses pantry staples like cocoa powder, flour, and eggs—nothing exotic or pricey here.
- Perfect for Any Celebration: Whether it’s a birthday, anniversary, or just a random Tuesday, this cake fits the bill.
- Crowd-Pleaser: Kids, adults, chocoholics—everyone asks for seconds.
- Unbelievably Delicious: The creamy chocolate frosting complements the moist layers, delivering that melt-in-your-mouth experience.
What sets this recipe apart is the layering technique and a special touch with the frosting. By whipping the frosting just right, you get a fluffiness that holds shape but still feels light. Plus, adding a hint of espresso powder sharpens the chocolate flavor without making it taste like coffee. It’s these little tricks that make it feel like you’re biting into something made with care and a bit of magic. Honestly, you won’t find this kind of richness in a typical store-bought cake.
Beyond the taste, this cake has a way of bringing people together. From the clumsy first slice to the last crumb, it’s about sharing moments, stories, and maybe a little kitchen mess too. It’s that kind of recipe that stays with you, inviting you back to the kitchen again and again.
What Ingredients You Will Need
This recipe uses simple, wholesome ingredients to deliver bold chocolate flavor and a perfectly moist texture without too much fuss. Most of these ingredients are pantry staples, and substitutions are easy if you have dietary preferences. Here’s what you’ll need:
- For the Cake Layers:
- All-purpose flour – 2 ½ cups (315g), sifted for lightness
- Unsweetened cocoa powder – ¾ cup (75g), I recommend Hershey’s for a classic taste
- Baking powder – 1 ½ teaspoons
- Baking soda – 1 ½ teaspoons
- Salt – 1 teaspoon
- Granulated sugar – 2 cups (400g), for that perfect sweetness
- Large eggs – 3, at room temperature
- Whole milk – 1 cup (240ml), can swap for almond milk if needed
- Vegetable oil – ½ cup (120ml), adds moisture
- Pure vanilla extract – 2 teaspoons
- Boiling water – 1 cup (240ml), helps bloom the cocoa flavor
- Espresso powder – 1 teaspoon (optional, but trust me, it deepens the chocolate)
- For the Chocolate Frosting:
- Unsalted butter – 1 cup (227g), softened to room temperature
- Powdered sugar – 4 cups (480g), sifted to avoid lumps
- Unsweetened cocoa powder – ¾ cup (75g)
- Heavy cream – ¼ cup (60ml), adds silkiness
- Pure vanilla extract – 2 teaspoons
- Pinch of salt – balances sweetness
For substitutions, if you want a gluten-free option, try a 1:1 gluten-free flour blend. For dairy-free, coconut cream can replace heavy cream, and use dairy-free butter alternatives. When picking cocoa powder, avoid Dutch-processed if you want a brighter chocolate note; natural unsweetened works best here.
Equipment Needed
- Three 8-inch (20 cm) round cake pans – non-stick or lined with parchment paper
- Mixing bowls – several sizes for wet and dry ingredients
- Electric mixer or stand mixer – helps whip the frosting to the perfect fluffiness
- Measuring cups and spoons – for accuracy
- Rubber spatula – great for folding and scraping bowls clean
- Cooling racks – to cool the layers evenly
- Offset spatula – for smooth frosting application
- Sifter – optional but recommended for cocoa and powdered sugar
If you don’t have three pans, you can bake layers sequentially, just add extra baking time. A hand mixer works fine, but a stand mixer makes frosting a breeze. My favorite budget-friendly pans are from Wilton; they heat evenly and clean up easily. Keep your mixer’s beaters clean for fluffy frosting—any leftover fat or crumbs can weigh it down.
Preparation Method
- Preheat and Prep: Preheat your oven to 350°F (175°C). Grease the three 8-inch pans and line the bottoms with parchment paper. This little step prevents sticking and keeps your layers neat. (Approx. 10 minutes)
- Mix Dry Ingredients: In a large bowl, sift together the flour, cocoa powder, baking powder, baking soda, and salt. This ensures everything is evenly distributed and light. (Approx. 5 minutes)
- Combine Wet Ingredients: In another bowl, whisk the sugar, eggs, milk, oil, and vanilla extract until smooth. Make sure your eggs are at room temperature for better emulsification. (Approx. 5 minutes)
- Blend Wet and Dry: Slowly add the dry mix to the wet ingredients, stirring gently to avoid overmixing. The batter should be smooth but a bit thick. (Approx. 3 minutes)
- Add Boiling Water and Espresso Powder: Dissolve the espresso powder in the boiling water, then carefully stir it into the batter. The batter will thin out—that’s perfect for moist cake layers! (Approx. 3 minutes)
- Divide and Bake: Pour the batter evenly into the three pans. Tap the pans gently on the counter to release air bubbles. Bake for 25-30 minutes until a toothpick inserted comes out clean. (Approx. 30 minutes)
- Cool the Cakes: Let the layers cool in the pans for 10 minutes before transferring to wire racks. Cooling completely is crucial to avoid melting the frosting. (Approx. 1 hour)
- Prepare the Frosting: Beat the softened butter until creamy. Gradually add powdered sugar and cocoa, alternating with heavy cream, until you reach a spreadable, fluffy consistency. Stir in vanilla and salt. (Approx. 15 minutes)
- Assemble the Cake: Place the first cake layer on your serving plate. Spread a generous layer of frosting on top. Repeat with the second layer. Finish by frosting the top and sides smoothly with the remaining frosting. (Approx. 20 minutes)
- Final Touches: For a polished look, chill the cake for 30 minutes, then smooth any imperfections with a warm spatula if you like. (Optional)
If you notice any cracks in the layers, don’t stress—they add a rustic charm. Also, resist the urge to rush cooling; frosting warm cake leads to melting and a mess. I once ignored this step and ended up with chocolate everywhere—lesson learned!
Cooking Tips & Techniques
Getting this decadent three-layer chocolate celebration cake just right takes a few tricks I’ve picked up over time. First off, always sift your dry ingredients. It prevents clumping, especially with cocoa powder, which can be stubborn. When mixing wet and dry, stir gently. Overmixing develops gluten and makes the cake dense, which you definitely don’t want here.
Another tip: use boiling water as the last ingredient in the batter. It blooms the cocoa and results in a moister crumb. I remember skipping this once, and the cake was dry—don’t make my mistake! The espresso powder is optional but trust me, it awakens the chocolate flavor without adding coffee taste.
For the frosting, softened butter is key. Too cold, and it won’t whip well; too warm, and it’ll be greasy. I usually leave it out for about an hour on the counter. When adding powdered sugar, do it gradually to avoid a sugar cloud in your kitchen. Whip the frosting until light and fluffy—this makes spreading easier and gives that dreamy texture.
Timing is also crucial. Bake layers evenly—rotate pans halfway through if your oven has hot spots. Cooling is a step you can multitask; while cakes cool, prep your frosting. Patience here pays off because frosting a warm cake is a recipe for disaster.
Finally, don’t be afraid to experiment with layering. If your layers aren’t perfectly flat, use a serrated knife to level them. It makes stacking easier and the final slice prettier. Honestly, even if it’s a little uneven, it tastes the same, so keep it fun!
Variations & Adaptations
This decadent three-layer chocolate celebration cake is wonderfully adaptable. Here are a few ways to make it your own:
- Vegan Version: Replace eggs with flax eggs (1 tablespoon ground flaxseed + 3 tablespoons water per egg) and use dairy-free milk and vegan butter for the frosting.
- Seasonal Twist: Add fresh raspberries or chopped strawberries between the layers for a fruity surprise. In the frosting, a teaspoon of orange zest adds a bright note perfect for winter celebrations.
- Flavor Boost: Swap the vanilla extract in the batter with almond extract for a nutty hint. Or fold in chocolate chips for extra texture.
- Gluten-Free: Use a 1:1 gluten-free baking flour blend. Add a teaspoon of xanthan gum if your blend doesn’t already include it to keep the structure intact.
- Personal Favorite: One time, I added a thin layer of salted caramel sauce between layers—wow, that sweet-salty combo blew everyone away!
Feel free to mix and match these ideas. This cake’s base is forgiving and versatile, so let your taste buds lead the way.
Serving & Storage Suggestions
Serve this decadent three-layer chocolate celebration cake slightly chilled or at room temperature for the best flavor and texture. The frosting softens a bit at room temp, making each bite melt in your mouth. For presentation, garnish with fresh berries, a sprinkle of cocoa powder, or even some edible gold leaf if you’re feeling fancy.
Complement the cake with rich coffee, a glass of cold milk, or even a bold red wine like a Cabernet Sauvignon for an adult twist. It also pairs beautifully with vanilla ice cream or whipped cream on the side.
To store, keep the cake covered in the refrigerator for up to 4 days. If you want to freeze it, wrap tightly in plastic wrap and place in a freezer bag or container for up to 2 months. When ready to serve, thaw overnight in the fridge and bring to room temperature before slicing.
Flavors actually deepen after a day or two, so if you can resist, letting the cake rest enhances the chocolate richness. Just remember to keep it well-covered to prevent drying out.
Nutritional Information & Benefits
This decadent three-layer chocolate celebration cake is definitely a treat, but it’s made with real ingredients and no artificial additives. Each slice (about 1/12th of the cake) roughly contains:
| Calories | 420 kcal |
|---|---|
| Fat | 22g (Saturated fat 12g) |
| Carbohydrates | 55g (Sugars 38g) |
| Protein | 5g |
| Fiber | 3g |
Chocolate, especially cocoa powder, contains antioxidants and can elevate mood (you know, the feel-good stuff). Using vegetable oil instead of butter in the cake layers reduces saturated fat, and whole milk adds a bit of calcium and creaminess. For those watching allergens, this recipe contains gluten, dairy, eggs, and soy (in some cocoa powders). However, adaptations for gluten-free and vegan diets are straightforward.
From a wellness standpoint, I think of this cake as a joyful indulgence—perfect for celebrating without guilt, especially when shared with loved ones. Life’s too short to skip dessert, right?
Conclusion
This decadent three-layer chocolate celebration cake is proof that sometimes, the best recipes come from happy accidents and a little kitchen chaos. It’s rich but not heavy, visually impressive without complicated steps, and downright delicious every single time. Whether you’re marking a milestone or simply craving chocolate, this cake makes the moment special.
Feel free to tweak the layers, swap out ingredients, or add your own flair—it’s a recipe that welcomes creativity. I love this cake because it brings people together around the table and invites smiles with every bite.
Give it a try, and let me know how it turns out! Share your adaptations or tips in the comments—I’m always eager to hear your chocolate celebration stories. Happy baking and even happier eating!
FAQs
Can I make this cake in advance?
Absolutely! You can bake the layers a day ahead and keep them wrapped tightly in the fridge. Assemble and frost the cake on the day you plan to serve for the freshest taste.
What if I don’t have three cake pans?
No worries! Bake each layer separately, just add about 5-10 minutes to the baking time per layer and cool before stacking.
How do I avoid the cake sinking in the middle?
Make sure to measure ingredients accurately and don’t open the oven door during the first 20 minutes of baking. Also, avoid overmixing the batter.
Can I use dark chocolate instead of cocoa powder?
You can melt dark chocolate and add it to the batter, but you’ll need to reduce oil or butter slightly. For this recipe, cocoa powder keeps the texture light and fluffy.
What’s the best way to store leftover cake?
Keep it covered in the refrigerator for up to 4 days or freeze slices wrapped individually for longer storage. Bring to room temperature before serving for best flavor.
Pin This Recipe!
Decadent Three-Layer Chocolate Celebration Cake

A rich, moist, and layered chocolate cake with velvety frosting, perfect for any celebration or a luxurious treat any day.
- Prep Time: 25 minutes
- Cook Time: 30 minutes
- Total Time: 1 hour 30 minutes
- Yield: 12 servings 1x
- Category: Dessert
- Cuisine: American
Ingredients
- 2 ½ cups (315g) all-purpose flour, sifted
- ¾ cup (75g) unsweetened cocoa powder (natural, not Dutch-processed)
- 1 ½ teaspoons baking powder
- 1 ½ teaspoons baking soda
- 1 teaspoon salt
- 2 cups (400g) granulated sugar
- 3 large eggs, at room temperature
- 1 cup (240ml) whole milk (can substitute almond milk)
- ½ cup (120ml) vegetable oil
- 2 teaspoons pure vanilla extract
- 1 cup (240ml) boiling water
- 1 teaspoon espresso powder (optional)
- 1 cup (227g) unsalted butter, softened to room temperature
- 4 cups (480g) powdered sugar, sifted
- ¾ cup (75g) unsweetened cocoa powder
- ¼ cup (60ml) heavy cream
- 2 teaspoons pure vanilla extract
- Pinch of salt
Instructions
- Preheat oven to 350°F (175°C). Grease three 8-inch round cake pans and line bottoms with parchment paper.
- In a large bowl, sift together flour, cocoa powder, baking powder, baking soda, and salt.
- In another bowl, whisk sugar, eggs, milk, vegetable oil, and vanilla extract until smooth.
- Slowly add dry ingredients to wet ingredients, stirring gently until smooth but slightly thick.
- Dissolve espresso powder in boiling water, then carefully stir into the batter to thin it out.
- Divide batter evenly among the three pans. Tap pans gently to release air bubbles.
- Bake for 25-30 minutes or until a toothpick inserted comes out clean.
- Cool cakes in pans for 10 minutes, then transfer to wire racks to cool completely (about 1 hour).
- For frosting, beat softened butter until creamy. Gradually add powdered sugar and cocoa powder, alternating with heavy cream, until fluffy and spreadable.
- Stir in vanilla extract and a pinch of salt.
- Place first cake layer on serving plate, spread a generous layer of frosting on top. Repeat with second layer.
- Frost top and sides smoothly with remaining frosting.
- Optional: Chill cake for 30 minutes and smooth imperfections with a warm spatula.
Notes
Sift dry ingredients to prevent clumps. Use boiling water last to bloom cocoa for moistness. Avoid overmixing to keep cake light. Cool layers completely before frosting to prevent melting. Softened butter is key for fluffy frosting. Optional espresso powder enhances chocolate flavor without coffee taste. If layers crack, it adds rustic charm. For gluten-free, use a 1:1 gluten-free flour blend and add xanthan gum if needed. Vegan adaptations include flax eggs and dairy-free substitutes.
Nutrition
- Serving Size: 1 slice (1/12th of c
- Calories: 420
- Sugar: 38
- Fat: 22
- Saturated Fat: 12
- Carbohydrates: 55
- Fiber: 3
- Protein: 5
Keywords: chocolate cake, three-layer cake, celebration cake, homemade chocolate cake, easy chocolate cake, chocolate frosting, moist chocolate cake


