
“Hey, can you make a cake for Saturday? Something big but not crazy complicated?” That text from my neighbor dropped into my phone on a Thursday evening, right when I was juggling dinner and a mountain of laundry. Honestly, my mind went blank at first. I’d never been much of a cake decorator — just the usual frosting-and-sprinkles type. But the thought of a graduation party without a standout cake? Unthinkable.
So, I grabbed a plain sheet cake from the bakery (because, hey, sometimes the shortcut is a lifesaver), and figured I’d try this simple decorating hack I’d seen floating around. The kind of hack that doesn’t require fancy piping skills or a ton of time—just a little creativity with some basic tools lying around the kitchen. As I spread the frosting, the cake started to look, well, pretty good. Then I added a few easy accents — nothing perfect, nothing intimidating — but it all came together in a way that made people stop and say, “Wow, did you make that?”
It wasn’t about mastering Swiss buttercream or intricate fondant shapes; it was just about making a big moment feel special with a little effort that anyone can manage. I still remember that quiet moment when the graduate’s face lit up, not because the cake was flawless, but because it was clearly made with care and a touch of flair. That’s why this easy sheet cake decorating hack stuck with me. It’s the kind of trick you’ll want to keep in your back pocket for every celebration that calls for a stunning cake without the stress.
Why You’ll Love This Recipe
This easy sheet cake decorating hack is a game changer, especially for busy hosts who want to impress without the fuss. I’ve tried countless cake decorating methods over the years, and this one stands out for being both approachable and striking.
- Quick & Easy: You can transform a simple sheet cake in under 30 minutes, perfect for last-minute party prep.
- Simple Ingredients: No need for exotic tools or expensive decorations—most are pantry staples or easy-to-find items.
- Perfect for Graduation Parties: The design is versatile enough to customize with school colors, names, or fun toppers that celebrate the graduate.
- Crowd-Pleaser: Guests love the look and taste, and it’s always a conversation starter.
- Unbelievably Delicious: Picking a great cake base (I often use a classic vanilla or chocolate from trusted bakeries) makes the whole experience indulgent but stress-free.
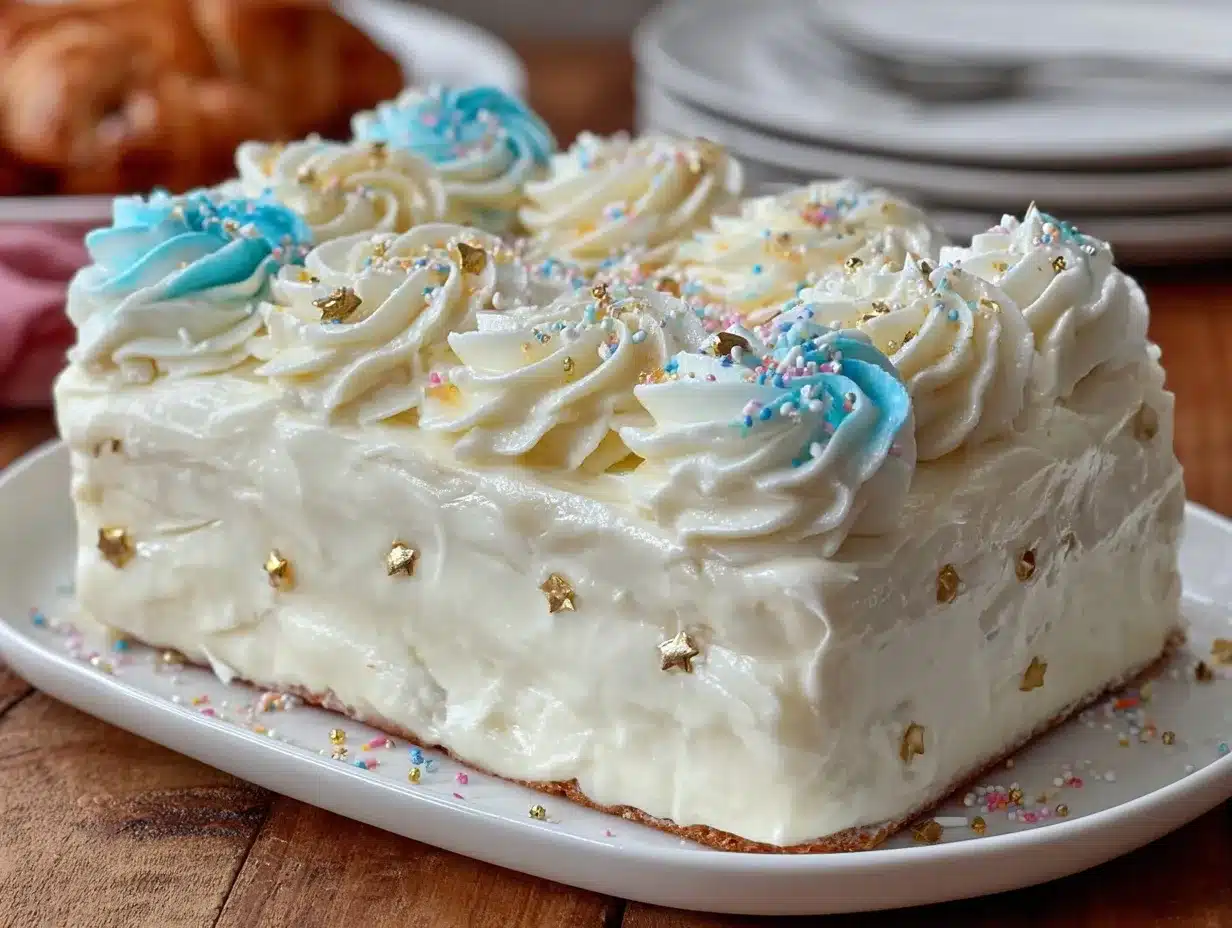
What sets this decorating hack apart is the clever use of simple tools—like plastic wrap, a zip-top bag, or even a kitchen comb—to create stunning textures and sharp edges without needing a piping bag or fancy icing tips. I’ve even swapped out traditional buttercream for whipped cream cheese frosting for a lighter twist that still holds up beautifully. It’s not just a cake; it’s a way to bring that party wow factor without turning your kitchen into a battleground. Honestly, it’s the kind of trick that makes you look like a pro, even if you’re not really one.
What Ingredients You Will Need
This recipe relies on straightforward, easy-to-source ingredients that come together for a moist, flavorful base and a frosting that’s as tasty as it is workable. The decorating elements are surprisingly simple, too.
- For the Sheet Cake Base:
- 1 box of high-quality yellow or chocolate cake mix (I recommend Betty Crocker or King Arthur for consistent results)
- Ingredients called for on the box (usually eggs, oil, and water)
- For the Frosting:
- 1 cup unsalted butter, softened (use a quality brand like Land O’Lakes for smooth texture)
- 4 cups powdered sugar, sifted
- 1/4 cup whole milk or heavy cream (dairy-free alternatives like oat milk work well too)
- 2 teaspoons vanilla extract
- A pinch of salt (balances sweetness)
- Decorating Supplies:
- Food coloring gels in school or party colors (I prefer AmeriColor gels for vivid hues)
- Plastic wrap or parchment paper
- Zip-top sandwich bags
- Kitchen comb or fork for texture
- Edible glitter or sprinkles (optional, for extra sparkle)
- Fresh flowers or themed toppers (optional, for personalization)
Feel free to swap out the boxed cake for a homemade recipe if you prefer, or try gluten-free cake mixes to accommodate dietary needs. The frosting is versatile enough to hold up with cream cheese or mascarpone for a tangier finish. For summer graduations, I often add a hint of lemon zest to the frosting for a fresh twist, which pairs wonderfully with a strawberry sheet cake variation.
Equipment Needed
- 9×13-inch sheet cake pan (non-stick or lined with parchment paper for easy removal)
- Mixing bowls (medium and large)
- Electric mixer or stand mixer (hand mixing is possible but more effort)
- Offset spatula or butter knife for spreading frosting smoothly
- Plastic wrap or parchment paper (for the decorating hack)
- Zip-top plastic bags (used as makeshift piping bags)
- Kitchen comb or fork (for creating textured frosting patterns)
For those without a kitchen comb, a fork works equally well to create simple striped textures in the frosting. I once improvised with the back of a spoon and it gave a charming, rustic touch. If budget is a concern, these tools are inexpensive and reusable, and the plastic bags can be swapped with parchment cones for a slightly different effect. Keeping your offset spatula clean and dry makes smoothing frosting a breeze, and I find warming the blade slightly under hot water helps with a flawless finish.
Preparation Method
- Preheat and Prepare: Heat your oven to 350°F (175°C). Grease your 9×13-inch sheet pan with butter or non-stick spray and line with parchment paper for easy cake removal.
- Mix the Cake Batter: In a large bowl, combine the cake mix with required ingredients — typically 3 large eggs, 1 cup vegetable oil, and 1 cup water (240 ml oil and water). Beat on medium speed for 2 minutes until smooth. The batter should be slightly thick but pourable.
- Bake: Pour batter into the prepared pan and smooth evenly. Bake for 30-35 minutes or until a toothpick inserted in the center comes out clean. Oven times vary, so check at 30 minutes.
- Cool Completely: Let the cake cool in the pan for 15 minutes, then remove to a wire rack to cool fully. This step is crucial for frosting to stick properly without melting or sliding off.
- Prepare the Frosting: Using an electric mixer, beat softened butter on medium speed until creamy (about 2 minutes). Gradually add powdered sugar, 1 cup at a time, mixing well after each addition. Add vanilla extract, salt, and milk/cream, then beat on high for 3-4 minutes until light and fluffy.
- Divide and Color the Frosting: Scoop out portions of frosting into small bowls for coloring. Use gel food coloring to tint each bowl to your desired shades. Stir well to blend color evenly.
- Apply Base Frosting: Spread a thin, even layer of one frosting color over the entire cake. This crumb coat seals the cake and prevents crumbs from mixing into your final layer.
- Chill: Place the cake in the refrigerator for 15 minutes to firm up the crumb coat.
- Create Decorative Texture: Fill a zip-top bag with a portion of colored frosting and snip a small corner to pipe simple shapes or borders. Alternatively, wrap frosting in plastic wrap and roll to smooth, then press gently across the cake to create waves or ridges.
- Use Kitchen Comb for Stripes: Drag the kitchen comb or fork lightly across the frosting surface to form parallel lines or a basket-weave effect. This adds dimension without intricate piping.
- Add Final Touches: Sprinkle edible glitter or place fresh flowers and themed toppers to personalize the cake for the graduate’s school colors or interests.
- Chill Before Serving: Refrigerate the decorated cake for 30 minutes to set the frosting, then serve at room temperature for best flavor.
Pro tip: If you notice the frosting is too stiff to pipe smoothly, add a splash more milk and whip again for a few seconds. Also, timing is everything — frosting too warm makes decorating tricky, too cold makes spreading tough. I usually keep my frosting chilled but not fridge-cold before decorating.
Cooking Tips & Techniques
Mastering this sheet cake decorating hack is about patience and a light touch. One mistake I made early on was rushing the cooling process — warm cake will cause your frosting to melt and slide off, turning your “stunning” cake into a sticky mess.
Using plastic wrap or a zip-top bag as a piping substitute is honestly liberating — no fancy piping tips needed, and cleanup is a breeze. Just remember to snip a small hole in the corner for controlled piping.
When creating textured patterns with a kitchen comb or fork, apply gentle, even pressure. Too hard, and you’ll tear the frosting; too light, and the effect won’t show. If you want a sharper edge, chill the cake again for 10-15 minutes between steps.
One trick I learned: if you want to add lettering or a name, practice on parchment paper first. It saves a lot of frustration and keeps the final look neat.
Multitasking helps: while the cake bakes and cools, prepare and color your frosting. This keeps the process flowing smoothly, especially when time is tight for last-minute celebrations.
Variations & Adaptations
This decorating hack is flexible enough to suit different tastes and dietary needs.
- Dietary Adaptation: Use a gluten-free cake mix and dairy-free frosting options to make this treat friendly for gluten or dairy intolerances.
- Flavor Variation: Swap vanilla cake for a rich chocolate or red velvet base. You can also infuse frosting with citrus zest, coffee, or cocoa powder for unique flavor twists.
- Seasonal Twist: For spring or summer graduations, add edible flowers or fresh fruit slices atop the frosting for a fresh, festive touch. In fall, sprinkle chopped nuts or caramel drizzle.
- Alternative Decorating Tools: If you want to try a different texture, use a crinkled piece of aluminum foil or the edge of a butter knife pressed gently to create a rustic look.
- Personalized Theme: Try adding edible gold leaf or metallic food paint for an elegant, celebratory vibe similar to the gold leaf champagne graduation cake style, but with far less effort.
Once, I swapped the traditional frosting for a no-bake strawberry cheesecake topping on a sheet cake base, inspired by the no-bake strawberry cheesecake cups recipe. It was a hit and a refreshing change for a warm-weather graduation.
Serving & Storage Suggestions
Serve this decorated sheet cake at room temperature for the best texture and flavor. Cold frosting can mute flavors and make the cake dense. Arrange on a sturdy platter or cake board, and add themed decorations around the edges for extra flair.
This cake pairs wonderfully with fresh fruit salads or light sides like the creamy cucumber dill salad, balancing the sweetness nicely. For beverages, sparkling lemonade or a fresh fruit punch complements the festive mood.
Store leftovers covered loosely with plastic wrap or in an airtight container in the refrigerator for up to 3 days. Before serving again, let the cake warm to room temperature for 30 minutes to soften the frosting. Freezing the cake is possible but may slightly affect frosting texture; thaw overnight in the fridge.
Flavors actually deepen a bit after a day, so if you can resist, prepping the cake a day ahead can be a strategic move. Just keep decorations like fresh flowers or sprinkles separate until serving.
Nutritional Information & Benefits
This cake is a treat, so enjoy in moderation, but I’ve found using real butter and high-quality ingredients makes a difference in richness without relying on artificial additives. A typical slice (1/12th of a 9×13 sheet) contains approximately 350 calories, 18g fat, 45g carbohydrates, and 3g protein.
Butter provides fat-soluble vitamins like A and E, while milk or cream adds calcium and protein. Using fresh, natural ingredients over processed options means fewer preservatives and a more wholesome dessert.
For those watching sugar intake, consider cutting back powdered sugar in frosting slightly or using a sugar alternative. Gluten-free versions are easy with specialty mixes, and dairy-free frosting swaps open this recipe up to many dietary needs.
Conclusion
This easy sheet cake decorating hack is a lifesaver when you want a show-stopping cake without the headache. It’s approachable, flexible, and has become my go-to trick for graduation parties (and honestly, other celebrations too). The way simple tools and a bit of patience turn a plain cake into a centerpiece still surprises me.
Feel free to make it your own — tweak colors, textures, and flavors to match your party’s vibe. I love that this method lets you shine without stress, sharing something homemade that looks like you spent hours, even when you didn’t.
If you try it, I’d love to hear how it went or what creative twists you added! This hack has saved many last-minute parties, and I’m sure it’ll do the same for you.
FAQs
Can I use homemade cake instead of a boxed mix for this sheet cake hack?
Absolutely! Homemade cake works wonderfully here. Just be sure it’s fully cooled before frosting for best results.
What if I don’t have a kitchen comb? Can I still create texture?
Yes! A fork or the edge of a butter knife can create similar effects. Even pressing gently with crinkled foil or plastic wrap can add interesting patterns.
How do I keep the frosting from melting when decorating?
Make sure your cake is completely cooled and keep your frosting chilled but spreadable. Work in a cool room and refrigerate the cake between decorating steps if needed.
Can I prepare this decorated cake a day ahead?
Definitely. Refrigerate it overnight and bring it to room temperature before serving to enjoy the best texture and flavor.
What’s a good alternative if I want a lighter frosting?
Try a whipped cream cheese frosting or stabilized whipped cream. Both can be tinted and textured similarly with this decorating hack.
Pin This Recipe!
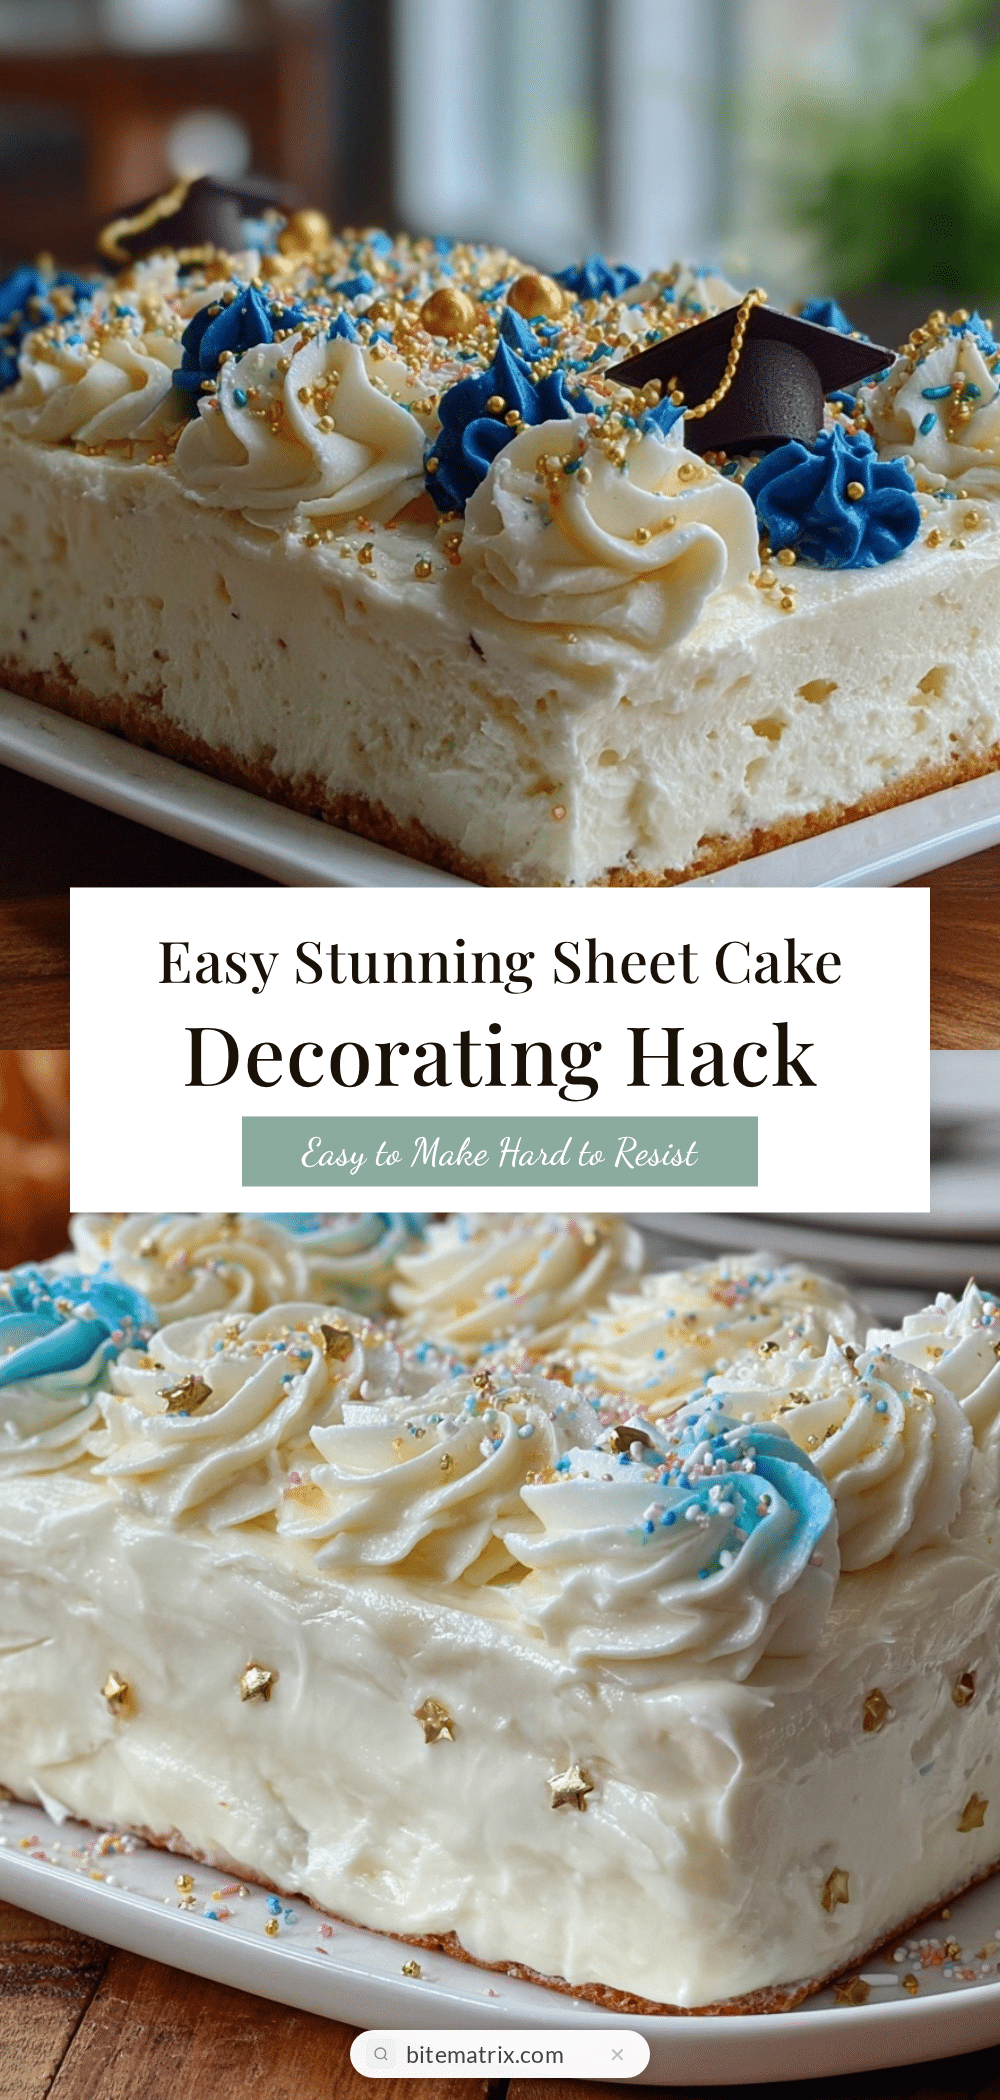
Easy Sheet Cake Decorating Hack for Stunning Graduation Party Ideas

A simple and approachable decorating hack to transform a plain sheet cake into a stunning centerpiece perfect for graduation parties, using basic tools and easy techniques.
- Prep Time: 20 minutes
- Cook Time: 30-35 minutes
- Total Time: 1 hour 15 minutes
- Yield: 12 servings 1x
- Category: Dessert
- Cuisine: American
Ingredients
- 1 box of high-quality yellow or chocolate cake mix (e.g., Betty Crocker or King Arthur)
- Ingredients called for on the cake mix box (usually 3 large eggs, 1 cup vegetable oil, 1 cup water)
- 1 cup unsalted butter, softened
- 4 cups powdered sugar, sifted
- 1/4 cup whole milk or heavy cream (or dairy-free alternatives like oat milk)
- 2 teaspoons vanilla extract
- A pinch of salt
- Food coloring gels in school or party colors (e.g., AmeriColor gels)
- Plastic wrap or parchment paper
- Zip-top sandwich bags
- Kitchen comb or fork for texture
- Edible glitter or sprinkles (optional)
- Fresh flowers or themed toppers (optional)
Instructions
- Preheat oven to 350°F (175°C). Grease a 9×13-inch sheet pan with butter or non-stick spray and line with parchment paper.
- In a large bowl, combine the cake mix with required ingredients (3 eggs, 1 cup vegetable oil, 1 cup water). Beat on medium speed for 2 minutes until smooth.
- Pour batter into the prepared pan and smooth evenly. Bake for 30-35 minutes or until a toothpick inserted in the center comes out clean.
- Let the cake cool in the pan for 15 minutes, then transfer to a wire rack to cool completely.
- Using an electric mixer, beat softened butter on medium speed until creamy (about 2 minutes). Gradually add powdered sugar, 1 cup at a time, mixing well after each addition.
- Add vanilla extract, salt, and milk or cream, then beat on high for 3-4 minutes until light and fluffy.
- Divide frosting into small bowls and tint each with gel food coloring as desired.
- Spread a thin, even crumb coat of one frosting color over the entire cake.
- Chill the cake in the refrigerator for 15 minutes to set the crumb coat.
- Fill a zip-top bag with colored frosting, snip a small corner, and pipe simple shapes or borders. Alternatively, wrap frosting in plastic wrap, roll to smooth, then press gently across the cake to create waves or ridges.
- Use a kitchen comb or fork to drag lightly across the frosting surface to create textured stripes or basket-weave patterns.
- Add edible glitter, fresh flowers, or themed toppers to personalize the cake.
- Refrigerate the decorated cake for 30 minutes to set the frosting before serving at room temperature.
Notes
Ensure the cake is completely cooled before frosting to prevent melting. Keep frosting chilled but spreadable for best results. Use plastic wrap or zip-top bags as inexpensive piping substitutes. Practice lettering on parchment paper first. For lighter frosting, try whipped cream cheese or stabilized whipped cream. Refrigerate cake between decorating steps if needed.
Nutrition
- Serving Size: 1 slice (1/12th of t
- Calories: 350
- Fat: 18
- Carbohydrates: 45
- Protein: 3
Keywords: sheet cake, cake decorating hack, graduation cake, easy cake decoration, simple frosting techniques, party cake, last-minute cake, vanilla cake, chocolate cake


