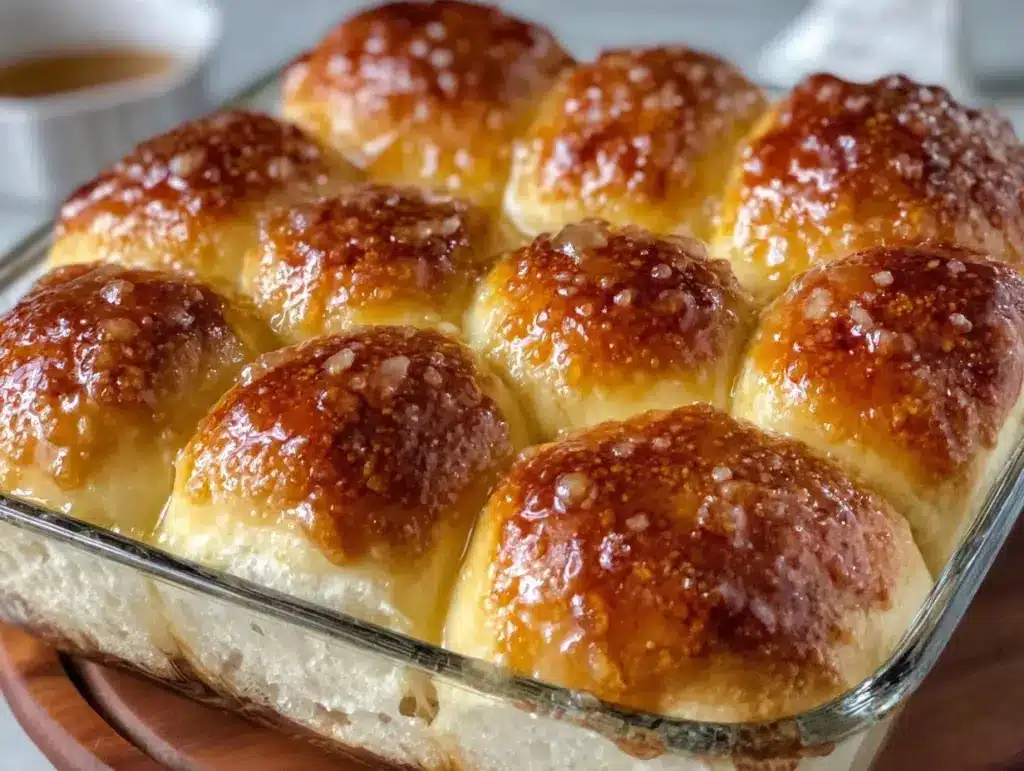
Let me tell you, when the oven fills my kitchen with the buttery aroma of fresh, fluffy dinner rolls, I swear the world outside just melts away. The golden tops glisten, the pillowy texture almost begs you to pinch a piece, and that first bite—soft, warm, with just the right hint of sweetness—always brings a flood of nostalgia. It’s the kind of smell that stops everyone in their tracks, making even the busiest night feel special.
The first time I made these fluffy dinner rolls, I was determined to recreate the ones my grandma used to make when I was knee-high to a grasshopper. She’d let me help knead the dough (mostly making a mess), and I remember sneaking buttery bites off the cooling rack before dinner. That moment—the moment you pause and just smile because you know you’ve nailed it—is unforgettable. I was instantly hooked, and so was my family.
Honestly, these rolls are dangerously easy, which means they disappear almost as quickly as you make them. My kids sneak them off the tray before I even get the butter out, and my husband swears they taste just like the ones from his childhood Sunday suppers. They’ve become a staple for every holiday, potluck, and cozy family dinner. If you’re looking for pure, nostalgic comfort that’s perfect for gifting, sharing, or just treating yourself, you’re going to want to bookmark this fluffy dinner rolls recipe.
I’ve tested (and retested) these homemade buttery rolls more times than I care to admit—in the name of research, of course! Whether you’re baking for a crowd or just want to brighten up your Pinterest board with a classic, this recipe truly feels like a warm hug. You know what? You might wish you’d found this one years ago.
Why You’ll Love This Recipe
If you’ve ever tried making dinner rolls and ended up with something dense and disappointing, I totally get it. I’ve had my fair share of hockey puck moments (let’s face it, not every recipe is a winner). That’s why I set out to create a fluffy dinner rolls recipe that’s foolproof—chef-tested, family-approved, and easy enough for any home baker.
- Quick & Easy: These homemade buttery rolls come together in just about 2 hours, with most of that time being hands-off rising. Perfect for busy weeknights or when you’re craving fresh bread last minute.
- Simple Ingredients: All you need are pantry staples—no special trips to the grocery store or weird additives required.
- Perfect for Any Occasion: Whether it’s holiday meals, potlucks, a cozy weeknight dinner, or brunch, these rolls fit right in.
- Crowd-Pleaser: Kids and adults alike devour these rolls. Honestly, they’re usually gone before the main course even hits the table.
- Unbelievably Delicious: The texture is light, airy, and oh-so-buttery. The flavor is comforting and just rich enough to pair with any dish.
What makes this fluffy dinner rolls recipe different? It’s all about the technique—gentle kneading, a patient rise, and a double brush of melted butter (before and after baking) for that crave-worthy golden finish. No shortcuts, but no complicated steps either. I blend a touch of sugar into the dough for subtle sweetness, and I always use King Arthur flour for the best texture.
This isn’t just good bread; it’s the kind that makes you close your eyes after the first bite. It’s comfort food, reborn—healthier and faster, but with every bit of the old-school satisfaction. If you want to impress guests without any stress, or just want to make a simple meal feel special, these easy homemade buttery rolls are your secret weapon. Trust me, you’ll be making them again and again.
What Ingredients You Will Need
These fluffy dinner rolls rely on simple, wholesome ingredients for that perfect balance of flavor and texture. You probably have most of them stashed in your kitchen already. Here’s what you’ll need:
- For the Dough:
- 3 ½ cups (420g) all-purpose flour (I always reach for King Arthur for a consistent, soft crumb)
- ¼ cup (50g) granulated sugar (adds subtle sweetness)
- 1 packet (2 ¼ tsp or 7g) instant yeast (or active dry yeast—both work, but instant is quicker)
- 1 tsp salt (balances the flavors and strengthens the dough)
- 1 cup (240ml) whole milk, warmed to 110°F/43°C (room temperature is fine, but warm milk helps the yeast bloom)
- ¼ cup (60g) unsalted butter, melted (adds richness—substitute with dairy-free margarine if needed)
- 1 large egg, room temperature (for structure and extra fluffiness)
- For Brushing:
- 2 tbsp (28g) unsalted butter, melted (for brushing before and after baking—don’t skip this step!)
- Optional Toppings:
- Coarse sea salt (for a savory finish)
- Fresh herbs, finely chopped (try rosemary or thyme for a fragrant twist)
Ingredient Tips:
- If you’re baking for someone gluten-free, swap out the all-purpose flour for a 1:1 gluten-free blend (Bob’s Red Mill works well).
- Dairy-free? Use plant-based milk and vegan butter. I’ve tested it with oat milk and Earth Balance, and it’s still fluffy and delicious.
- Don’t have instant yeast? Active dry yeast works—just let it proof in the warm milk with sugar for 5 minutes before mixing.
- Want to add a little extra sweetness? Substitute honey for half the sugar (makes them slightly more golden and fragrant).
- For a whole wheat version, swap 1 cup of all-purpose flour for whole wheat flour—just add an extra tablespoon of milk to keep the rolls soft.
Honestly, these ingredients come together like magic. Just remember: fresh yeast and good butter make all the difference!
Equipment Needed
You don’t need a fancy bakery setup to make these fluffy dinner rolls—just a few kitchen basics and a dash of patience. Here’s what I use every time:
- Mixing Bowl: A large bowl for combining and kneading the dough. If you have a stand mixer, that’s even easier (but your hands work just fine).
- Wooden Spoon or Dough Hook: For mixing. I use my old wooden spoon—never lets me down.
- Measuring Cups and Spoons: Precision matters for yeast breads, so I always use a digital scale for flour (helps avoid heavy rolls).
- Baking Pan: A 9×13-inch (23×33 cm) pan is perfect for classic pull-apart rolls. If you prefer round rolls, a cast iron skillet works too.
- Kitchen Towel or Plastic Wrap: For covering the dough during rising. I use a clean tea towel—my grandma’s trick for a cozy rise.
- Pastry Brush: For brushing on that glorious melted butter. Silicone brushes are easy to clean, but any soft brush will do.
If you don’t have a stand mixer, don’t sweat it—hand kneading is therapeutic (and honestly, kind of fun). For budget-friendly options, thrift stores are gold mines for sturdy pans and mixing bowls. If you use nonstick pans, a little extra butter for greasing helps rolls release easily. After baking, I just soak my pan with warm water—makes cleanup a breeze!
Preparation Method

I promise, making these homemade buttery rolls is easier than you think. Just follow these steps:
-
Mix the Dough (10 minutes):
Combine 3 ½ cups (420g) flour, ¼ cup (50g) sugar, 2 ¼ tsp (7g) instant yeast, and 1 tsp salt in a large bowl. Whisk to blend.
In a separate bowl, whisk together 1 cup (240ml) warm milk, ¼ cup (60g) melted butter, and 1 large egg. Pour the wet ingredients into the dry.
Stir until a shaggy dough forms. If using a stand mixer, use the dough hook on low speed for 2-3 minutes.
Tip: If dough seems dry, add 1-2 tbsp extra milk. If it’s sticky, sprinkle in a little more flour. -
Knead the Dough (8 minutes):
Turn the dough onto a lightly floured surface. Knead for 8 minutes until smooth and elastic (it should spring back when pressed).
Warning: Over-kneading can make rolls tough. If you’re using a mixer, keep it on medium-low.
Sensory cue: Dough should feel soft but not sticky. -
First Rise (45 minutes):
Place dough in a greased bowl. Cover with a kitchen towel or plastic wrap.
Let rise in a warm spot until doubled in size, about 45 minutes (sometimes a bit longer if your kitchen is cool).
Tip: If your yeast is sluggish, move the bowl to a slightly warm oven (turned off). -
Shape the Rolls (10 minutes):
Punch down the risen dough. Divide into 15 equal pieces (about 50g each).
Roll each piece into a ball and arrange in a greased 9×13-inch pan, spaced slightly apart.
Personal note: I use the “cupped hand” method to create smooth tops—just gently rotate each dough ball against the counter. -
Second Rise (30 minutes):
Cover the pan and let rolls rise again until puffed and nearly touching, about 30 minutes.
Warning: Don’t rush this step—the second rise gives cloud-like texture.
Sensory cue: Rolls should look pillowy and soft. -
Bake the Rolls (18-22 minutes):
Preheat oven to 375°F (190°C).
Brush tops with 1 tbsp melted butter.
Bake for 18-22 minutes, until golden brown and fragrant. Tops should feel firm but springy.
Personal tip: Rotate pan halfway through for even browning.
Troubleshooting: If rolls are browning too quickly, tent with foil. -
Finish and Serve (5 minutes):
Remove pan from oven. Brush with remaining melted butter while still warm.
Cool for 10 minutes before serving—if you can wait that long!
Sensory cue: Rolls should be golden, soft, and steaming when broken open.
Extra tip: If you’re short on time, you can let the dough rise overnight in the fridge—just bring to room temp before shaping. These steps work every time (trust me, I’ve messed up enough batches to know!).
Cooking Tips & Techniques
Let’s face it, baking bread can be hit or miss—especially if you’re new to yeast doughs. Over the years, I’ve learned a few tricks that keep these fluffy dinner rolls foolproof.
- Warm Ingredients: Using warm milk helps activate the yeast faster. Cold milk slows things down (I learned this the hard way on a chilly winter night).
- Don’t Over-Knead: Eight minutes of kneading is usually perfect. If the dough gets tough, the rolls won’t rise as high. When I first started, I’d get impatient and my rolls came out like bricks.
- Perfect Rising Spots: If your kitchen is drafty, pop the covered bowl in the (turned-off) oven with the light on. Consistent warmth makes a huge difference.
- Measuring Flour: Always spoon and level, or use a scale. Too much flour = dry rolls. I used to pack my cups and wondered why my rolls weren’t fluffy.
- Butter Brushing: Don’t skip this step! It keeps the tops soft and adds that signature flavor. Brush before baking for color and after for shine (and extra yum).
- Timing: Multitask by prepping your dinner while the dough rises. I often chop veggies or set the table during the second rise.
- Testing Doneness: Rolls are done when tops are golden and they sound hollow when tapped. If in doubt, use a thermometer—190°F (88°C) in the center is perfect.
- Consistency: Stick to the two rise method. Skipping one makes rolls flat (I tried it once—never again!).
Honestly, my biggest failures came from rushing or guessing at measurements. Slow down, trust the process, and you’ll get bakery-quality results every time. Don’t be afraid to experiment—these rolls are forgiving!
Variations & Adaptations
The beauty of this fluffy dinner rolls recipe is how easy it is to tweak! Here are my favorite ways to mix things up:
- Whole Wheat Dinner Rolls: Swap up to 1 cup (120g) of all-purpose flour for whole wheat. Add 1 extra tablespoon of milk to keep them soft. Result: a slightly nutty flavor and more fiber.
- Garlic Herb Rolls: Mix 1 tbsp chopped fresh herbs (rosemary, thyme, parsley) and 1 minced garlic clove into the dough before shaping. Brush with garlic butter for extra punch.
- Sweet Honey Rolls: Substitute half the sugar with honey. Sprinkle tops with a little extra before baking for a glossy, sweet finish.
Cooking Methods & Dietary Swaps:
- Dairy-Free: Use plant-based milk and vegan butter. I’ve made these for my lactose-intolerant friends, and they loved them!
- Gluten-Free: Use a 1:1 gluten-free flour blend. Texture is slightly different, but still tasty.
- Skillet Rolls: Shape and bake in a cast iron skillet for crisp edges and a rustic look. Perfect for serving right from the pan.
Personal twist: I sometimes add a sprinkle of cinnamon and sugar to half the batch for a sweet breakfast roll. My kids think it’s dessert! If you want to get creative, try stuffing each roll with a cube of cheese or a dab of jam. There’s really no wrong way to make these rolls your own.
Serving & Storage Suggestions
These dinner rolls are best served warm—straight from the oven if you can swing it. The crust is golden, the inside is steamy, and the flavor is unbeatable. I usually arrange them in a basket lined with a pretty napkin for a homey touch (makes for a gorgeous Pinterest photo, too!).
Pair with soups, stews, roast chicken, or just a pat of butter and a drizzle of honey. They’re also perfect for sopping up gravy or making tiny sandwiches with leftover turkey or ham.
Storage:
- Store cooled rolls in an airtight container at room temperature for up to 2 days.
- For longer storage, wrap tightly and freeze for up to 2 months. Thaw overnight at room temp or reheat in a low oven (300°F/150°C) for 10 minutes.
- To keep rolls soft, add a slice of bread to the container (old baker’s trick!).
Flavors actually deepen after a day—so if you somehow have leftovers, you’re in luck. Reheat gently to restore fluffiness. I often toast slices for breakfast (with jam or cheese—so good!).
Nutritional Information & Benefits
Each fluffy dinner roll has about 120 calories, with 3g protein, 2g fat, and 20g carbs. Using whole wheat flour bumps up the fiber, and swapping in plant-based milk makes them dairy-free.
Health Benefits: Whole milk and eggs provide protein and vitamins, while homemade rolls let you control sugar and sodium. These rolls are naturally nut-free and can be made gluten-free with the right flour blend.
If you’re watching carbs, try making smaller rolls or using almond flour for part of the mix. Just be aware of allergens: wheat, dairy, and eggs are the main ones. Personally, I love how these homemade buttery rolls fit into a balanced meal—comforting, satisfying, and made with real ingredients. Moderation is key, but honestly, good bread is always worth a spot on the table.
Conclusion
If you’re searching for an easy homemade buttery rolls recipe that delivers pure comfort and crowd-pleasing results, these fluffy dinner rolls are the answer. They’re simple to make, endlessly adaptable, and guaranteed to bring smiles around your table.
Don’t be afraid to tweak the recipe—swap in whole wheat, add herbs, or go dairy-free. That’s the best part about baking at home: you get rolls that fit your life perfectly. I love this recipe because it brings my family together, fills my house with warmth, and makes every meal just a little more special.
Give these a try, and let me know in the comments how you make them your own. Share your rolls on Pinterest, tag me, or pass the recipe to a friend. Baking bread is all about sharing—and I hope you find as much joy in these rolls as I do. Happy baking!
Frequently Asked Questions
Can I make these fluffy dinner rolls ahead of time?
Yes! You can prepare the dough and let it rise overnight in the fridge. Shape and bake the next day for fresh rolls with minimal fuss.
What’s the best way to reheat dinner rolls without drying them out?
Wrap the rolls in foil and warm in a 300°F (150°C) oven for 10 minutes. You can also microwave for 10-15 seconds, but oven reheating keeps them fluffier.
Can I freeze these homemade buttery rolls?
Absolutely! Cool completely, wrap tightly in plastic or foil, and freeze for up to 2 months. Thaw at room temp and reheat as needed.
Do I have to use a stand mixer to make these rolls?
Nope! You can easily knead by hand. It takes a bit more effort but gives great results. I do it all the time when I want a hands-on experience.
How can I make these rolls gluten-free?
Use a 1:1 gluten-free flour blend in place of all-purpose flour. Keep an eye on dough texture and add a splash of extra milk if needed—gluten-free dough can be a little thirstier!
Pin This Recipe!

Fluffy Dinner Rolls Recipe – Easy Homemade Buttery Rolls for Any Meal
These fluffy dinner rolls are soft, buttery, and easy to make with simple pantry ingredients. Perfect for holidays, potlucks, or any cozy family dinner, they deliver nostalgic comfort and crowd-pleasing flavor every time.
- Prep Time: 28 minutes
- Cook Time: 18-22 minutes
- Total Time: 2 hours
- Yield: 15 rolls 1x
- Category: Bread
- Cuisine: American
Ingredients
- 3 1/2 cups (420g) all-purpose flour
- 1/4 cup (50g) granulated sugar
- 1 packet (2 1/4 tsp or 7g) instant yeast (or active dry yeast)
- 1 tsp salt
- 1 cup (240ml) whole milk, warmed to 110°F
- 1/4 cup (60g) unsalted butter, melted
- 1 large egg, room temperature
- 2 tbsp (28g) unsalted butter, melted (for brushing)
- Optional: Coarse sea salt, for topping
- Optional: Fresh herbs, finely chopped (rosemary or thyme)
Instructions
- Mix the Dough (10 minutes): In a large bowl, whisk together flour, sugar, yeast, and salt. In a separate bowl, whisk warm milk, melted butter, and egg. Pour wet ingredients into dry and stir until a shaggy dough forms. If using a stand mixer, mix with dough hook on low for 2-3 minutes. Add extra milk if dry, or flour if sticky.
- Knead the Dough (8 minutes): Turn dough onto a lightly floured surface and knead for 8 minutes until smooth and elastic. If using a mixer, knead on medium-low. Dough should be soft but not sticky.
- First Rise (45 minutes): Place dough in a greased bowl, cover with a towel or plastic wrap, and let rise in a warm spot until doubled in size, about 45 minutes.
- Shape the Rolls (10 minutes): Punch down dough and divide into 15 equal pieces (about 50g each). Roll each piece into a ball and arrange in a greased 9×13-inch pan, spaced slightly apart.
- Second Rise (30 minutes): Cover pan and let rolls rise until puffed and nearly touching, about 30 minutes.
- Bake the Rolls (18-22 minutes): Preheat oven to 375°F (190°C). Brush tops with 1 tbsp melted butter. Bake for 18-22 minutes until golden brown and fragrant. Rotate pan halfway through for even browning. Tent with foil if browning too quickly.
- Finish and Serve (5 minutes): Remove pan from oven and brush with remaining melted butter. Cool for 10 minutes before serving.
Notes
For dairy-free rolls, use plant-based milk and vegan butter. For gluten-free, use a 1:1 gluten-free flour blend and add a splash of extra milk if needed. Rolls can be made ahead and dough can rise overnight in the fridge. Brush with butter before and after baking for best flavor and texture. Store in an airtight container for up to 2 days or freeze for up to 2 months.
Nutrition
- Serving Size: 1 roll
- Calories: 120
- Sugar: 3
- Sodium: 120
- Fat: 2
- Saturated Fat: 1
- Carbohydrates: 20
- Fiber: 1
- Protein: 3
Keywords: dinner rolls, fluffy rolls, homemade bread, buttery rolls, easy dinner rolls, holiday bread, yeast rolls, pull-apart rolls


