Let me tell you, the moment the rich, velvety scent of melted chocolate mingled with the sweet, crumbly aroma of cake hit my kitchen, I knew I was onto something dangerously good. The first time I crafted these irresistible cake pop drumsticks, it was an accidental masterpiece born from a rainy weekend and a stubborn craving for something both nostalgic and fun. You know the kind of moment where you pause, take a deep breath, and just smile because you realize you’ve created a treat that brings pure joy? Yeah, that kind of magic.
When I was knee-high to a grasshopper, my grandma used to make simple chocolate treats that my cousins and I would sneak like tiny spies. These cake pop drumsticks remind me of those carefree days but with a modern twist that’s both playful and utterly delicious. Honestly, my family couldn’t stop sneaking them off the cooling rack (and I can’t really blame them). They’re perfect for sweetening up potlucks, surprising the kids, or brightening up your Pinterest cookie board with something a little different.
I’ve tested this recipe more times than I care to admit (in the name of research, of course), and it’s now a staple for family gatherings and gifting. If you’re looking for a homemade chocolate treat that feels like a warm hug, you’re going to want to bookmark this one.
Why You’ll Love This Recipe
Honestly, this irresistible cake pop drumsticks recipe ticks all the boxes for a crowd-pleasing homemade treat. Here’s why it’s one of my favorites:
- Quick & Easy: Comes together in under 45 minutes, perfect for busy weeknights or last-minute cravings.
- Simple Ingredients: No fancy grocery trips needed; you likely already have everything in your kitchen.
- Perfect for Parties: Great for birthdays, potlucks, or just a cozy movie night treat.
- Crowd-Pleaser: Always gets rave reviews from kids and adults alike — the chocolate coating is just irresistible.
- Unbelievably Delicious: The combo of moist cake and rich chocolate coating is comfort food at its finest.
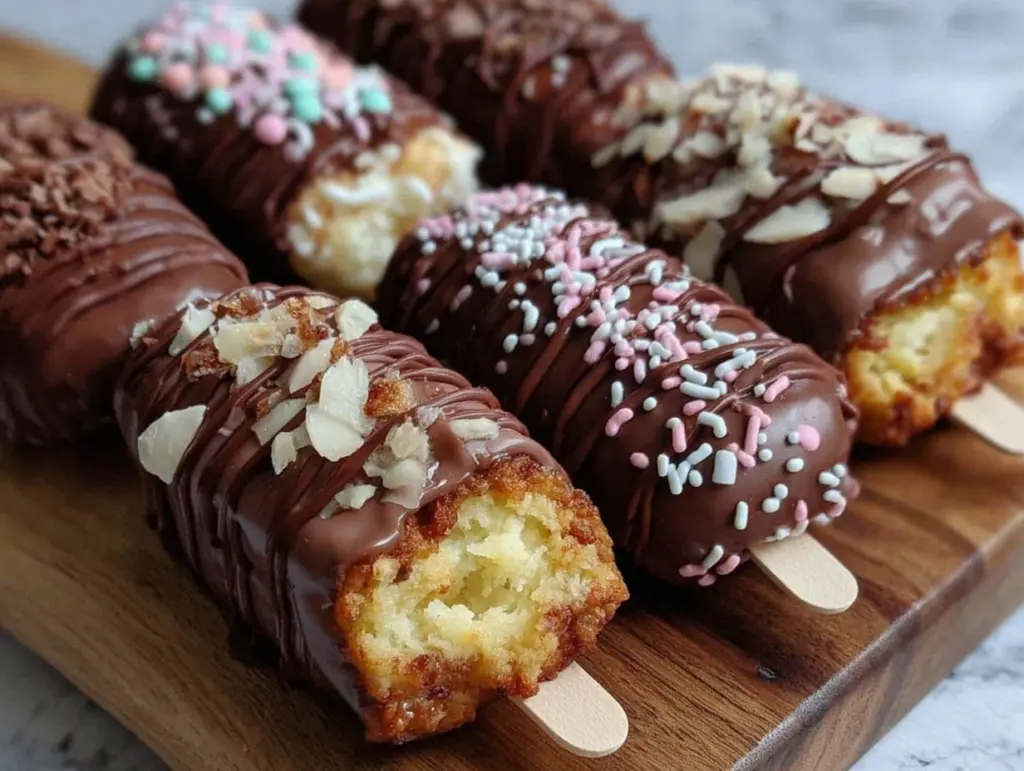
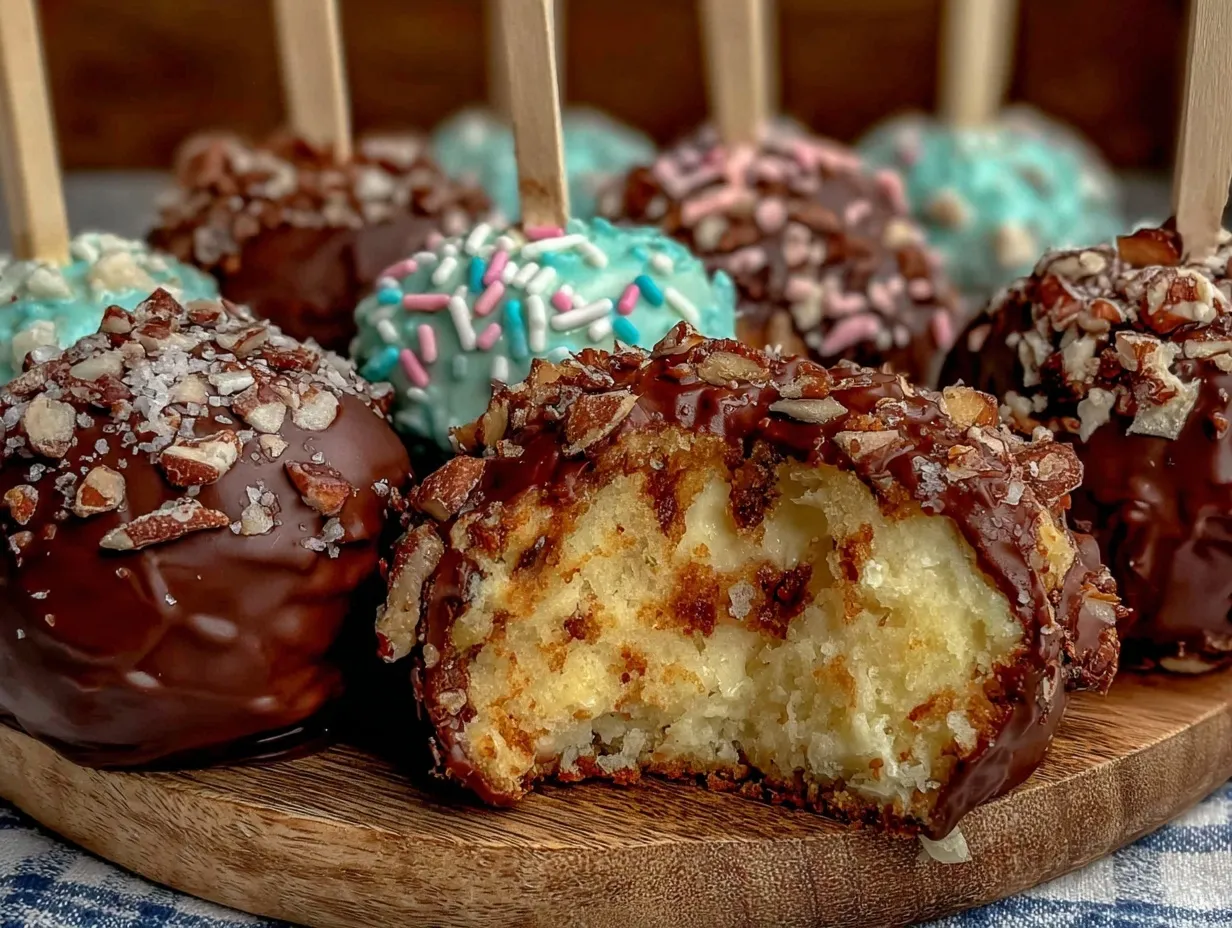
What makes this recipe stand out is the special touch of the rich chocolate coating that hardens with a satisfying snap, giving the cake pops a playful drumstick look and texture. Plus, blending in a hint of vanilla and the right mix of cake crumbs gives these drumsticks a moist, flavorful heart. It’s not just a cake pop — it’s a miniature work of edible art that tastes as good as it looks.
This recipe isn’t just good—it’s the kind that makes you close your eyes after the first bite. It’s perfect for impressing guests without the stress or turning a simple snack into something memorable and fun.
What Ingredients You Will Need
This recipe uses simple, wholesome ingredients to deliver bold flavor and satisfying texture without the fuss. Most are pantry staples, making it easy to whip up these treats anytime.
- For the cake base:
- 1 box of yellow or chocolate cake mix (about 15.25 oz / 432 g) — I prefer Betty Crocker for consistent results
- 3 large eggs, room temperature
- 1/2 cup (120 ml) vegetable oil
- 1 cup (240 ml) water
- For the cake pop mixture:
- 2 cups (about 300 g) cake crumbs, crumbled from baked cake
- 1/2 cup (120 g) cream cheese, softened (adds richness and helps the mixture hold together)
- For the chocolate coating:
- 2 cups (340 g) semi-sweet chocolate chips or chopped chocolate — Ghirardelli works beautifully here
- 2 tbsp (30 g) coconut oil or vegetable shortening (helps the chocolate coat smoothly and harden well)
- For decoration and assembly:
- Wooden drumstick sticks or sturdy lollipop sticks (can use skewers trimmed to size)
- Optional sprinkles, crushed nuts, or edible glitter for garnish
If you want to swap anything out, almond flour or gluten-free cake mix can be used for a gluten-free version. Likewise, dairy-free cream cheese and chocolate chips are perfect for dairy-free diets. The key is to get a moist cake crumb and smooth, glossy coating for that signature drumstick look.
Equipment Needed
- Baking pan (9×13 inch / 23×33 cm) to bake the cake
- Large mixing bowls for batter and cake pop mixture
- Electric mixer or sturdy spoon (electric mixer makes blending cream cheese easier)
- Baking sheet lined with parchment paper for setting drumsticks
- Microwave-safe bowl or double boiler for melting chocolate
- Wooden sticks or lollipop sticks — I find wooden skewers trimmed to size are budget-friendly and sturdy
- Cooling rack (optional, but helpful to let excess chocolate drip off)
If you don’t have a double boiler, a microwave works just fine, but melt chocolate in short bursts to avoid burning. Also, a silicone spatula is great for scraping batter and coating the drumsticks evenly. Maintenance tip: keep your wooden sticks dry before dipping to prevent them from bending or breaking.
Preparation Method
- Bake the cake: Preheat your oven to 350°F (175°C). Prepare the cake batter according to the box instructions—combine 1 box of cake mix, 3 large eggs, 1/2 cup vegetable oil, and 1 cup water in a large bowl. Mix until smooth, about 2-3 minutes. Pour into a greased 9×13 inch (23×33 cm) pan and bake for 30-35 minutes or until a toothpick comes out clean. Let the cake cool completely (about 1 hour) before proceeding.
- Prepare the cake pop mixture: Crumble the cooled cake into fine crumbs in a large bowl. Add 1/2 cup softened cream cheese and mix thoroughly until the mixture holds together when pressed. This step is crucial—if it’s too dry, add a teaspoon of cream cheese; if too wet, add a bit more cake crumbs. The texture should be moist but firm enough to shape.
- Shape the drumsticks: Take about 2 tablespoons (30 g) of the cake mixture and form it into an oval shape about the size of a chicken drumstick. Repeat with the remaining mixture. Place them on a parchment-lined baking sheet.
- Insert sticks: Carefully insert wooden sticks about halfway into each cake pop drumstick. Chill in the refrigerator for at least 30 minutes; this helps them firm up and prevents breakage during dipping.
- Melt the chocolate coating: In a microwave-safe bowl, combine 2 cups semi-sweet chocolate chips and 2 tablespoons coconut oil. Microwave in 30-second intervals, stirring well each time, until smooth and glossy. Alternatively, melt them in a double boiler over simmering water.
- Coat the drumsticks: Remove chilled drumsticks from the fridge. Holding the stick, dip each cake pop drumstick into the melted chocolate, covering completely. Let excess chocolate drip off and place back on parchment paper. If you want, sprinkle with decorations immediately before the chocolate sets.
- Let the chocolate set: Allow drumsticks to cool at room temperature or pop them in the fridge for 15-20 minutes until the coating hardens with a satisfying snap.
- Serve and enjoy: These cake pop drumsticks are best enjoyed the same day but can be stored for later (see storage tips below).
Tip: If the chocolate starts to harden while dipping, gently reheat it to keep it smooth. Also, don’t skip chilling the shaped drumsticks — it’s the secret to clean dips without crumb fallout.
Cooking Tips & Techniques
One trick I learned the hard way is to get the cake crumbs as fine as possible; big chunks don’t hold together well and can cause crumbly drumsticks. Using a mixer or pulsing in a food processor helps, but don’t pulverize into powder.
When melting chocolate, patience is key. Microwave in short bursts and stir often to avoid burning. Adding coconut oil not only thins the chocolate for smooth dipping but also ensures a shiny, crack-resistant finish.
Another handy tip: chill the drumsticks before dipping. I once skipped this step, and my drumsticks fell apart mid-dip — not a pretty sight! Chilling firms the mixture and helps the chocolate coat smoothly.
For the smoothest coating, dip quickly and let the excess drip off naturally; don’t try to spread the chocolate with a utensil or you might damage the shape. Finally, if you want to multitask, bake the cake the day before — it saves time and makes the process less hectic.
Variations & Adaptations
Want to mix things up? Here are a few ways to customize your cake pop drumsticks:
- Flavor twists: Mix cocoa powder into the cake batter for a double chocolate treat or add a teaspoon of cinnamon for a warm spice note.
- Seasonal spin: Swap the cream cheese for pumpkin puree and add pumpkin pie spice for a fall-inspired version. In summer, try mixing in crushed freeze-dried berries for a fruity surprise.
- Dietary adaptations: Use gluten-free cake mix and almond milk for a gluten-free, dairy-free option. Swap cream cheese with coconut cream or dairy-free cream cheese alternatives.
- Alternative coatings: Instead of chocolate, try white chocolate mixed with a drop of food coloring for a fun look or a drizzle of caramel for a rich contrast.
I’ve personally tried adding chopped toasted pecans to the cake pop mixture — it adds a delightful crunch that surprises the palate and complements the smooth chocolate coating beautifully.
Serving & Storage Suggestions
These irresistible cake pop drumsticks are best served chilled or at room temperature. They make a playful centerpiece for dessert tables and pair wonderfully with a cold glass of milk or a warm cup of coffee.
If you’re serving at a party, arrange them standing upright in a foam block or decorative jar filled with sprinkles or sugar for a festive look. They’re also perfect for gifting — wrap in cellophane tied with a ribbon for an adorable homemade treat.
To store, keep them in an airtight container in the refrigerator for up to 5 days. For longer storage, freeze them in a single layer on a baking sheet, then transfer to a freezer-safe container for up to 3 months. When ready, thaw in the fridge overnight and bring to room temperature before serving.
Reheating isn’t necessary, but if you prefer a softer texture, a few seconds in the microwave (10-15 seconds) will do the trick. Just be careful not to melt the chocolate coating completely.
Nutritional Information & Benefits
Each cake pop drumstick contains approximately 180-220 calories, depending on size and coating thickness. They provide a moderate amount of fat and sugar — perfect for an occasional indulgence.
The cream cheese adds a touch of protein and richness, while the chocolate coating offers antioxidants from the cocoa. Choosing dark or semi-sweet chocolate provides a slightly healthier option compared to milk chocolate.
This recipe can be adapted for gluten-free and dairy-free diets, making it accessible to many. Of course, it contains common allergens like eggs, dairy, and gluten unless substitutions are made.
From a wellness perspective, I love how this recipe balances comfort and simplicity, allowing you to enjoy a homemade treat without complicated or artificial ingredients.
Conclusion
If you’re looking for a sweet treat that’s as fun to make as it is to eat, these irresistible cake pop drumsticks with rich chocolate coating are a must-try. They bring together nostalgic flavors, playful presentation, and that perfect chocolate snap that will have everyone asking for seconds.
Feel free to customize this recipe to match your taste buds or dietary needs—whether you add a seasonal twist or swap the chocolate for white, the base idea stays just as delightful. Personally, I treasure this recipe because it reminds me of cozy family moments and simple pleasures.
Give it a shot, and don’t forget to share your take on it! I’d love to hear how you make these treats your own or any fun decorating ideas you come up with. Happy baking and chocolate loving!
FAQs
Can I use homemade cake instead of box mix for the drumsticks?
Absolutely! Any moist cake will work. Just crumble it finely and mix with cream cheese the same way.
How do I prevent the chocolate coating from cracking?
Adding a bit of coconut oil to your melted chocolate helps it stay smooth and flexible, preventing cracks once set.
Can I make these cake pop drumsticks ahead of time?
Yes, you can prepare them a day ahead. Store covered in the fridge to keep them fresh.
What if my cake pop mixture is too crumbly to shape?
Try adding a little more cream cheese, a teaspoon at a time, until it sticks together well but isn’t too wet.
Is there a way to make these nut-free?
Yes, just avoid adding any nuts or nut-based toppings. The base recipe is naturally nut-free if you use nut-free ingredients.
Pin This Recipe!

Irresistible Cake Pop Drumsticks Recipe Easy Homemade Chocolate Treats

These cake pop drumsticks are a quick and easy homemade chocolate treat combining moist cake crumbs with a rich chocolate coating, perfect for parties and family gatherings.
- Prep Time: 15 minutes
- Cook Time: 35 minutes
- Total Time: 1 hour 50 minutes
- Yield: 24 servings 1x
- Category: Dessert
- Cuisine: American
Ingredients
- 1 box of yellow or chocolate cake mix (about 15.25 oz / 432 g)
- 3 large eggs, room temperature
- 1/2 cup (120 ml) vegetable oil
- 1 cup (240 ml) water
- 2 cups (about 300 g) cake crumbs, crumbled from baked cake
- 1/2 cup (120 g) cream cheese, softened
- 2 cups (340 g) semi-sweet chocolate chips or chopped chocolate
- 2 tbsp (30 g) coconut oil or vegetable shortening
- Wooden drumstick sticks or sturdy lollipop sticks
- Optional sprinkles, crushed nuts, or edible glitter for garnish
Instructions
- Preheat your oven to 350°F (175°C). Prepare the cake batter according to the box instructions—combine 1 box of cake mix, 3 large eggs, 1/2 cup vegetable oil, and 1 cup water in a large bowl. Mix until smooth, about 2-3 minutes.
- Pour batter into a greased 9×13 inch (23×33 cm) pan and bake for 30-35 minutes or until a toothpick comes out clean. Let the cake cool completely (about 1 hour).
- Crumble the cooled cake into fine crumbs in a large bowl. Add 1/2 cup softened cream cheese and mix thoroughly until the mixture holds together when pressed. Adjust with more cream cheese or cake crumbs if needed.
- Take about 2 tablespoons (30 g) of the cake mixture and form it into an oval shape about the size of a chicken drumstick. Repeat with the remaining mixture and place on a parchment-lined baking sheet.
- Carefully insert wooden sticks about halfway into each cake pop drumstick. Chill in the refrigerator for at least 30 minutes to firm up.
- In a microwave-safe bowl, combine 2 cups semi-sweet chocolate chips and 2 tablespoons coconut oil. Microwave in 30-second intervals, stirring well each time, until smooth and glossy. Alternatively, melt in a double boiler.
- Remove chilled drumsticks from the fridge. Holding the stick, dip each cake pop drumstick into the melted chocolate, covering completely. Let excess chocolate drip off and place back on parchment paper. Add decorations if desired before chocolate sets.
- Allow drumsticks to cool at room temperature or refrigerate for 15-20 minutes until the coating hardens with a snap.
- Serve and enjoy. Store in an airtight container in the refrigerator for up to 5 days or freeze for up to 3 months.
Notes
Chill the shaped drumsticks before dipping to prevent breakage and ensure a smooth chocolate coating. Melt chocolate in short bursts to avoid burning. Adding coconut oil thins the chocolate and helps it harden with a shiny finish. Use fine cake crumbs for best texture. Store in airtight container refrigerated up to 5 days or freeze up to 3 months.
Nutrition
- Serving Size: 1 cake pop drumstick
- Calories: 200
- Sugar: 16
- Sodium: 150
- Fat: 12
- Saturated Fat: 6
- Carbohydrates: 22
- Fiber: 1
- Protein: 3
Keywords: cake pop drumsticks, chocolate treats, homemade cake pops, easy dessert, party snacks, chocolate coating, cream cheese cake pops


