Introduction
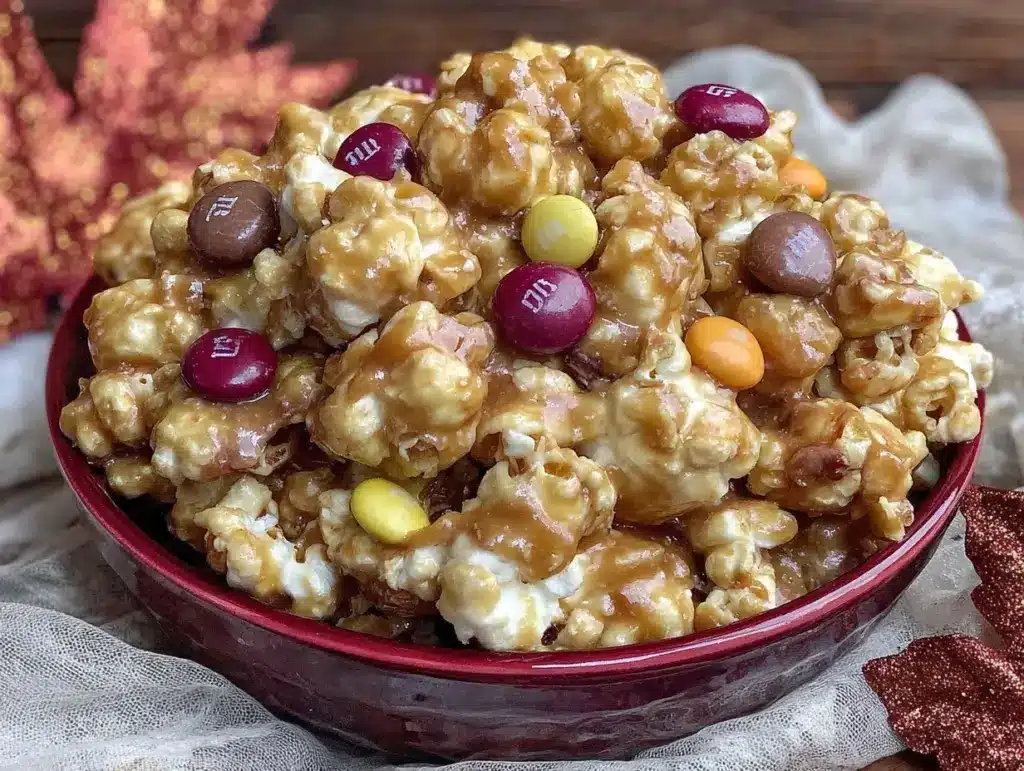
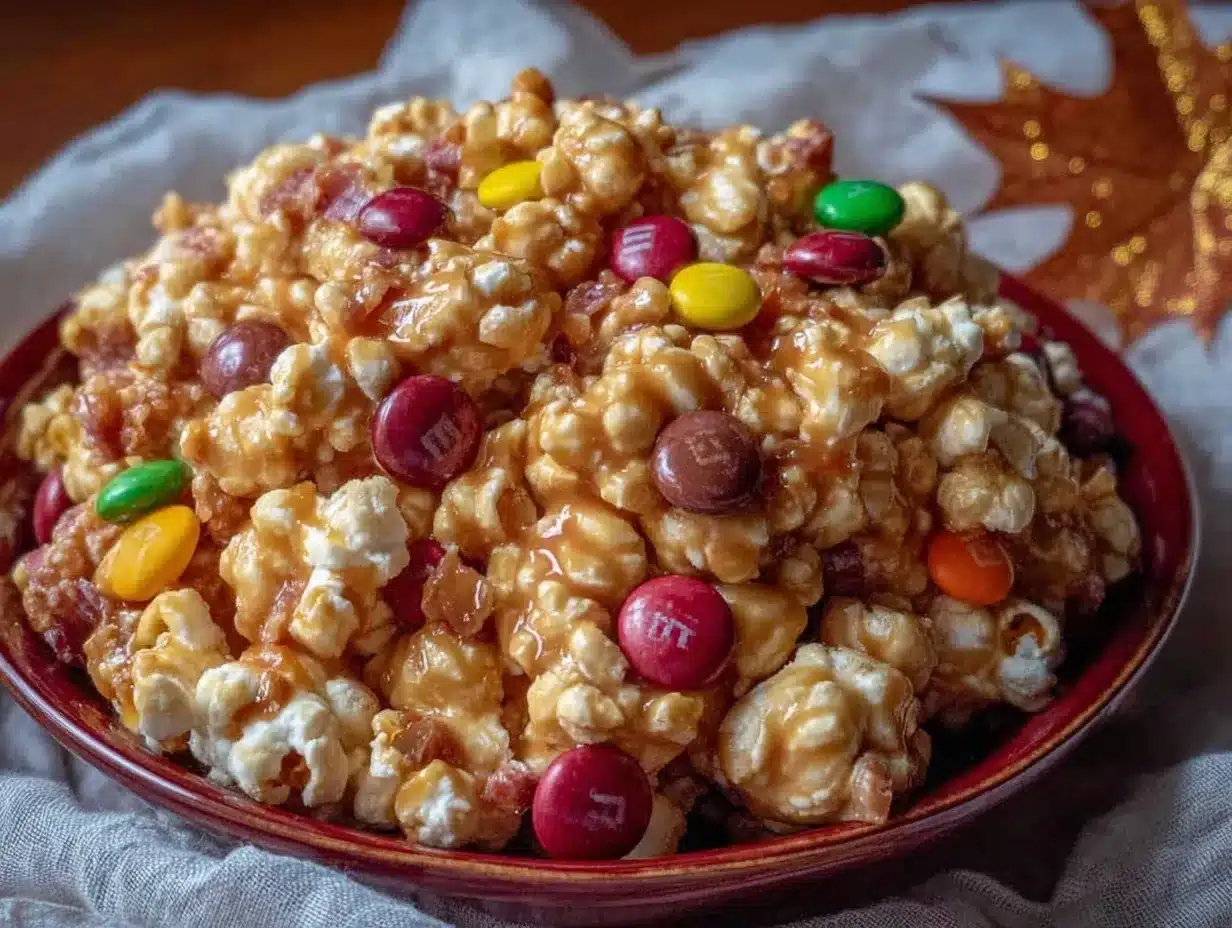
The crunch of sweet, buttery caramel corn mixed with the warm spices of fall is the ultimate seasonal treat. Whether you’re cozying up with a good book, hosting a movie night, or preparing snacks for a fall gathering, harvest caramel corn hits all the right notes. I first stumbled upon this recipe during a chilly autumn evening when the scent of caramel and cinnamon filled the air—it was love at first bite!
What makes this caramel corn irresistible is its perfect balance of sweet and salty, with a hint of spice that feels tailor-made for crisp autumn days. It’s not just a snack; it’s a tradition in my home every fall. The recipe is simple, made with pantry staples, and endlessly customizable. Plus, it’s the kind of treat that makes everyone ask for seconds—and the recipe.
If you’re ready for some serious fall snacking, this irresistible harvest caramel corn recipe is about to become your new favorite tradition. Trust me, you’ll want to make extra because it disappears faster than the autumn leaves!
Why You’ll Love This Recipe
- Perfect Fall Flavor: The warm caramel paired with a touch of cinnamon and nutmeg screams sweater weather.
- Easy to Make: You don’t need any fancy tools or expertise—just a little patience and a love for homemade snacks.
- Versatile: Add nuts, drizzle chocolate, or mix in dried fruit to make it uniquely yours.
- Crowd-Pleaser: Whether for a party, a gift, or a snack stash, this caramel corn wins over everyone.
- Great for Gifting: Package it up in cute bags or jars and you’ve got the perfect fall gift.
What sets this recipe apart is the combination of classic caramel corn with warm seasonal spices. It’s not overly sweet, and the crisp texture makes it nearly impossible to resist. Plus, it’s baked to perfection, ensuring every bite is crunchy and full of flavor. I’ve tested this recipe countless times, tweaking the spice levels and perfecting the caramel consistency—so you can trust it’s a winner.
This is the kind of recipe that brings people together. It’s comforting, easy to share, and has that nostalgic childhood feel. Whether you’re munching on it solo, sharing it with friends, or sneaking a handful before bed, harvest caramel corn is fall in every bite.
What Ingredients You Will Need
This recipe uses simple ingredients to create a truly special snack. You probably have most of what you need right in your pantry!
- Popcorn kernels: About ½ cup (yields approximately 12 cups popped corn).
- Unsalted butter: 1 cup, melted (for rich caramel flavor).
- Brown sugar: 2 cups, packed (light or dark works—dark adds a deeper flavor).
- Light corn syrup: ½ cup (helps achieve that perfect caramel texture).
- Salt: ½ teaspoon (balances the sweetness).
- Baking soda: ½ teaspoon (adds airiness to the caramel, making it lighter).
- Cinnamon: 1 teaspoon (for that warm fall vibe).
- Ground nutmeg: ¼ teaspoon (optional, but highly recommended).
- Vanilla extract: 1 teaspoon (rounds out the flavors beautifully).
- Optional add-ins: Chopped pecans, almonds, or a drizzle of melted chocolate.
Feel free to get creative! Swap brown sugar for coconut sugar for a deeper, caramelized flavor or add pumpkin spice for a festive twist. If you’re gluten-free, double-check that your corn syrup is safe.
Equipment Needed
- Large pot with lid: To pop the kernels. You can use an air popper if you prefer!
- Large mixing bowl: For tossing the popcorn with caramel.
- Medium saucepan: To prepare the caramel sauce.
- Wooden spoon: For stirring the caramel—trust me, a sturdy spoon is key!
- Two baking sheets: Lined with parchment paper for even baking.
If you don’t have an air popper, a stovetop pot works perfectly fine with a bit of oil. As for baking sheets, any flat tray will do—just make sure to line them to prevent sticking.
Preparation Method
- Pop the popcorn: Heat 2 tablespoons of oil in a large pot over medium heat. Add ½ cup of popcorn kernels, cover, and shake the pot occasionally until popping slows. Remove from heat and transfer the popped corn to a large mixing bowl. Discard any unpopped kernels.
- Preheat the oven: Set your oven to 250°F (120°C). Line two large baking sheets with parchment paper.
- Make the caramel sauce: In a medium saucepan, melt 1 cup of unsalted butter over medium heat. Stir in 2 cups of packed brown sugar, ½ cup light corn syrup, and ½ teaspoon salt. Bring the mixture to a boil and let it cook for 4-5 minutes, stirring constantly.
- Mix in spices and baking soda: Remove the saucepan from heat and quickly stir in ½ teaspoon baking soda, 1 teaspoon cinnamon, ¼ teaspoon nutmeg, and 1 teaspoon vanilla extract. The mixture will foam up—that’s normal!
- Toss with popcorn: Gradually pour the caramel mixture over the popcorn, tossing gently to coat as evenly as possible. Work quickly to ensure the caramel doesn’t harden before spreading.
- Bake the caramel corn: Spread the coated popcorn onto the prepared baking sheets in an even layer. Bake for 45 minutes, stirring every 15 minutes to ensure even coating.
- Cool and enjoy: Remove the trays from the oven and let the caramel corn cool completely. Break apart any large clumps and serve!
Pro tip: If your caramel starts to harden while you’re tossing, warm it slightly on the stove to loosen it up. And don’t skip stirring during the baking process—it’s key for that perfect crispy texture!
Cooking Tips & Techniques
- Use fresh popcorn: Stale kernels may not pop as well, leaving you with fewer fluffy pieces.
- Don’t rush the caramel: Letting the sauce boil for at least 4 minutes ensures it reaches the right consistency.
- Keep stirring: Constant stirring while baking prevents the caramel from pooling and ensures even coating.
- Watch the spices: Adjust the cinnamon and nutmeg to your taste, but don’t overdo it—the caramel should remain the star.
- Store properly: Let the caramel corn cool completely before storing it in an airtight container to keep it crispy.
From my experience, patience is key when making caramel. Rushing through the steps or skipping stirring can lead to uneven results. Take your time—it’s worth it!
Variations & Adaptations
- Nutty twist: Add 1 cup of chopped pecans, almonds, or walnuts to the caramel corn for extra crunch.
- Chocolate drizzle: Once cooled, drizzle melted milk or dark chocolate over the caramel corn for a decadent touch.
- Spice it up: Replace cinnamon and nutmeg with pumpkin spice for a seasonal flavor explosion.
- Healthier version: Use coconut sugar instead of brown sugar and swap corn syrup for honey.
- Allergy-friendly: Substitute butter with vegan butter and ensure other ingredients are dairy-free for a vegan version.
I’ve tried swapping out the nutmeg for cardamom once, and let me tell you—it was a game changer! Feel free to experiment with your favorite flavors to make this recipe your own.
Serving & Storage Suggestions
Serve this caramel corn at room temperature in a big bowl for snacking or fill mason jars for a charming presentation at fall gatherings. Pair it with apple cider, hot chocolate, or even a pumpkin spice latte for the ultimate autumn experience.
To store, let the caramel corn cool completely and transfer it to an airtight container. It’ll stay fresh and crispy for up to a week. For longer storage, seal it in a freezer-safe bag and freeze for up to a month. To enjoy, simply let it come to room temperature or warm it slightly in the oven.
Pro tip: The flavors deepen over time, making it even better after a day or two. But let’s be honest—it rarely lasts that long!
Nutritional Information & Benefits
Here’s a breakdown of the nutritional value per one cup of caramel corn (approximate):
- Calories: 150
- Fat: 6g
- Sugar: 15g
- Carbohydrates: 22g
- Protein: 1g
Popcorn itself is naturally low in calories and high in fiber, making it a great base for snacking. While caramel adds sweetness, the use of brown sugar and spices provides a comforting, homemade touch free from artificial flavors. Nuts and dark chocolate add a dose of healthy fats and antioxidants if you choose to include them.
For those avoiding gluten, this recipe is naturally gluten-free—just double-check your corn syrup and other ingredients.
Conclusion
This irresistible harvest caramel corn recipe is the perfect way to celebrate fall. It’s delicious, easy, and packed with cozy flavors that will have everyone coming back for more. Whether you’re enjoying it as a snack, a party treat, or a thoughtful gift, it’s bound to be a hit.
If you make this recipe, let me know how it turns out in the comments below. Do you have a unique twist on caramel corn? I’d love to hear your ideas! Let’s get snacking!
FAQs
1. Can I use store-bought popcorn instead of popping my own?
Yes, you can use store-bought plain popcorn, but make sure it’s unsalted and unbuttered for the best results.
2. How do I know when the caramel sauce is ready?
The caramel is ready when it reaches a smooth, thick consistency and boils for 4-5 minutes. It should coat the back of a spoon easily.
3. Can I make this recipe vegan?
Absolutely! Use vegan butter and ensure your sugar and corn syrup are vegan-friendly.
4. What’s the best way to store leftover caramel corn?
Keep it in an airtight container at room temperature for up to a week or freeze it for up to a month.
5. Can I double this recipe?
Yes, you can easily double the recipe—just make sure to use multiple baking sheets to ensure even cooking.
Pin This Recipe!
Irresistible Harvest Caramel Corn Recipe for Perfect Fall Snacking

This irresistible harvest caramel corn recipe combines sweet, buttery caramel with warm fall spices for the ultimate seasonal treat. Perfect for snacking, gifting, or gatherings!
- Prep Time: 15 minutes
- Cook Time: 45 minutes
- Total Time: 1 hour
- Yield: 12 cups 1x
- Category: Snack
- Cuisine: American
Ingredients
- ½ cup popcorn kernels
- 1 cup unsalted butter, melted
- 2 cups brown sugar, packed
- ½ cup light corn syrup
- ½ teaspoon salt
- ½ teaspoon baking soda
- 1 teaspoon cinnamon
- ¼ teaspoon ground nutmeg
- 1 teaspoon vanilla extract
- Optional add-ins: chopped pecans, almonds, or a drizzle of melted chocolate
Instructions
- Heat 2 tablespoons of oil in a large pot over medium heat. Add ½ cup of popcorn kernels, cover, and shake the pot occasionally until popping slows. Remove from heat and transfer the popped corn to a large mixing bowl. Discard any unpopped kernels.
- Preheat the oven to 250°F (120°C). Line two large baking sheets with parchment paper.
- In a medium saucepan, melt 1 cup of unsalted butter over medium heat. Stir in 2 cups of packed brown sugar, ½ cup light corn syrup, and ½ teaspoon salt. Bring the mixture to a boil and let it cook for 4-5 minutes, stirring constantly.
- Remove the saucepan from heat and quickly stir in ½ teaspoon baking soda, 1 teaspoon cinnamon, ¼ teaspoon nutmeg, and 1 teaspoon vanilla extract. The mixture will foam up—that’s normal!
- Gradually pour the caramel mixture over the popcorn, tossing gently to coat as evenly as possible. Work quickly to ensure the caramel doesn’t harden before spreading.
- Spread the coated popcorn onto the prepared baking sheets in an even layer. Bake for 45 minutes, stirring every 15 minutes to ensure even coating.
- Remove the trays from the oven and let the caramel corn cool completely. Break apart any large clumps and serve.
Notes
[‘Use fresh popcorn for better results.’, ‘Let the caramel sauce boil for at least 4 minutes to reach the right consistency.’, ‘Stir the caramel corn every 15 minutes while baking to ensure even coating.’, ‘Let the caramel corn cool completely before storing to keep it crispy.’, ‘Feel free to customize with nuts, chocolate drizzle, or spices like pumpkin spice.’]
Nutrition
- Serving Size: 1 cup
- Calories: 150
- Sugar: 15
- Fat: 6
- Carbohydrates: 22
- Protein: 1
Keywords: caramel corn, fall snack, popcorn recipe, autumn treat, sweet and salty snack