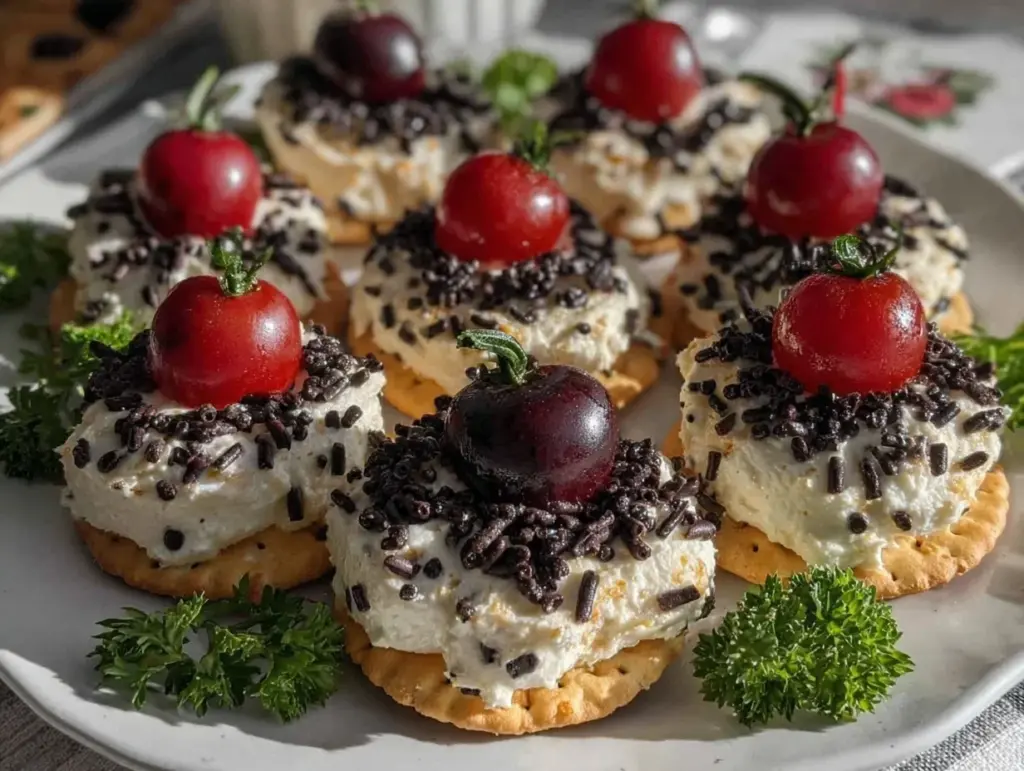
Picture this: the kitchen table is scattered with bright, crunchy crackers, juicy grape tomatoes, and little dollops of creamy cheese. The sunlight’s pouring in, and the giggles of kids fill the air as eager hands reach for their own whimsical love bug ladybug crackers. Honestly, the first time I whipped up these love bug ladybug crackers for my daughter’s birthday, the room was instantly buzzing (pun intended) with excitement. The cheery reds and playful dots had everyone – from toddlers to grandparents – smiling ear to ear.
It all started years ago when I was knee-high to a grasshopper, helping my grandma create edible animals for our family picnics. Fast forward to a rainy Saturday, I found myself trying to recreate that same magic for my own kids. The moment I placed those cute crackers on the platter, the kind where you pause, take a deep breath, and just smile because you know you’re onto something truly special, I was instantly hooked. There’s something about food that looks as fun as it tastes – it’s like pure, nostalgic comfort wrapped in a crunchy shell.
Let’s face it, snacks at kids’ parties can be hit or miss. But these love bug ladybug crackers? My family couldn’t stop sneaking them off the tray (and I couldn’t really blame them). They’re dangerously easy for little helpers to assemble, making them perfect for rainy day crafts or last-minute party treats. Honestly, I wish I’d stumbled upon this idea years ago. Now, it’s a staple for family gatherings, gifting, and just brightening up your Pinterest snack board. After testing these crackers every which way (in the name of research, of course), I can say with confidence – this recipe feels like a warm hug. You’re going to want to bookmark this one for every occasion!
Why You’ll Love This Recipe
If you’re searching for a snack that’s equal parts adorable and delicious, these love bug ladybug crackers are your new go-to. As a food blogger and mom who’s tested dozens of party recipes, I can promise – this is one of those rare finds that checks every box. Here’s why you’ll love them:
- Quick & Easy: Comes together in under 20 minutes, so you can whip up a batch even when you’re short on time.
- Simple Ingredients: No tricky grocery lists here; you probably have everything right in your pantry or fridge.
- Perfect for Parties: Ideal for kids’ parties, classroom snacks, baby showers, or just a playful afternoon treat.
- Crowd-Pleaser: Both kids and adults rave about how cute (and tasty) these are. They disappear fast!
- Unbelievably Delicious: Crisp crackers, creamy cheese, and fresh tomato come together for a snack that’s surprisingly satisfying.
What makes these whimsical love bug ladybug crackers stand out? Unlike the usual party snacks, these aren’t just cute – they taste genuinely good. The creamy cheese base is smooth and rich, the tomatoes add a burst of tangy sweetness, and the olives give a savory finish. Plus, the assembly is a breeze (even for little hands), and you can customize them for allergies or dietary needs. This recipe isn’t just another Pinterest pretty – it’s been through the ringer in my kitchen, with tweaks and taste tests galore. It’s comfort food made playful, turning snack time into a moment of joy and creativity.
After the first bite, you’ll know: these crackers aren’t just a snack, they’re a little party on a plate. Whether you want to impress guests without the stress or just add a dose of whimsy to your next family movie night, these crackers deliver every time. Trust me, you’ll find yourself making them for all sorts of occasions, and each time, they’ll bring out smiles and happy memories.
What Ingredients You Will Need
This recipe uses simple, wholesome ingredients to create bold flavor and a whimsical look, without any fancy fuss. Most of these are pantry staples, and the fresh produce can be swapped for what’s in season or on hand. Here’s what you’ll need for a batch of love bug ladybug crackers:
- For the Base:
- Round crackers (like Ritz or your favorite gluten-free variety)
- Cream cheese, softened (can use regular, whipped, or dairy-free for allergies)
- Optional: Hummus or goat cheese (for flavor twists)
- For the Ladybug Body:
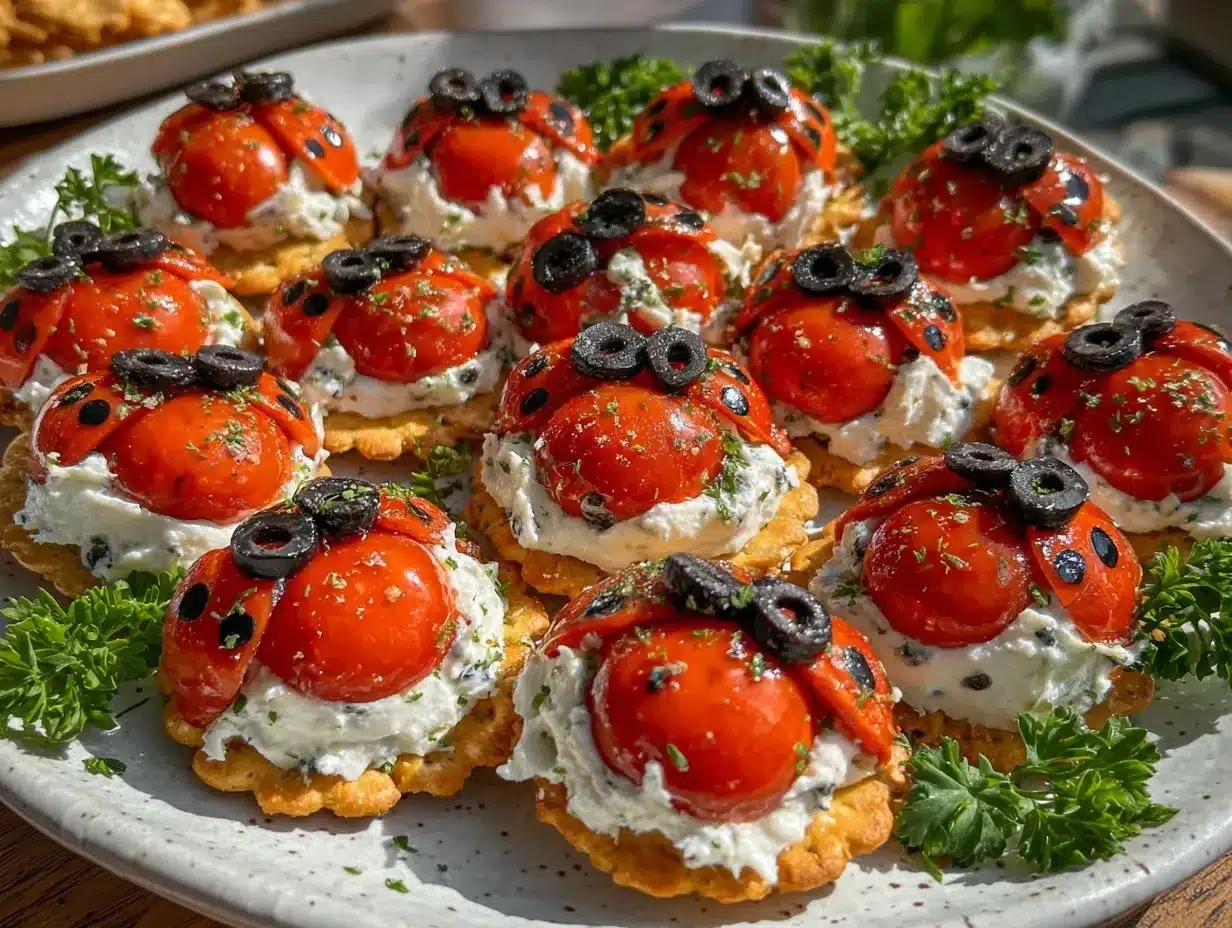
- Grape tomatoes, halved
- Cherry tomatoes work well too, especially for larger crackers
- For the Ladybug Head & Dots:
- Black olives, sliced (pitted Kalamata or regular black olives)
- Mini chocolate chips or black sesame seeds (for extra dot detail – optional)
- For Decoration:
- Fresh chives (for antennae – snip into short pieces)
- Parsley leaves or baby spinach (for a grassy background – optional)
Ingredient Tips: I personally love using whipped cream cheese for a lighter, spreadable base. If you need a nut-free option, hummus works great and adds a bit of earthiness. For gluten-free crackers, I recommend Simple Mills or Schar brands for best texture. Look for firm grape tomatoes so they hold their shape and color well. If you want to get creative, swap out the olives for blueberries or use edible eyes for extra whimsy.
Seasonal swaps? Absolutely! When summer hits, try cherry tomatoes fresh from the garden. In winter, roasted red pepper strips can be a fun twist. And for parties with allergy needs, dairy-free cream cheese or vegan crackers make these love bug ladybug crackers a safe option for everyone. No specialized or hard-to-find ingredients—just simple, tasty components that come together in a snap.
Equipment Needed
You don’t need a fancy kitchen to make these love bug ladybug crackers, which is half the fun. Here’s what I reach for:
- Small paring knife (for halving tomatoes and olives)
- Butter knife or mini spatula (for spreading cream cheese)
- Cutting board (preferably non-slip for quick prep)
- Small kitchen scissors (for snipping chives)
- Serving platter or tray (for creative presentation)
If you don’t have a mini spatula, honestly, a regular butter knife works just fine. For the chives, sharp kitchen scissors are easier than a knife and safer for little helpers. I’ve tried making these with both plastic and wooden cutting boards—wooden boards just feel homey and add to the experience. You can use paper plates for serving at parties, but a tiered platter really shows off those little bugs!
Maintenance tip: If you use a paring knife for both tomatoes and olives, rinse it between uses so the flavors don’t mix. For budget-friendly options, dollar store tools work just as well for this recipe. The only “special” equipment is the kitchen scissors, but regular ones (clean, of course) will work in a pinch. No need to break the bank or buy anything new—just grab what you’ve got and get assembling!
Preparation Method
- Gather Ingredients: Set out all your crackers (about 24 for a standard party tray), cream cheese (about 8 oz / 225 g), grape tomatoes, black olives, chives, and any optional decorations.
- Prep the Base: Using a butter knife or mini spatula, spread a generous layer of cream cheese (about 1 tsp / 5 g per cracker) onto each cracker. Make sure to go all the way to the edges for extra “stick” (kids love helping with this part).
- Slice the Tomatoes: Carefully slice each grape tomato in half lengthwise. You’ll need one half per cracker, so count out 24 halves. Tip: Use a sharp paring knife and gentle pressure to avoid squishing.
- Make the Ladybug Head: Slice black olives into small rounds (about ¼ inch thick / 6 mm). Place one round at the edge of each cracker as the “head.” If using large olives, cut them into quarters for a smaller head.
- Create the Body: Place one tomato half, cut side down, onto the cracker, slightly overlapping the olive head. Press gently so it “sticks” into the cream cheese.
- Add the Dots: Cut tiny bits of black olive or use mini chocolate chips/black sesame seeds for ladybug spots. Press 3–5 dots into the tomato half. If using chocolate chips, face the pointy end down for a smoother look.
- Attach the Antennae: Snip chives into ½-inch (12 mm) pieces. Push two pieces gently into the cream cheese just above the olive head. If the chives are too thick, split them lengthwise.
- Decorate the Platter: Arrange parsley leaves or baby spinach around the crackers for a “grassy” look. Optional, but it makes your love bug ladybug crackers pop and gives extra snack options.
- Troubleshooting: If crackers crack while spreading, use a gentler touch or let the cream cheese warm slightly. Tomatoes rolling off? Press them gently into the cheese and check for flatness before placing.
- Final Touches: Chill the finished crackers for 10–15 minutes before serving to help set the cream cheese and keep toppings in place. If prepping ahead, cover lightly with plastic wrap and store in the fridge.
Sensory cues: The cream cheese should be creamy and spreadable, the tomatoes bright and shiny, and the olives glossy. You’ll know you’ve nailed it when each cracker looks like a tiny, cheerful ladybug ready to party. For efficiency, line up crackers in assembly-line style and let little helpers add heads, bodies, and dots. Honestly, the more hands, the more fun!
Cooking Tips & Techniques
Making whimsical love bug ladybug crackers isn’t rocket science, but a few pro tips can make the process smoother and the results even cuter. Here’s what I’ve learned:
- Keep Cream Cheese Soft: Let cream cheese sit at room temp for 10 minutes before spreading. Cold cheese tears crackers, and nobody wants that mess.
- Use Firm Tomatoes: Mushy tomatoes slide around. Pick grape or cherry tomatoes that are glossy and firm to the touch for best results.
- Antennas Can Be Tricky: Chives break easily if too long. I’ve snapped plenty over the years, so now I use shorter pieces and insert them gently.
- Don’t Overload Dots: Too many dots can make the tomato soggy. Three to five is plenty for a classic ladybug look.
- Work Assembly-Line Style: Lay out all crackers first, spread cheese, then add toppings. Multitasking this way keeps things organized and fun—especially with kids helping.
- Common Mistake: Skipping the chill time. Warm cheese means sliding tomatoes and falling heads. Always chill for at least 10 minutes before serving.
- Personal Fail: Once, I used flavored cream cheese (herb & garlic). Tasted great but the green flecks made my ladybugs look a bit… sickly. Stick to plain or whipped for best visual effect.
Consistency tip: Make sure each cracker has a similar amount of cheese and toppings. This isn’t just for looks – it means every bite is balanced. For big parties, prep ingredients in advance and assemble just before serving. Trust me, a little extra prep makes party day way less stressful!
Variations & Adaptations
One of the best things about these love bug ladybug crackers is how easy they are to adapt. Whether you’re catering to allergies, picky eaters, or just want a seasonal spin, here are some tried-and-true variations:
- Gluten-Free: Swap regular crackers for your favorite gluten-free brand (Simple Mills is my go-to). The taste is spot-on, and no one can tell the difference.
- Vegan/Dairy-Free: Use dairy-free cream cheese (like Kite Hill or Tofutti) and vegan crackers. For the head, try black beans or blueberries instead of olives.
- Low-Carb: Try cucumber slices or mini bell pepper rounds as the base instead of crackers. They’re crisp and add a fresh bite.
- Flavor Twists: Swap cream cheese for hummus, goat cheese, or even mashed avocado. Each brings a new flavor profile and color.
- Seasonal: In summer, use fresh garden tomatoes and herbs. In winter, roasted red pepper strips for the body and capers for dots.
For allergies, always double-check cracker and cheese labels. For nut allergies, avoid almond-based crackers or spreads. I’ve made a version with mashed peas and green olives for a “green bug” theme—my son thought they were hilarious! For a dessert version, use graham crackers, strawberry slices, and chocolate chips for a sweet treat.
Let your imagination run wild! The recipe is forgiving, playful, and perfect for customizing to fit your party theme, dietary needs, or just what’s in your fridge.
Serving & Storage Suggestions
Serve these love bug ladybug crackers chilled, straight from the fridge for the best texture and visual appeal. The cream cheese stays firm, and the toppings don’t slip around. Arrange them on a white platter or tiered tray for a Pinterest-worthy presentation – a sprinkle of parsley or spinach underneath makes them pop.
Pair with fresh fruit skewers, veggie sticks, and lemonade for a complete kids’ party spread. For grown-ups, add a cheese board or charcuterie for a whimsical touch. These crackers also work well as a snack for school lunch boxes (just pack them in a snug container to keep everything in place).
To store, cover loosely with plastic wrap and refrigerate for up to 24 hours. If you’re prepping ahead, assemble the crackers, but add the chive antennas just before serving for best crunch. Freezing isn’t recommended – fresh is best! For reheating (if needed), simply let them sit at room temperature for 10–15 minutes. The flavors develop a bit as they chill, making them even tastier after a short rest.
Honestly, they look just as cute the next day, and the tomatoes keep their shine. If you have leftovers, break them up into salad toppings – nothing goes to waste!
Nutritional Information & Benefits
Each love bug ladybug cracker has about 50–60 calories, depending on the base and toppings. They’re a fun way to sneak in veggies (tomatoes, olives, and chives) while keeping snack time light. Cream cheese provides a dose of protein and calcium, especially if you use the whipped or Greek yogurt-based varieties.
Low in added sugar and customizable for gluten-free, dairy-free, and vegetarian diets. Watch for potential allergens: wheat (crackers), dairy (cream cheese), and olives (sometimes processed with oil). Choose allergy-friendly alternatives when needed.
From a wellness perspective, I love that these crackers offer real ingredients and colorful produce. They fit nicely into a balanced party menu and encourage kids to eat their veggies in a playful way. Snack time never felt so wholesome!
Conclusion
If you’re looking for a recipe that combines fun, flavor, and a healthy dose of creativity, these whimsical love bug ladybug crackers are it. They’re easy to make, so customizable, and guaranteed to be the star of any kids’ party or playful family gathering. Honestly, every time I make them, I’m reminded how much joy a little snack can bring.
Feel free to swap ingredients, try different flavors, and let your kids get creative with assembly. It’s the kind of recipe that grows with your family’s tastes and traditions. I love these crackers because they’re more than just food—they’re a little moment of happiness on a plate.
If you try this recipe, let me know how it went! Share your own variations in the comments, pin it for later, or tag your photos to inspire more snack-time creativity. Here’s to snacks that make you smile!
Frequently Asked Questions
How far in advance can I make love bug ladybug crackers?
You can assemble them up to 24 hours ahead. Just keep them refrigerated and add the chive antennas right before serving for best freshness.
Can I make these crackers gluten-free?
Absolutely! Use your favorite gluten-free round crackers. Simple Mills or Schar brands work well and taste great.
What can I use instead of cream cheese?
Try hummus, goat cheese, mashed avocado, or even dairy-free cream cheese for allergy-friendly options. Each brings a new flavor and texture.
Are these safe for nut allergies?
Yes, as long as you use nut-free crackers and spreads. Double-check ingredient labels to be sure.
Can kids help make these crackers?
Definitely! Kids love assembling the ladybugs – spreading cheese, placing tomatoes, and adding dots. It’s a fun, hands-on kitchen activity for all ages.
Pin This Recipe!
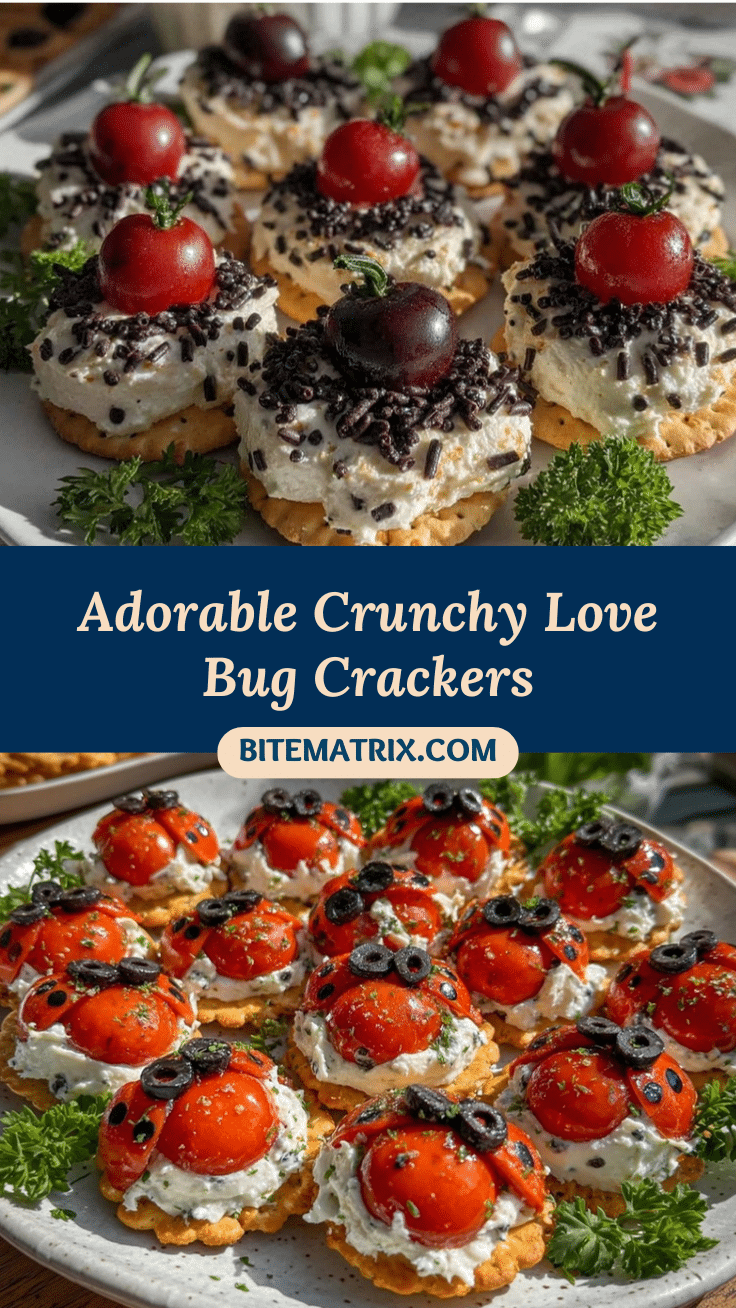
Love Bug Ladybug Crackers Recipe for Kids Parties

These whimsical love bug ladybug crackers are an adorable, easy-to-make snack perfect for kids’ parties, family gatherings, or playful afternoons. Crisp crackers, creamy cheese, and fresh veggies come together for a fun, hands-on treat that delights both kids and adults.
- Prep Time: 15 minutes
- Cook Time: 0 minutes
- Total Time: 15 minutes
- Yield: 24 crackers 1x
- Category: Snack
- Cuisine: American
Ingredients
- 24 round crackers (such as Ritz or gluten-free variety)
- 8 oz cream cheese, softened (regular, whipped, or dairy-free)
- 12 grape tomatoes, halved (or cherry tomatoes for larger crackers)
- 12 black olives, sliced (pitted Kalamata or regular black olives)
- Mini chocolate chips or black sesame seeds (optional, for dot detail)
- Fresh chives, snipped into short pieces (for antennae)
- Parsley leaves or baby spinach (optional, for decoration)
- Optional: hummus or goat cheese (for flavor twists)
Instructions
- Set out all ingredients: crackers, cream cheese, grape tomatoes, black olives, chives, and optional decorations.
- Spread about 1 teaspoon of cream cheese onto each cracker, covering to the edges.
- Slice grape tomatoes in half lengthwise; use one half per cracker.
- Slice black olives into small rounds (about 1/4 inch thick); place one round at the edge of each cracker as the head.
- Place one tomato half, cut side down, onto the cracker, slightly overlapping the olive head. Press gently to stick.
- Add 3–5 dots to each tomato half using tiny bits of black olive, mini chocolate chips, or black sesame seeds.
- Snip chives into 1/2-inch pieces and gently insert two pieces above the olive head for antennae.
- Arrange parsley leaves or baby spinach around the crackers on a serving platter for decoration.
- Chill the finished crackers for 10–15 minutes before serving to help set the cream cheese and keep toppings in place.
- If prepping ahead, cover lightly with plastic wrap and store in the fridge. Add chive antennas just before serving.
Notes
Let cream cheese soften before spreading to avoid cracking crackers. Use firm tomatoes for best results. Chill crackers before serving to keep toppings in place. Kids can help with assembly for a fun activity. For gluten-free or dairy-free versions, use appropriate crackers and spreads. Add chive antennas just before serving for best crunch.
Nutrition
- Serving Size: 1 cracker
- Calories: 55
- Sugar: 1
- Sodium: 90
- Fat: 3
- Saturated Fat: 1.5
- Carbohydrates: 6
- Fiber: 0.5
- Protein: 1.5
Keywords: ladybug crackers, kids party snacks, easy snack ideas, whimsical food, edible crafts, cream cheese crackers, gluten-free snack, vegetarian snack, party appetizers


