“I never thought a simple mishap in the kitchen could turn into a graduation party sensation,” my friend Lisa laughed the other day, recalling how these Perfect Brownie Cookie Graduation Cap Treats came to be. It was the Saturday before her son’s graduation, and she was racing against the clock. Originally aiming for classic brownies, she accidentally mixed in cookie dough instead of the usual batter. Honestly, I thought it was a disaster waiting to happen. But when the treats came out of the oven, they looked like tiny graduation caps—unexpectedly charming and delicious.
What really stuck with me was how the smell of chocolate and vanilla filled the room, drawing neighbors and family alike into the kitchen. Maybe you’ve been there—scrambling to find something festive and fuss-free for a celebration. These treats aren’t just quick fixes; they carry that nostalgic warmth of homemade sweets, but with a playful twist that makes them perfect for marking big milestones. I still chuckle thinking about how Lisa’s rushed, slightly chaotic baking session led to this fun tradition in our friend group.
So, if you’re looking for a crowd-pleasing, easy-to-make dessert that captures the spirit of graduation without the stress, these brownie cookie graduation cap treats might just be your new go-to. Let me tell you, they’ve saved more than one last-minute party for me—and they might just do the same for you.
Why You’ll Love This Recipe
- Quick & Easy: Comes together in under 45 minutes, perfect for busy celebration prep or last-minute party ideas.
- Simple Ingredients: No fancy or hard-to-find items needed; the pantry staples you already have will do the trick.
- Perfect for Graduations: Fun, thematic treat that’s great for school parties, family gatherings, or any milestone event.
- Crowd-Pleaser: Kids and adults alike love the chewy brownie-cookie combo topped with a little cap decoration.
- Unbelievably Delicious: The rich chocolate flavor with a subtle crisp edge makes these treats irresistible.
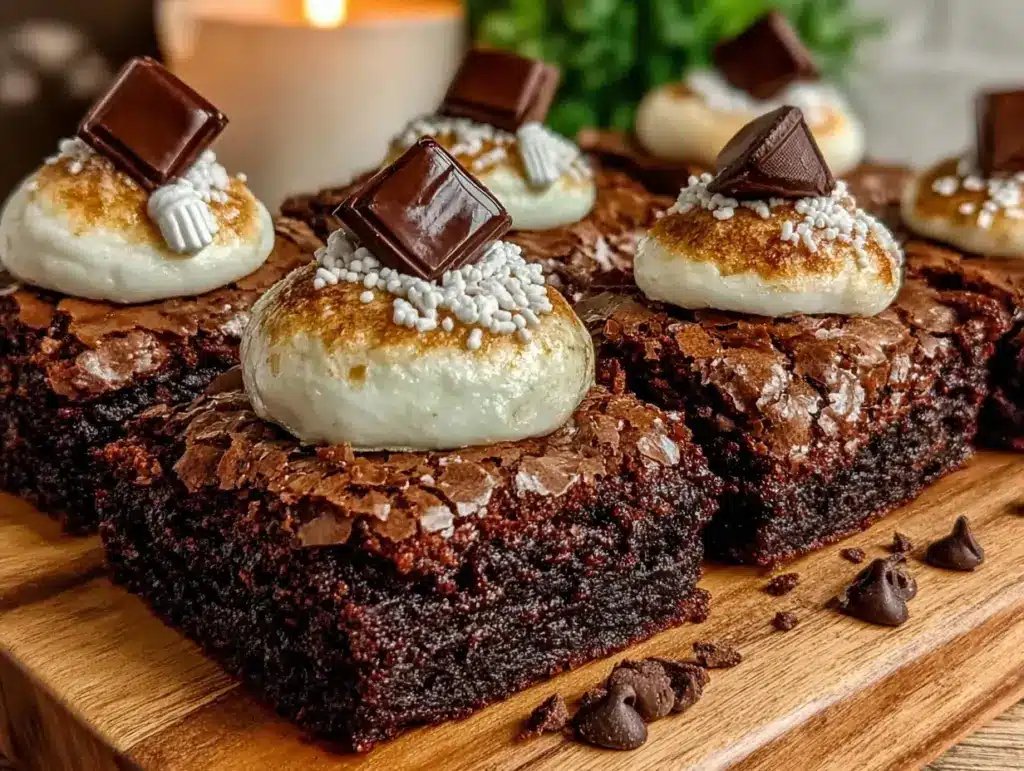
This isn’t just another brownie or cookie recipe. The magic lies in the texture—a perfect balance of fudgy and chewy that’s hard to find elsewhere. Plus, the little “graduation caps” made from simple square cookies and a chocolate disk add that whimsical touch without much effort. I tested this several times in my kitchen, tweaking baking times and decorations until it just felt right—like a sweet nod to accomplishment and fun all in one bite.
Honestly, after that first bite, I caught myself closing my eyes, savoring the gooey chocolate texture while knowing this was a recipe I’d keep coming back to—not just for graduations, but whenever I want to surprise guests with something playful yet comforting.
What Ingredients You Will Need
This recipe uses straightforward ingredients that come together to create a rich, fudgy brownie base with a crispy cookie topping shaped into cute graduation caps. Most of these are pantry staples, making it super easy to whip up when the celebration mood strikes.
- For the Brownie Cookie Base:
- Unsalted butter, 1/2 cup (115g), melted (adds richness and moisture)
- Granulated sugar, 1 cup (200g)
- Large eggs, 2, room temperature
- Vanilla extract, 1 teaspoon
- All-purpose flour, 3/4 cup (95g)
- Unsweetened cocoa powder, 1/3 cup (35g) (use Dutch-processed for deeper flavor)
- Salt, 1/4 teaspoon
- Baking powder, 1/4 teaspoon (for slight lift)
- For the Graduation Cap Topping:
- Chocolate wafer cookies or square vanilla wafer cookies, about 24 pieces (look for sturdy ones that hold shape well)
- Mini chocolate disks or candy melts, 24 pieces (you can substitute with small chocolate chips melted and hardened)
- Black decorating icing or edible marker (optional, for the tassel detail)
For best results, I like using a trusted brand like Ghirardelli cocoa powder—it really brings that deep chocolate punch. If you want a gluten-free option, swapping the all-purpose flour with almond flour works well, though the texture will be slightly different. And if dairy is an issue, try coconut oil instead of butter, which adds a subtle coconut note that pairs surprisingly well with the chocolate.
Equipment Needed
- Mixing bowls (one large for wet ingredients, one for dry)
- Electric mixer or sturdy whisk (to get the batter smooth and aerated)
- Measuring cups and spoons (accuracy really helps here, especially with cocoa and flour)
- 8×8 inch (20×20 cm) baking pan lined with parchment paper (for easy release and clean edges)
- Cooling rack (to let the treats cool completely before decorating)
- Small offset spatula or butter knife (handy for spreading and smoothing batter)
- Optional: piping bag or small plastic bag with a tiny corner cut (for drawing tassels on the caps)
Honestly, you don’t need anything fancy. I’ve made these treats with just a whisk and a spoon when the mixer was buried in the back of the cupboard. If you’re on a budget, parchment paper is a game changer here—it keeps the brownies from sticking and makes cleanup effortless.
Preparation Method
- Preheat and Prep (10 minutes): Preheat your oven to 350°F (175°C). Line an 8×8 inch (20×20 cm) baking pan with parchment paper, leaving some overhang for easy removal later.
- Mix Wet Ingredients (5 minutes): In a large bowl, whisk together the melted butter and granulated sugar until combined. Add in the eggs one at a time, mixing well after each addition. Stir in the vanilla extract. The mixture should look glossy and smooth.
- Combine Dry Ingredients (3 minutes): In a separate bowl, sift together the flour, cocoa powder, salt, and baking powder. Sifting helps avoid lumps and ensures a more even batter.
- Fold Dry into Wet (3 minutes): Gradually add the dry ingredients into the wet mixture. Use a spatula to fold gently until just combined. Overmixing can make the treats tough, so stop as soon as you don’t see flour.
- Pour Batter and Smooth (2 minutes): Transfer the batter into the prepared pan. Spread evenly with a spatula or offset knife. The batter will be thick and fudgy.
- Bake (20-25 minutes): Bake for 20 to 25 minutes, checking at 20 minutes. The edges should be set, but the center still slightly soft when you gently shake the pan. Insert a toothpick for a few moist crumbs, but not wet batter.
- Cool Completely (30 minutes): Remove from oven and place on a cooling rack. Let the brownie base cool fully (this is key so the topping adheres properly).
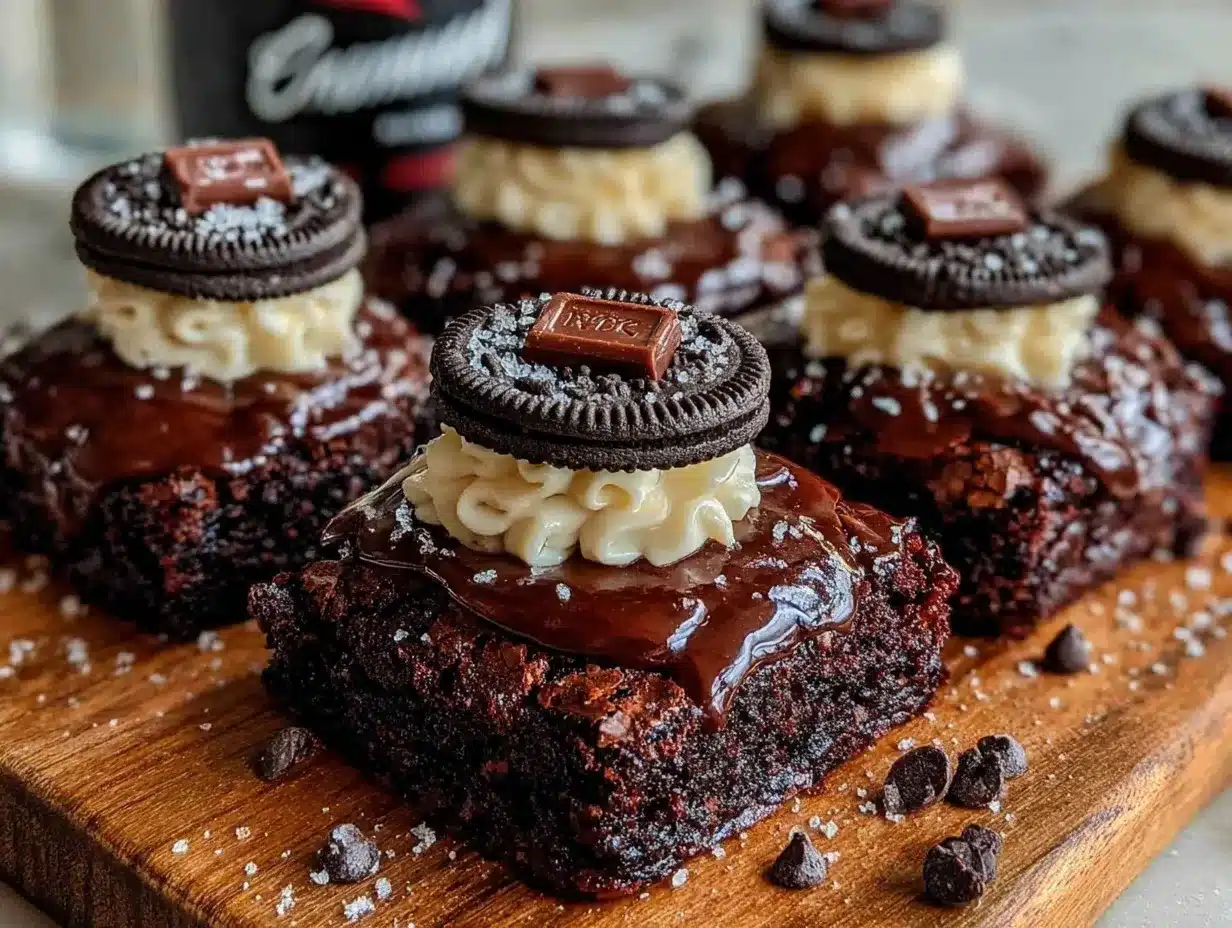
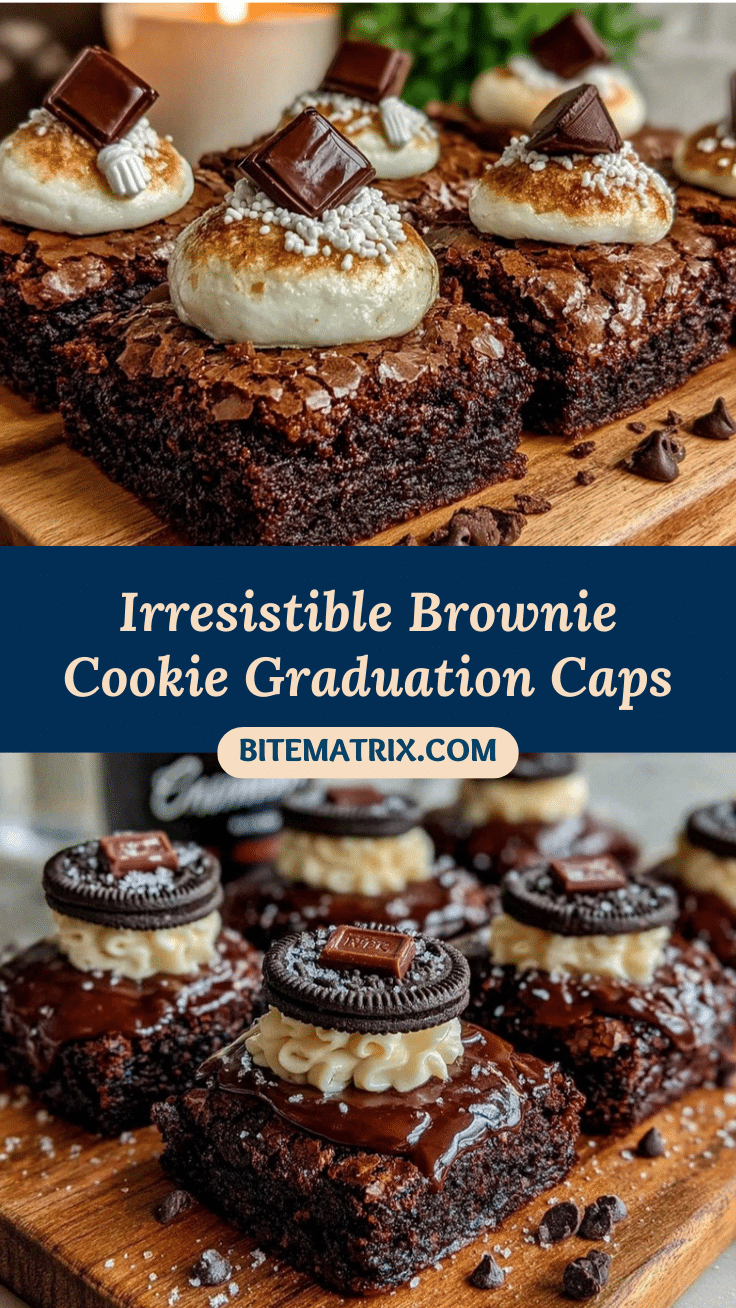
- Assemble the Graduation Caps (10-15 minutes): Place a chocolate wafer cookie on top of each brownie square. Add a mini chocolate disk centered on each cookie to mimic the mortarboard button.
- Add Tassel Details (Optional, 5 minutes): Use black decorating icing or an edible marker to draw a simple tassel from the center disk to one corner of the wafer cookie. If you’re feeling creative, you can pipe little loops or curls for tassel threads.
- Final Chill (15 minutes): Pop the assembled treats into the fridge for about 15 minutes to set the decorations before serving.
Small note: I once forgot to let the brownies cool completely before adding the cookies—let’s just say the cookies sank a bit, and it was a messy but tasty lesson! So patience here really pays off.
Cooking Tips & Techniques
One trick I learned the hard way is not to overbake the brownie base. You want that fudgy texture, not dry or cakey. Start checking at 20 minutes, and remember that the brownies will continue to set as they cool.
When mixing, folding the dry ingredients gently preserves air bubbles, keeping the texture tender. I’ve ruined batches by rushing this step, and trust me, it’s worth the extra care.
On the decoration front, if you can’t find mini chocolate disks, melting chocolate chips and spooning tiny drops onto the wafers works just as well. Just cool them in the fridge to harden before assembly.
Timing-wise, while the brownies cool, you can prepare your decorating icing or tidy up the kitchen—multitasking helps keep the process smooth. And if you want to speed things up, chilling the brownie base in the fridge for 15 minutes after baking helps them firm up faster for assembly.
Lastly, if you’re baking at altitude or in a humid climate, slightly reducing the sugar and adding a pinch more flour can keep the texture on point.
Variations & Adaptations
- Nutty Upgrade: Fold in 1/2 cup (60g) chopped walnuts or pecans into the batter for a crunchy surprise inside each brownie cookie. I tried this once when hosting a nut-loving friend, and it was a hit.
- Gluten-Free Version: Swap all-purpose flour with a 1:1 gluten-free baking flour blend. Make sure it contains xanthan gum for structure. The texture will be slightly different but still delicious.
- Vegan Option: Use flax eggs (1 tablespoon ground flaxseed + 3 tablespoons water per egg) and vegan butter or coconut oil. Choose dairy-free chocolate wafers and candy melts to keep it fully plant-based.
- Seasonal Twist: In spring or summer, try adding a teaspoon of orange zest to the batter or use lemon-flavored wafers for a bright citrus note that pairs surprisingly well with chocolate.
- Spiced Variation: Add 1/2 teaspoon of cinnamon and a pinch of cayenne for a warm, spicy kick. It’s unexpected but works beautifully, especially for fall graduations.
Every time I make these, I like experimenting with the toppings. One time I even swapped the wafer cookies for thin brownie squares and used white chocolate disks for a fun contrast. It wasn’t traditional, but it sure was tasty!
Serving & Storage Suggestions
Serve these treats at room temperature for the best texture. The brownie base should be chewy and soft, while the cookie “caps” remain crisp. Arrange them on a festive platter with some colorful napkins or scatter confetti for a fun presentation.
Pair these with a cold glass of milk, coffee, or even a sparkling soda for a complete celebration experience. For adults, a cup of rich espresso or a dessert wine complements the chocolate nicely.
To store, keep the treats in an airtight container at room temperature for up to 3 days. If your kitchen is warm, refrigeration is fine but let them come back to room temp before serving to enjoy the ideal texture.
For longer storage, freeze assembled treats in a single layer on a baking sheet, then transfer to a freezer-safe container. Thaw at room temperature for about 30 minutes before serving. The flavors mellow beautifully over time, making them an even sweeter surprise the next day.
Nutritional Information & Benefits
Each Perfect Brownie Cookie Graduation Cap Treat contains approximately 150 calories, 8 grams of fat, 20 grams of carbohydrates, and 2 grams of protein. While they lean on the indulgent side, the portion size keeps things reasonable for a celebratory treat.
Key ingredients like cocoa powder bring antioxidants to the table, which support heart health and mood. Using real butter and eggs adds richness and essential nutrients like vitamin A and choline.
Gluten-free and vegan variations make these treats accessible to many dietary needs, and swapping ingredients thoughtfully can keep them lower in sugar or dairy-free without sacrificing flavor.
Honestly, I see these treats as a balance between celebration and mindful enjoyment—perfect for honoring milestones without going overboard.
Conclusion
Perfect Brownie Cookie Graduation Cap Treats bring a little whimsy and a lot of chocolatey goodness to any celebration. They’re easy enough for a last-minute party save but special enough to feel like a thoughtful nod to the graduate’s big day.
Feel free to tweak the toppings, mix in nuts or spices, or swap ingredients to match your preferences—that’s part of the fun here. I love these treats because they’re proof that sometimes the best recipes come from a happy accident in the kitchen and a bit of creativity.
If you give this recipe a try, I’d be thrilled to hear how you customize it or what memories it sparks for your celebrations. Go ahead, leave a comment or share your photo—I’m all ears and excited to see your versions!
Here’s to sweet successes and tasty traditions that bring everyone to the table.
FAQs
Can I make these brownie cookie graduation caps ahead of time?
Yes! They store well for a few days at room temperature or can be frozen for longer storage. Just make sure to assemble the caps after chilling if freezing the base separately.
What if I don’t have square wafer cookies for the caps?
You can use thin brownie squares, large chocolate chips, or even small cookies you have on hand. The key is to have a flat, sturdy piece to mimic the mortarboard shape.
How do I make the tassel detail if I don’t have decorating icing?
You can skip it entirely or use a thin line of melted chocolate piped with a toothpick. An edible marker also works well for drawing simple lines.
Is there a dairy-free option for this recipe?
Absolutely! Use coconut oil or vegan butter instead of regular butter, flax eggs instead of chicken eggs, and dairy-free chocolate wafers and candy melts.
Can I double this recipe for a larger crowd?
Yes, just double the ingredients and bake in a 9×13 inch (23×33 cm) pan. Baking time may increase to 30-35 minutes, so keep an eye on the texture to avoid overbaking.
Pin This Recipe!
Perfect Brownie Cookie Graduation Cap Treats

These chewy brownie cookie treats topped with chocolate wafer graduation caps are a quick, easy, and crowd-pleasing dessert perfect for celebrations and milestone events.
- Prep Time: 20 minutes
- Cook Time: 25 minutes
- Total Time: 45 minutes
- Yield: 24 servings 1x
- Category: Dessert
- Cuisine: American
Ingredients
- 1/2 cup (115g) unsalted butter, melted
- 1 cup (200g) granulated sugar
- 2 large eggs, room temperature
- 1 teaspoon vanilla extract
- 3/4 cup (95g) all-purpose flour
- 1/3 cup (35g) unsweetened cocoa powder (Dutch-processed recommended)
- 1/4 teaspoon salt
- 1/4 teaspoon baking powder
- About 24 chocolate wafer cookies or square vanilla wafer cookies
- 24 mini chocolate disks or candy melts (or small chocolate chips melted and hardened)
- Black decorating icing or edible marker (optional, for tassel detail)
Instructions
- Preheat your oven to 350°F (175°C). Line an 8×8 inch (20×20 cm) baking pan with parchment paper, leaving some overhang for easy removal.
- In a large bowl, whisk together the melted butter and granulated sugar until combined. Add eggs one at a time, mixing well after each addition. Stir in vanilla extract until mixture is glossy and smooth.
- In a separate bowl, sift together flour, cocoa powder, salt, and baking powder to avoid lumps.
- Gradually fold the dry ingredients into the wet mixture using a spatula until just combined. Avoid overmixing.
- Pour the batter into the prepared pan and spread evenly with a spatula or offset knife.
- Bake for 20 to 25 minutes, checking at 20 minutes. Edges should be set and center slightly soft with moist crumbs on a toothpick.
- Remove from oven and cool completely on a cooling rack to ensure topping adheres properly.
- Place a chocolate wafer cookie on top of each brownie square. Add a mini chocolate disk centered on each cookie to mimic the mortarboard button.
- Optional: Use black decorating icing or edible marker to draw a tassel from the center disk to one corner of the wafer cookie.
- Chill the assembled treats in the fridge for about 15 minutes to set decorations before serving.
Notes
Do not overbake to maintain fudgy texture. Let brownies cool completely before adding wafer cookies to prevent sinking. If mini chocolate disks are unavailable, melt chocolate chips and spoon small drops onto wafers, then chill to harden. For gluten-free, substitute flour with gluten-free blend containing xanthan gum. For vegan, use flax eggs, vegan butter or coconut oil, and dairy-free chocolate wafers and candy melts.
Nutrition
- Serving Size: 1 brownie cookie tre
- Calories: 150
- Fat: 8
- Carbohydrates: 20
- Protein: 2
Keywords: brownie cookie, graduation treats, easy dessert, chocolate dessert, party treats, celebration recipe, quick brownies, chewy brownies


