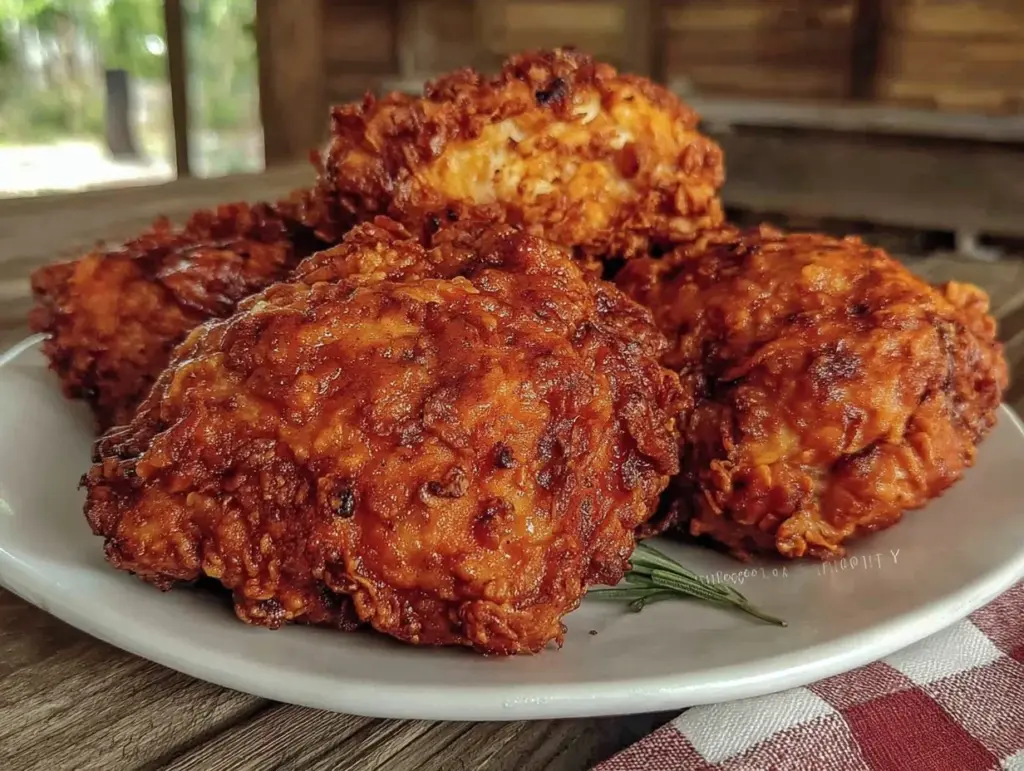
Let me tell you, the sight of a golden, crispy fried chicken piece is enough to make anyone’s stomach rumble, but what if I told you this fried chicken is actually a cake? Yeah, you read that right. The first time I crafted this perfect cake disguised as fried chicken, I was instantly hooked — the kind of moment where you pause, take a deep breath, and just grin because you know you’re onto something truly special. Years ago, when I was knee-high to a grasshopper, dessert meant straightforward cakes and pies, but this playful, sneaky dessert changes the game entirely.
I stumbled on this recipe on a rainy weekend, trying to brighten things up with a fun baking project. Honestly, my family couldn’t stop sneaking those “fried chicken” pieces off the cooling rack (and I can’t really blame them). It’s dangerously easy to make yet delivers pure, nostalgic comfort with an unexpected twist. You know what? It’s perfect for potlucks, as a sweet surprise for your kids, or to brighten up your Pinterest cookie board with a show-stopping dessert that everyone’s buzzing about.
I’ve tested this recipe multiple times in the name of research, of course, and it’s become a staple for family gatherings, gifting, and just those moments when you want to wow people without spending hours in the kitchen. This perfect cake disguised as fried chicken feels like a warm hug wrapped in a clever disguise — you’re going to want to bookmark this one.
Why You’ll Love This Recipe
This perfect cake disguised as fried chicken isn’t just a quirky twist; it’s a thoughtfully crafted dessert that hits all the right notes. Here’s why it stands out:
- Quick & Easy: Comes together in under 90 minutes, perfect for last-minute cravings or impressing guests without the fuss.
- Simple Ingredients: No fancy grocery trips needed; you probably have everything in your pantry already.
- Perfect for Entertaining: Great for potlucks, holiday parties, or any time you want to surprise and delight.
- Crowd-Pleaser: Always gets rave reviews from kids and adults alike — it’s a real conversation starter.
- Unbelievably Delicious: The moist, tender cake crumb paired with the crunchy “breading” texture is next-level comfort food with a sweet twist.
What really sets this recipe apart is the technique — blending a rich vanilla cake with a crispy, cinnamon-sugar coating that tricks the eye and delights the palate. It’s not just another cake; it’s a fun, playful creation that makes you close your eyes after the first bite and smile. This recipe is like comfort food reimagined, a little cheeky but with all the soul-soothing satisfaction you’d want from a dessert.
Whether you’re aiming to impress guests without stress or turning a simple meal into something memorable, this perfect cake disguised as fried chicken has you covered.
What Ingredients You Will Need
This recipe uses simple, wholesome ingredients to deliver bold flavor and satisfying texture without the fuss. Most are pantry staples, and substitutions are easy if you’re short on something.
- For the Cake:
- 2 cups (250g) all-purpose flour (I recommend King Arthur for best texture)
- 1 ½ teaspoons baking powder
- ½ teaspoon baking soda
- ½ teaspoon salt
- ¾ cup (170g) unsalted butter, softened (adds richness)
- 1 cup (200g) granulated sugar
- 2 large eggs, room temperature
- 1 tablespoon vanilla extract
- 1 cup (240ml) buttermilk (or milk with 1 tablespoon lemon juice as substitute)
- For the “Fried Chicken” Coating:
- 1 cup (100g) crushed cornflakes or crispy cereal (gives that crunchy texture)
- ½ cup (100g) granulated sugar
- 2 teaspoons ground cinnamon
- ¼ teaspoon salt
- For the “Glue” to Stick Coating:
- ½ cup (120ml) heavy cream or coconut cream (helps coating stick perfectly)
- 2 tablespoons light corn syrup or honey (adds sheen and stickiness)
For gluten-free options, swap the flour for a blend like Bob’s Red Mill 1-to-1 gluten-free baking flour. I’ve tried swapping regular sugar with coconut sugar for a more caramel-like flavor — worked like a charm! When fresh cinnamon is on hand, that’s always my go-to for the coating. In summer, you can even sprinkle in a pinch of nutmeg or pumpkin spice for a seasonal twist.
Equipment Needed
- Mixing bowls (large and medium-sized) — I prefer glass for easy cleanup
- Electric hand mixer or stand mixer — helps get the batter smooth and fluffy
- Measuring cups and spoons — precise measurements make all the difference
- 9-inch round cake pans (2) or a large loaf pan for shaping the “chicken” pieces
- Cooling rack — essential for letting the “fried chicken” dry to perfection
- Food processor or rolling pin (for crushing the cornflakes)
- Baking sheet lined with parchment paper
If you don’t have a stand mixer, I’ve made this by hand — just takes a bit more elbow grease but totally doable. For crushing cornflakes, a zip-top bag and rolling pin work just as well as a food processor, and it keeps things budget-friendly. Maintaining your mixer beaters and keeping your baking pans greased well will help you avoid sticking and tearing the cake during shaping.
Preparation Method
- Preheat and Prep: Preheat your oven to 350°F (175°C). Grease and flour your cake pans to avoid sticking. This step sets you up for success.
- Mix Dry Ingredients: In a medium bowl, whisk together 2 cups (250g) flour, 1 ½ teaspoons baking powder, ½ teaspoon baking soda, and ½ teaspoon salt. Set aside.
- Cream Butter and Sugar: In a large bowl, beat ¾ cup (170g) softened butter with 1 cup (200g) sugar until light and fluffy — about 3-4 minutes. This is where the cake gets its tender crumb.
- Add Eggs and Vanilla: Beat in 2 large eggs, one at a time, then stir in 1 tablespoon vanilla extract until combined.
- Alternate Adding Dry Ingredients and Buttermilk: Gradually add the dry mixture alternately with 1 cup (240ml) buttermilk, beginning and ending with the dry ingredients. Mix until just combined (don’t overmix or the cake will be tough).
- Bake: Pour batter evenly into pans. Bake for 25-30 minutes or until a toothpick inserted in the center comes out clean. Let the cakes cool about 10 minutes in pans, then turn onto a wire rack to cool completely.
- Prepare Coating: While the cake cools, crush 1 cup (100g) cornflakes to a coarse texture. In a separate bowl, mix ½ cup (100g) sugar, 2 teaspoons cinnamon, and ¼ teaspoon salt.
- Mix “Glue”: Combine ½ cup (120ml) heavy cream with 2 tablespoons light corn syrup or honey in a shallow dish. This will help the coating stick to the cake.
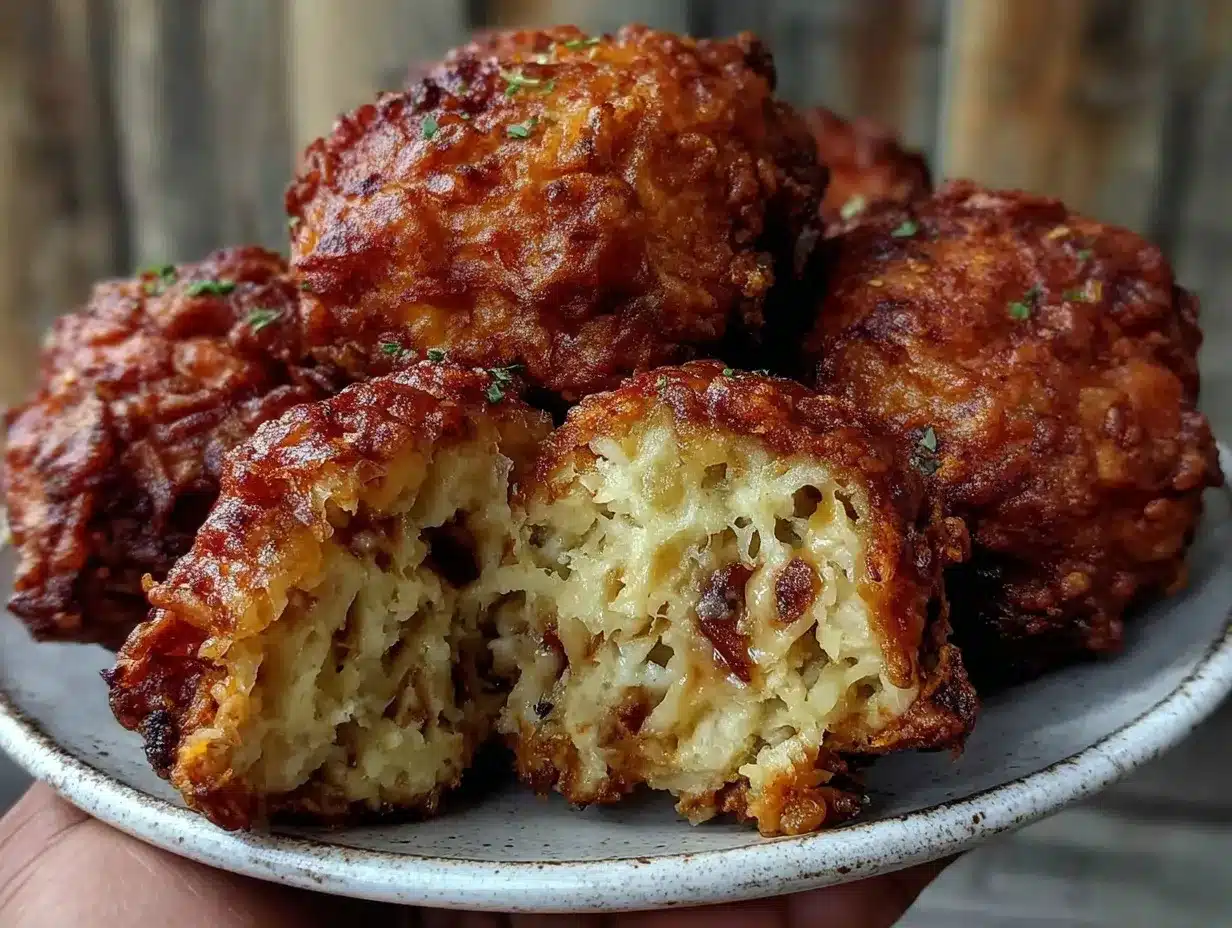
- Shape Cake Pieces: Once cooled, cut the cake into irregular pieces resembling fried chicken cuts (think drumsticks, thighs). You can use a sharp knife to carve the edges for a more “battered” look.
- Coat the Cake: Dip each piece briefly into the cream mixture, then roll thoroughly in the crushed cornflake and cinnamon sugar mixture. Place on a parchment-lined baking sheet.
- Set the “Fried Chicken” Cake: Let the coated pieces rest for 15-20 minutes to firm up the coating.
- Serve: Arrange your cake pieces on a platter as if serving real fried chicken. The effect is pure magic!
Pro tip: If the coating feels soggy, pop the pieces into a 300°F (150°C) oven for 5-7 minutes to crisp up without drying the cake. Just keep a close eye, you don’t want to burn the “breading.”
Cooking Tips & Techniques
Getting this perfect cake disguised as fried chicken just right takes a few little tricks I’ve learned over the years. First, don’t skip properly creaming the butter and sugar — that’s what gives the cake its tender, airy crumb. I’ve messed up a batch or two by rushing this step, and the cake turned out dense and sad.
When mixing the batter, always alternate adding dry ingredients with buttermilk and mix gently. Overmixing can lead to a tough texture, and honestly, nobody wants that in a cake pretending to be fried chicken!
For the coating, crushing your cornflakes to a coarse texture is key — too fine and you lose that crunchy illusion; too big and it looks unnatural. I’ve found using a zip-top bag with a rolling pin is easiest and less messy than pulling out a food processor.
One common mistake is dipping the cake pieces for too long in the cream mixture, which can saturate and soften the coating. A quick dip is all you need. Also, letting the coated cake rest before serving helps the “breading” firm up, so resist the urge to dive in immediately.
Timing-wise, multitasking helps — bake the cake while prepping your coating, then shape and coat once everything is cool. This keeps things moving smoothly without the cake crumbling or coating melting.
Variations & Adaptations
- Flavor Twist: Add a teaspoon of pumpkin spice or ginger to the coating mix for a seasonal vibe. I tried this last fall and it was a hit at our family harvest party.
- Chocolate Version: Swap half the flour for cocoa powder and use chocolate cereal crumbs for coating. It’s a chocoholic’s dream disguised as savory chicken.
- Vegan Adaptation: Use dairy-free butter and substitute eggs with flax eggs (1 tablespoon ground flaxseed + 3 tablespoons water per egg). Swap buttermilk for almond milk with a splash of apple cider vinegar. Use coconut cream for the coating dip.
- Gluten-Free: Use a 1-to-1 gluten-free flour blend and gluten-free crispy cereal. I recommend Bob’s Red Mill for consistent results.
- Baking Method: You can bake cake pieces in muffin tins to get mini “chicken nuggets” instead of large pieces. Adjust baking time to 18-22 minutes.
Serving & Storage Suggestions
Serve this perfect cake disguised as fried chicken at room temperature for the best texture. Arrange the pieces on a rustic wooden board or a white platter to really sell the illusion. Pair it with a side of whipped cream, honey drizzle, or even a scoop of vanilla ice cream for an extra indulgent touch.
If you’re serving at a party, place toothpicks in each piece for easy grabbing. It’s a guaranteed conversation starter!
To store, keep leftover pieces in an airtight container at room temperature for up to 2 days or refrigerate for up to 4 days. The coating will soften slightly in the fridge, so pop pieces in a preheated 300°F (150°C) oven for 5 minutes before serving to refresh the crunch.
For longer storage, freeze the pieces in a single layer on a baking sheet, then transfer to a freezer bag for up to 3 months. Thaw overnight in the fridge and crisp up in the oven before serving. Flavors actually deepen a bit after resting, so leftovers can be even better!
Nutritional Information & Benefits
This cake offers a sweet treat with moderate calories per serving — roughly 300-350 calories depending on piece size. Using real butter and buttermilk adds richness and calcium, while cinnamon contributes antioxidants.
Gluten-free and vegan versions make this accessible for many dietary needs. While it’s a dessert, the use of wholesome ingredients means you’re not just eating empty calories. Plus, the fun factor boosts your mood — which, honestly, is just as important.
Be mindful of allergens like dairy, eggs, and gluten, but with substitutions, most can enjoy this playful dessert. From a wellness perspective, treats like these remind us that eating is about joy and creativity, not just nutrition.
Conclusion
This perfect cake disguised as fried chicken is a must-try for anyone who loves a good surprise on their dessert plate. It’s simple to make, fun to serve, and delicious every single time. Customize the flavors, try out the variations, and watch your friends and family’s jaws drop when they realize what’s really on their plate.
Personally, I adore this recipe because it brings a smile to the table and turns baking into a little adventure. If you give it a try, drop a comment below and share how your “fried chicken” turned out. Or better yet, tell me your own spin on this playful dessert!
Go ahead—make this show-stopping dessert your own, and don’t forget to share it with those you love. You’re going to have a blast with this one, trust me!
FAQs
Can I make this cake in advance?
Yes! You can bake and assemble the cake pieces a day ahead. Store them in an airtight container at room temperature or refrigerate and crisp up in the oven before serving.
What’s the best way to crush cornflakes for the coating?
Place cornflakes in a zip-top bag and gently crush with a rolling pin until coarse but not powdery. Avoid using a food processor unless pulsing lightly to keep texture.
Can I use other cereals for the coating?
Absolutely! Crispy rice cereal or gluten-free corn cereal work well. Just make sure they’re crunchy and not too sweet to keep the savory illusion.
How do I keep the coating from falling off?
Quickly dip cake pieces in the cream-corn syrup “glue,” then immediately coat with the cereal mix. Let them rest for 15-20 minutes to firm up for best adhesion.
Is this recipe kid-friendly?
Definitely! Kids love the fun surprise and the sweet, crunchy texture. Plus, it’s a great way to get little ones involved in baking — shaping the “chicken” is a blast.
Pin This Recipe!
Perfect Cake Disguised as Fried Chicken Easy Step-by-Step Dessert Recipe

A playful and clever dessert that looks like fried chicken but is actually a moist vanilla cake with a crunchy cinnamon-sugar coating. Perfect for entertaining and surprising guests.
- Prep Time: 20 minutes
- Cook Time: 30 minutes
- Total Time: 50 minutes
- Yield: 8 servings 1x
- Category: Dessert
- Cuisine: American
Ingredients
- 2 cups (250g) all-purpose flour
- 1 ½ teaspoons baking powder
- ½ teaspoon baking soda
- ½ teaspoon salt
- ¾ cup (170g) unsalted butter, softened
- 1 cup (200g) granulated sugar
- 2 large eggs, room temperature
- 1 tablespoon vanilla extract
- 1 cup (240ml) buttermilk (or milk with 1 tablespoon lemon juice as substitute)
- 1 cup (100g) crushed cornflakes or crispy cereal
- ½ cup (100g) granulated sugar
- 2 teaspoons ground cinnamon
- ¼ teaspoon salt
- ½ cup (120ml) heavy cream or coconut cream
- 2 tablespoons light corn syrup or honey
Instructions
- Preheat your oven to 350°F (175°C). Grease and flour your cake pans to avoid sticking.
- In a medium bowl, whisk together 2 cups (250g) flour, 1 ½ teaspoons baking powder, ½ teaspoon baking soda, and ½ teaspoon salt. Set aside.
- In a large bowl, beat ¾ cup (170g) softened butter with 1 cup (200g) sugar until light and fluffy, about 3-4 minutes.
- Beat in 2 large eggs, one at a time, then stir in 1 tablespoon vanilla extract until combined.
- Gradually add the dry mixture alternately with 1 cup (240ml) buttermilk, beginning and ending with the dry ingredients. Mix until just combined.
- Pour batter evenly into pans. Bake for 25-30 minutes or until a toothpick inserted in the center comes out clean.
- Let the cakes cool about 10 minutes in pans, then turn onto a wire rack to cool completely.
- While the cake cools, crush 1 cup (100g) cornflakes to a coarse texture.
- In a separate bowl, mix ½ cup (100g) sugar, 2 teaspoons cinnamon, and ¼ teaspoon salt.
- Combine ½ cup (120ml) heavy cream with 2 tablespoons light corn syrup or honey in a shallow dish.
- Once cooled, cut the cake into irregular pieces resembling fried chicken cuts.
- Dip each piece briefly into the cream mixture, then roll thoroughly in the crushed cornflake and cinnamon sugar mixture.
- Place coated pieces on a parchment-lined baking sheet and let rest for 15-20 minutes to firm up the coating.
- Arrange cake pieces on a platter and serve.
Notes
Do not overmix the batter to avoid a tough cake. Crush cornflakes to a coarse texture for the best crunchy coating. Dip cake pieces quickly in the cream mixture to prevent sogginess. Let coated pieces rest before serving to firm up the coating. To refresh coating crunch, bake coated pieces at 300°F (150°C) for 5-7 minutes.
Nutrition
- Serving Size: One irregular cake p
- Calories: 325
- Sugar: 30
- Sodium: 220
- Fat: 15
- Saturated Fat: 9
- Carbohydrates: 45
- Fiber: 1
- Protein: 4
Keywords: cake, fried chicken cake, dessert, vanilla cake, cinnamon sugar coating, fun dessert, party dessert, potluck dessert


