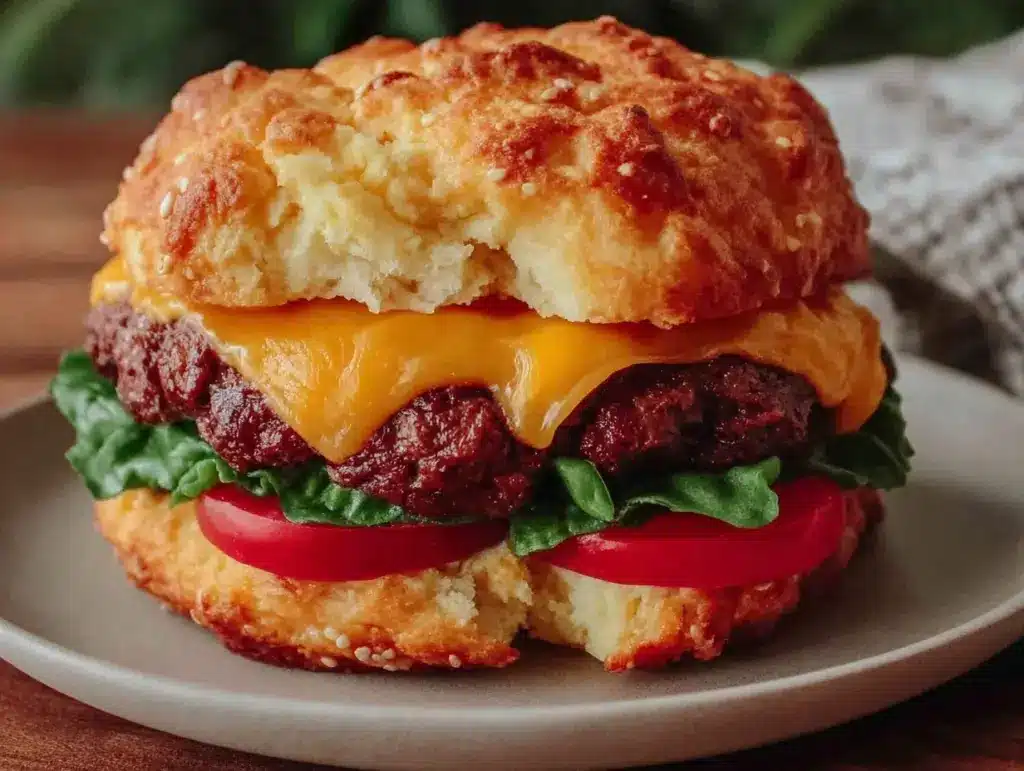
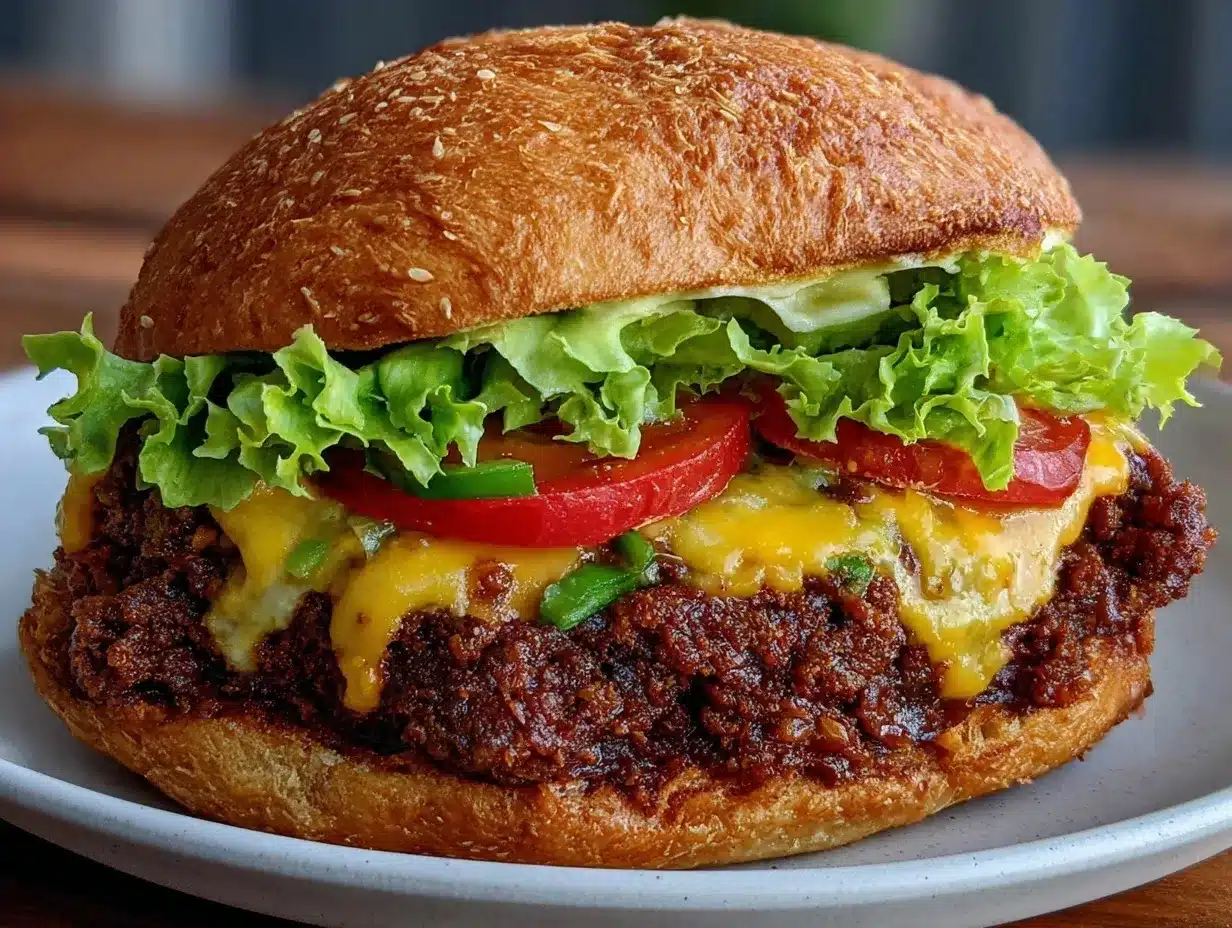
Let me tell you, the sight of a juicy burger sitting on your plate only to realize it’s actually a cake is enough to make anyone’s jaw drop. The first time I crafted this perfect cake that looks like a burger, I was instantly hooked—the kind of moment where you pause, take a deep breath, and just smile because you know you’re onto something truly special. Honestly, it felt like a magic trick on a plate, and I couldn’t wait to share it.
Years ago, when I was knee-high to a grasshopper, desserts were straightforward—sweets that looked like sweets. But stumbling upon this burger cake recipe on a rainy weekend changed my whole perspective. I wished I’d discovered it years ago because it brings pure, nostalgic comfort with a twist that’s dangerously easy to pull off. My family couldn’t stop sneaking bites off the “burger” before I even got to slice it, and I can’t really blame them.
You know what makes this dessert so perfect? It’s just right for potlucks, birthday parties, or when you want to brighten up your Pinterest cookie board with something that truly surprises and delights. Tested multiple times in the name of research, of course, it’s become a staple for family gatherings and gifting. If you’re ready for a cake that feels like a warm hug but looks like a fun, unexpected burger, you’re going to want to bookmark this one.
Why You’ll Love This Recipe
From my kitchen to yours, this perfect cake that looks like a burger is a blend of creativity and simplicity that’s hard to beat. Here’s why it’s a total winner:
- Quick & Easy: Comes together in under 90 minutes, perfect for last-minute dessert emergencies or weekend fun.
- Simple Ingredients: No fancy grocery runs needed—you likely have everything already.
- Perfect for Any Occasion: Whether it’s a kid’s birthday, a quirky celebration, or just because, it’s a showstopper.
- Crowd-Pleaser: Kids and adults alike are always amazed, making it a guaranteed hit.
- Unbelievably Delicious: The soft cake layers paired with the creamy “cheese” frosting and “lettuce” buttercream give you that perfect flavor and texture combo.
What separates this from other dessert illusions? It’s the attention to detail—the way the cake batter is tinted and layered, the clever use of colored frosting to mimic burger ingredients, and a technique I developed for shaping the cake that’s both fun and straightforward. Honestly, it’s not just another novelty cake; it’s the kind of dessert that makes you close your eyes after the first bite and say, “Wow.”
This recipe isn’t just tasty; it’s a playful twist on comfort food that impresses without stress. Whether you want to wow guests or surprise your family, this burger cake turns a simple dessert into something memorable.
What Ingredients You Will Need
This perfect cake that looks like a burger uses simple, wholesome ingredients to deliver a bold visual impact and satisfying taste without fuss. Most are pantry staples, with a few easy-to-find baking essentials.
- For the Cake Layers:
- 2 ½ cups (312g) all-purpose flour, sifted (I prefer King Arthur for consistent texture)
- 2 ½ tsp baking powder
- ½ tsp baking soda
- ½ tsp salt
- 1 cup (226g) unsalted butter, softened (use good quality for richness)
- 1 ¾ cups (350g) granulated sugar
- 4 large eggs, room temperature
- 1 tbsp vanilla extract
- 1 cup (240ml) buttermilk, room temperature (adds tenderness)
- Food coloring: orange, green, red, yellow gel colors (for “burger” colors)
- For the Frostings and Fillings:
- 3 cups (360g) powdered sugar
- 1 ½ cups (340g) unsalted butter, softened
- 2 tsp vanilla extract
- 1-2 tbsp heavy cream or milk (adjust for consistency)
- Orange gel color (for “cheese” layer)
- Green gel color (for “lettuce”)
- Red gel color (for “tomato”)
- Yellow gel color (for “mustard” effect)
- Extras:
- Sesame seeds (to sprinkle on top “bun”)
- Optional: cocoa powder (for light shading on “burger patty”)
For substitutions, you can swap almond flour for a gluten-free option, or use dairy-free butter and milk if needed. I’ve tried using natural food coloring, but gel colors work best for vibrant burger layers. In summer, adding fresh edible flowers as garnish gives a fun twist, but the classic look is a winner every time.
Equipment Needed
- Two 8-inch (20 cm) round cake pans (non-stick or lined with parchment paper)
- Mixing bowls—medium and large
- Electric hand mixer or stand mixer (makes frosting smooth and easy)
- Offset spatula (for frosting and smoothing layers)
- Palette knife or butter knife (for shaping details)
- Measuring cups and spoons (for accuracy)
- Cooling racks (to cool cakes evenly)
- Serrated knife (to level cakes)
If you don’t have an offset spatula, a regular butter knife works fine; just take your time. For budget-friendly pans, aluminum cake pans from your local store work perfectly well. I keep my cake pans well-seasoned and avoid using metal utensils that scratch the surface—keeps them lasting for years.
Preparation Method
- Preheat and Prep: Preheat your oven to 350°F (175°C). Grease and flour two 8-inch (20 cm) cake pans, or line with parchment paper for easy removal. Set aside.
- Mix Dry Ingredients: In a medium bowl, whisk together 2 ½ cups (312g) all-purpose flour, 2 ½ tsp baking powder, ½ tsp baking soda, and ½ tsp salt. This ensures even distribution of leavening agents.
- Cream Butter and Sugar: In a large bowl, beat 1 cup (226g) softened butter and 1 ¾ cups (350g) sugar with an electric mixer until light and fluffy—about 3 minutes. This step is key for a tender cake.
- Add Eggs and Vanilla: Beat in 4 large eggs, one at a time, then mix in 1 tbsp vanilla extract until smooth.
- Alternate Dry and Wet: Add dry ingredients in three additions, alternating with 1 cup (240ml) buttermilk, starting and ending with dry. Mix gently to avoid overbeating—overmixing can make the cake tough.
- Divide and Color Batter: Divide the batter into three bowls. Tint one portion orange for the “bun,” one green for “lettuce,” and one red for “tomato.” Leave a small amount uncolored for the “patty” base or tint with cocoa powder.
- Layer Batter in Pans: Pour the orange batter evenly into both pans for the top and bottom “buns.” Bake for 25-30 minutes or until a toothpick inserted comes out clean. Let cool for 10 minutes before removing from pans to cool completely on racks.
- Prepare Frostings: Beat 1 ½ cups (340g) softened butter with 3 cups (360g) powdered sugar and 2 tsp vanilla until creamy. Divide into small bowls and tint with orange (for cheese), green (for lettuce), red (for tomato), and yellow (for mustard) gel colors. Add heavy cream or milk a teaspoon at a time for spreadability.
- Shape the Cake: Once cakes are cooled, use a serrated knife to level the tops and carve gentle rounded edges to mimic a burger bun shape. Use leftover cake or scraps to build up the “patty” layer in the middle, tinting with cocoa powder for color.
- Assemble Layers: Start with one “bun” layer, spread green “lettuce” frosting, then red “tomato” frosting, followed by the “patty” cake layer with a thin chocolate or cocoa frosting if desired. Add orange “cheese” frosting on top of the patty, then crown with the second orange “bun” layer.
- Final Touches: Frost the top “bun” with a smooth layer of orange buttercream and sprinkle sesame seeds for authenticity. Use small strokes of yellow frosting to mimic mustard drips around the edges.
- Chill and Serve: Refrigerate the cake for at least 30 minutes to set the frosting. Bring to room temperature before slicing for best texture and flavor.
If your frosting feels too thick, a splash of milk goes a long way! For carving, take your time—it’s easier to trim a little at a time than to fix big mistakes. The visual cues—like smooth frosting and rounded edges—make this cake truly convincing.
Cooking Tips & Techniques
Here’s what I’ve learned creating this perfect cake that looks like a burger:
- Coloring Batter: Use gel food coloring to avoid thinning the batter. A little goes a long way, and you can always add more for deeper shades.
- Leveling Cakes: Don’t skip leveling! Uneven layers make the burger illusion fall flat. A serrated knife and a steady hand are your best friends.
- Frosting Consistency: Too stiff frosting is tough to spread; too soft and it’ll slide off. Aim for a creamy but firm texture by adjusting powdered sugar and milk.
- Shaping Tips: Carve gently for rounded buns; rough edges can give a rustic “burger” look but keep it neat enough to sell the illusion.
- Multitasking: Bake cakes first and let them cool while prepping frostings. This saves time and keeps things moving smoothly.
- Common Mistake: Overmixing batter leads to dense cakes. Mix just until ingredients combine for a tender crumb.
Honestly, my first attempt was a bit lopsided, but once I slowed down and took my time shaping, the results were way better. You’ll get the hang of it fast!
Variations & Adaptations
Want to switch things up? Here are some fun variations for this burger cake:
- Diet-Friendly: Use almond flour and dairy-free butter to make a gluten-free, vegan-friendly burger cake. Coconut cream works well for frosting here.
- Seasonal Twist: Swap out the “lettuce” green frosting with pistachio-flavored buttercream for an extra nutty surprise during winter holidays.
- Flavor Variations: Add a hint of cinnamon or espresso powder in the “patty” cake layer for a richer depth of flavor.
- Cooking Method: Try baking mini burger cakes in cupcake tins for individual servings—perfect for parties.
- Personal Favorite: I once added a thin layer of raspberry jam under the “cheese” frosting to mimic ketchup—unexpected but delicious!
Serving & Storage Suggestions
This burger cake is best served at room temperature so the buttercream is soft and creamy. Slice it like a regular cake and watch your guests’ faces light up at the surprise inside.
Pair it with a cold glass of milk or a cup of coffee for a nostalgic dessert experience. For a more playful touch, serve with mini ketchup and mustard bottles on the side.
Store leftovers covered tightly in the fridge for up to 4 days. You can freeze individual slices wrapped well in plastic wrap and foil for up to 2 months. Thaw overnight in the fridge and bring to room temperature before serving.
Flavors actually develop and mellow a bit after resting, so if you make it a day ahead, it tastes even better (if you can resist waiting that long!).
Nutritional Information & Benefits
Per serving (based on 12 slices), this cake provides roughly:
| Calories | 350 kcal |
|---|---|
| Fat | 20g |
| Carbohydrates | 40g |
| Protein | 4g |
This dessert is rich and indulgent but made with real butter and fresh ingredients. Using buttermilk adds tenderness and a slight tang, balancing sweetness. You can opt for gluten-free flour to accommodate dietary needs, though it may affect texture slightly.
Keep in mind the presence of common allergens like eggs, dairy, and gluten. For those avoiding these, the dairy-free and gluten-free variations mentioned earlier work well.
From a wellness point of view, this cake is a treat that brings joy and creativity to your kitchen—sometimes that’s just as important as nutritional content!
Conclusion
To wrap it up, this perfect cake that looks like a burger is a fun, impressive twist on traditional desserts that will wow anyone lucky enough to try it. It’s easy enough for even novice bakers, yet creative enough to make you look like a kitchen pro.
Feel free to customize the colors, flavors, and layers to suit your taste—this cake is all about having fun and surprising your loved ones. Honestly, I adore this recipe because it brings smiles, sparks conversations, and tastes downright delicious.
Give it a go, and don’t forget to share your burger cake adventures in the comments below—let’s swap tips and celebrate all the fun dessert illusions out there. Happy baking, friends!
FAQs
Can I make this burger cake ahead of time?
Yes! You can bake the cake layers and prepare the frosting a day ahead. Assemble and decorate the day you plan to serve for best freshness.
What if I don’t have gel food coloring?
Gel coloring gives the best vibrant results without thinning your batter or frosting. If you only have liquid colors, use sparingly to avoid runny batter.
How do I keep the cake layers from drying out?
Make sure not to overbake. Also, wrap cooled layers tightly in plastic wrap and store at room temperature if using the same day.
Is this cake suitable for kids?
Absolutely! Kids love the fun burger appearance and the creamy, sweet flavors inside.
Can I use a different cake flavor?
Definitely! Vanilla works best for color, but chocolate or red velvet can be fun alternatives—just adjust frosting colors to match the theme.
Pin This Recipe!

Perfect Cake That Looks Like a Burger

A fun and creative dessert illusion cake that looks like a juicy burger but tastes like a delicious layered cake with colorful frostings mimicking burger ingredients.
- Prep Time: 30 minutes
- Cook Time: 30 minutes
- Total Time: 1 hour
- Yield: 12 servings 1x
- Category: Dessert
- Cuisine: American
Ingredients
- 2 ½ cups (312g) all-purpose flour, sifted
- 2 ½ tsp baking powder
- ½ tsp baking soda
- ½ tsp salt
- 1 cup (226g) unsalted butter, softened
- 1 ¾ cups (350g) granulated sugar
- 4 large eggs, room temperature
- 1 tbsp vanilla extract
- 1 cup (240ml) buttermilk, room temperature
- Food coloring: orange, green, red, yellow gel colors
- 3 cups (360g) powdered sugar
- 1 ½ cups (340g) unsalted butter, softened
- 2 tsp vanilla extract
- 1–2 tbsp heavy cream or milk
- Orange gel color (for cheese layer)
- Green gel color (for lettuce)
- Red gel color (for tomato)
- Yellow gel color (for mustard effect)
- Sesame seeds (to sprinkle on top bun)
- Optional: cocoa powder (for light shading on burger patty)
Instructions
- Preheat oven to 350°F (175°C). Grease and flour two 8-inch (20 cm) cake pans or line with parchment paper.
- In a medium bowl, whisk together flour, baking powder, baking soda, and salt.
- In a large bowl, beat softened butter and sugar with an electric mixer until light and fluffy, about 3 minutes.
- Beat in eggs one at a time, then mix in vanilla extract until smooth.
- Add dry ingredients in three additions alternating with buttermilk, starting and ending with dry ingredients. Mix gently to avoid overbeating.
- Divide batter into three bowls. Tint one orange for buns, one green for lettuce, one red for tomato. Leave a small amount uncolored or tint with cocoa powder for patty.
- Pour orange batter evenly into both pans and bake for 25-30 minutes or until a toothpick comes out clean. Cool 10 minutes in pans then transfer to racks to cool completely.
- Prepare frosting by beating butter, powdered sugar, and vanilla until creamy. Divide into bowls and tint with orange, green, red, and yellow gel colors. Adjust consistency with heavy cream or milk.
- Level cooled cakes with serrated knife and carve rounded edges to mimic burger buns. Use scraps to build patty layer tinted with cocoa powder.
- Assemble cake layers: bottom bun, green lettuce frosting, red tomato frosting, patty cake layer with optional cocoa frosting, orange cheese frosting, then top bun.
- Frost top bun smoothly with orange buttercream and sprinkle sesame seeds. Add yellow frosting drips to mimic mustard.
- Refrigerate cake for at least 30 minutes to set frosting. Bring to room temperature before slicing and serving.
Notes
Use gel food coloring for vibrant colors without thinning batter or frosting. Level cakes carefully for best illusion. Adjust frosting consistency with milk or cream. Refrigerate to set frosting before serving. For gluten-free or vegan versions, substitute almond flour and dairy-free butter/milk.
Nutrition
- Serving Size: 1 slice (1/12th of c
- Calories: 350
- Fat: 20
- Carbohydrates: 40
- Protein: 4
Keywords: burger cake, dessert illusion, creative cake, novelty cake, birthday cake, fun dessert, cake tutorial


