“You know that moment when a simple craving turns into a full-blown kitchen adventure? That’s exactly how these red velvet whoopie pies came to be. It was a chilly Thursday evening, and I was halfway through fixing the leaky faucet in my neighbor’s kitchen when she casually mentioned her grandmother’s secret red velvet recipe. I wasn’t expecting much, honestly, but the way her eyes lit up made me promise to try it out. I ended up with a bit of a mess—flour on the counter, a cracked mixing bowl, and a frosting disaster that had me laughing into the night. But those whoopie pies? They turned out so good I was sneaking bites well past midnight.
There’s something about the soft, cakey texture paired with that creamy frosting that hits you right in the comfort zone. Maybe you’ve been there too—looking for that treat that feels both nostalgic and fresh. These red velvet whoopie pies are exactly that: a little nostalgic, a little playful, and totally irresistible. I keep making them, not just because they’re delicious, but because every batch brings back that quirky evening and the joy of a happy kitchen accident.
So, if you’ve ever wanted to whip up a homemade treat that’s perfect for sharing (or sneaking away for yourself), get ready. This recipe is about to become your go-to for red velvet whoopie pies with creamy frosting that’s as dreamy as it sounds.
Why You’ll Love This Recipe
Honestly, these red velvet whoopie pies aren’t just another dessert. They’ve been tested, tweaked, and approved by family, friends, and yes, even my picky neighbor who swears she’s not a sweets person. Here’s why they’ll quickly become a favorite in your kitchen too:
- Quick & Easy: You can have these beauties ready in under 45 minutes—perfect for those last-minute dessert cravings.
- Simple Ingredients: No need for specialty shops; most ingredients are staples you probably already have on hand.
- Perfect for Gatherings: Whether it’s a potluck, birthday party, or casual get-together, these whoopie pies steal the show every time.
- Crowd-Pleaser: Kids, adults, and even those who claim to “not be into sweets” can’t resist them.
- Unbelievably Delicious: The balance of moist, tender red velvet cake and smooth, tangy cream cheese frosting is just next-level comfort food.
What sets this recipe apart? Well, it’s the little things. Like folding the batter just right to keep it fluffy, and blending the frosting until it’s ultra-smooth—trust me, you’ll notice the difference. Plus, I swapped in a bit of buttermilk powder instead of liquid buttermilk, which makes the batter easier to handle and keeps the pies tender. It’s not just another red velvet whoopie pie recipe—it’s the one I keep coming back to, time and again.
What Ingredients You Will Need
This recipe uses simple, wholesome ingredients to deliver bold flavor and that classic velvety texture without the fuss. Most are pantry staples, and substitutions are easy if you need them.
- For the Red Velvet Cakes:
- All-purpose flour – 2 cups (240g), sifted for lightness
- Cocoa powder – 2 tablespoons (unsweetened, preferably Dutch-processed for richer color)
- Baking soda – 1 teaspoon
- Salt – ½ teaspoon
- Granulated sugar – 1 cup (200g)
- Unsalted butter – ½ cup (113g), softened (I like using Land O’Lakes for best texture)
- Large eggs – 2, room temperature
- Buttermilk powder – 2 tablespoons (optional; if unavailable, substitute with ½ cup buttermilk liquid)
- Vanilla extract – 1 teaspoon (pure is always best)
- Red food coloring – 2 tablespoons (gel-based for vibrant color without extra liquid)
- White vinegar – 1 teaspoon (helps the cakes rise and adds tang)
- For the Creamy Frosting:
- Cream cheese – 8 ounces (225g), softened (I recommend Philadelphia brand for creaminess)
- Unsalted butter – ¼ cup (57g), softened
- Powdered sugar – 2 cups (240g), sifted to avoid lumps
- Vanilla extract – 1 teaspoon
- Pinch of salt (balances sweetness)
If you want to make this gluten-free, swap the all-purpose flour with a 1-to-1 gluten-free baking blend. For a dairy-free version, use coconut cream cheese and vegan butter alternatives—though the texture will be slightly different, it still tastes wonderful!
Equipment Needed
- Mixing bowls (one large and one medium) – glass or stainless steel works best
- Electric hand mixer or stand mixer – for smooth batter and frosting
- Measuring cups and spoons – precise measurements make a big difference here
- Sifter or fine mesh sieve – to keep flour and powdered sugar lump-free
- Baking sheets – two standard-size (cookie sheets with edges)
- Parchment paper or silicone baking mats – essential to prevent sticking
- Cooling racks – for letting the cakes cool without sogginess
- Spatula – flexible, for folding batter and spreading frosting
- Optional: piping bag and round tip – for neat frosting application, though a spoon works fine too
I once tried to skip the sifter and ended up with a lumpy batter that nearly ruined the batch—lesson learned! Also, investing in a good silicone baking mat pays off. The pies come off cleanly, and cleanup is a breeze. If you don’t have one, parchment paper is a great budget-friendly alternative.
Preparation Method

- Preheat and Prep: Set your oven to 350°F (175°C). Line two baking sheets with parchment paper or silicone mats to keep the whoopie pies from sticking.
- Mix Dry Ingredients: In a medium bowl, sift together 2 cups (240g) all-purpose flour, 2 tablespoons cocoa powder, 1 teaspoon baking soda, and ½ teaspoon salt. Set aside.
- Cream Butter and Sugar: In a large bowl, beat ½ cup (113g) softened unsalted butter and 1 cup (200g) sugar until light and fluffy—about 3-4 minutes with a mixer on medium speed. This step is key for that tender crumb.
- Add Eggs and Flavor: Beat in 2 large eggs, one at a time, then stir in 1 teaspoon vanilla extract and 2 tablespoons red food coloring until fully combined. The batter will turn a rich, vibrant red—don’t be shy with the color.
- Incorporate Dry Ingredients & Buttermilk Powder: Gradually add the dry mix to the wet ingredients, alternating with 2 tablespoons buttermilk powder (or ½ cup liquid buttermilk if using). Mix gently after each addition, folding just until combined. Overmixing can make the cakes tough.
- Add Vinegar: Stir in 1 teaspoon white vinegar last. You’ll notice the batter lighten and become a bit frothy—this helps with the rise.
- Portion the Batter: Using a tablespoon or small cookie scoop, drop rounded spoonfuls of batter (about 2 tablespoons or 30g each) onto the prepared baking sheets, spacing them 2 inches apart. They will spread slightly.
- Bake: Bake for 10-12 minutes until the tops are set and spring back lightly when pressed. Avoid overbaking; the cakes should be soft and tender.
- Cool Completely: Remove from oven and transfer the cakes to cooling racks. Let cool fully before frosting to prevent melty messes.
- Prepare the Frosting: In a clean bowl, beat 8 ounces (225g) softened cream cheese and ¼ cup (57g) softened unsalted butter until smooth and creamy. Gradually add 2 cups (240g) powdered sugar, 1 teaspoon vanilla extract, and a pinch of salt. Beat until fluffy and spreadable. If frosting is too thick, add a teaspoon of milk; too thin, add a bit more powdered sugar.
- Assemble the Whoopie Pies: Pair up cakes of similar size. Spread or pipe about 1 tablespoon of frosting onto the flat side of one cake, then sandwich with the other. Gently press together without squeezing out the filling.
- Chill and Serve: For best flavor, chill the whoopie pies for at least 30 minutes to let the frosting set. Then, enjoy the perfect balance of soft cake and creamy filling.
If you notice any cakes puffing unevenly, rotate your baking sheets halfway through baking for even heat distribution. And hey, if you forget the baking soda one time (been there), just add a pinch extra next batch—these things happen!
Cooking Tips & Techniques
Making red velvet whoopie pies is fun but needs a bit of care to get them just right. Here are some tips I’ve picked up along the way:
- Don’t Overmix the Batter: Once you add the flour, fold gently until just combined. Overmixing develops gluten, leading to dense cakes.
- Use Gel Food Coloring: Liquid food coloring can thin the batter, making it spread too much. Gel or paste types give you that deep red without extra liquid.
- Room Temperature Ingredients: Butter, eggs, and cream cheese should be at room temp for smooth mixing and even baking.
- Chill the Frosting: If your frosting gets too soft, pop it in the fridge for 10 minutes before assembling. It helps with piping and keeps the filling stable.
- Multitasking: While the cakes bake and cool, whip up the frosting to save time—just keep an eye on the cakes so they don’t cool too long.
- Watch the Oven: Baking times can vary with ovens. Start checking at 10 minutes to avoid drying out your cakes.
I once tried skipping the vinegar, thinking it was optional, but the cakes were flatter and less vibrant—lesson learned! Also, piping frosting makes assembly neater but using a spoon is totally fine if you’re in a pinch (or like a bit of rustic charm).
Variations & Adaptations
If you’re feeling creative or need to tweak for dietary needs, these red velvet whoopie pies are quite adaptable:
- Gluten-Free: Swap all-purpose flour for a 1-to-1 gluten-free blend. Add a teaspoon of xanthan gum if your blend doesn’t contain it for better structure.
- Vegan Version: Use plant-based butter and vegan cream cheese, replace eggs with flax eggs (1 tablespoon flaxseed meal + 3 tablespoons water per egg), and use dairy-free milk instead of buttermilk powder or liquid.
- Flavor Twists: Add a teaspoon of instant espresso powder to the batter for a subtle mocha hint, or sprinkle a pinch of cinnamon for warmth.
- Filling Variations: Mix in a tablespoon of orange zest into the frosting for citrus brightness, or swirl in a bit of raspberry jam for a fruity surprise.
- Baking Method: If you don’t want to bake small cakes, try making them as cupcakes and sandwiching after cooling—just adjust baking times accordingly.
Personally, I once tried adding a touch of almond extract to the frosting, and it gave a lovely nutty depth that surprised everyone at brunch!
Serving & Storage Suggestions
These whoopie pies are best served slightly chilled or at room temperature. The frosting firms up just enough in the fridge to hold its shape, but softens quickly once plated.
- Serve on a pretty platter with a dusting of powdered sugar or a few fresh berries for a pop of color.
- Pair with a warm cup of coffee, milk, or a light fruity tea to complement the rich flavors.
- Store leftovers in an airtight container in the refrigerator for up to 4 days. They taste even better after a day as the flavors mingle.
- For longer storage, freeze assembled whoopie pies in a single layer on a baking sheet, then transfer to a freezer bag. Thaw in the fridge overnight before serving.
- Reheat gently in the microwave for 10-15 seconds if you prefer them warm, but don’t overdo it or the frosting might melt.
Over time, the cakes soak up some moisture from the frosting, making each bite wonderfully tender and flavorful. Honestly, sometimes I make them a day ahead just for that reason.
Nutritional Information & Benefits
Each red velvet whoopie pie (makes about 12) contains approximately:
| Nutrient | Per Serving |
|---|---|
| Calories | 220 kcal |
| Carbohydrates | 28g |
| Fat | 11g |
| Protein | 3g |
| Sugar | 18g |
Key ingredients like cream cheese provide calcium and some protein, while the cocoa powder adds antioxidants. Using buttermilk powder or real buttermilk adds a nice tang and helps with digestion. These are not low-calorie treats, but perfect for an occasional indulgence that brings joy. If you want to lighten them up, try reducing powdered sugar in the frosting slightly or swapping some butter for Greek yogurt.
Conclusion
These red velvet whoopie pies with creamy frosting are a delightful treat that’s both fun to make and impossible to resist. Whether you’re whipping them up for a party or a cozy night in, they bring that perfect mix of soft cake and tangy sweetness that keeps folks coming back for more. Don’t hesitate to put your own spin on the recipe—maybe add a dash of spice or swap the frosting for your favorite filling.
I love these pies because they remind me of unexpected kitchen moments and the joy of sharing something homemade that actually turns out better than planned. If you try the recipe, I’d love to hear how you made it yours! Drop a comment, share your tweaks, or let me know your favorite way to enjoy them.
Here’s to your next baking adventure—happy whoopie pie making!
Frequently Asked Questions
Can I make the red velvet whoopie pies ahead of time?
Yes! You can bake the cakes a day in advance and store them in an airtight container at room temperature. Assemble with frosting just before serving for the freshest taste.
What can I use instead of red food coloring?
For a natural alternative, beet juice or powder works well, though it may give a slightly different hue and flavor. Keep in mind the color won’t be as vibrant as with gel food coloring.
How do I prevent the frosting from being too runny?
Make sure your cream cheese and butter are properly softened but not melted. If frosting is too soft, refrigerate it for 10-15 minutes to firm up before spreading or piping.
Can I freeze these whoopie pies?
Absolutely! Freeze them assembled on a tray, then transfer to a sealed bag or container. Thaw overnight in the fridge before serving.
What’s the best way to get the cakes evenly sized?
Use a small cookie scoop or tablespoon to portion the batter onto the baking sheet. This helps keep the cakes uniform and ensures even baking.
Pin This Recipe!

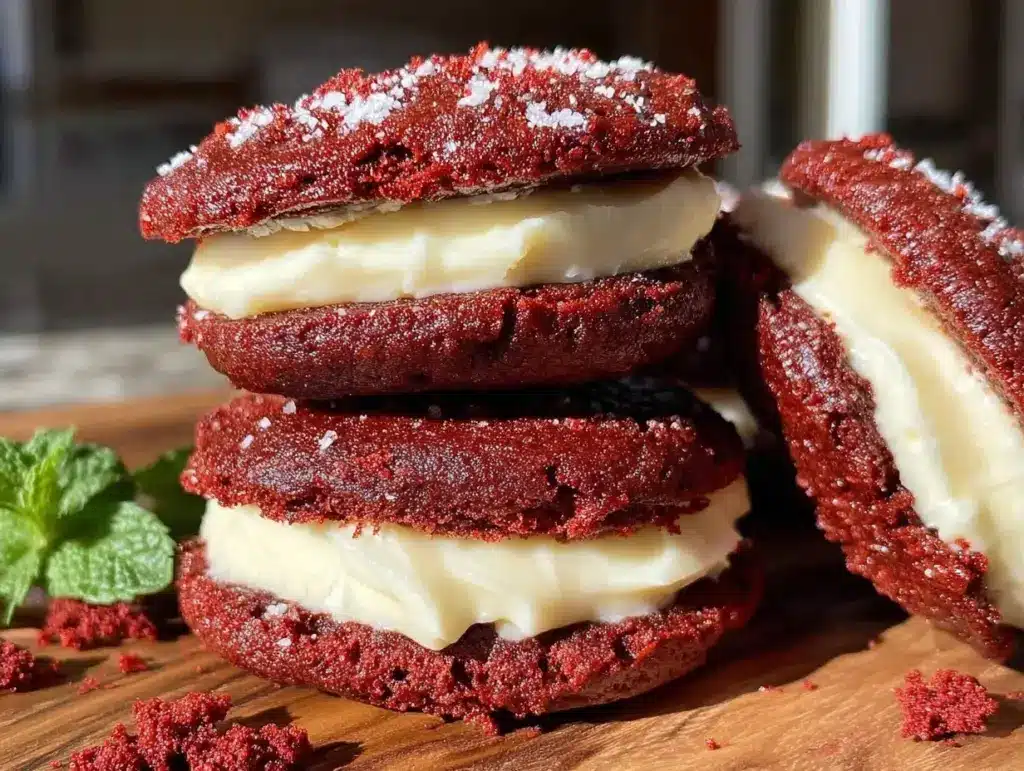
Red Velvet Whoopie Pies Recipe Easy Homemade Treat with Creamy Frosting

Soft, cakey red velvet whoopie pies paired with creamy, tangy cream cheese frosting make a nostalgic and irresistible treat perfect for sharing or sneaking away for yourself.
- Prep Time: 15 minutes
- Cook Time: 12 minutes
- Total Time: 42 minutes
- Yield: 12 servings
- Category: Dessert
- Cuisine: American
Ingredients
- All-purpose flour – 2 cups (240g), sifted for lightness
- Cocoa powder – 2 tablespoons (unsweetened, preferably Dutch-processed for richer color)
- Baking soda – 1 teaspoon
- Salt – ½ teaspoon
- Granulated sugar – 1 cup (200g)
- Unsalted butter – ½ cup (113g), softened
- Large eggs – 2, room temperature
- Buttermilk powder – 2 tablespoons (optional; if unavailable, substitute with ½ cup buttermilk liquid)
- Vanilla extract – 1 teaspoon
- Red food coloring – 2 tablespoons (gel-based)
- White vinegar – 1 teaspoon
- Cream cheese – 8 ounces (225g), softened
- Unsalted butter – ¼ cup (57g), softened
- Powdered sugar – 2 cups (240g), sifted
- Vanilla extract – 1 teaspoon
- Pinch of salt
Instructions
- Preheat oven to 350°F (175°C). Line two baking sheets with parchment paper or silicone mats.
- In a medium bowl, sift together flour, cocoa powder, baking soda, and salt. Set aside.
- In a large bowl, beat softened butter and sugar until light and fluffy, about 3-4 minutes.
- Beat in eggs one at a time, then stir in vanilla extract and red food coloring until fully combined.
- Gradually add dry ingredients to wet ingredients, alternating with buttermilk powder (or liquid buttermilk), folding gently until just combined.
- Stir in white vinegar last; batter will lighten and become frothy.
- Drop rounded spoonfuls (about 2 tablespoons or 30g each) onto prepared baking sheets, spacing 2 inches apart.
- Bake for 10-12 minutes until tops are set and spring back lightly when pressed.
- Remove from oven and transfer cakes to cooling racks; cool completely before frosting.
- In a clean bowl, beat cream cheese and softened butter until smooth and creamy.
- Gradually add powdered sugar, vanilla extract, and salt; beat until fluffy and spreadable. Adjust consistency with milk or powdered sugar as needed.
- Pair cakes of similar size; spread or pipe about 1 tablespoon frosting onto flat side of one cake and sandwich with another.
- Chill assembled whoopie pies for at least 30 minutes before serving.
Notes
Do not overmix the batter to keep cakes tender. Use gel food coloring for vibrant color without thinning batter. Room temperature ingredients ensure smooth mixing and even baking. Chill frosting if too soft before assembling. Rotate baking sheets halfway through baking for even cooking. Piping frosting makes assembly neater but a spoon works fine.
Nutrition
- Serving Size: 1 whoopie pie
- Calories: 220
- Sugar: 18
- Fat: 11
- Carbohydrates: 28
- Protein: 3
Keywords: red velvet, whoopie pies, cream cheese frosting, homemade dessert, easy baking, nostalgic treat


