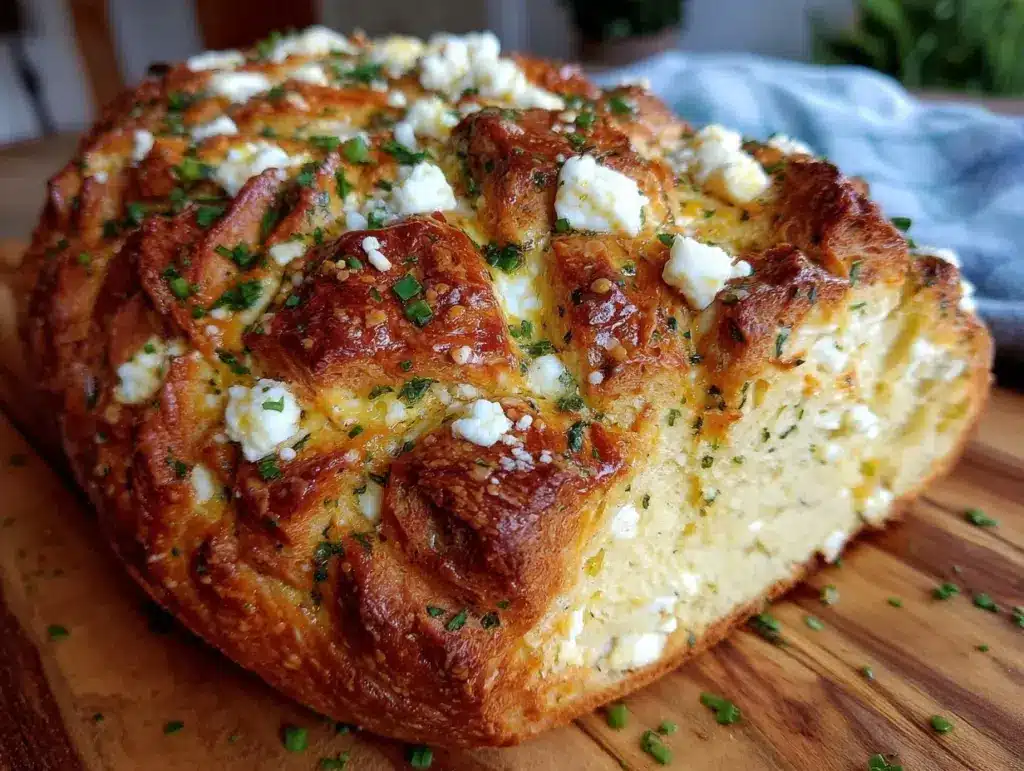
There’s nothing quite like the aroma of freshly baked bread wafting through the kitchen, especially when it’s infused with garlic, herbs, and gooey melted cheese. Let me tell you, the first time I pulled this Garlic Herb and Cheese Bread out of the oven, I knew I had stumbled upon something special. The crust was golden brown and crispy, while the inside was soft and pillowy, with little pockets of melted cheese and bursts of herby goodness. It’s one of those recipes that makes you stop and savor the moment—pure comfort food joy.
This bread has become a staple at my family gatherings. My kids can’t resist sneaking slices before dinner, and my friends always ask for the recipe. It’s one of those dishes that feels fancy enough for a dinner party but is easy enough to whip up on a lazy Sunday afternoon. Whether you’re serving it alongside a hearty soup, using it for sandwiches, or simply enjoying it fresh out of the oven with a pat of butter, this bread is guaranteed to steal the show.
And let’s be honest—there’s something magical about homemade bread. The transformation from simple ingredients into a loaf of warm, fragrant perfection feels like a little victory every time. So, get ready to roll up your sleeves and dive into the delicious world of Flavorful Garlic Herb and Cheese Bread. You’re going to want to bookmark this one!
Why You’ll Love This Recipe
- Quick & Easy: You don’t need to be a professional baker to pull this off. The steps are simple, and the results are stunning.
- Simple Ingredients: Everything you need is likely already in your pantry or fridge—no special shopping trips required.
- Perfect for Any Occasion: Whether it’s a cozy dinner, a potluck, or a holiday gathering, this bread fits the bill.
- A Guaranteed Crowd-Pleaser: Everyone loves the combination of garlic, herbs, and cheese—it’s a flavor trifecta that wins hearts every time.
- Unbelievably Delicious: The crispy crust, cheesy inside, and burst of fresh herbs make this bread unforgettable.
What sets this recipe apart is the balance of flavors and textures. It’s not just cheesy bread—it’s herb-infused, garlicky perfection. The dough is easy to work with, and the addition of cheese makes it extra indulgent. It’s the kind of bread you’ll want to bake again and again, whether for impressing guests or treating yourself to a little comfort.
Trust me, after one bite, you’ll find yourself craving this bread. It’s not just food; it’s a cozy hug for your taste buds.
What Ingredients You Will Need
This recipe uses simple, wholesome ingredients to deliver bold flavor and satisfying texture without the fuss.
- All-purpose flour: The base of your bread—perfect for a soft yet structured loaf.
- Active dry yeast: Gives the bread its lovely rise and fluffy texture.
- Granulated sugar: Helps activate the yeast and adds a subtle touch of sweetness.
- Warm water: Essential for activating the yeast (around 105°F/40°C is ideal).
- Olive oil: Adds moisture and flavor to the dough.
- Salt: Enhances all the savory flavors.
- Minced garlic: Fresh and aromatic—you can’t have garlic bread without garlic!
- Fresh herbs: Parsley, thyme, and rosemary give the bread its signature flavor. (Feel free to mix and match based on what you have.)
- Shredded mozzarella cheese: Melts beautifully into the bread for gooey, cheesy goodness.
- Grated Parmesan cheese: Adds a salty, nutty kick that complements the mozzarella.
- Unsalted butter: For brushing on top of the finished loaf (adds richness and shine).
If you’re missing an ingredient, don’t worry! You can substitute dried herbs for fresh ones, swap mozzarella for cheddar or Gruyère, and even use vegan cheese for a dairy-free option.
Equipment Needed
- Mixing bowls: You’ll need a couple for mixing and proofing the dough.
- Measuring cups and spoons: Accurate measurements are key for baking.
- Whisk: To combine your dry ingredients evenly.
- A clean kitchen towel: For covering the dough while it rises.
- Baking sheet: Perfect for shaping and baking your bread.
- Pastry brush: For brushing butter or olive oil on top of the baked bread.
If you don’t have a pastry brush, a spoon will work just fine for spreading the butter. And if you’re new to baking, a simple mixing bowl and your hands are really all you need to make this recipe a success.
Preparation Method

- In a large mixing bowl, whisk together 3 cups (375g) of all-purpose flour, 1 teaspoon of salt, and 1 tablespoon of sugar.
- In a small bowl, combine 1 packet (2 ¼ teaspoons) of active dry yeast with 1 cup (240ml) of warm water. Let it sit for about 5 minutes until frothy.
- Gradually add the yeast mixture and 2 tablespoons of olive oil to the dry ingredients. Mix until a shaggy dough forms.
- Turn the dough onto a lightly floured surface and knead for 8-10 minutes until smooth and elastic. If the dough feels sticky, add a bit more flour, 1 tablespoon at a time.
- Place the dough in a lightly oiled bowl, cover it with a clean kitchen towel, and let it rise in a warm place for 1 hour or until doubled in size.
- Preheat your oven to 375°F (190°C).
- Roll out the dough into a rough rectangle and sprinkle evenly with 1 cup (100g) of shredded mozzarella, ¼ cup (25g) of grated Parmesan, 2 tablespoons of minced garlic, and 2 tablespoons of finely chopped fresh herbs.
- Roll up the dough tightly into a log and pinch the seams to seal. Place the log seam-side down on a greased baking sheet.
- Cover with a towel and let it rise again for 30 minutes.
- Bake for 25-30 minutes until the bread is golden brown and sounds hollow when tapped on the bottom.
- Brush the top with melted butter and sprinkle with a pinch of fresh herbs for garnish. Let cool slightly before slicing.
The smell of garlic and herbs will fill your kitchen—it’s pure heaven!
Cooking Tips & Techniques
- Don’t rush the rise: Give your dough enough time to double in size—it’s worth the wait for the perfect texture.
- Warm water is key: Make sure your water is warm but not too hot (around 105°F/40°C) to properly activate the yeast.
- Knead with love: Kneading develops the gluten, which gives your bread its structure. Don’t skimp on this step!
- Cheese placement matters: Spread the cheese evenly so every slice has gooey goodness.
- Don’t overbake: Keep an eye on the bread in the last few minutes. A golden crust is perfect, but overbaking can dry out the loaf.
These tips will help you achieve bakery-quality bread every time—and let’s face it, homemade bread is always better.
Variations & Adaptations
- Gluten-free: Use a 1:1 gluten-free all-purpose flour for those avoiding gluten.
- Dairy-free: Swap out the mozzarella and Parmesan for your favorite dairy-free cheese alternatives.
- Add some spice: Mix in a pinch of red pepper flakes or smoked paprika for a little heat.
- Seasonal herbs: In summer, try adding fresh basil and oregano instead of parsley and thyme.
- Make it mini: Divide the dough into smaller portions and create individual rolls for serving at parties.
I once added sun-dried tomatoes to the filling, and let me tell you, it was a game-changer!
Serving & Storage Suggestions
This bread is best served warm, straight from the oven, with a pat of butter melting into each slice. Pair it with a bowl of hearty soup or pasta for the ultimate comfort meal. It also makes a great side for a salad or a roast dinner.
If you have leftovers (rare, but it happens), store them in an airtight container at room temperature for up to 2 days or in the refrigerator for up to 5 days. To reheat, simply pop slices in the oven at 350°F (175°C) for a few minutes or give them a quick zap in the microwave. The flavors deepen even more after a day or two, making it just as irresistible!
Nutritional Information & Benefits
Each slice of this bread is estimated to contain around:
- Calories: 180
- Protein: 6g
- Carbohydrates: 22g
- Fat: 7g
Garlic and herbs bring antioxidant and anti-inflammatory benefits to the table, while cheese adds protein and calcium. This recipe can be adjusted to fit gluten-free and dairy-free diets, making it a versatile option for various dietary needs.
Conclusion
If you’re searching for a recipe that combines comfort, flavor, and a touch of indulgence, this Garlic Herb and Cheese Bread is it. It’s easy to make, endlessly customizable, and guaranteed to impress. Whether you’re baking for your family or hosting friends, this bread will have everyone asking for seconds—and the recipe!
Give it a try and make it your own. Add your favorite herbs, experiment with different cheeses, or even toss in some extra garlic if you’re feeling bold. Don’t forget to let me know how it turned out in the comments—I’d love to hear your adaptations and ideas!
Bake it, share it, and enjoy every cheesy, garlicky bite. Happy baking!
FAQs
Can I use instant yeast instead of active dry yeast?
Yes, you can! Just skip the activation step and mix the instant yeast directly into the dry ingredients.
Can I freeze this bread?
Absolutely! Wrap it tightly in plastic wrap and store in the freezer for up to 3 months. Thaw and reheat before serving.
What’s the best way to reheat leftover bread?
The oven is your best bet—350°F (175°C) for about 5-7 minutes will refresh the crust beautifully.
Can I use dried herbs instead of fresh?
Yes, use about half the amount of dried herbs since they’re more concentrated in flavor.
How do I know the dough is properly kneaded?
The dough should feel smooth and elastic. To test, give it a gentle poke—it should spring back slightly.
Pin This Recipe!

Flavorful Garlic Herb Cheese Bread Recipe You’ll Love

A golden, crispy crust with a soft, pillowy inside filled with gooey cheese, garlic, and fresh herbs—this bread is pure comfort food joy.
- Prep Time: 15 minutes
- Cook Time: 30 minutes
- Total Time: 1 hour 45 minutes
- Yield: 1 loaf (approximately 8 servings) 1x
- Category: Bread
- Cuisine: American
Ingredients
- 3 cups (375g) all-purpose flour
- 1 teaspoon salt
- 1 tablespoon granulated sugar
- 1 packet (2 ¼ teaspoons) active dry yeast
- 1 cup (240ml) warm water
- 2 tablespoons olive oil
- 2 tablespoons minced garlic
- 2 tablespoons finely chopped fresh herbs (parsley, thyme, rosemary)
- 1 cup (100g) shredded mozzarella cheese
- ¼ cup (25g) grated Parmesan cheese
- 2 tablespoons unsalted butter (melted)
Instructions
- In a large mixing bowl, whisk together flour, salt, and sugar.
- In a small bowl, combine yeast with warm water and let sit for 5 minutes until frothy.
- Gradually add the yeast mixture and olive oil to the dry ingredients. Mix until a shaggy dough forms.
- Turn the dough onto a lightly floured surface and knead for 8-10 minutes until smooth and elastic.
- Place the dough in a lightly oiled bowl, cover with a clean kitchen towel, and let it rise in a warm place for 1 hour or until doubled in size.
- Preheat the oven to 375°F (190°C).
- Roll out the dough into a rough rectangle and sprinkle evenly with mozzarella, Parmesan, garlic, and fresh herbs.
- Roll up the dough tightly into a log and pinch the seams to seal. Place the log seam-side down on a greased baking sheet.
- Cover with a towel and let it rise again for 30 minutes.
- Bake for 25-30 minutes until the bread is golden brown and sounds hollow when tapped on the bottom.
- Brush the top with melted butter and sprinkle with fresh herbs for garnish. Let cool slightly before slicing.
Notes
[‘Give the dough enough time to rise for the perfect texture.’, ‘Use warm water (around 105°F/40°C) to properly activate the yeast.’, ‘Spread cheese evenly for consistent gooeyness in every slice.’, ‘Keep an eye on the bread during the last few minutes of baking to avoid overbaking.’]
Nutrition
- Serving Size: 1 slice
- Calories: 180
- Fat: 7
- Carbohydrates: 22
- Protein: 6
Keywords: Garlic bread, Cheese bread, Herb bread, Comfort food, Homemade bread


