There’s something utterly magical about the holidays—the way twinkling lights cast a glow over the kitchen, the gentle hum of Christmas carols in the background, and, let’s be honest, the irresistible aroma of sweet treats wafting through the house. Picture this: you’re unwrapping a pan of creamy, chocolatey Christmas Oreo Lasagna, the layers showing off a festive palette that practically shouts “holiday cheer!” The first time I made this for our family’s Christmas Eve, I was instantly swept up by the nostalgia—there’s just something about Oreos, whipped cream, and creamy pudding all snuggled together that feels like a warm hug. It’s the kind of moment where you pause, take a deep breath, and just smile because you know you’re onto something that everyone will remember.
Honestly, I stumbled on this recipe one chilly December weekend when I was knee-high to a grasshopper, rummaging through Grandma’s handwritten recipe cards, looking for something I could make without turning on the oven. I wish I’d discovered this no-bake Christmas Oreo Lasagna years ago—it would’ve saved a few holiday meltdowns and a lot of oven space. The layers are pure, nostalgic comfort: a crunchy Oreo base, fluffy cream cheese filling, rich pudding, and a crown of whipped topping, all dressed up in festive sprinkles and crushed minty candies. My family couldn’t stop sneaking forkfuls off the pan before dinner (and I can’t really blame them). Even the grumpy uncle who claims to “not like sweets” went back for seconds—talk about proven appeal!
This dessert isn’t just a showstopper for your holiday table—it’s dangerously easy, which means it’s perfect for potlucks, last-minute gatherings, or a sweet treat for your kids after a snowball fight. You know what? It’ll brighten up your Pinterest board and your dessert spread, guaranteed. I’ve tested this recipe more times than I can count (in the name of research, of course), and every time it lands on the table, it becomes an instant favorite. It’s now a staple for family gatherings, gifting, and those moments when you want something that feels like home. Trust me, you’re going to want to bookmark this one.
Why You’ll Love This No-Bake Christmas Oreo Lasagna
If you’re looking for a festive showstopper that’s as easy as it is impressive, this No-Bake Christmas Oreo Lasagna ticks every box. After years of holiday baking marathons (and more than a few kitchen disasters), I can confidently say this recipe is a lifesaver. Here’s why you’ll be reaching for it again and again:
- Quick & Easy: Comes together in under 30 minutes—no oven, no stress, just a few mixing bowls and some holiday spirit. Perfect for busy weeknights or when you’ve got a million other things to do.
- Simple Ingredients: No fancy grocery lists here. You probably have most of these in your pantry or fridge already. The magic is in everyday staples like Oreos, cream cheese, and instant pudding.
- Perfect for Parties: This dessert is made for sharing—think Christmas parties, office potlucks, or cozy movie nights with the family. It slices beautifully and always gets oohs and ahhs when you reveal those colorful layers.
- Crowd-Pleaser: Kids, adults, even those “I’m not a dessert person” folks—everyone devours this. The combination of creamy, crunchy, and chocolatey is basically irresistible.
- Unbelievably Delicious: The texture contrast is next-level comfort: creamy pudding, fluffy whipped topping, and that signature Oreo crunch. Plus, the holiday sprinkles and minty candies make it taste as festive as it looks.
What sets this No-Bake Christmas Oreo Lasagna apart from the rest? For one, it’s all about the layers—a perfectly balanced mix of creamy and crunchy, sweet but not cloying. I use peppermint extract for a merry twist and a blend of vanilla and chocolate puddings for depth. If you’ve ever had a no-bake dessert that turned out mushy or bland, you know the struggle. But this recipe? It’s sturdy enough to slice, but soft enough to melt in your mouth. The secret is in chilling the layers just right (I learned this after a few wobbly attempts—patience pays off!).
This isn’t just another Christmas dessert—it’s the one that makes you close your eyes with the first bite, soaking in the flavors and memories. It’s comfort food made festive and a way to impress with zero stress. Whether you’re looking to wow guests or just treat your family to something special, this Oreo Lasagna is your ticket to holiday magic.
What Ingredients You Will Need
This No-Bake Christmas Oreo Lasagna is built from simple, reliable ingredients that come together for a dessert that’s as festive as it is flavorful. Most of these are pantry staples, with a few fun holiday touches tossed in. Here’s what you’ll need:
- For the Oreo Crust:
- 36 Christmas Oreo cookies (about 2 regular packs, or use classic Oreos with red and green holiday sprinkles for color)
- 6 tablespoons (85g) unsalted butter, melted (adds richness and helps the crust set)
- For the Cream Cheese Layer:
- 8 ounces (225g) cream cheese, softened to room temperature (I love Philadelphia for its smoothness)
- 1/2 cup (60g) powdered sugar (for a touch of sweetness)
- 2 tablespoons (30ml) milk (whole or 2% work best)
- 1 teaspoon pure vanilla extract
- 1/2 teaspoon peppermint extract (optional, but oh-so-merry!)
- 1 1/2 cups (360ml) whipped topping (like Cool Whip, thawed)
- For the Pudding Layer:
- 1 package (3.4 ounces/96g) instant chocolate pudding mix
- 1 package (3.4 ounces/96g) instant vanilla pudding mix
- 2 3/4 cups (650ml) cold milk (whole milk gives the richest flavor, but skim works too)
- For the Topping:
- 2 cups (480ml) whipped topping (Cool Whip or homemade sweetened whipped cream)
- 1/2 cup (about 60g) crushed peppermint candies or candy canes (for crunch and color)
- Holiday sprinkles (red, green, white—go wild!)
- Extra Oreo crumbs or mini Oreos for garnish (optional, but adorable)
Ingredient Tips & Swaps:
- For a gluten-free version, use gluten-free chocolate sandwich cookies.
- Dairy-free? Substitute with plant-based cream cheese, non-dairy whipped topping, and almond or oat milk in the pudding.
- If you can’t find Christmas Oreos, use regular ones and add colored sprinkles or a dash of red and green sanding sugar to the crust.
- Not a fan of peppermint? Skip the extract and candies—add a dash more vanilla for classic cookies-and-cream flavor.
- In a pinch, homemade whipped cream (sweetened to taste) can replace store-bought whipped topping, though it may be a bit softer.
Equipment Needed
- 9×13-inch (23x33cm) baking dish: The classic lasagna pan size—glass or ceramic are both great. If you only have an 8×8-inch, just halve the recipe.
- Food processor or large zip-top bag and rolling pin: For crushing Oreos. No food processor? Place cookies in a bag and crush away with a rolling pin (kids love this part!).
- Mixing bowls (at least 3): One for the crust, one for the cream cheese layer, and one for pudding.
- Electric mixer or sturdy whisk: For beating the cream cheese smooth and fluffy. I’ve used both—just a bit more elbow grease with the whisk.
- Rubber spatula or offset spatula: For spreading layers evenly—an offset spatula makes neat layers easy, but a rubber spatula works fine too.
- Measuring cups and spoons: Accuracy matters for the layers to set up right.
- Plastic wrap or foil: For covering as it chills in the fridge overnight.
Honestly, you don’t need anything fancy. I’ve made this at friends’ houses with just bowls, a mug for crushing cookies, and a fork for mixing. If you have a favorite lasagna pan, give it a quick check for chips or cracks before starting—it’ll make for a pretty presentation and easy cleanup. Budget tip? Thrift store pans and dollar store spatulas work like a charm (and take the pressure off if you’re gifting the dessert and don’t want your good pan wandering off!).
How to Make No-Bake Christmas Oreo Lasagna
-
Crush the Oreos: Place 36 Christmas Oreos in a food processor and pulse until fine crumbs form. (No processor? Put cookies in a zip-top bag and crush with a rolling pin until no big pieces remain.)
Sensory cue: The crumbs should be sandy, with no dry chunks—if you see bigger pieces, keep going!
Tip: Reserve 1/4 cup (about 30g) crumbs for garnish. -
Make the Crust: Pour the Oreo crumbs into a mixing bowl. Add 6 tablespoons (85g) melted butter and stir until all crumbs are coated and the mixture looks like wet sand.
Warning: Don’t skimp on butter here—too little and your crust won’t hold together.
Press crumb mixture into the bottom of a 9×13-inch (23x33cm) baking dish, pressing down firmly with your hands or the bottom of a flat glass. Place in the fridge to chill while you prep the next layer (about 10 minutes). -
Prepare the Cream Cheese Layer: In a clean bowl, beat 8 ounces (225g) softened cream cheese with an electric mixer until smooth and fluffy (about 2 minutes). Add 1/2 cup (60g) powdered sugar, 2 tablespoons (30ml) milk, 1 teaspoon vanilla extract, and 1/2 teaspoon peppermint extract (if using). Beat until combined and creamy, scraping down the sides as needed.
Gently fold in 1 1/2 cups (360ml) whipped topping until smooth.
Sensory cue: The mixture should be light, fluffy, and lump-free.
Spread evenly over the chilled Oreo crust.
Tip: For clean layers, drop dollops all over the crust, then connect with a spatula. -
Mix the Pudding Layer: In another bowl, whisk together 1 package (3.4oz/96g) chocolate pudding mix, 1 package (3.4oz/96g) vanilla pudding mix, and 2 3/4 cups (650ml) cold milk for 2 minutes until it thickens.
Warning: Don’t overbeat—stop as soon as it’s thick and creamy.
Let sit for 5 minutes to set up.
Spread pudding evenly over the cream cheese layer.
Sensory cue: It should be thick enough to mound on a spoon, not runny! -
Add the Final Topping: Gently spread 2 cups (480ml) whipped topping over pudding, swirling or smoothing as desired.
Sprinkle with reserved Oreo crumbs, 1/2 cup (60g) crushed peppermint candies, and festive holiday sprinkles. Add mini Oreos if you’re feeling playful! -
Chill: Cover with plastic wrap or foil and refrigerate for at least 4 hours (overnight is best for neat slices and flavor melding).
Tip: If you’re in a rush, 2 hours will do, but the layers may be a bit softer. - Slice and Serve: Use a sharp knife dipped in hot water, wiping between cuts for clean slices. Serve chilled and watch the smiles light up around the table!
Troubleshooting: If layers run together, your pudding may not be set enough—give it more chill time next batch, or use a tad less milk. If your crust crumbles, press it down more firmly and don’t skip chilling. Trust me, I’ve had my share of “Oreo mud pie” moments before nailing this method!
Cooking Tips & Techniques
I’ve made more variations of this No-Bake Christmas Oreo Lasagna than I can count, and a few simple tricks make all the difference:
- Chill Everything: The colder your ingredients, the easier the layers set up. If your kitchen is warm, pop the pudding and whipped topping in the freezer for 10 minutes before assembling.
- Don’t Overmix the Pudding: Whisk just until thick and creamy—overmixing can make it runny (I learned this after one disastrous “pudding soup” attempt!).
- Press the Crust Firmly: Use the bottom of a measuring cup to compact the Oreo crust. If it’s too loose, it’ll fall apart when you slice.
- Layer Gently: Each layer should be dropped by spoonfuls, then spread gently to avoid mixing colors and textures. An offset spatula is your friend here.
- Customize with Extracts: A dash of peppermint or almond extract adds a holiday twist. Just don’t go overboard—a little goes a long way.
- Slice with Care: For clean slices, dip your knife in hot water and wipe it clean between cuts. (Yes, it’s fussy, but worth it for pretty servings!)
- Make Ahead: This dessert actually gets better as it sits. The flavors meld, and the texture firms up overnight—just don’t add crunchy toppings until right before serving so they stay crisp.
And hey, if you forget to chill it long enough or the layers get a little messy, no worries—it tastes amazing no matter what. That’s the beauty of a no-bake lasagna: forgiving, festive, and always delicious.
Variations & Adaptations
- Gluten-Free Christmas Oreo Lasagna: Use gluten-free chocolate sandwich cookies instead of regular Oreos. The rest of the ingredients are naturally gluten-free—just double-check your pudding mix for any hidden wheat ingredients.
- Peppermint Mocha Twist: Mix 1 tablespoon (15ml) cooled strong coffee into the pudding layer and add a bit more peppermint extract. Top with chocolate curls and crushed candy canes for a grown-up flavor.
- Red Velvet Oreo Lasagna: Swap out regular Oreos for Red Velvet Oreos (if you can find them!) and add a few drops of red food coloring to the cream cheese layer. This makes for a super festive look.
- Fruit-Lover’s Version: Add a layer of chopped strawberries or raspberries between the pudding and whipped topping layers. It’s a bright, juicy addition that cuts the richness a bit.
- Dairy-Free Adaptation: Use dairy-free cream cheese, plant-based milk, and coconut whipped topping. I’ve done this for a friend with allergies, and it works beautifully—just chill a little longer for best texture.
- Nut-Allergy Friendly: Skip the peppermint candies if they’re processed in a facility with nuts, and check all labels. You can use colored sanding sugar or extra sprinkles for crunch and color instead.
One year, I swapped the traditional Oreos for gingerbread sandwich cookies and added a dash of cinnamon to the cream cheese layer—my family still talks about that version. Don’t be afraid to play! This recipe is the ultimate blank canvas for your holiday cravings.
Serving & Storage Suggestions
This No-Bake Christmas Oreo Lasagna is at its best served chilled, straight from the fridge. The layers stay neat, the toppings are crisp, and each slice looks like a holiday postcard. I like to cut generous squares and serve them on a white platter with a sprinkle of extra crushed peppermints for a snowy effect.
Pair this dessert with mugs of hot cocoa, peppermint mochas, or even a glass of cold milk for the kids (classic, right?). It also pairs nicely with a scoop of vanilla ice cream or a swirl of whipped cream for extra indulgence. If you’re serving a crowd, set out a bowl of extra sprinkles and candies so everyone can “decorate” their own slice—makes for a fun, interactive dessert bar!
To store, cover the pan tightly with plastic wrap or foil and refrigerate for up to 4 days. The flavors deepen as it sits, and honestly, the texture gets even better after a night in the fridge. For longer storage, freeze tightly covered for up to 1 month—just thaw overnight in the fridge before serving. If you have leftovers (a rare occurrence in my house), individual portions can be wrapped and frozen for a quick treat any time you need a taste of Christmas.
Flavors may mellow over time, and the crust may soften, but it’s always delicious. Just add a fresh sprinkle of crushed candies before serving to revive that festive crunch!
Nutritional Information & Benefits
Here’s the scoop: a typical serving (about 1/12th of the pan) of No-Bake Christmas Oreo Lasagna clocks in around 320 calories, with 18g fat, 39g carbohydrates, and 4g protein. It’s a treat, not a health food, but the joy it brings is absolutely worth it now and then.
Key ingredients like cream cheese provide calcium and a bit of protein, while peppermint candies can help freshen up your post-dessert breath (bonus!). If you’re aiming for lower sugar, you can use sugar-free pudding and light whipped topping—just watch the setting times, as they can be softer.
This dessert is naturally nut-free (as long as your candies and cookies are safe), and can be adapted to be gluten-free or dairy-free with a few easy swaps. That said, it does contain dairy and gluten in its classic form, so always check your ingredient labels if allergies are a concern.
For me, the real “wellness” benefit is the happiness that comes from sharing a no-fuss, festive treat with people you love. That’s holiday magic, plain and simple.
Conclusion
If you’re searching for a holiday dessert that’s foolproof, festive, and guaranteed to spark joy, this No-Bake Christmas Oreo Lasagna is your answer. It delivers on every front: easy to make, impossible to resist, and endlessly customizable. Whether you’re a kitchen newbie or a seasoned baker looking for a break from the oven, you’ll love how this recipe brings everyone together around the table.
Don’t be afraid to put your own twist on it—swap flavors, add your favorite candies, or go wild with the sprinkles. Each batch is a new adventure! Personally, I love how every bite takes me back to cozy holiday gatherings with my family, laughter echoing, and forks clinking against plates. That’s the kind of happiness I want to share with you.
If you try this No-Bake Christmas Oreo Lasagna, let me know how it turns out! Leave a comment, share your favorite variation, or tag me on social media so I can see your festive creations. Here’s to sweet memories, simple joys, and plenty of Oreo crumbs this Christmas—happy holidays and happy no-baking!
Frequently Asked Questions
Can I make No-Bake Christmas Oreo Lasagna ahead of time?
Absolutely! In fact, it tastes even better after chilling overnight. Just add sprinkles and crunchy toppings right before serving so they stay fresh and colorful.
What if I can’t find Christmas Oreos?
No worries—use regular Oreos and add festive sprinkles or colored sugar to the crust and topping. You’ll still get that holiday look and flavor!
How do I make this gluten-free?
Use gluten-free chocolate sandwich cookies and check your pudding mix for gluten-containing ingredients. All other layers can stay the same or be swapped for your favorite gluten-free brands.
Can I freeze leftovers?
Yes! Slice the lasagna, wrap pieces tightly, and freeze for up to 1 month. Thaw in the fridge before eating. The crust may be a bit softer, but it’ll still taste fantastic.
What’s the best way to get clean slices?
Use a sharp knife dipped in hot water and wipe it clean between cuts. Chilling the lasagna overnight also helps the layers set for picture-perfect servings.
Pin This Recipe!

No-Bake Christmas Oreo Lasagna

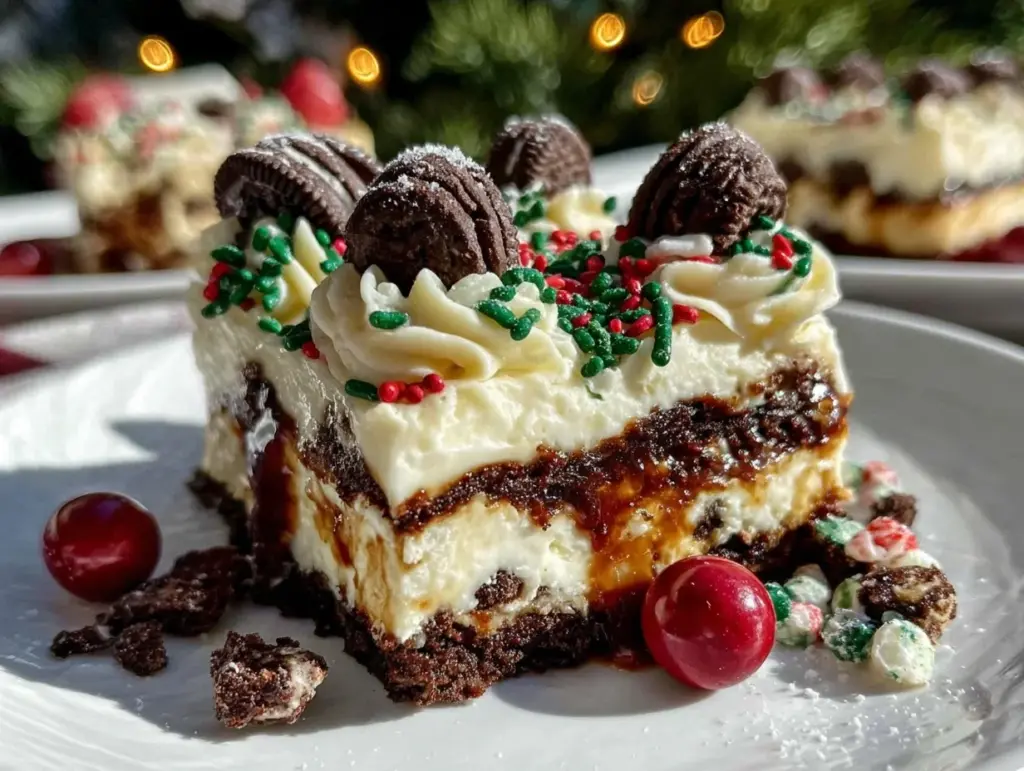
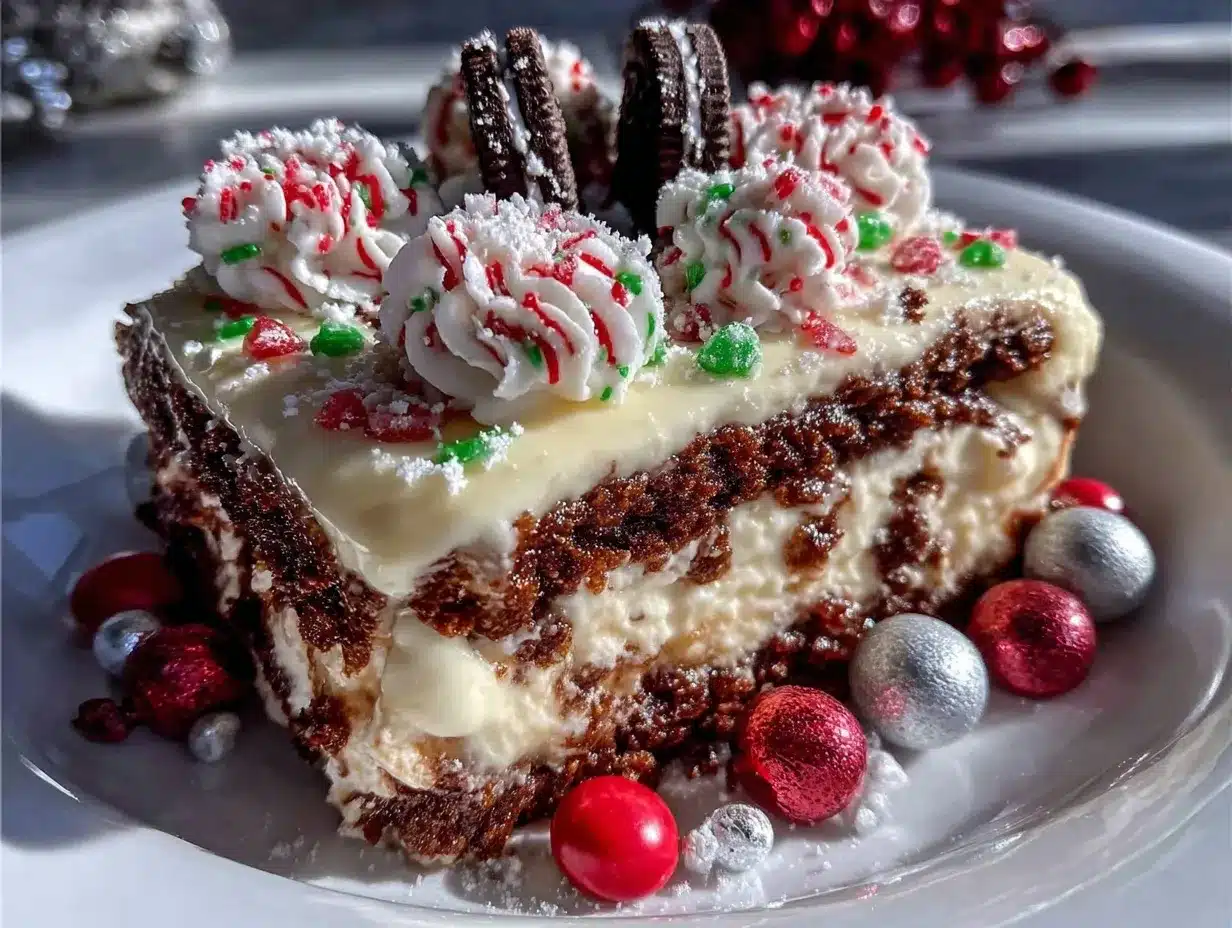
This festive, no-bake Christmas Oreo Lasagna features layers of crunchy Oreo crust, creamy peppermint cream cheese, rich pudding, and fluffy whipped topping, all topped with holiday sprinkles and crushed candies. It’s an easy, crowd-pleasing dessert perfect for holiday gatherings, potlucks, or family celebrations.
- Prep Time: 25 minutes
- Cook Time: 0 minutes
- Total Time: 4 hours 25 minutes (includes chilling time)
- Yield: 12 servings 1x
- Category: Dessert
- Cuisine: American
Ingredients
- 36 Christmas Oreo cookies (about 2 regular packs, or use classic Oreos with red and green holiday sprinkles for color)
- 6 tablespoons unsalted butter, melted
- 8 ounces cream cheese, softened to room temperature
- 1/2 cup powdered sugar
- 2 tablespoons milk (whole or 2%)
- 1 teaspoon pure vanilla extract
- 1/2 teaspoon peppermint extract (optional)
- 1 1/2 cups whipped topping (like Cool Whip, thawed)
- 1 package (3.4 ounces) instant chocolate pudding mix
- 1 package (3.4 ounces) instant vanilla pudding mix
- 2 3/4 cups cold milk (whole or skim)
- 2 cups whipped topping (Cool Whip or homemade sweetened whipped cream)
- 1/2 cup crushed peppermint candies or candy canes
- Holiday sprinkles (red, green, white)
- Extra Oreo crumbs or mini Oreos for garnish (optional)
Instructions
- Crush the Oreos: Place 36 Christmas Oreos in a food processor and pulse until fine crumbs form. Alternatively, place cookies in a zip-top bag and crush with a rolling pin. Reserve 1/4 cup crumbs for garnish.
- Make the Crust: Pour Oreo crumbs into a mixing bowl. Add 6 tablespoons melted butter and stir until all crumbs are coated. Press mixture into the bottom of a 9×13-inch baking dish. Chill in the fridge for about 10 minutes.
- Prepare the Cream Cheese Layer: In a bowl, beat 8 ounces softened cream cheese until smooth and fluffy. Add 1/2 cup powdered sugar, 2 tablespoons milk, 1 teaspoon vanilla extract, and 1/2 teaspoon peppermint extract (if using). Beat until creamy. Gently fold in 1 1/2 cups whipped topping until smooth. Spread evenly over the chilled Oreo crust.
- Mix the Pudding Layer: In another bowl, whisk together 1 package chocolate pudding mix, 1 package vanilla pudding mix, and 2 3/4 cups cold milk for 2 minutes until thickened. Let sit for 5 minutes to set. Spread pudding evenly over the cream cheese layer.
- Add the Final Topping: Gently spread 2 cups whipped topping over the pudding layer. Sprinkle with reserved Oreo crumbs, 1/2 cup crushed peppermint candies, and holiday sprinkles. Add mini Oreos if desired.
- Chill: Cover with plastic wrap or foil and refrigerate for at least 4 hours (overnight is best).
- Slice and Serve: Use a sharp knife dipped in hot water, wiping between cuts for clean slices. Serve chilled.
Notes
For best results, chill overnight for neat slices and melded flavors. For gluten-free, use gluten-free sandwich cookies. For dairy-free, substitute with plant-based cream cheese, non-dairy whipped topping, and non-dairy milk. Add crunchy toppings just before serving to keep them crisp. Customize with different extracts or cookies for fun variations.
Nutrition
- Serving Size: 1/12th of the pan
- Calories: 320
- Sugar: 26
- Sodium: 270
- Fat: 18
- Saturated Fat: 10
- Carbohydrates: 39
- Fiber: 1
- Protein: 4
Keywords: no-bake, Christmas dessert, Oreo lasagna, holiday dessert, peppermint, easy dessert, potluck, layered dessert, festive, kid-friendly


