The moment the scent of bubbling cheese and roasted garlic hits my kitchen, I know something cozy is about to happen—air fryer cheesy garlic bread is that kind of magic. There’s just something about the crisp edges, melty cheese, and that unmistakable garlicky aroma that has everyone (even the pickiest eaters) dropping what they’re doing to snag a piece. Honestly, this recipe became a family favorite the very week I got my air fryer! I was on a mission to turn out golden, restaurant-style cheesy garlic bread at home, but with less mess and a much faster turnaround. You know what? The air fryer did not disappoint.
I still remember the first time I threw together this cheesy garlic bread in the air fryer on a whim—no oven preheating, no babysitting the broiler, and definitely no burnt edges. Just quick assembly, a few minutes in the basket, and, boom, the perfect cheesy garlic bread every single time. As a busy parent and a home cook who hates waiting, this has been my go-to for last-minute sides, game nights, and even “just because” snacking. It’s not only a time-saver but a crowd-pleaser, too.
If you’ve been skeptical about making garlic bread in an air fryer, trust me—once you try this air fryer cheesy garlic bread, there’s no going back. The air fryer gives it that beautiful crunch while keeping the inside soft and fluffy. Plus, you can customize the cheese blend or add a sprinkle of herbs for extra flavor. Whether you’re a beginner in the kitchen or someone who’s always on the run, you’ll love how this recipe brings cheesy, garlicky goodness to your table in just minutes. It’s easy enough for kids to help with and impressive enough for guests. After testing this recipe more times than I can count (my family never complains), I can confidently say: it’s foolproof, fast, and totally addictive!
Why You’ll Love This Air Fryer Cheesy Garlic Bread
- Quick & Easy: From pantry to plate in under 15 minutes—no oven drama, no complicated steps. Perfect for weeknights or sudden carb cravings.
- Simple Ingredients: Nothing fancy here; just bread, butter, garlic, cheese, and a sprinkle of herbs. You probably have everything already.
- Perfect for Any Occasion: This air fryer cheesy garlic bread is a must-have for pasta nights, potlucks, game days, or just a cozy snack on the couch.
- Crowd-Pleaser: Kids, teens, adults—everyone fights for the last piece. It’s gooey, golden, and downright addictive.
- Unbeatable Flavor & Texture: The air fryer creates that crisp, golden crust while keeping the inside soft and cheesy. You get the best of both worlds!
You know what sets this recipe apart? I blend softened butter, freshly minced garlic, and a pinch of Italian herbs before spreading it over the bread. Then I layer on a generous mix of mozzarella and sharp cheddar for a gooey, flavorful melt that doesn’t just taste like any old garlic bread—it’s the kind you crave. The air fryer’s quick, hot blast caramelizes the cheese just right, giving every bite a little crunch and a lot of ooze. No soggy bread, no burnt edges, just pure garlic bread bliss.
When I first started making air fryer cheesy garlic bread, I worried it wouldn’t measure up to the classic oven-baked version. But honestly, it’s better—faster, less cleanup, and the cheese-to-bread ratio is perfect every time. I’ve made this for family dinners, neighborhood potlucks, and even as a midnight snack. The best part? It makes a simple spaghetti dinner feel like a feast, and it’s practically foolproof. Whether you’re a total kitchen newbie or a seasoned home cook, you’re going to love making (and eating) this cheesy, garlicky side dish!
What Ingredients You Will Need
This air fryer cheesy garlic bread recipe keeps things simple but big on flavor. Most ingredients are basic pantry staples, and you can swap in what you have or adjust to your taste—no stress, just yum.
- Bread: 1 loaf Italian bread, French baguette, or ciabatta (about 12oz/340g), halved lengthwise (day-old bread works great for extra crunch)
- Butter: 1/2 cup (115g) unsalted butter, softened (room temperature for easy spreading)
- Fresh Garlic: 3-4 cloves, minced or pressed (for that real garlic kick; jarred works in a pinch, but fresh is best)
- Mozzarella Cheese: 1 cup (100g), shredded (low-moisture works best for gooey melt)
- Cheddar Cheese: 1/2 cup (60g), shredded (adds sharpness; use Monterey Jack for a milder taste)
- Parmesan Cheese: 1/4 cup (25g), finely grated (for a salty, nutty finish; optional, but I love it!)
- Italian Seasoning: 1 teaspoon (or use dried oregano and basil separately)
- Fresh Parsley: 2 tablespoons, chopped (for garnish and a pop of color; skip if you don’t have it)
- Salt & Pepper: To taste (just a pinch; cheese is salty, so don’t overdo it)
- Optional – Red Pepper Flakes: A pinch (for a bit of heat)
Ingredient Tips:
- Best Bread: I usually grab a day-old Italian loaf from the bakery—holds up perfectly under all that cheese and butter. Baguette makes smaller, crispier pieces; ciabatta is super rustic and chewy.
- Butter: Salted butter works if that’s what you have—just taste before adding extra salt.
- Cheese: Try mozzarella and provolone for a super-stretchy melt, or go all cheddar for that sharp bite. For a dairy-free version, use your favorite plant-based butter and cheese shreds (I’ve tried it—still delish!).
- Garlic: If you’re really in a hurry, garlic powder can stand in. Use about 1 teaspoon, but trust me, fresh garlic is worth it if you have time.
- Herbs: Dried Italian seasoning is super convenient, but fresh basil or parsley makes it extra pretty for serving.
You can swap in gluten-free bread, use vegan cheese, or even try a whole wheat loaf for something a little more wholesome. I’ve made it with all kinds of bread and cheese combos—cheesy garlic bread is pretty forgiving!
Equipment Needed
- Air Fryer: Any basket-style or oven-style air fryer will work (I use a 4-quart Cosori, but even the small ones do the trick!)
- Bread Knife: For slicing your loaf evenly (a serrated knife makes it way easier and less crumbly)
- Cutting Board: For safe and steady slicing
- Mixing Bowl: To blend the garlic butter mixture
- Spoon or Small Spatula: For spreading the buttery goodness
- Measuring Cups & Spoons: For accuracy—though I’ll admit, sometimes I eyeball the cheese
- Parchment Paper or Foil (optional): For easier cleanup, especially if your air fryer basket tends to get messy
- Tongs: For removing the hot bread safely
Personal Tips: I’ve used everything from an old-school bread knife to a cheap plastic spatula—don’t stress if you’re missing a “fancy” tool. Just be gentle spreading the butter so the bread doesn’t tear. If your air fryer basket is on the smaller side, cut the bread into pieces that fit comfortably. And don’t forget: a little parchment paper in the basket saves on scrubbing melted cheese later!
Preparation Method

-
Prep the Bread:
Slice your loaf (Italian, French, or ciabatta) in half lengthwise. If your air fryer is small, cut each half into pieces that fit in the basket—usually about 6-inch (15cm) chunks. Don’t worry if it looks rustic; garlic bread is all about flavor, not perfection! -
Make the Garlic Butter:
In a mixing bowl, combine 1/2 cup (115g) softened unsalted butter, 3-4 minced garlic cloves, 1 teaspoon Italian seasoning, and a pinch of salt and pepper. Stir until it’s smooth and spreadable. (If your butter’s a bit hard, microwave it for 10 seconds.) -
Spread the Goodness:
Smear the garlic butter mixture evenly across the cut side of each bread piece. Don’t skimp—this is where the flavor happens! Make sure to get all the way to the edges for maximum crispiness and taste. -
Add the Cheese:
Sprinkle a generous layer of shredded mozzarella (1 cup/100g) and cheddar (1/2 cup/60g) over the buttered bread. Top with 1/4 cup (25g) grated Parmesan if using. Give it a gentle press so the cheese sticks. Want it extra cheesy? Add another handful—no one’s judging! -
Preheat the Air Fryer:
Set your air fryer to 350°F (175°C) and let it run for 2-3 minutes. This helps the bread start crisping right away. If your air fryer doesn’t preheat, just add a minute to the cook time. -
Air Fry the Bread:
Place the bread pieces, cheese side up, in a single layer in the basket. Don’t overcrowd—work in batches if needed. Air fry for 5-7 minutes, until the cheese is melted, bubbly, and starting to brown at the edges. (Tip: Check at 5 minutes; some air fryers run hot! If the cheese is browning too fast, lower the temp to 320°F/160°C.)
Warning: Cheese can fly around in the air fryer. Press it in well, or cover loosely with a small piece of foil for the first few minutes if needed. -
Garnish & Serve:
Carefully remove the hot bread with tongs. Sprinkle with chopped parsley and a pinch of red pepper flakes if you like a little heat. Slice and serve immediately—cheesy garlic bread waits for no one!
Troubleshooting:
- If bread is too crisp before the cheese melts, lower the temperature and cook a bit longer.
- If the cheese isn’t browning, add an extra minute or two and check often.
- If your bread feels too soft, let it rest in the air fryer for 1 minute after the timer stops. The residual heat crisps up the bottom perfectly.
Personal Prep Note: I always check the bread at the 5-minute mark—every air fryer has its own quirks. Don’t wander too far; cheesy garlic bread goes from perfect to “oops!” in no time. And if you’re making a double batch, keep the first round warm in a low oven (250°F/120°C) while you finish the rest.
Cooking Tips & Techniques
- Even Layer, Even Melt: Spread the garlic butter all the way to the edges of the bread. This helps every bite crisp up and keeps the cheese from sliding off.
- Press Down the Cheese: After sprinkling the cheese, press it gently into the buttered bread. This little trick helps it stay put during the air fry cycle (otherwise, you might find cheese blown around your basket!).
- Watch the Timing: Air fryers work fast. I once overcooked a batch by just 2 minutes—super crunchy, but not in a good way! Start checking at 5 minutes and go from there.
- Batch Cooking: If your air fryer basket is small, work in batches. Overcrowding leads to uneven melting and less crispy edges. Trust me, I tried to squeeze in too much once—ended up with half-melted, floppy bread. Not worth it.
- Don’t Skip Preheating: Preheating the air fryer (even for just 2 minutes) gives you that immediate sizzle and guarantees a golden, crisp crust.
- Cleanup Made Easy: Place a small piece of parchment paper under the bread. It keeps cheese from sticking to the basket and makes cleanup painless.
Personal Lessons Learned: Early on, I’d try to “eyeball” the cheese and butter, but too much butter made the bread soggy, and too little cheese just felt sad. Now I measure loosely, but don’t overdo either—there’s a sweet spot for that perfect gooey-but-crisp bite.
Consistency Tip: Use bread that’s a day old or slightly stale. Fresh bread is great, but the texture is best when it’s not super soft. It holds up under all the toppings and gets extra crunchy in the air fryer.
Variations & Adaptations
- Gluten-Free Cheesy Garlic Bread: Use your favorite gluten-free bread. I’ve tried this with gluten-free baguettes, and the results are still cheesy and crisp—just watch the cook time, as some gluten-free breads brown faster.
- Vegan Option: Swap in plant-based butter and dairy-free cheese shreds. A sprinkle of nutritional yeast adds a savory, “cheesy” flavor. I used this option for a vegan friend, and nobody missed the dairy!
- Spicy Jalapeño: Add thinly sliced jalapeños or a pinch of cayenne to the cheese mix. This is a favorite for game day at our house—cheesy, garlicky, and with a kick.
- Pesto Twist: Spread a thin layer of basil pesto on the bread before adding the cheese and garlic butter. It brings a fresh, herby flavor that’s perfect for summer.
- Different Cheeses: Switch up the cheese blend: provolone, Monterey Jack, or gouda all work beautifully. Use what you like or what’s in the fridge!
Personal Favorite: Sometimes I sprinkle crumbled cooked bacon over the cheese before air frying—super indulgent, but oh so good. You can also top with chopped sun-dried tomatoes or olives for a Mediterranean vibe.
For allergens, choose lactose-free cheese or gluten-free bread as needed. To make in the oven, follow the same steps but bake at 400°F (200°C) for 10-12 minutes—watch closely for bubbling cheese and golden edges.
Serving & Storage Suggestions
Air fryer cheesy garlic bread is best served hot and melty, straight from the basket. Slice each piece into strips or triangles for easy sharing—kids love dunking them!
- Serving Ideas: Pair with classic spaghetti, lasagna, or a hearty soup. It’s also amazing with a crisp Caesar salad or alongside grilled chicken. For a party, serve with warmed marinara for dipping—always a hit.
- Presentation Tip: Sprinkle with extra parsley or a dash of red pepper flakes for color and a little zing. Arrange on a wooden board for that rustic, Pinterest-worthy look.
- Storage: Store leftovers in an airtight container in the fridge for up to 2 days. The bread will soften, but it reheats beautifully.
- Reheating: Pop pieces back in the air fryer at 320°F (160°C) for 2-3 minutes, or until warmed through and crispy again. The microwave works in a pinch, but the bread won’t be as crunchy.
- Make Ahead: You can prep the buttered, cheese-topped bread ahead of time and refrigerate for up to 8 hours. Just air fry when ready to serve.
Flavor Note: I find the garlic flavor deepens after a few hours, so leftovers are still super tasty. If you want extra crunch, reheat uncovered in the air fryer for best results.
Nutritional Information & Benefits
Here’s a rough estimate for one serving (about 1/6 of the loaf):
- Calories: 230
- Protein: 8g
- Fat: 13g
- Carbs: 21g
- Calcium: 15% DV
Key Benefits: The cheese adds protein and calcium, while garlic brings antioxidants and immune-boosting goodness. Using whole wheat or gluten-free bread can make it a better fit for special diets.
Allergen Note: Contains dairy and gluten—use substitutions as needed for allergies or sensitivities. I’ve made it with vegan cheese and gluten-free bread for friends, and it still disappears in minutes!
From a wellness perspective, I see this as a treat—comfort food that makes a meal feel special. Pair with a fresh salad for a balanced plate, and enjoy every cheesy, garlicky bite!
Conclusion
If you’ve been craving that perfect, crispy-yet-gooey garlic bread but don’t want to wait for the oven, this air fryer cheesy garlic bread is your new best friend. Fast, foolproof, and endlessly customizable, it’ll steal the show at any meal or gathering. I love how it transforms even the simplest dinner into something special—and, let’s be honest, it’s the first thing gone at every family get-together.
Don’t be afraid to make it your own—switch up the cheeses, sneak in some herbs, or try a spicy twist. This recipe is meant for sharing and adapting to your cravings. Honestly, every time I pull a batch from the air fryer, I know I’m about to make people happy.
I hope you’ll try this air fryer cheesy garlic bread and let me know how it turns out for you! Leave a comment with your favorite variations or share a picture of your masterpiece. Go on, treat yourself—you deserve it! Happy air frying!
Frequently Asked Questions
Can I use pre-sliced bread for this air fryer cheesy garlic bread?
Yes! Just layer the garlic butter and cheese on each slice. Reduce the air fry time to 3-5 minutes since thinner slices cook faster.
What’s the best bread to use for cheesy garlic bread in the air fryer?
Italian or French loaves work best—they’re sturdy and crisp up nicely. Baguette is great for bite-sized pieces, and ciabatta gives a rustic texture.
Can I make this recipe dairy-free?
Absolutely. Use plant-based butter and your favorite dairy-free cheese shreds. Add a sprinkle of nutritional yeast for extra cheesy flavor.
How do I keep the cheese from flying off in the air fryer?
Press the cheese gently into the buttered bread, or cover loosely with foil for the first few minutes. It helps keep everything in place!
How long does leftover cheesy garlic bread last, and how do I reheat it?
Store leftovers in the fridge for up to 2 days. Reheat in the air fryer at 320°F (160°C) for 2-3 minutes to restore crispiness.
Pin This Recipe!
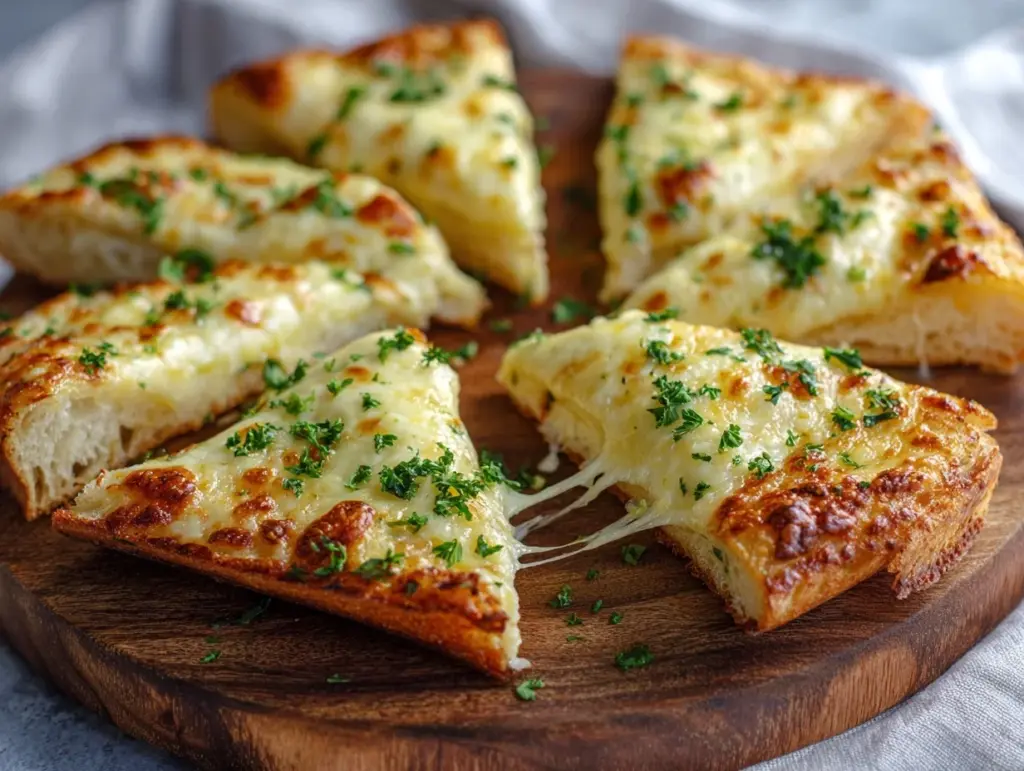
Air Fryer Cheesy Garlic Bread

This air fryer cheesy garlic bread is quick, easy, and irresistibly delicious, featuring crisp edges, gooey cheese, and a bold garlic flavor. Perfect as a side for pasta, soups, or as a crowd-pleasing snack, it comes together in under 15 minutes with minimal mess.
- Prep Time: 7 minutes
- Cook Time: 7 minutes
- Total Time: 14 minutes
- Yield: 6 servings 1x
- Category: Side Dish
- Cuisine: American, Italian
Ingredients
- 1 loaf Italian bread, French baguette, or ciabatta (about 12oz), halved lengthwise
- 1/2 cup unsalted butter, softened
- 3–4 cloves fresh garlic, minced or pressed
- 1 cup shredded mozzarella cheese
- 1/2 cup shredded cheddar cheese
- 1/4 cup finely grated Parmesan cheese (optional)
- 1 teaspoon Italian seasoning (or dried oregano and basil)
- 2 tablespoons fresh parsley, chopped (for garnish)
- Salt & pepper, to taste
- Pinch of red pepper flakes (optional, for heat)
Instructions
- Slice the loaf in half lengthwise. If needed, cut each half into pieces that fit your air fryer basket (about 6-inch chunks).
- In a mixing bowl, combine softened butter, minced garlic, Italian seasoning, and a pinch of salt and pepper. Mix until smooth and spreadable.
- Spread the garlic butter mixture evenly over the cut side of each bread piece, reaching all the way to the edges.
- Sprinkle shredded mozzarella and cheddar cheese evenly over the buttered bread. Top with grated Parmesan if using, and gently press the cheese into the bread.
- Preheat the air fryer to 350°F for 2-3 minutes.
- Place bread pieces, cheese side up, in a single layer in the air fryer basket. Do not overcrowd; work in batches if needed.
- Air fry for 5-7 minutes, until cheese is melted, bubbly, and starting to brown at the edges. Check at 5 minutes and adjust time as needed.
- Carefully remove bread with tongs. Garnish with chopped parsley and red pepper flakes if desired. Slice and serve immediately.
Notes
Use day-old bread for extra crunch. Press cheese gently into the buttered bread to prevent it from flying off in the air fryer. If your air fryer is small, work in batches. For gluten-free or vegan options, substitute bread and cheese as needed. Store leftovers in an airtight container in the fridge for up to 2 days and reheat in the air fryer for best results.
Nutrition
- Serving Size: 1/6 loaf (about 2 slices)
- Calories: 230
- Sugar: 2
- Sodium: 350
- Fat: 13
- Saturated Fat: 7
- Carbohydrates: 21
- Fiber: 1
- Protein: 8
Keywords: air fryer garlic bread, cheesy garlic bread, quick side dish, easy garlic bread, air fryer recipes, kid friendly, party appetizer, vegetarian, comfort food