The first time I pulled this cheesy garlic pepperoni pizza pull-apart bread wreath out of the oven, the kitchen filled with that unmistakable aroma of bubbling cheese, sizzling pepperoni, and toasty garlic. You know the one—it makes you drop whatever you’re doing and wander closer, pretending you’re “just checking” on dinner. Honestly, this recipe is pure party magic. I stumbled on the idea during a holiday potluck scramble, trying to mash up my love for gooey pizza and crowd-pleasing appetizers. Spoiler: it totally worked.
It’s funny—this cheesy pull-apart bread wreath has become my go-to for just about every gathering, from Super Bowl get-togethers to birthday brunches. I’ve tweaked it over time, swapping cheeses, playing with herbs, and sometimes sneaking in extra garlic (it’s never too much, right?). There’s something about tearing off those soft, golden, cheese-laced bites that brings everyone together—like nobody’s too grown-up for a little hands-on pizza fun.
So, why should you make this irresistible cheesy garlic pepperoni pizza pull-apart bread wreath? For one, it’s outrageously tasty—think soft, pillowy dough, melty cheese, zippy pepperoni, and garlicky butter all working together in every bite. Plus, it’s easy to prep ahead, transport, and serve. Perfect for busy hosts or anyone who loves a recipe that looks as impressive as it tastes. If you’re looking to wow friends, feed a crowd, or just want to treat yourself to next-level comfort food, this is your answer. Let’s get started!
Why You’ll Love This Cheesy Garlic Pepperoni Pull-Apart Bread Wreath
- Quick & Easy: This cheesy garlic pepperoni pizza pull-apart bread wreath comes together in about an hour, including bake time. No need for fancy dough skills or endless prep—just simple steps and big flavors.
- Simple Ingredients: Everything you need is pretty basic—store-bought pizza dough, shredded mozzarella, pepperoni, and a handful of pantry staples. No hunting for rare ingredients.
- Perfect for Parties: Whether it’s a holiday appetizer, game day feast, or family movie night, this pull-apart bread shines as the centerpiece (and it looks stunning on the table!).
- Crowd-Pleaser: I’ve made this for picky kids, cheese-obsessed adults, and everyone in between—it disappears fast, every single time.
- Unbelievably Delicious: The combination of crispy golden edges, gooey cheese, and garlicky butter is just… wow. It’s like the best parts of pizza in every bite.
What really makes this cheesy garlic pepperoni pull-apart bread wreath stand out? For starters, I blend the garlic butter with Italian herbs and brush it over each dough ball before and after baking—it’s a trick I learned after a few flavor “misses” early on. The result? Super flavorful, buttery pieces that don’t dry out. And using a bundt pan or arranging the dough in a wreath shape gives it that wow-factor for the holidays or any special occasion.
You know those recipes that people talk about for months after? This is one of them. I’ve gotten texts asking for the “pizza wreath recipe” more times than I can count. It’s comforting, easy, and always gets people gathering around (sometimes fighting for the last piece—true story!). If you need a showstopper that’s secretly simple, this is your new best friend.
What Ingredients You Will Need
This cheesy garlic pepperoni pizza pull-apart bread wreath recipe uses straightforward, wholesome ingredients that come together for that classic pizza flavor—no stress, just crave-worthy results. Most of these are pantry or fridge staples, and there are easy swaps if you want to customize. Here’s what you’ll want on hand:
- For the Dough:
- 2 cans (about 16 oz/450g each) refrigerated pizza dough (or homemade, if you’re feeling ambitious!)
- Tip: Store-bought dough saves so much time and works beautifully, but if you have a favorite homemade recipe, go for it.
- For the Cheesy Filling:
- 2 cups (200g) shredded mozzarella cheese (whole milk for max meltiness)
- 1 cup (100g) shredded cheddar cheese (adds a little sharpness—optional, but so good)
- 1/2 cup (50g) grated Parmesan cheese (for that salty, nutty finish)
- 1/2 cup (80g) mini pepperoni slices (or regular, chopped small)
- Note: Turkey or plant-based pepperoni works well for different diets.
- For the Garlic Butter:
- 6 tbsp (85g) unsalted butter, melted
- 3-4 cloves garlic, minced (about 2 tbsp/20g)
- 1 tbsp fresh parsley, finely chopped (or 1 tsp dried parsley flakes)
- 1 tsp Italian seasoning blend
- 1/4 tsp crushed red pepper flakes (optional, for a little kick)
- Note: If you love garlic, don’t be shy—add an extra clove or two.
- For Assembly & Serving:
- Cooking spray or extra butter (for greasing the pan)
- 1 cup (250ml) pizza sauce or marinara (for dipping)
- Extra Parmesan and parsley for garnish
Substitution Suggestions:
- Gluten-Free: Use your favorite gluten-free pizza dough (I’ve had good luck with the Schär brand).
- Dairy-Free: Swap in vegan cheeses and vegan butter. Daiya mozzarella melts well, and Miyoko’s vegan butter is a solid choice.
- No Pepperoni? Use cooked sausage, sliced olives, or diced veggies like bell peppers or jalapeños.
- Cheese Options: Try Monterey Jack for extra meltiness or provolone for a milder flavor.
Honestly, the best part is you can make this work with whatever you have in the fridge. Don’t stress if you’re missing one of the cheeses—just toss in what you love most.
Equipment Needed
- Bundt Pan or Ring Cake Pan: This gives the wreath its gorgeous shape. No bundt pan? Use a round cake pan and shape the dough into a ring, leaving the center open.
- Mixing Bowls: At least two—one for the cheeses and one for the garlic butter.
- Basting Brush: For brushing on all that dreamy garlic butter. If you don’t have one, a spoon works (just go gently).
- Measuring Cups and Spoons: Precision helps keep the flavors balanced.
- Sharp Knife or Pizza Cutter: For cutting the dough into pieces.
- Baking Sheet (optional): If you’re not using a pan, shape the wreath on a lined baking sheet.
- Aluminum Foil: Useful if the top browns too quickly—just tent loosely.
- Serving Platter: To show off your beautiful wreath!
If you’re just starting out, don’t worry about having the fanciest tools. I made my first pull-apart bread with just an old cake pan and a silicone spatula, and it still turned out amazing. Wash your basting brush right after use so the garlic butter doesn’t harden—trust me, that stuff can be stubborn! And if you’re on a budget, there’s no need to buy a new pan; shape the dough free-form on parchment, and it’ll still look festive.
Preparation Method

-
Prep Your Pan and Preheat:
Preheat your oven to 350°F (175°C). Generously grease a bundt or ring pan with butter or cooking spray. If using a baking sheet, line it with parchment paper for easy cleanup.
-
Mix the Cheesy Filling:
In a large bowl, combine 2 cups (200g) mozzarella, 1 cup (100g) cheddar, 1/2 cup (50g) Parmesan, and 1/2 cup (80g) mini pepperoni slices. Toss together until evenly mixed. Set aside.
-
Make the Garlic Butter:
Melt 6 tbsp (85g) unsalted butter in a small bowl. Stir in minced garlic, 1 tbsp parsley, 1 tsp Italian seasoning, and a pinch of red pepper flakes. The aroma will be strong—don’t worry, it mellows during baking.
-
Cut and Fill the Dough:
Unroll the pizza dough onto a lightly floured surface. Cut each can into 16 pieces (about 1.5-inch/4cm squares)—you’ll have 32 pieces total. Flatten each square slightly, then place a spoonful of cheese-pepperoni mixture in the center. Pinch the edges to seal and roll into a ball. It’s okay if a little cheese peeks out.
Prep Note: Don’t overfill or the cheese may leak (not the worst problem, but a little messy!).
-
Shape the Wreath:
Arrange the filled balls, seam side down, in the prepared bundt pan or in a ring shape on your baking sheet. Pack them snugly—this helps them bake up nice and fluffy.
-
Brush with Garlic Butter:
Reserve about 1/4 of the butter for later. Brush the rest generously over the dough balls, making sure to get all the nooks and crannies.
-
Bake:
Bake for 30-35 minutes, or until the bread is golden brown and sounds hollow when tapped. If the top browns too quickly, tent with foil for the last 10 minutes.
Sensory Cue: The kitchen should smell like a pizzeria by now—warm, garlicky, and inviting!
-
Cool and Unmold:
Let the wreath cool in the pan for 10 minutes, then carefully invert onto a serving platter. Use a butter knife to loosen any sticky spots if needed.
Warning: The cheese will be hot—don’t burn your fingers!
-
Finish and Serve:
Brush the warm bread with the remaining garlic butter. Sprinkle extra Parmesan and parsley over the top for a beautiful finish. Serve with a bowl of pizza sauce for dipping.
Troubleshooting:
- If the dough balls won’t seal, pinch the seams again and roll gently. A little water on your fingertips can help.
- If cheese leaks, don’t stress—those crispy cheese bits are delicious!
- For a crispier crust, bake closer to 40 minutes, but watch closely so it doesn’t over-brown.
Personal Tip: I always sneak one piece right after brushing with the last bit of garlic butter. It’s the cook’s reward, right?
Cooking Tips & Techniques
- Use Room Temperature Dough: Cold dough can shrink and be hard to work with. Let it rest on the counter for 15-20 minutes before shaping. (Learned that after a few stubborn batches!)
- Don’t Overload the Filling: Too much cheese or pepperoni makes it hard to seal the balls. Stick to about 1 tablespoon of filling per piece for best results.
- Brush Butter in Layers: Brushing before and after baking gives maximum flavor and a shiny, golden finish. If you skip the post-bake brush, you’ll miss out on that mouthwatering sheen.
- Keep It Snug: Nestle the dough balls close together in the pan—they’ll rise and bake into each other, creating that classic pull-apart texture.
- Check for Doneness: The top should be a deep golden color and the edges should pull away slightly from the pan. If in doubt, use a thermometer—the center should hit at least 190°F (88°C).
- Timing is Everything: If you’re making this ahead, assemble the wreath and keep it covered in the fridge for up to 4 hours. Bake just before serving for ultimate freshness.
I’ve had a few “oops” moments—like forgetting to grease the pan (hello, stuck bread!), or pulling it out too soon and ending up with doughy centers. If you’re multitasking, set a timer and check the bread at the 25-minute mark. And don’t worry if it’s not perfect—pizza pull-apart bread is meant to be a little rustic and a lot of fun.
Variations & Adaptations
- Vegetarian Version: Skip the pepperoni and add sautéed mushrooms, spinach, or sun-dried tomatoes to the cheese filling. A little feta or goat cheese is amazing here, too.
- Spicy Buffalo Style: Mix cooked shredded chicken with buffalo sauce and a bit of blue cheese into the filling for a bold twist. Serve with ranch or blue cheese dressing for dipping.
- Breakfast Wreath: Swap pepperoni for cooked crumbled breakfast sausage, add scrambled eggs, and use cheddar and Monterey Jack cheeses. Serve with salsa or hot sauce.
- Gluten-Free Adaptation: Use certified gluten-free pizza dough and double-check that your pepperoni and cheese are gluten-free. The process is the same, but bake times might be a touch longer.
- Herb & Garlic Explosion: Add fresh basil, oregano, or rosemary to the garlic butter for an even more fragrant punch. I sometimes toss in a little lemon zest for brightness.
My personal favorite? I once made a Mediterranean-inspired version with olives, roasted red peppers, and feta—huge hit at a summer picnic. Don’t be afraid to experiment; this cheesy garlic pepperoni pull-apart bread wreath is the ultimate blank canvas for your favorite flavors.
Serving & Storage Suggestions
Serve your cheesy garlic pepperoni pizza pull-apart bread wreath warm, right out of the oven, when the cheese is at peak gooeyness. Place it on a big platter with a bowl of pizza sauce or marinara in the center for easy dipping (kids and adults both love this setup).
- Presentation: Garnish with extra parsley or basil for a fresh pop of color. For parties, try placing small bowls of different dipping sauces around the wreath—ranch, spicy aioli, or garlic butter are all winners.
- Pairings: Serve with a crisp Caesar salad, roasted veggies, or a fruity punch for a full spread. If it’s a brunch, pair with mimosas or sparkling water with lemon.
- Storage: Leftovers (if you’re lucky enough to have any!) keep well in an airtight container in the fridge for up to 3 days. Reheat in a 350°F (175°C) oven for 10 minutes, or pop individual pieces in the microwave for 30 seconds.
- Freezing: Freeze baked bread, wrapped tightly, for up to 1 month. Thaw overnight in the fridge and reheat in the oven until warmed through.
- Flavor Note: The garlic butter soaks in as it sits, making leftovers extra flavorful the next day. I honestly think it tastes even better after a night in the fridge!
Nutritional Information & Benefits
This cheesy garlic pepperoni pizza pull-apart bread wreath is definitely a treat, but it’s got a few bright spots too. Each serving (about 1/12 of the wreath) delivers roughly:
- Calories: 270
- Protein: 10g
- Fat: 14g
- Carbs: 26g
- Fiber: 1g
- Sugar: 2g
Health Benefits: The mozzarella and cheddar add a protein boost, and using part-skim cheeses can lighten things up. Swapping turkey or plant-based pepperoni trims saturated fat. Garlic and herbs bring antioxidants and flavor—no need for heavy sauces or extra salt. Just keep in mind, this is an appetizer meant for sharing (or not, if you’re having one of those days!). Allergens include gluten, dairy, and possibly soy from some pepperoni brands. Always check labels if you have sensitivities.
From a wellness perspective, I love that this recipe encourages sharing and gathering—food is about more than just nutrition, after all!
Conclusion
If you’re searching for a show-stopping appetizer that’s easy, delicious, and guaranteed to bring people together, this cheesy garlic pepperoni pizza pull-apart bread wreath is it. It’s the kind of recipe that turns a regular night into something special, with every gooey, garlicky bite. Whether you’re a pizza fanatic, a garlic lover, or just someone who likes to impress with minimal effort, you’ll find yourself coming back to this one again and again.
Feel free to make it your own—swap in your favorite cheeses, play with fillings, or double the garlic (you know you want to). I love seeing how people put their own spin on this recipe and make it work for their families and friends.
So what are you waiting for? Whip up this cheesy garlic pepperoni pull-apart bread wreath, snap a pic, and let me know how it turned out! Drop a comment, share your favorite variation, or tag me in your party pics. Here’s to more cheesy, joyful moments—one pull-apart bite at a time.
Frequently Asked Questions
Can I make this pull-apart bread ahead of time?
Absolutely! You can assemble the wreath up to 4 hours ahead and keep it covered in the fridge. Bake right before serving for the best flavor and texture.
What can I use instead of pepperoni?
Feel free to substitute cooked crumbled sausage, diced veggies (like bell peppers, mushrooms, or olives), or even leave it plain and extra cheesy for a vegetarian version.
Do I have to use a bundt pan?
Nope! You can arrange the dough balls in a ring on a parchment-lined baking sheet or use any round cake pan with a bowl in the center to keep the wreath shape.
How do I keep the bread from sticking to the pan?
Generously grease your pan with butter or cooking spray, and let the bread cool for about 10 minutes before unmolding. If needed, run a butter knife around the edge to loosen it.
Can I freeze the leftovers?
Yes! Wrap leftover bread tightly in foil and freeze for up to 1 month. Thaw in the fridge overnight and reheat in a 350°F (175°C) oven until hot and bubbly again.
Pin This Recipe!

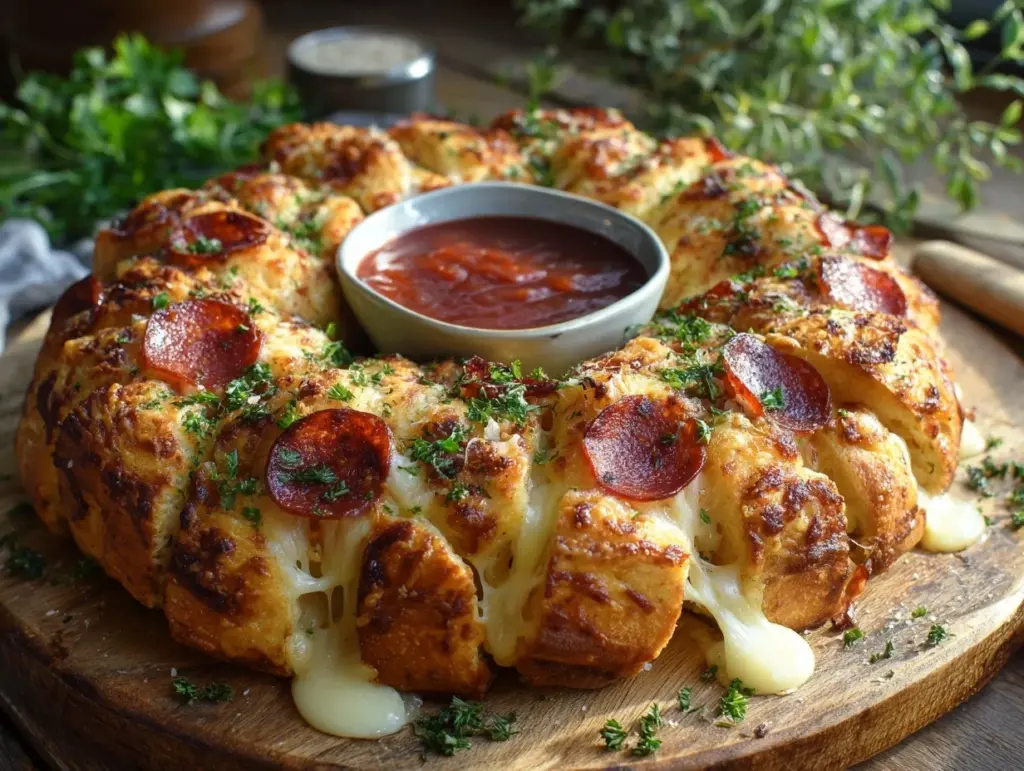
Cheesy Garlic Pepperoni Pull-Apart Bread Wreath

This cheesy garlic pepperoni pull-apart bread wreath is a show-stopping, crowd-pleasing appetizer featuring soft pizza dough stuffed with gooey cheese and zesty pepperoni, all brushed with garlicky herb butter. Perfect for parties, game days, or any gathering, it’s easy to make, fun to eat, and guaranteed to disappear fast.
- Prep Time: 25 minutes
- Cook Time: 35 minutes
- Total Time: 1 hour
- Yield: 12 servings 1x
- Category: Appetizer
- Cuisine: American, Italian-American
Ingredients
- 2 cans (about 16 oz each) refrigerated pizza dough (or homemade)
- 2 cups shredded mozzarella cheese (whole milk recommended)
- 1 cup shredded cheddar cheese (optional, for sharpness)
- 1/2 cup grated Parmesan cheese
- 1/2 cup mini pepperoni slices (or regular, chopped small)
- 6 tbsp unsalted butter, melted
- 3–4 cloves garlic, minced (about 2 tbsp)
- 1 tbsp fresh parsley, finely chopped (or 1 tsp dried parsley flakes)
- 1 tsp Italian seasoning blend
- 1/4 tsp crushed red pepper flakes (optional)
- Cooking spray or extra butter (for greasing the pan)
- 1 cup pizza sauce or marinara (for dipping)
- Extra Parmesan and parsley for garnish
Instructions
- Preheat oven to 350°F (175°C). Generously grease a bundt or ring pan with butter or cooking spray. If using a baking sheet, line it with parchment paper.
- In a large bowl, combine mozzarella, cheddar, Parmesan, and mini pepperoni slices. Toss until evenly mixed and set aside.
- Melt butter in a small bowl. Stir in minced garlic, parsley, Italian seasoning, and red pepper flakes.
- Unroll pizza dough onto a lightly floured surface. Cut each can into 16 pieces (about 1.5-inch squares) for a total of 32 pieces. Flatten each square, place a spoonful of cheese-pepperoni mixture in the center, pinch edges to seal, and roll into a ball.
- Arrange filled balls, seam side down, in the prepared bundt pan or in a ring shape on a baking sheet. Pack them snugly together.
- Reserve about 1/4 of the garlic butter for later. Brush the rest generously over the dough balls.
- Bake for 30-35 minutes, or until golden brown and sounds hollow when tapped. Tent with foil if browning too quickly.
- Let the wreath cool in the pan for 10 minutes, then carefully invert onto a serving platter. Loosen with a butter knife if needed.
- Brush the warm bread with the remaining garlic butter. Sprinkle extra Parmesan and parsley on top. Serve warm with pizza sauce for dipping.
Notes
Let dough come to room temperature before shaping for easier handling. Don’t overfill dough balls to prevent leaks. Brush garlic butter both before and after baking for maximum flavor. Can be assembled up to 4 hours ahead and baked just before serving. Leftovers reheat well and can be frozen for up to 1 month.
Nutrition
- Serving Size: 1/12 of the wreath
- Calories: 270
- Sugar: 2
- Sodium: 600
- Fat: 14
- Saturated Fat: 7
- Carbohydrates: 26
- Fiber: 1
- Protein: 10
Keywords: pull-apart bread, cheesy bread, pepperoni bread, party appetizer, pizza bread, garlic bread, holiday appetizer, game day snack, easy appetizer, bread wreath