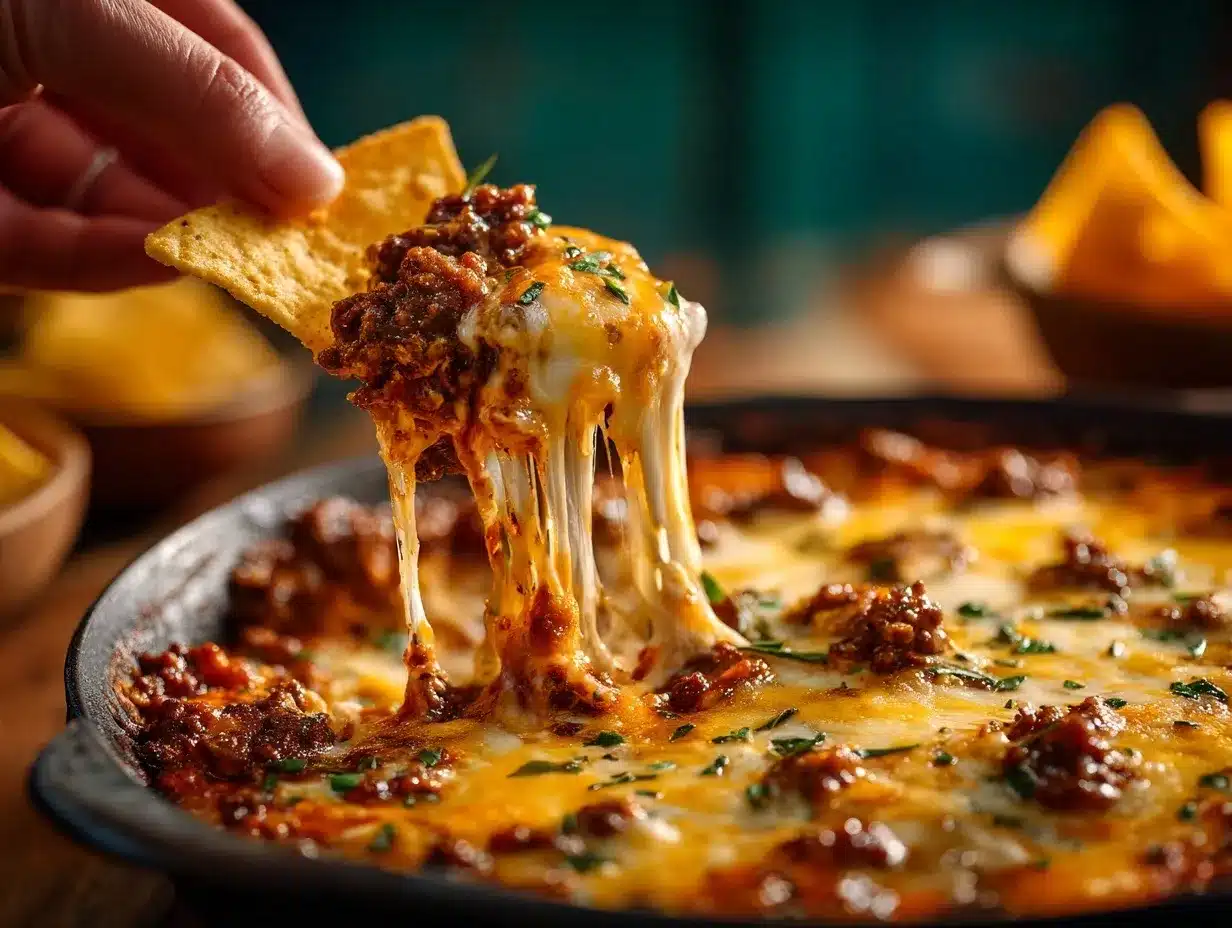
The aroma that fills your kitchen when this football dip is bubbling away in the oven? Honestly, that’s my favorite part of game day. There’s just something about rich, cheesy dips that scream, “Let’s gather!” and, trust me, this football dip recipe is as easy as it gets—but it tastes like a touchdown every single time. I remember the first time I whipped this up for a playoff party; the bowl was practically licked clean before halftime. You know those snacks that get everyone crowding around the table? This is that recipe.
There’s a little bit of nostalgia built in, too. I started making this oven-baked football dip back in college, when our tiny apartment was the go-to spot for Sunday football. Over the years, I’ve tweaked it—adding more layers, experimenting with spice, and perfecting the cheesy pull. Now, it’s my signature game day appetizer, and I can’t imagine a watch party without it.
What’s great is you don’t need fancy ingredients or complicated steps. This football dip recipe is easy, forgiving, and totally customizable—so whether you’re feeding a big crowd or just want something cozy on the couch, it fits the bill. Plus, it’s made in one baking dish, so even cleanup is a breeze. If you love dips that are gooey, flavorful, and always a hit, you’ll want to add this to your regular rotation. Let’s face it: game day snacks aren’t complete without a warm, oven-baked dip, and this is my absolute favorite way to kick things off!
Why You’ll Love This Football Dip Recipe
- Super Simple: You don’t need to be a chef—just layer, bake, and enjoy. It’s perfect for beginners, but even seasoned cooks love how foolproof it is.
- Comes Together Quickly: Prep takes less than 15 minutes, and it bakes to bubbly perfection in under 30. Perfect for last-minute cravings or when guests show up unannounced!
- Uses Pantry Staples: Most ingredients are probably already in your kitchen—think cream cheese, salsa, shredded cheese, and beans. No fancy grocery runs required.
- Ultimate Crowd-Pleaser: I’ve never had leftovers—kids and adults dive in with gusto. It’s one of those appetizers that disappears fast, especially when served with crunchy chips.
- Perfect for Any Occasion: While it’s definitely a football dip, it’s become my go-to for potlucks, family movie nights, and even holiday parties. The flavors work year-round.
- Customizable to the Max: Want it spicy? Toss in jalapeños. Need it vegetarian? Skip the meat. I’ve made a dozen versions, and every one’s been a hit.
- Cheesy, Creamy Goodness: The blend of melty cheese, creamy base, and zesty toppings makes for next-level comfort food. You’ll find yourself sneaking extra bites, trust me.
What sets this oven-baked football dip apart is the clever layering—creamy base, hearty beans, zippy salsa, and a mountain of cheese that melts into gooey bliss. Some recipes just dump everything together, but the layers here mean every scoop gets a bit of everything. I’ve tested dozens of combos, and this is the balance I keep coming back to. It hits all the right notes: creamy, savory, a little spicy, and ridiculously satisfying.
But honestly, the best part is how it brings people together. There’s something about dipping into a communal dish that sparks conversation and laughter. Whether you’re rooting for rival teams or just there for the snacks (no shame!), this football dip recipe makes everyone feel like a winner. If you want a game day appetizer that’s as easy as it is delicious, this is the one to beat.
What Ingredients You Will Need
This football dip recipe uses simple, bold-flavored ingredients that work together for ultimate satisfaction. Most are pantry or fridge staples, and you can swap things in or out to suit your crew’s tastes. Here’s what you’ll need:
- For the Creamy Base:
- Cream cheese (8 oz / 225g, softened) – I like the full-fat version for extra richness, but reduced-fat works fine too.
- Sour cream (1/2 cup / 120g) – Adds tang and keeps things scoopable. Greek yogurt is a great substitute for a lighter version.
- For the Hearty Layer:
- Refried beans (1 can, 15 oz / 425g) – Smooth and savory, these beans make the dip filling. Black beans, mashed, also work if you prefer.
- Cooked ground beef or turkey (1/2 pound / 225g, optional) – Adds protein and makes the dip even more hearty. I often use taco-seasoned beef for extra flavor.
- For the Zesty Kick:
- Salsa (1 cup / 240ml, mild or medium) – Use your favorite jarred brand. Chunky salsa gives nice texture, but smooth works too.
- Green chilies (1 small can, 4 oz / 113g, drained, optional) – For a mild heat. Skip if you want it super kid-friendly.
- For the Cheesy Topping:
- Shredded cheddar cheese (2 cups / 200g) – I love sharp cheddar for maximum flavor, but any blend works. Monterey Jack is great for melting.
- Shredded mozzarella cheese (1 cup / 100g) – Adds gooey stretchiness. You can use all cheddar if that’s what you have.
- Optional Garnishes:
- Chopped green onions (2-3 stalks) – Adds color and fresh flavor.
- Sliced jalapeños – For spice lovers.
- Chopped tomatoes or fresh cilantro – Totally optional but makes a pretty presentation.
- For Serving:
- Tortilla chips, pita chips, or sturdy crackers – You want something strong enough to scoop all those layers!
Ingredient tips: I always use Philadelphia cream cheese for the creamiest base, and Pace salsa for a mild kick (not sponsored, just what I grab). If you want to make it vegetarian, just leave out the meat—no other changes needed. And if you’re running low on one cheese, just use more of the other. The flavors are forgiving, and honestly, that’s what makes this football dip recipe easy and fun.
Equipment Needed
- Medium Mixing Bowl: For blending the creamy base. Any sturdy bowl will do, but a glass one lets you see that everything’s mixed evenly.
- Spatula or Wooden Spoon: For stirring and spreading layers. I prefer silicone spatulas—they scrape every last bit out.
- 9×9-inch (23×23 cm) Baking Dish: I use a glass Pyrex dish, but any oven-safe ceramic or even a metal pan works. If you double the recipe, a 9×13-inch (23×33 cm) dish is perfect.
- Nonstick Spray or Butter: To coat the baking dish and prevent sticking. A quick spritz makes cleanup easy.
- Oven Mitts: Essential for pulling out a hot, bubbly dip safely. I’ve definitely burned myself on excitement before—don’t skip these.
- Cheese Grater: If you’re shredding cheese fresh (which melts better), a box grater is your friend.
- Serving Spoon or Small Ladle: To scoop out those cheesy layers without making a mess.
If you don’t have a 9×9 dish, an 8×8 works fine—just watch the baking time, as it might take a couple minutes longer for thicker layers. I’ve even used a pie plate in a pinch! For budget-friendly options, check out thrift stores; I snagged my favorite glass baking dish for just a couple bucks. And if you ever find baked-on cheese tough to clean, soak your dish in warm, soapy water for 20 minutes—comes right off!
Preparation Method
-
Preheat the oven:
Set your oven to 375°F (190°C). This gives you a golden, bubbly top without drying out the creamy layers underneath. -
Mix the creamy base:
In a medium mixing bowl, combine 8 oz (225g) softened cream cheese and 1/2 cup (120g) sour cream. Use a spatula or hand mixer to blend until smooth and fluffy. If your cream cheese is cold, microwave it for 15 seconds to soften—makes blending much easier. -
Prepare the baking dish:
Lightly grease a 9×9-inch (23×23 cm) baking dish with nonstick spray or a bit of butter. This keeps the dip from sticking and helps with cleanup later. -
Layer the creamy base:
Spread the cream cheese and sour cream mixture evenly over the bottom of your prepared baking dish. Take your time to get it into the corners—it’s the foundation of every scoop. -
Add the beans:
Dollop 1 can (15 oz / 425g) of refried beans over the creamy layer. Gently spread with a spoon or offset spatula. If using black beans, mash them lightly first for easier spreading. -
Add the meat (optional):
Sprinkle 1/2 pound (225g) cooked ground beef or turkey over the beans. For extra flavor, season your meat with a little taco seasoning while cooking. If skipping meat, just move to the next step. -
Spread the salsa:
Pour 1 cup (240ml) salsa evenly over the previous layers. I like using a chunky salsa for more texture, but any type works. Drain off excess liquid if your salsa is very watery to prevent sogginess. -
Add green chilies (optional):
Sprinkle 1 small can (4 oz / 113g, drained) of diced green chilies over the salsa for a gentle heat. Totally optional, but I love the flavor kick. -
Top with cheese:
Sprinkle 2 cups (200g) shredded cheddar cheese and 1 cup (100g) shredded mozzarella over the top. Spread it out so every bite gets cheesy goodness. If you’re a cheese fiend (like me), add an extra handful! -
Bake:
Place the dish on the center rack of your preheated oven. Bake for 22-28 minutes, until the cheese is melted, bubbly, and golden brown at the edges. If using a deeper dish, it may take an extra 2-3 minutes. -
Garnish and serve:
Remove from the oven (use oven mitts!). Let cool for 5 minutes so it sets slightly—this makes scooping easier. Sprinkle with chopped green onions, sliced jalapeños, and/or chopped tomatoes if you like. -
Serve with chips:
Place the hot dish on a trivet or heat-safe surface. Serve immediately with sturdy tortilla chips, pita chips, or crackers.
Troubleshooting tips: If your dip seems watery, your salsa may have extra liquid—just drain it first next time. For extra thick dip, chill the cream cheese/sour cream mix for 10 minutes before layering. And if the cheese isn’t browning, pop the dip under the broiler for 1-2 minutes at the end (watch closely!). Honestly, the hardest part is waiting for it to cool enough to dig in.
Cooking Tips & Techniques
- Layering is key: Don’t rush the spreading steps—each layer adds a different flavor and texture. If you just mix it all together, you lose that fun “dig through the layers” experience! I learned this after my first (messy) attempt.
- Softer cream cheese blends better: Cold cream cheese clumps, so always let it soften first. I once tried to skip this and ended up with lumps that just wouldn’t go away. Live and learn.
- Use freshly shredded cheese: Pre-shredded cheese is convenient, but it sometimes melts less smoothly because of anti-caking agents. If you have time, shred your own. The melt is so much better—trust me.
- Don’t overbake: When the cheese is bubbly and just starting to brown, it’s ready. Overbaking can make the bottom dry out and the top tough. If you get distracted (guilty as charged), just cover with foil and add a splash of milk before reheating leftovers.
- Customize the heat: Add pickled jalapeños, a dash of hot sauce, or use spicy salsa if your crowd loves a kick. For a milder dip, stick with mild salsa and skip the chilies.
- Multitasking strategy: While the dip bakes, set up your snack table—chips, drinks, and maybe a veggie platter for balance. This way, everything’s ready when the dip comes out of the oven.
- Consistency for success: If you want the dip to look Pinterest-worthy, use a glass dish so the layers show through. For parties, I sometimes double the recipe and bake it in a larger dish—just add a few extra minutes to the baking time.
After dozens of football parties, I’ve learned there’s no such thing as “too much cheese.” But seriously, a little planning goes a long way. Prepping your layers ahead of time makes assembly a snap on game day. And if you’re worried about leftovers…don’t be. There won’t be any!
Variations & Adaptations
- Vegetarian Version: Skip the meat altogether and add extra beans or a layer of sautéed mushrooms for heartiness. Sometimes I use black beans and corn—so good and colorful!
- Low-Carb Adaptation: Replace the beans with mashed cauliflower or extra cream cheese/sour cream blend. Serve with sliced bell peppers or cucumber rounds instead of chips for dipping.
- Spicy Buffalo Twist: Replace salsa with buffalo wing sauce and add shredded rotisserie chicken (about 1 cup). Top with blue cheese crumbles after baking for a fun flavor mashup.
- Dairy-Free Option: Use dairy-free cream cheese and shredded cheese alternatives (like Daiya), and swap the sour cream for a plant-based version. The results are surprisingly creamy!
- Make it Tex-Mex: Add a layer of corn, black olives, and chopped red peppers between the beans and salsa. Sometimes I sprinkle on taco seasoning for an even bolder flavor.
I’ve even made this football dip recipe in mini ramekins for individual servings—great for parties where everyone wants their own. If you’re adapting for allergies, double-check your cheese and salsa for hidden gluten or dairy. Personal favorite? I once added smoked paprika and a sprinkle of bacon bits—total game changer!
Serving & Storage Suggestions
This football dip is best enjoyed hot and fresh from the oven. The cheese is gooey, the flavors are melded, and the top is golden—perfection! Serve it straight from the baking dish with a big bowl of tortilla chips nearby. For a prettier presentation, sprinkle on extra green onions, diced tomatoes, or even a little fresh cilantro right before serving.
If you want to round out your game day table, pair this dip with crisp veggie sticks, jalapeño poppers, or a tangy coleslaw. Cold drinks—like soda, beer, or iced tea—balance out the rich cheese. If the dip cools down, just pop it back in the oven (350°F/175°C) for 10 minutes or microwave individual portions for 30-45 seconds until hot.
Storing leftovers is easy: let the dip cool, cover tightly with foil or transfer to an airtight container, and refrigerate for up to 4 days. It reheats beautifully in the oven or microwave. For longer storage, freeze in single portions for up to a month—thaw overnight in the fridge before reheating. Honestly, the flavors get even better the next day as everything mingles. Just don’t expect it to last long!
Nutritional Information & Benefits
Here’s an estimated breakdown per serving (based on one-eighth of the dip, without chips):
- Calories: ~310
- Protein: ~13g
- Carbohydrates: ~14g
- Fat: ~22g
This football dip recipe offers a good dose of protein, especially if you include the ground beef or turkey. The beans add fiber, while the dairy gives you calcium and a satisfying richness. If you’re looking for a gluten-free appetizer, just double-check your chips and salsa. For a lower-carb or keto version, use extra creamy base and veggies for dipping. Allergens to be aware of: dairy (cheese, sour cream), and sometimes gluten if using pre-made mixes. I love that you can tweak this recipe to fit so many eating styles—it’s comfort food, but still totally adaptable to your needs!
Conclusion
If you’re searching for the best game day oven dip recipe, this football dip delivers every single time. It’s easy, quick, and guaranteed to get rave reviews—whether you’re hosting a big crowd or just want something extra cozy for a night in. I genuinely love how this football dip recipe brings everyone together and makes snack time feel special.
Don’t be afraid to put your own spin on it—add more heat, swap out the beans, or pile on the toppings. The beauty is in the customization, so make it your own! This is the kind of dish I keep coming back to, and I hope it becomes a staple at your gatherings too.
If you try this football dip, let me know in the comments how it turned out! Share your favorite variations or game day stories—I can’t wait to hear them. Here’s to more cheers, more chips, and the most irresistible dip on the table!
Frequently Asked Questions
Can I make this football dip recipe ahead of time?
Absolutely! You can assemble the dip up to a day in advance, cover it tightly, and refrigerate. When you’re ready to serve, just bake as directed (add a few extra minutes if it’s cold from the fridge).
What’s the best way to reheat leftover football dip?
For best results, reheat in the oven at 350°F (175°C) until bubbly (about 15 minutes). For single servings, the microwave works great—heat in 30-second bursts until hot.
Can I freeze this oven-baked dip?
Yes! Cool the dip completely, then freeze in airtight containers for up to one month. Thaw overnight in the fridge and reheat before serving. The texture might be slightly softer but still delicious.
How can I make this dip spicier?
Use hot salsa, add diced jalapeños to the layers, or stir in a dash of cayenne pepper. You can also sprinkle crushed red pepper flakes on top before baking for an extra kick.
What are the best dippers for football dip?
Tortilla chips are classic, but pita chips, sliced bell peppers, celery sticks, or even toasted baguette slices work well. Just pick something sturdy enough to scoop up all those layers!
Pin This Recipe!

Football Dip Recipe Easy Best Oven-Baked Game Day Appetizer

This oven-baked football dip is a cheesy, layered crowd-pleaser perfect for game day or any gathering. It comes together quickly with pantry staples and is endlessly customizable for your crew’s tastes.
- Prep Time: 15 minutes
- Cook Time: 25 minutes
- Total Time: 40 minutes
- Yield: 8 servings 1x
- Category: Appetizer
- Cuisine: American
Ingredients
- 8 oz cream cheese, softened
- 1/2 cup sour cream
- 1 can (15 oz) refried beans (or mashed black beans)
- 1/2 pound cooked ground beef or turkey (optional, can use taco seasoning)
- 1 cup salsa (mild or medium, chunky or smooth)
- 1 small can (4 oz) green chilies, drained (optional)
- 2 cups shredded cheddar cheese
- 1 cup shredded mozzarella cheese
- Chopped green onions (2-3 stalks, for garnish, optional)
- Sliced jalapeños (for garnish, optional)
- Chopped tomatoes or fresh cilantro (for garnish, optional)
- Tortilla chips, pita chips, or sturdy crackers (for serving)
Instructions
- Preheat oven to 375°F (190°C).
- In a medium mixing bowl, blend softened cream cheese and sour cream until smooth and fluffy.
- Lightly grease a 9×9-inch baking dish with nonstick spray or butter.
- Spread the cream cheese and sour cream mixture evenly in the bottom of the dish.
- Dollop and gently spread refried beans (or mashed black beans) over the creamy base.
- Sprinkle cooked ground beef or turkey (if using) over the beans.
- Pour salsa evenly over the previous layers. Drain excess liquid if salsa is watery.
- Sprinkle green chilies over the salsa, if using.
- Top with shredded cheddar and mozzarella cheese, spreading evenly.
- Bake for 22-28 minutes, until cheese is melted, bubbly, and golden at the edges.
- Remove from oven and let cool for 5 minutes.
- Garnish with green onions, jalapeños, and/or chopped tomatoes or cilantro if desired.
- Serve hot with tortilla chips, pita chips, or sturdy crackers.
Notes
For a vegetarian version, omit the meat and add extra beans or sautéed mushrooms. Use freshly shredded cheese for best melt. Drain salsa if watery to prevent soggy dip. Customize heat with jalapeños or spicy salsa. Can be assembled ahead and baked when ready. Leftovers reheat well in oven or microwave.
Nutrition
- Serving Size: About 1/8 of the dip (without chips)
- Calories: 310
- Sugar: 3
- Sodium: 650
- Fat: 22
- Saturated Fat: 11
- Carbohydrates: 14
- Fiber: 3
- Protein: 13
Keywords: football dip, game day appetizer, oven baked dip, cheesy dip, party dip, easy dip recipe, layered dip, crowd pleaser, refried beans dip, cream cheese dip