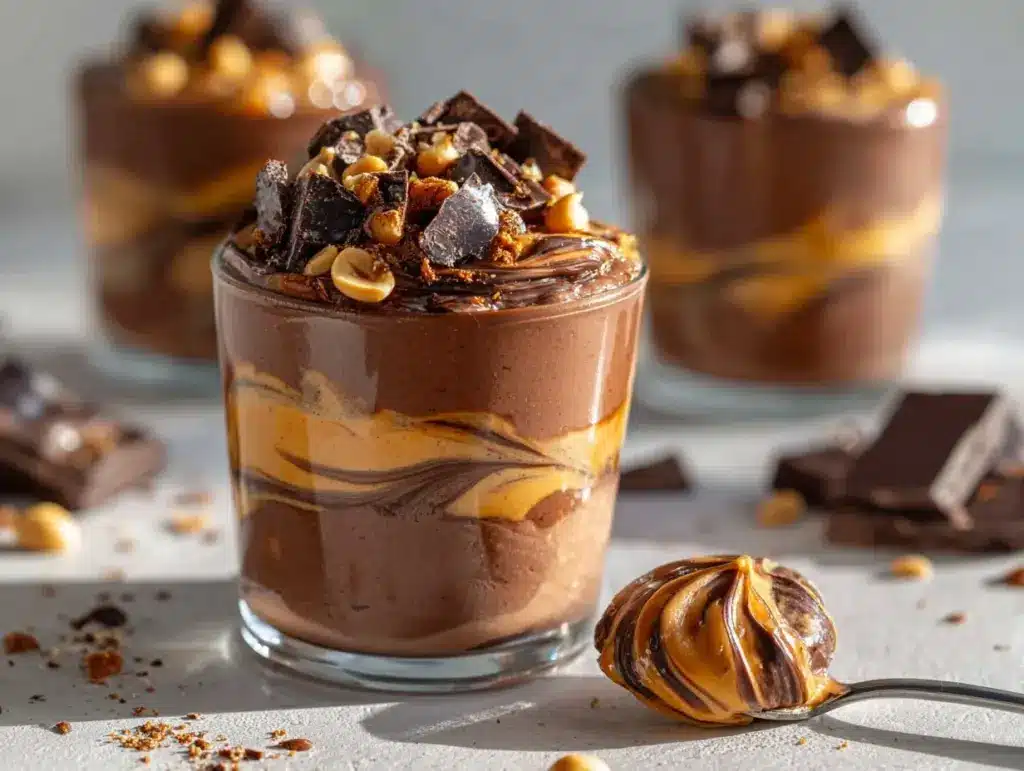
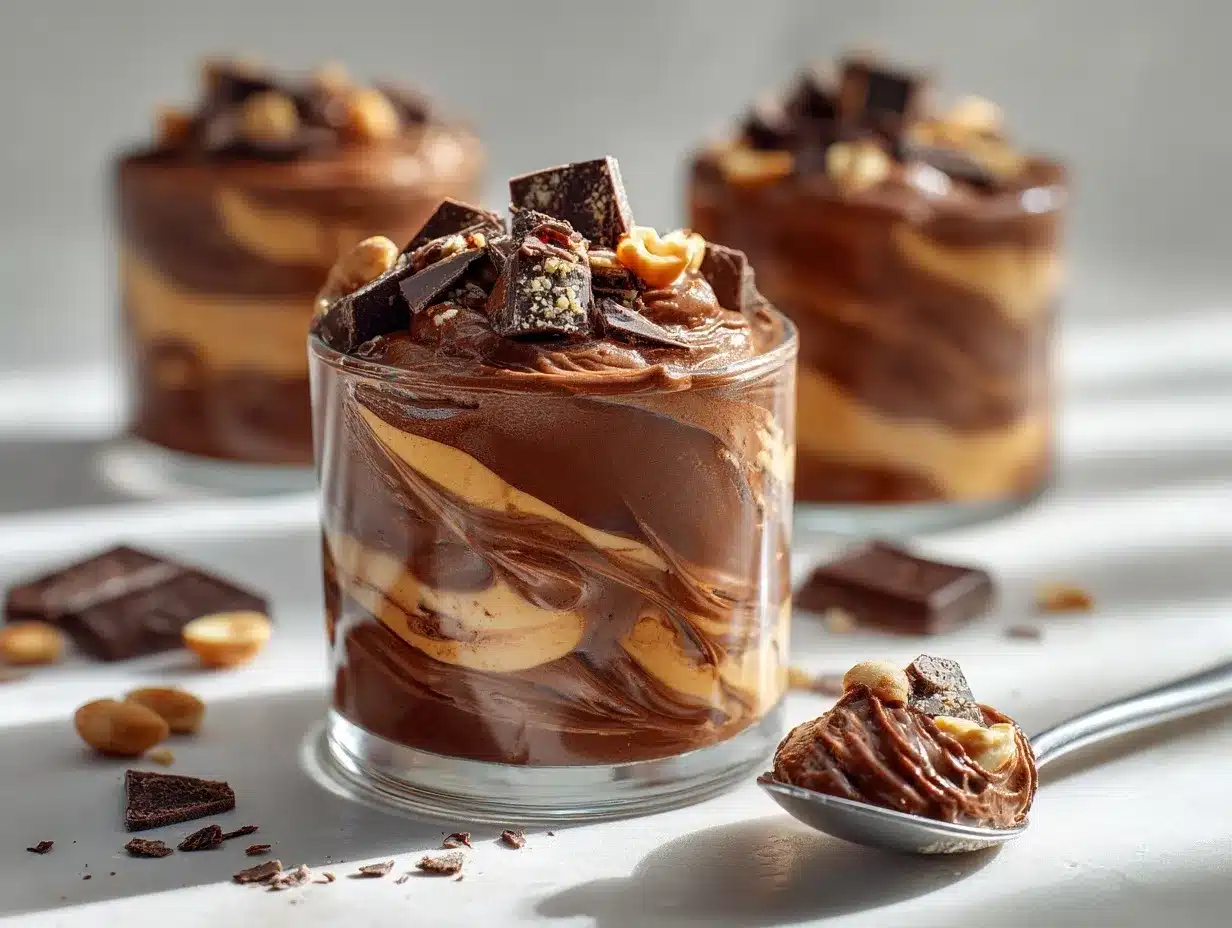
The first time I made high-protein chocolate peanut butter pudding cups, I honestly didn’t expect them to become my new go-to dessert. The rich, velvety chocolate, balanced with a creamy peanut butter swirl, and somehow, they’re packed with protein? It’s almost too good to be true! The best part is, you get all that decadent flavor without the sugar crash or the guilt trip that usually follows a late-night treat.
This recipe came about on a lazy Sunday afternoon when I was craving something sweet but didn’t want to undo my week’s healthy eating. I remembered a tip from a fellow fitness enthusiast: use Greek yogurt and protein powder as a base for pudding. I took that advice, added my own twist (because, let’s face it, chocolate and peanut butter belong together), and after a few tweaks, these high-protein chocolate peanut butter pudding cups became a staple in my fridge. Whether you’re fueling up after a workout, wrangling hungry kids, or just want a better-for-you dessert, these pudding cups tick all the boxes.
Honestly, I’ve tested this recipe more times than I can count (my family doesn’t mind being the taste testers one bit). It’s quick, easy, and totally customizable. If you’re looking for a dessert that’s equally comforting and nutritious, these high-protein chocolate peanut butter pudding cups are about to become your new obsession. They’re the kind of treat you can feel good about eating—any time of day.
Why You’ll Love This Recipe
If you’re anything like me, you want a dessert that satisfies your cravings but also fits into your healthy routine. These high-protein chocolate peanut butter pudding cups are my answer to that eternal struggle. After lots of recipe testing (and some chocolatey mishaps), I can confidently say this is one dessert you’ll actually look forward to making—again and again.
- Quick & Easy: Whip up the pudding in under 15 minutes—plus chilling time. Perfect for busy weeknights or prepping ahead for an on-the-go snack.
- Simple Ingredients: No hunting down specialty foods. Most of these are pantry staples, and you can swap things in or out depending on what you have.
- Perfect for Any Occasion: These pudding cups look cute on a brunch table, work as a fun after-school snack, or make a secretly healthy dessert for dinner parties. I’ve even packed them for picnics!
- Crowd-Pleaser: Even picky eaters (yep, I have a couple in my house) devour these without a second thought. You get all the flavor of a classic chocolate-peanut butter combo but in a lighter, more nourishing form.
- Unbelievably Delicious: The texture is creamy and rich, and the chocolate-peanut butter swirl is pure comfort. You really get that “treat yourself” feeling—without the sugar overload.
What sets this high-protein chocolate peanut butter pudding cups recipe apart? It’s the way the Greek yogurt blends with cocoa and peanut butter—it’s not chalky or runny. I use a little trick: blending the peanut butter into the pudding base so you get a perfectly smooth consistency. You can add a sprinkle of flaky salt on top or layer in crunchy granola for texture (trust me on that one). The best part is, you can adjust the sweetness or the protein content to your liking, making it truly your own.
This isn’t just another protein pudding—it’s the version that actually feels like dessert, but it’s smart enough for your fitness goals. It’s comfort food, but with benefits. And honestly, nothing beats that first cold spoonful after a long day.
What Ingredients You Will Need
This recipe uses everyday, wholesome ingredients to deliver a chocolate-peanut butter punch that’s both rich and nourishing. No need for fancy products—just real food that comes together easily.
- For the Pudding Base:
- Plain Greek yogurt (2 cups / 480g) – go for full-fat for creaminess, or 0% for fewer calories. I like Fage or Chobani for thickness.
- Unsweetened cocoa powder (1/4 cup / 25g) – Dutch-process gives a deeper flavor, but any unsweetened variety works.
- Chocolate protein powder (1 scoop / approx. 30g) – whey or plant-based both work. Pick your favorite brand (I’m partial to Orgain or Optimum Nutrition for smoothness).
- Milk of choice (1/2 cup / 120ml) – dairy or unsweetened non-dairy (almond, soy, oat). Adds silkiness to the mix.
- Maple syrup or honey (2-3 tbsp / 30-45ml) – adjust for sweetness. You can use a sugar-free syrup if you’re watching carbs.
- Pure vanilla extract (1 tsp / 5ml) – brings out the chocolate flavor.
- Pinch of salt – it really makes the chocolate pop.
- For the Peanut Butter Swirl:
- Creamy peanut butter (1/3 cup / 80g) – natural or regular, your call. If you’re going for extra protein, some brands even have added whey.
- Optional: a splash of milk (1-2 tbsp / 15-30ml) to thin out the peanut butter for swirling.
- For Topping (Optional):
- Dark chocolate shavings or mini chocolate chips (for a little crunch and extra chocolatey goodness)
- Crushed roasted peanuts (for texture)
- Flaky sea salt (trust me—just a pinch takes it over the top!)
- Granola or chopped banana slices (if you want to dress it up or make it breakfast-worthy)
Ingredient swaps: You can use Skyr or quark instead of Greek yogurt for a Scandinavian twist, almond butter if you’re avoiding peanuts, or swap in a vegan protein powder for a fully plant-based treat. If you’re avoiding dairy, coconut yogurt works, though it might be a bit tangier.
Tip: If you’re making these high-protein chocolate peanut butter pudding cups for meal prep, go with a protein powder you already love drinking—flavor matters!
Equipment Needed
- Mixing Bowls: One medium and one small bowl are all you need. I’ve used glass and stainless steel—either works, but glass is easier for checking the color and texture.
- Whisk or Electric Mixer: A simple hand whisk does the job, but if you want super-smooth pudding, a handheld electric mixer or even a blender works wonders.
- Measuring Cups and Spoons: Accuracy matters, especially for the protein powder and cocoa. I use standard stainless sets, but anything you have will work.
- Rubber Spatula: Great for scraping down the sides and swirling the peanut butter. A spoon works if you don’t have one, but spatulas make cleanup easier.
- Serving Cups or Ramekins: You can use small mason jars, glass cups, or even recycled yogurt containers—whatever makes you happy. I’ve even used coffee mugs in a pinch.
- Plastic Wrap or Lids: For covering the pudding while it chills. If you make these a lot, reusable silicone lids are handy and eco-friendly.
Don’t worry if you don’t have a fancy mixer; I’ve made these with just a fork and some elbow grease. If you use a blender, make sure to rinse it right away (dried protein powder is a pain to scrub off). And if you’re on a budget, most dollar store kitchen tools will do just fine for this recipe!
Preparation Method
-
Prepare the Chocolate Base:
- In a medium mixing bowl, combine 2 cups (480g) Greek yogurt, 1/4 cup (25g) unsweetened cocoa powder, and 1 scoop (about 30g) chocolate protein powder.
- Whisk until the mixture is smooth and there are no cocoa clumps—about 1-2 minutes. If using a blender, pulse on low until fully combined. Don’t overmix; just enough so it’s creamy.
- Add 1/2 cup (120ml) milk, 2-3 tbsp (30-45ml) maple syrup or honey, 1 tsp (5ml) vanilla extract, and a pinch of salt.
- Continue whisking for another minute. The mix should look thick but pourable. If it’s too thick for your liking, add another splash of milk. Too thin? Add a spoonful more protein powder or cocoa.
-
Make the Peanut Butter Swirl:
- In a small bowl, add 1/3 cup (80g) creamy peanut butter. If your peanut butter is stiff, microwave for 10-15 seconds or stir in 1-2 tbsp (15-30ml) milk to loosen it.
- Whisk until the peanut butter is smooth and easy to drizzle.
-
Assemble the Pudding Cups:
- Divide half of the chocolate pudding base evenly among 4 serving cups (about 1/4 cup / 60g per cup).
- Add a spoonful of peanut butter (about 1 tbsp / 20g) on top of each layer. Use a toothpick or knife to swirl gently—don’t overdo it, or you’ll lose the marbled look.
- Repeat with the rest of the chocolate pudding and another swirl of peanut butter on top.
-
Chill:
- Cover each cup with plastic wrap or a lid. Refrigerate for at least 1-2 hours, until firm and chilled. Overnight is even better—the flavors get richer as they meld together.
- Tip: If you’re impatient (like me sometimes), pop them in the freezer for 20-30 minutes for a quick chill. Just don’t forget about them!
-
Add Toppings and Serve:
- Before serving, top each cup with a sprinkle of dark chocolate shavings, crushed peanuts, a pinch of flaky salt, or even some granola if you like crunch.
- The pudding should be silky and spoonable—if it’s too thick after chilling, let it sit at room temp for 5 minutes before eating.
Troubleshooting: If your pudding is grainy, your protein powder might not dissolve well—try sifting the cocoa and powder together before mixing. If it’s too tangy, a little extra syrup or a splash of vanilla can mellow it out. And if it separates after chilling, just give it a good stir before serving.
Cooking Tips & Techniques
- Use Room Temperature Ingredients: Cold yogurt or milk can cause cocoa powder to clump. Let everything sit out for 10 minutes before mixing.
- Mixing Matters: Whisk the cocoa and protein powder into the yogurt slowly. Dumping it all in at once leads to lumps—trust me, I’ve learned the hard way.
- Don’t Overmix: Over-whipping can make the pudding too runny, especially with Greek yogurt. Mix until just smooth for that perfect creamy texture.
- Chill Time: The longer it sits, the better the flavor and texture. If you can, make these high-protein chocolate peanut butter pudding cups the night before for the dreamiest result.
- Swirling Technique: Use a toothpick or small knife to swirl the peanut butter—gentle, figure-eight motions work best. If you swirl too much, the colors blend and you lose that beautiful marbling.
- Layering: For a Pinterest-worthy look, layer the pudding and peanut butter in clear cups or jars. It looks super fancy with minimal effort.
- Serving Size: These are rich, so a little goes a long way. Small jars or ramekins are perfect for portion control (and they just look adorable).
- Clean Up Fast: Wash mixing tools right away—dried peanut butter and chocolate are stubborn to clean later. I’ve lost a few good whisks to procrastination!
Most importantly, don’t stress about perfection. Some batches are a little runnier, some a bit thicker, but they’re always delicious. The more you make these, the more you’ll find your pudding “sweet spot.”
Variations & Adaptations
- Vegan Version: Use coconut or almond yogurt and a plant-based protein powder. Swap honey or maple syrup for agave. Almond butter works instead of peanut butter if you want to change up the flavor.
- Nut-Free Option: Use sunflower seed butter instead of peanut butter for an allergy-friendly treat. It has a similar creamy texture and works great in this recipe.
- Seasonal Flavors: For a winter twist, add a pinch of cinnamon or chili powder to the chocolate base. In summer, swirl in a layer of mashed raspberries or sliced strawberries with the peanut butter for a PB&J vibe.
- Different Cooking Methods: If you want a frozen treat, pour the pudding into popsicle molds and freeze for about 4 hours. You’ll get healthy fudge pops that taste like a cheat meal.
- Customizing Sweetness: Adjust the amount of syrup or honey to your taste, or use a zero-calorie sweetener if cutting sugar.
- My Personal Twist: Sometimes I stir in a spoonful of instant espresso powder to the chocolate base—hello, mocha pudding cups! It’s incredible if you love coffee.
Don’t be afraid to get creative—these high-protein chocolate peanut butter pudding cups are super forgiving and easy to play with. Just keep the basic ratio of yogurt to chocolate and protein powder, and you’ll be golden.
Serving & Storage Suggestions
These pudding cups are best served chilled, straight from the fridge. For a pretty finish, layer in clear glasses and top with chocolate shavings, a drizzle of melted peanut butter, or a few banana slices. They look gorgeous on a brunch table or as individual desserts at any gathering.
Pair with a cup of coffee, cold brew, or even a glass of cold almond milk for a super satisfying snack. Want to make it more of a meal? Top with granola, chopped nuts, or fresh berries for breakfast.
For storage, cover each cup with plastic wrap or a lid and keep in the fridge for up to 4 days. The texture actually improves as it sits—so don’t worry if you make a big batch. You can also freeze these for up to 2 months; just thaw in the fridge overnight before serving. If you’re reheating (for a warm pudding craving), microwave in 10-second bursts, stirring in between, until just warmed through.
Pro tip: The flavors get richer after a day or two, so they’re even better as a make-ahead dessert!
Nutritional Information & Benefits
Each high-protein chocolate peanut butter pudding cup (based on the recipe above, divided into 4 servings) contains approximately:
- Calories: 220-250
- Protein: 18-22g (depending on your protein powder and yogurt type)
- Carbohydrates: 15-18g
- Fat: 8-12g
- Sugar: 7-10g (from honey/maple syrup and yogurt, mainly)
The real benefit? You’re getting a dessert that’s high in protein (great for muscle recovery, satiety, and energy), with healthy fats from peanut butter and antioxidants from cocoa. It’s naturally gluten-free and can be made dairy-free or nut-free with easy swaps. Just keep an eye on potential allergens from protein powder or nut butters.
I love how this recipe fits into my wellness routine—there’s no sugar crash, and I know exactly what’s in each cup. It’s proof that healthy can actually taste indulgent!
Conclusion
There’s something undeniably satisfying about these high-protein chocolate peanut butter pudding cups. Whether you’re making them for a quick snack, a post-workout treat, or a healthy dessert, they deliver on flavor, texture, and nutrition. You can easily tailor them to your tastes—more chocolate, less sweet, or even mix up the nut butter.
I keep coming back to this recipe because it’s simple, reliable, and always hits the spot. If you’re looking for a dessert that you can actually feel good about eating, this is it. I hope you love them as much as my family does!
Give these a try and let me know how you customize your pudding cups. Did you add a special topping? Try a different protein powder? Drop your thoughts in the comments, share this recipe with a friend, or tag your pudding creations online—I’d love to see how you make it your own. Happy snacking!
Frequently Asked Questions
How long can I store high-protein chocolate peanut butter pudding cups in the fridge?
They’ll keep fresh for up to 4 days when covered. The flavor actually gets even better after a day or two!
Can I make these pudding cups vegan?
Absolutely! Use plant-based yogurt (like coconut or almond), a vegan protein powder, and swap the honey or maple syrup for agave or another vegan sweetener.
What’s the best way to get a smooth pudding texture?
Use room temperature ingredients, whisk the cocoa and protein powder in slowly, and don’t overmix. If you have a blender, that’s the easiest way to make it super smooth.
Can I use other nut butters instead of peanut butter?
Yes, almond butter, cashew butter, or even sunflower seed butter work beautifully. Just make sure to use a creamy variety for the best swirl.
Is this recipe suitable for kids?
Definitely! Just check your protein powder for kid-friendly ingredients, and adjust the sweetness to their liking. My kids love these with chocolate chips on top!
Pin This Recipe!
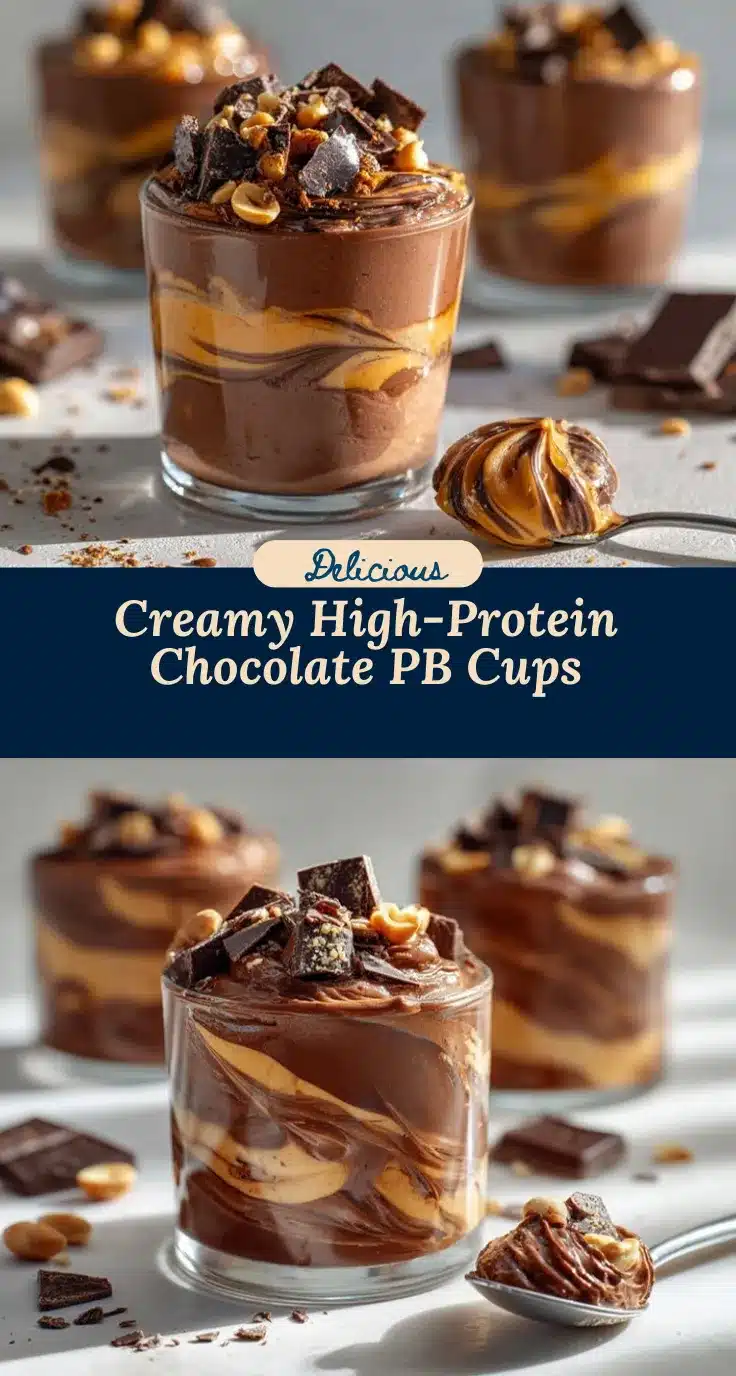
High-Protein Chocolate Peanut Butter Pudding Cups

These high-protein chocolate peanut butter pudding cups are a creamy, decadent dessert packed with protein and healthy fats. Quick to make and customizable, they’re perfect for a healthy snack, post-workout treat, or guilt-free dessert.
- Prep Time: 15 minutes
- Cook Time: 0 minutes
- Total Time: 1 hour 15 minutes (includes chilling)
- Yield: 4 servings 1x
- Category: Dessert
- Cuisine: American
Ingredients
- 2 cups plain Greek yogurt (full-fat or 0%)
- 1/4 cup unsweetened cocoa powder
- 1 scoop (about 30g) chocolate protein powder (whey or plant-based)
- 1/2 cup milk of choice (dairy or unsweetened non-dairy)
- 2–3 tablespoons maple syrup or honey (or sugar-free syrup)
- 1 teaspoon pure vanilla extract
- Pinch of salt
- 1/3 cup creamy peanut butter (natural or regular)
- 1–2 tablespoons milk (optional, to thin peanut butter)
- Optional toppings: dark chocolate shavings or mini chocolate chips, crushed roasted peanuts, flaky sea salt, granola, chopped banana slices
Instructions
- In a medium mixing bowl, combine Greek yogurt, cocoa powder, and chocolate protein powder.
- Whisk until smooth and no cocoa clumps remain (1-2 minutes). If using a blender, pulse on low until combined.
- Add milk, maple syrup or honey, vanilla extract, and a pinch of salt. Whisk for another minute until thick but pourable. Adjust consistency with more milk or protein powder if needed.
- In a small bowl, add peanut butter. If stiff, microwave for 10-15 seconds or stir in 1-2 tablespoons milk to loosen. Whisk until smooth and drizzle-able.
- Divide half of the chocolate pudding base evenly among 4 serving cups (about 1/4 cup per cup).
- Add a spoonful of peanut butter (about 1 tablespoon) on top of each layer. Swirl gently with a toothpick or knife.
- Repeat with the remaining chocolate pudding and another swirl of peanut butter on top.
- Cover each cup with plastic wrap or a lid. Refrigerate for at least 1-2 hours, until firm and chilled (overnight is best). For a quick chill, freeze for 20-30 minutes.
- Before serving, top each cup with optional toppings: dark chocolate shavings, crushed peanuts, flaky salt, granola, or banana slices.
- If pudding is too thick after chilling, let sit at room temperature for 5 minutes before eating.
Notes
For best results, use room temperature ingredients to avoid clumping. Adjust sweetness and protein content to taste. For a vegan version, use plant-based yogurt, vegan protein powder, and agave. Store covered in the fridge for up to 4 days or freeze for up to 2 months. The pudding thickens and flavors deepen as it chills. Swirl peanut butter gently for a marbled look. Clean mixing tools promptly for easy cleanup.
Nutrition
- Serving Size: 1 pudding cup (about 1/2 cup)
- Calories: 235
- Sugar: 8
- Sodium: 140
- Fat: 10
- Saturated Fat: 2.5
- Carbohydrates: 16
- Fiber: 2
- Protein: 20
Keywords: high protein, chocolate, peanut butter, pudding, healthy dessert, Greek yogurt, protein powder, gluten-free, easy, no bake, meal prep