The smell of warm caramel bubbling away in the oven is pure magic, isn’t it? It’s like autumn has decided to hug your kitchen, and you can’t help but feel cozy. These Easy Sheet Pan Caramel Apples are my go-to recipe whenever the leaves start to fall and the air gets crisp. They’re sticky, sweet, and a little bit messy—in all the best ways possible! Plus, they’re ridiculously simple to make, and cleanup is a breeze thanks to the sheet pan method.
I first started making these caramel apples when my kids begged for them after a trip to the orchard. But let’s be real—dipping apples into molten caramel is harder than it looks, not to mention the cleanup. That’s when I decided to simplify the process and use a sheet pan instead. Now, it’s become a family tradition we look forward to every year.
Whether you’re hosting a fall party, looking for the perfect Halloween treat, or just want to indulge in a comforting dessert, this recipe has you covered. So grab your favorite apples and let’s create some magic!
Why You’ll Love This Recipe
- Super Simple: No fancy equipment or complicated techniques here—it’s all about easy steps that anyone can follow.
- Quick Prep: From start to finish, you’ll have these sheet pan caramel apples ready in under 30 minutes.
- Perfect for Groups: This recipe works wonderfully for family gatherings, fall-themed parties, or even as a fun dessert station where everyone can pick their favorite toppings.
- Customizable: Sweet tooth? Add chocolate chips. Love nuts? Sprinkle them generously. The topping options are endless!
- No Mess: Who has time to clean gooey caramel off a pot? Using a sheet pan makes cleanup so much easier—you’ll thank yourself later.
- Kid-Friendly: Let the little ones help sprinkle the toppings! It’s a great way to get them involved in the kitchen.
These caramel apples are not just a dessert—they’re a celebration of fall. The first bite will make you close your eyes and savor the buttery caramel coating paired with crisp, juicy apples. One sheet pan, a handful of ingredients, and you’ve got a treat that’s as delightful to make as it is to eat.
What Ingredients You’ll Need
This recipe uses straightforward ingredients that you probably already have in your pantry. If you don’t, they’re easy to find at your local grocery store.
- Apples: Choose firm, tart apples like Granny Smith or sweet ones like Honeycrisp—whatever you prefer!
- Caramel squares: Unwrap store-bought caramel candies for convenience. If you’re feeling ambitious, you can make your own caramel from scratch.
- Heavy cream: Helps thin out the caramel so it’s easier to coat the apples.
- Butter: Adds richness to the caramel sauce.
- Vanilla extract: A splash of vanilla takes the caramel’s flavor to the next level.
- Sea salt: Optional, but a sprinkle of flaky sea salt balances the sweetness beautifully.
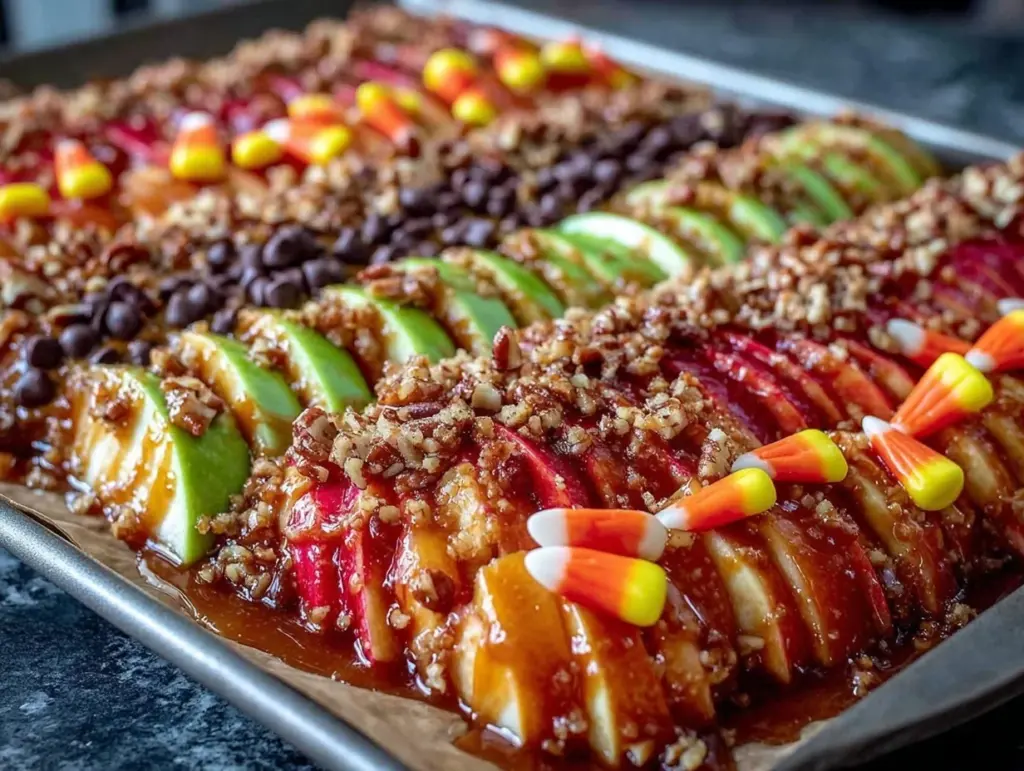
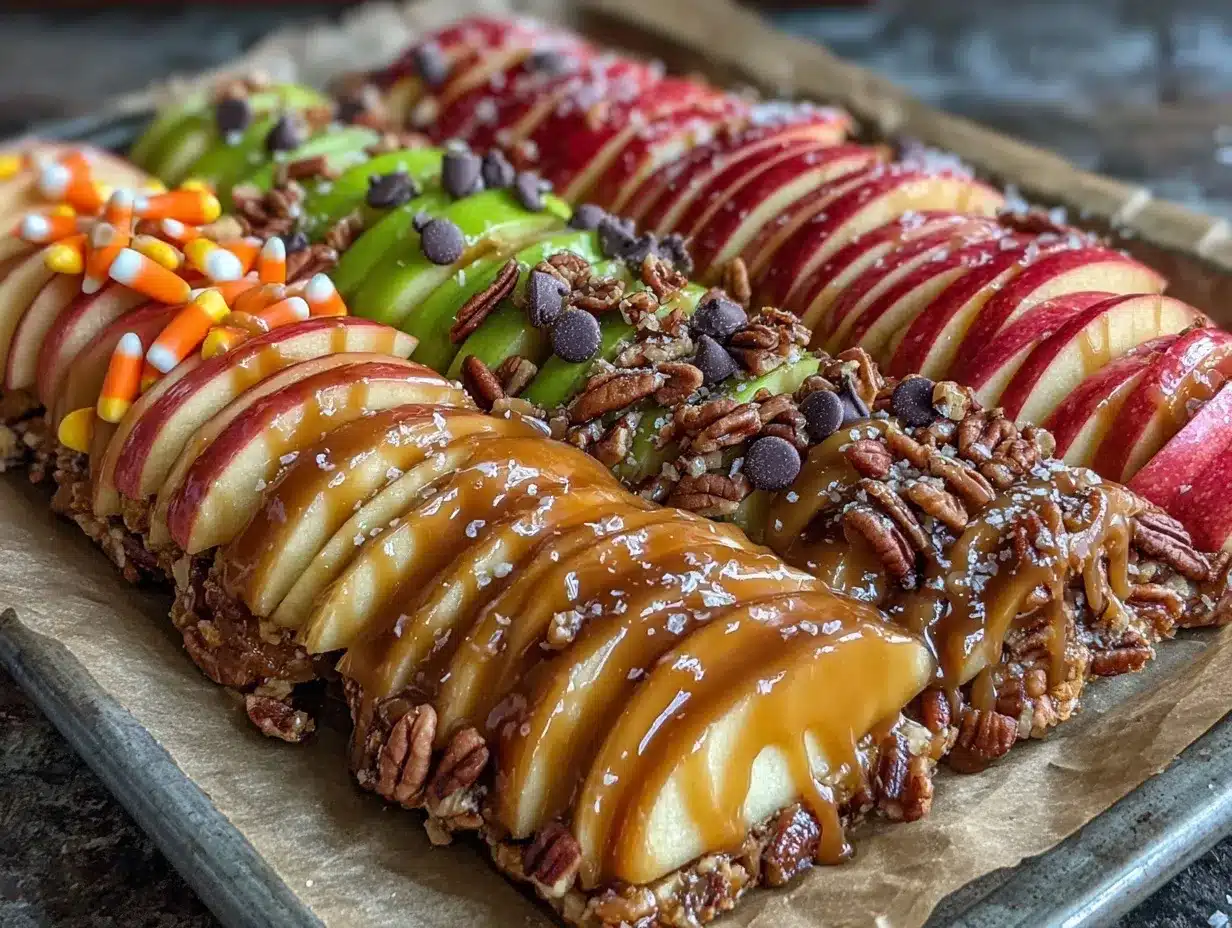
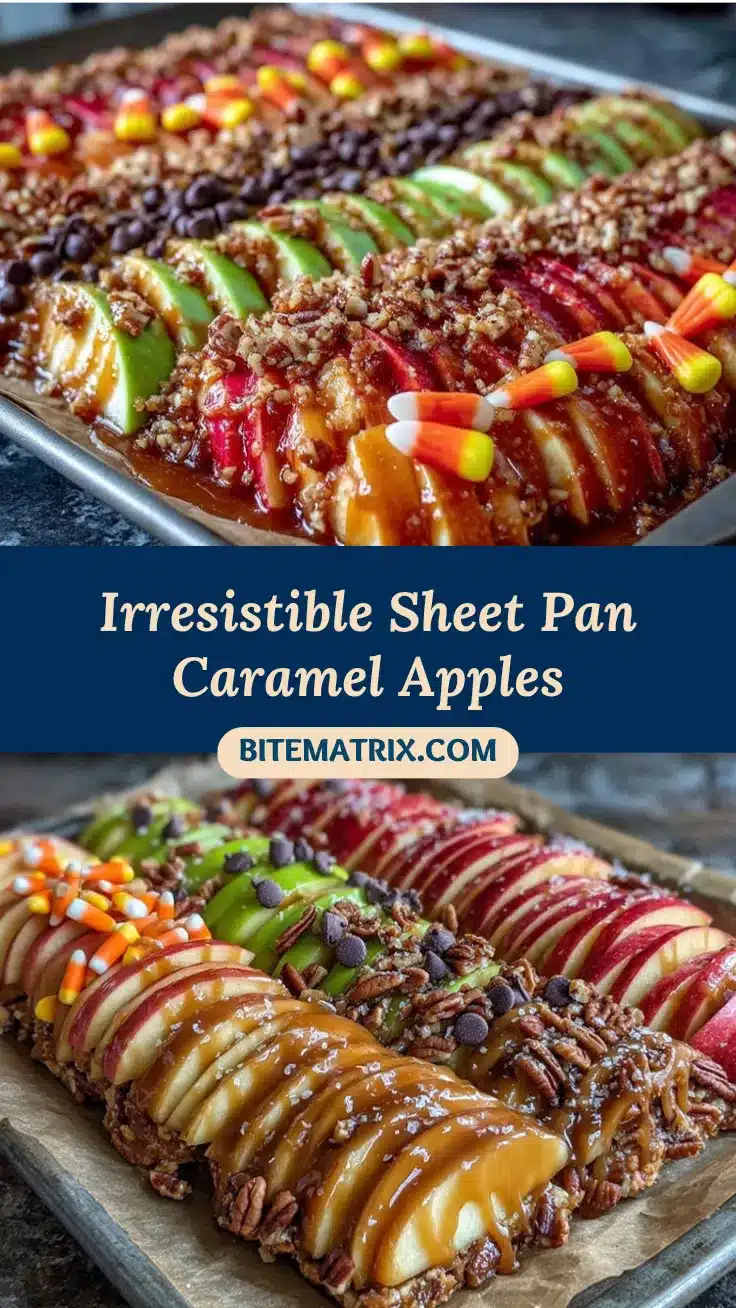
- Toppings: Get creative! Crushed nuts, mini chocolate chips, shredded coconut, rainbow sprinkles, or even crushed pretzels work wonderfully.
Pro tip: If you’re hosting a party, set up a DIY topping bar so everyone can mix and match their favorites!
Equipment Needed
To make these Easy Sheet Pan Caramel Apples, you’ll need the following tools:
- Sheet pan: A standard-sized sheet pan works best for spreading out the apple slices and caramel.
- Parchment paper: Essential for easy cleanup and prevents sticking.
- Small saucepan: You’ll use this to melt the caramel and mix in the cream and butter.
- Sharp knife: For slicing the apples into wedges.
- Rubber spatula: Perfect for stirring the caramel and spreading it over the apples.
- Tongs: These make it easier to handle the hot caramel-covered apple slices.
Don’t worry if you don’t have everything on the list—improvise! You can use aluminum foil instead of parchment paper or even a butter knife instead of a spatula in a pinch.
Preparation Method
- Preheat your oven: Set it to 375°F (190°C) and line a sheet pan with parchment paper. This step is crucial for easy cleanup later.
- Prepare the apples: Wash and dry your apples thoroughly. Slice them into even wedges, around 6-8 slices per apple, and remove the seeds.
- Melt the caramel: In a small saucepan, add the caramel squares, heavy cream, butter, and vanilla extract. Heat over low-medium heat, stirring constantly, until the mixture is smooth and creamy. This should take about 5-7 minutes.
- Arrange the apple slices: Place the apple wedges in a single layer on the lined sheet pan. Make sure they don’t overlap to ensure even coating.
- Drizzle the caramel: Using a spoon or spatula, drizzle the melted caramel generously over the apple slices. Work quickly, as the caramel will start to harden as it cools.
- Add toppings: Sprinkle your favorite toppings over the caramel-coated apples. Be creative! You can even make different sections on the sheet pan for variety.
- Bake: Pop the sheet pan into the oven and bake for about 10 minutes, or until the caramel starts to bubble slightly.
- Cool and serve: Let the caramel apples cool for 5-10 minutes before serving. This helps the caramel set and makes it easier to pick up the slices.
And there you have it—your irresistible sheet pan caramel apples are ready to enjoy!
Cooking Tips & Techniques
Here are some tried-and-true tips to ensure your Easy Sheet Pan Caramel Apples turn out perfectly every time:
- Choose the right apples: Firm, crisp apples like Granny Smith or Honeycrisp are ideal as they hold up well to the heat and caramel.
- Don’t skimp on parchment paper: Trust me on this one—caramel can get sticky, and parchment paper makes cleanup a breeze.
- Work quickly with the caramel: Once it’s melted, move fast! Caramel cools and hardens quickly, so don’t let it sit for too long.
- Watch the oven: Keep an eye on the apples while baking. You want the caramel to bubble but not burn.
- Season to taste: A sprinkle of sea salt adds a gourmet touch, but you can skip it if you prefer pure sweetness.
With these tips in mind, you’re destined for success every single time.
Variations & Adaptations
Want to switch things up? Here are some fun ways to customize your sheet pan caramel apples:
- Dietary adaptations: Use dairy-free caramel and coconut cream for a vegan version. They taste just as indulgent!
- Seasonal twist: Add some cinnamon or nutmeg to the caramel for a warm, spiced flavor that screams fall.
- Fruit swap: Don’t have apples? Pear slices or bananas also work beautifully with caramel.
- Make it extra indulgent: Drizzle melted chocolate over the caramel for a double-layered dessert. You can even sprinkle flaky salt for a salted caramel chocolate combo.
- Nut-free option: Stick to safe toppings like sprinkles, crushed graham crackers, or mini marshmallows.
I once added crushed graham crackers and a drizzle of dark chocolate. It was a hit with everyone!
Serving & Storage Suggestions
These Easy Sheet Pan Caramel Apples are best served warm, straight from the oven, but you can also make them ahead of time.
- Serving: Arrange the apple slices on a platter and serve with toothpicks or small forks for easy grabbing. Pair them with a warm cup of cider for the ultimate autumn treat.
- Storage: If you have leftovers (unlikely, but hey, it happens), store them in an airtight container in the refrigerator for up to 3 days.
- Reheating: To enjoy them warm again, pop them in the oven at 350°F (175°C) for 5 minutes or until the caramel softens.
- Pro tip: The caramel flavors deepen over time, so they’re even better the next day!
Nutritional Information & Benefits
While these caramel apples are definitely a treat, they do have a few perks:
- Apples: Packed with fiber and vitamin C, they’re a nutritious base for this dessert.
- Nuts: If you add nuts, you’re sneaking in healthy fats and protein.
- Portion control: Serving apple slices instead of whole apples makes it easier to enjoy a smaller, more manageable portion.
- Allergens: This recipe can be adjusted for gluten-free or dairy-free diets, making it accessible for more people.
It’s the perfect way to indulge without overdoing it!
Conclusion
There’s just something about fall that calls for cozy, sweet treats, and these Easy Sheet Pan Caramel Apples deliver that seasonal magic in the simplest way. Whether you’re making them for a party or just to enjoy on a chilly evening, they’re guaranteed to bring smiles to everyone’s faces.
I love this recipe because it brings my family together every autumn to laugh, snack, and get a little sticky. Plus, the endless topping possibilities make it feel new and exciting every time.
So grab your favorite apples, whip up some caramel, and let your creativity shine. Don’t forget to share your favorite toppings or adaptations in the comments below—I’d love to hear what you come up with! Happy fall and happy baking!
FAQs
Can I use store-bought caramel sauce instead of caramel squares?
Absolutely! If you’re short on time, store-bought caramel sauce works great. Just warm it slightly before drizzling it over the apple slices.
What’s the best type of apple to use?
Granny Smith apples are a classic choice for caramel apples because their tartness balances the sweetness perfectly. Honeycrisp and Fuji apples are also great options for a sweeter version.
Can I make these ahead of time?
Yes, you can prepare the caramel apples ahead of time and store them in the fridge for up to three days. Reheat them in the oven for a few minutes before serving.
Are these suitable for a vegan diet?
Yes! Use vegan caramel and replace the butter with a plant-based alternative. You can also use coconut cream instead of heavy cream.
What are some unique topping ideas?
Try crushed graham crackers, pretzel bits, freeze-dried fruit, or even a drizzle of chocolate. You can also experiment with spices like cinnamon or pumpkin spice for a fall-inspired kick!
Pin This Recipe!
Easy Sheet Pan Caramel Apples Recipe Perfect for Fall

These Easy Sheet Pan Caramel Apples are a simple, customizable, and kid-friendly dessert perfect for fall gatherings or cozy evenings. Enjoy the buttery caramel coating paired with crisp, juicy apples.
- Prep Time: 10 minutes
- Cook Time: 10 minutes
- Total Time: 20 minutes
- Yield: 4-6 servings 1x
- Category: Dessert
- Cuisine: American
Ingredients
- 4–6 apples (Granny Smith or Honeycrisp)
- 1 cup caramel squares (store-bought, unwrapped)
- 2 tablespoons heavy cream
- 2 tablespoons butter
- 1 teaspoon vanilla extract
- 1/4 teaspoon sea salt (optional)
- Assorted toppings: crushed nuts, mini chocolate chips, shredded coconut, rainbow sprinkles, crushed pretzels
Instructions
- Preheat your oven to 375°F (190°C) and line a sheet pan with parchment paper.
- Wash and dry your apples thoroughly. Slice them into even wedges, around 6-8 slices per apple, and remove the seeds.
- In a small saucepan, add the caramel squares, heavy cream, butter, and vanilla extract. Heat over low-medium heat, stirring constantly, until the mixture is smooth and creamy (about 5-7 minutes).
- Place the apple wedges in a single layer on the lined sheet pan, ensuring they don’t overlap.
- Using a spoon or spatula, drizzle the melted caramel generously over the apple slices. Work quickly as the caramel will start to harden as it cools.
- Sprinkle your favorite toppings over the caramel-coated apples.
- Bake the sheet pan in the oven for about 10 minutes, or until the caramel starts to bubble slightly.
- Let the caramel apples cool for 5-10 minutes before serving.
Notes
[‘Choose firm, crisp apples like Granny Smith or Honeycrisp for the best results.’, ‘Work quickly with the caramel as it cools and hardens fast.’, ‘A sprinkle of sea salt adds a gourmet touch to the caramel.’, ‘Keep an eye on the apples while baking to prevent the caramel from burning.’, ‘Set up a DIY topping bar for parties to let guests customize their caramel apples.’]
Nutrition
- Serving Size: 1-2 apple slices per
- Calories: 200
- Sugar: 25
- Sodium: 50
- Fat: 8
- Saturated Fat: 5
- Carbohydrates: 30
- Fiber: 2
- Protein: 1
Keywords: caramel apples, fall dessert, easy recipe, sheet pan dessert, kid-friendly, customizable toppings